

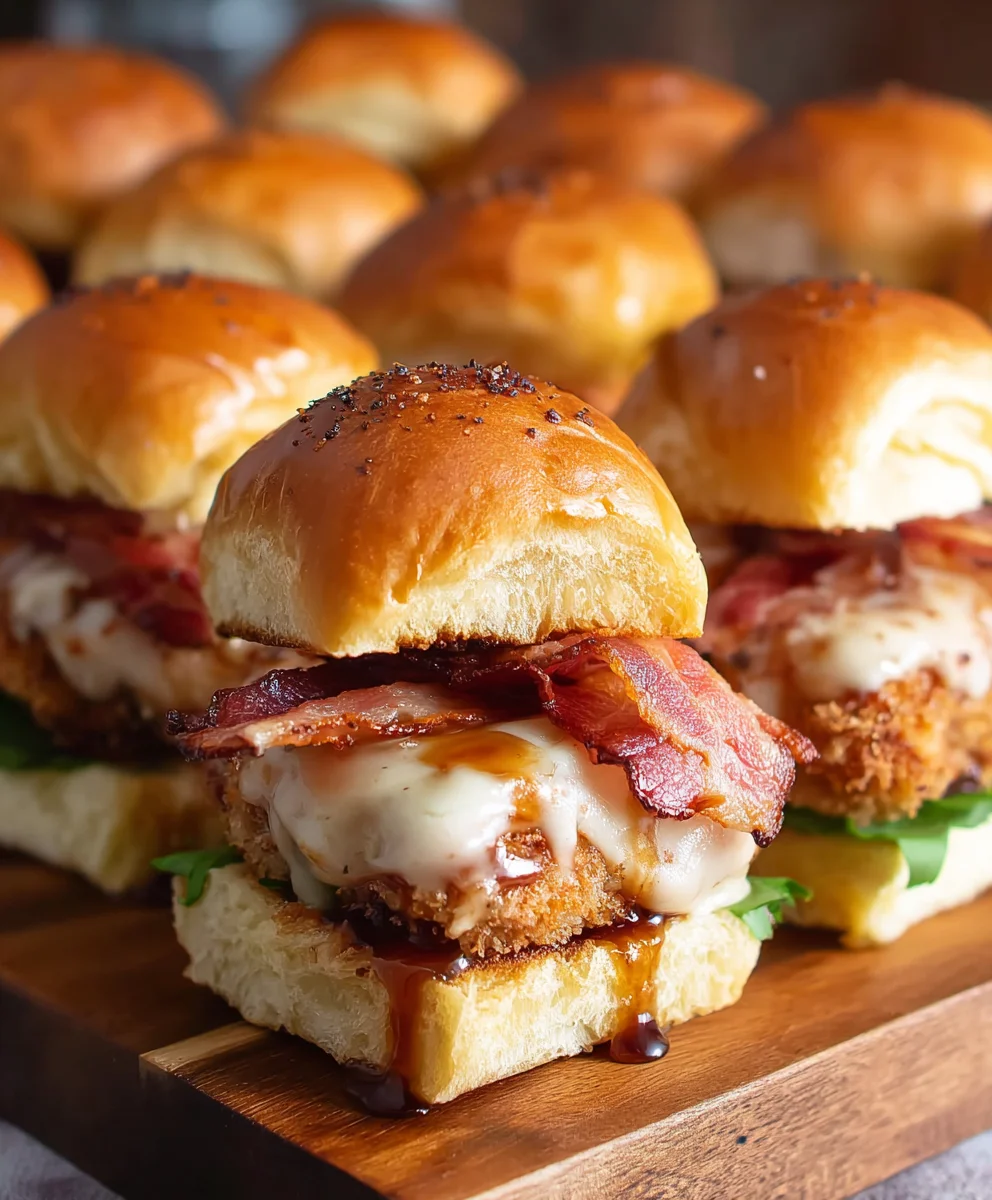
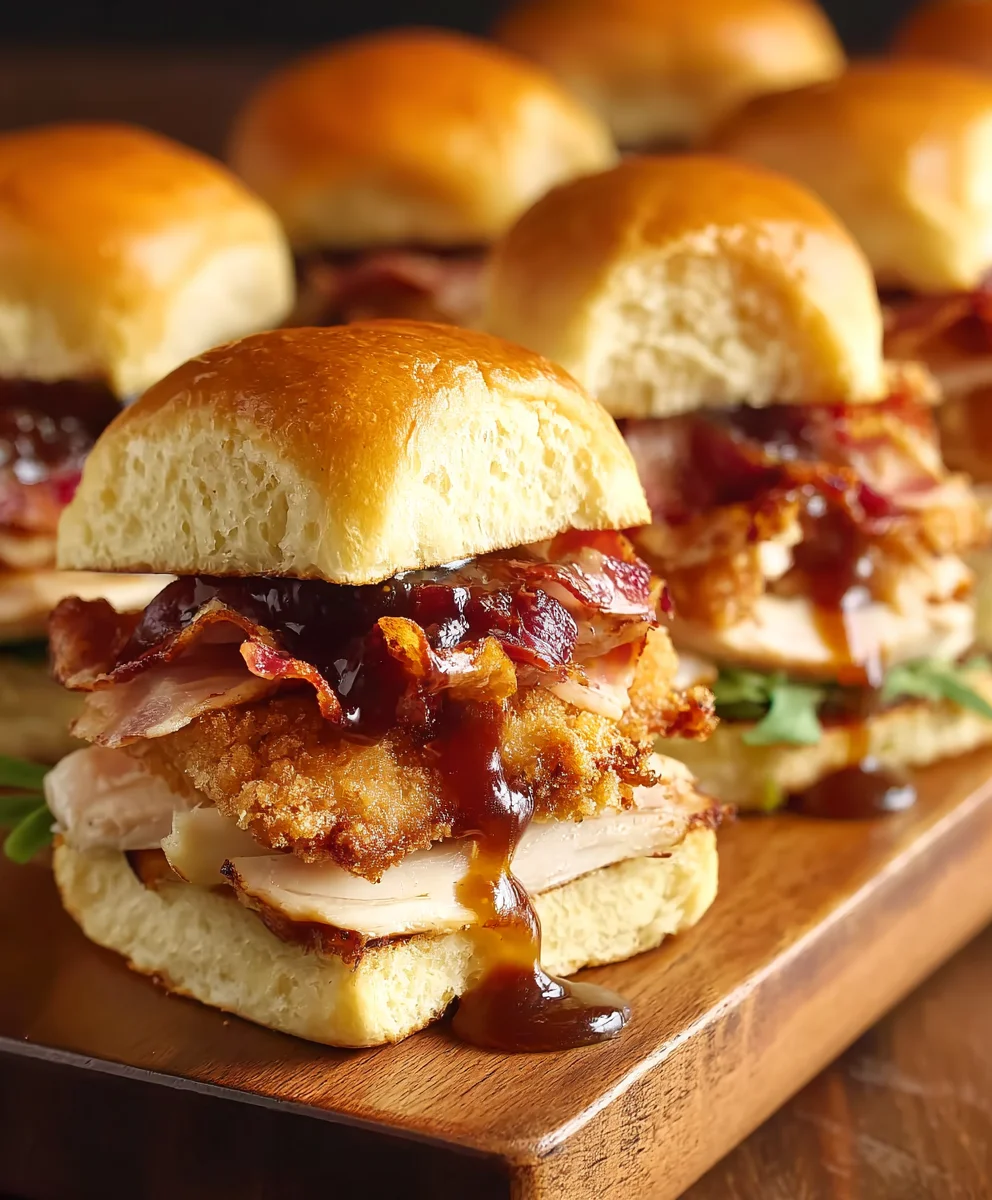
Maple Chicken Beef Bacon Sliders are the ultimate crowd-pleaser, a miniature marvel that packs a punch of flavor and a delightful texture combination. Imagine perfectly seasoned ground beef patties, infused with the subtle sweetness of maple, then crowned with crispy, savory bacon and nestled within soft slider buns. It’s this harmonious blend of sweet and salty, tender and crisp, that makes these sliders so utterly irresistible. People adore them for their approachable elegance – they feel special enough for a party but are wonderfully casual for a family dinner or game day. What truly sets our Maple Chicken Beef Bacon Sliders apart is the thoughtful balance of ingredients, ensuring each bite is an explosion of deliciousness. Get ready to elevate your slider game!

Ingredients:
- 12 Kings Hawaiian slider rolls
- 12 cooked chicken strips
- 4 slices Gouda cheese
- 4-6 slices cooked bacon
- ¼ cup maple butter
Preparing the Slider Components
Before we assemble these delicious Maple Chicken Beef Bacon Sliders, it’s crucial to get all our components ready. This makes the assembly process smooth and ensures every bite is perfectly balanced.
First, let’s address the Kings Hawaiian slider rolls. These are the foundation of our sliders, and their inherent sweetness is a perfect counterpoint to the savory fillings. Carefully slice each roll in half horizontally. You want a clean cut so the top and bottom halves sit nicely on the fillings. If your rolls are very fresh and soft, a serrated knife works best to avoid squishing them. Set the top halves aside on a clean plate or baking sheet.
Next, let’s prepare the chicken. You’ll be using 12 cooked chicken strips. If your chicken strips are large, you might want to cut them in half to fit better within the slider rolls. This also allows for more even distribution of the chicken throughout the sliders. Aim for pieces that are roughly the size of the slider roll’s width.
Now, for the Gouda cheese. We have 4 slices of Gouda cheese. To ensure it melts beautifully and covers the chicken evenly, I like to cut each slice into quarters. This creates smaller, more manageable pieces that will spread out and adhere to the chicken as it heats.
The bacon is already cooked, which is a great time-saver! For these sliders, we want the bacon to add a salty crunch. If your bacon slices are very long, you can break them in half or even thirds, depending on how much bacon you want in each slider. This also makes them easier to arrange on top of the chicken.
Finally, we have our flavor powerhouse: the maple butter. This is what truly elevates these sliders to something special. Make sure your maple butter is at room temperature so it’s easy to spread. If it’s too cold, it might tear the delicate slider rolls.
Assembling the Maple Chicken Beef Bacon Sliders
With all our ingredients prepped and ready, it’s time for the fun part: assembly! This is where the magic happens, bringing all these wonderful flavors together.
Lay out the bottom halves of your 12 Kings Hawaiian slider rolls on a large baking sheet. This will be the base for our delicious creation. Now, place one cooked chicken strip onto each bottom slider roll. Don’t worry if there’s a little overhang; we can tuck things in later. The goal is to have a substantial piece of chicken in every slider.
On top of each chicken strip, arrange the prepared Gouda cheese pieces. Distribute them as evenly as possible so that each slider gets a good amount of cheese. This will create a lovely, melty layer that holds everything together.
Next, place 1-2 pieces of the cooked bacon on top of the Gouda cheese for each slider. The amount of bacon per slider is a personal preference, so feel free to adjust based on how much you love that crispy, salty goodness.
Now comes the crucial step for infusing that signature maple flavor. Take your softened maple butter and carefully spread a thin, even layer onto the cut side of the top half of each Kings Hawaiian slider roll. You want enough to impart that lovely maple sweetness and richness without making the rolls soggy. This is where the maple butter really shines, binding the flavors and adding a delightful glaze.
Once all the top halves are buttered, gently place them onto the bottom halves, completing the assembly of your Maple Chicken Beef Bacon Sliders. You should now have 12 perfectly formed sliders, ready for their final transformation.
Warming and Melting the Sliders
The final stage is to bring everything together and achieve that perfect melt and warmth. This step is key to ensuring the cheese is gooey, the chicken is heated through, and the maple butter has slightly softened the rolls, creating an irresistible texture.
Preheat your oven to 350°F (175°C). This moderate temperature is ideal for gently warming the sliders without burning the buns or overcooking the chicken.
Carefully arrange the assembled sliders on your baking sheet. Ensure they are not too crowded, allowing for even heat circulation. If you have any extra bacon bits or small pieces of chicken that fell out during assembly, you can tuck them into any slider that looks a little sparse.
Cover the baking sheet tightly with aluminum foil. This is a critical step for the melting process. The foil creates a steamy environment within the pan, which helps the Gouda cheese to melt smoothly and evenly over the chicken and bacon. It also prevents the top of the buns from drying out.
Place the foil-covered baking sheet into the preheated oven. Allow the sliders to bake for approximately 10-15 minutes. The exact time will depend on how warm your cooked chicken is to begin with. You’re looking for the cheese to be completely melted and slightly bubbly, and the sliders to be warmed through.
After 10-15 minutes, carefully remove the aluminum foil. For an extra touch of golden perfection and to lightly toast the tops of the buns, you can leave the sliders uncovered in the oven for an additional 2-3 minutes, or until the tops of the rolls are lightly golden brown. Keep a close eye on them during this short period to prevent burning. Once they reach your desired level of warmth and golden-brown hue, remove the Maple Chicken Beef Bacon Sliders from the oven. Let them rest for a minute or two before serving, allowing the flavors to meld and the cheese to set just slightly.
Conclusion:
And there you have it – your ultimate guide to crafting delicious and crowd-pleasing Maple Chicken Beef Bacon Sliders! We’ve walked through each step, from preparing the perfect savory patties to achieving that delightful maple-infused glaze, ensuring your sliders are a guaranteed hit. These little flavor bombs are incredibly versatile and are perfect for any occasion, from casual game nights to more festive gatherings. Don’t be afraid to experiment with the serving suggestions; they’re all designed to complement the rich, sweet, and salty profile of the sliders.
Remember, the beauty of these Maple Chicken Beef Bacon Sliders lies in their adaptability. Feel free to swap out cheeses, add a dash of your favorite hot sauce to the glaze, or even try a different type of bun. The key is to have fun in the kitchen and make them your own! I truly hope you enjoy making and devouring these incredible sliders as much as I do. Happy cooking!
Frequently Asked Questions:
Can I make the slider patties ahead of time?
Absolutely! You can form the Maple Chicken Beef Bacon Sliders patties up to 24 hours in advance and store them, uncooked, in the refrigerator on a parchment-lined plate, loosely covered. This can save you valuable time on the day of your event.
What other toppings would go well with these sliders?
Besides the classic lettuce and tomato, consider adding caramelized onions for extra sweetness, a tangy pickle relish, a creamy coleslaw, or even a sprinkle of crispy fried shallots for added texture. A dollop of aioli or a spicy mayo would also be fantastic.
Maple Chicken Beef Bacon Sliders-Delicious Bites
A delightful recipe for easy-to-make sliders featuring sweet Hawaiian rolls, savory chicken, melty Gouda, crispy bacon, and a rich maple butter glaze.
Ingredients
-
12 Kings Hawaiian slider rolls
-
12 cooked chicken strips
-
4 slices Gouda cheese
-
4-6 slices cooked beef bacon
-
1/4 cup maple butter
Instructions
-
Step 1
Prepare the ingredients: Slice slider rolls in half. Cut chicken strips if large. Quarter Gouda cheese slices. Break cooked beef bacon into manageable pieces. Ensure maple butter is at room temperature for easy spreading. -
Step 2
Assemble the sliders: Place bottom halves of slider rolls on a baking sheet. Top each with a chicken strip, followed by Gouda cheese pieces, and 1-2 pieces of beef bacon. -
Step 3
Butter the tops: Spread a thin, even layer of maple butter onto the cut side of the top half of each slider roll. -
Step 4
Complete assembly: Gently place the buttered top halves onto the assembled bottom halves, completing all 12 sliders. -
Step 5
Warm and melt: Preheat oven to 350°F (175°C). Arrange sliders on a baking sheet, cover tightly with aluminum foil, and bake for 10-15 minutes, or until cheese is melted and sliders are warmed through. -
Step 6
Optional toasting: Remove foil and bake uncovered for an additional 2-3 minutes for lightly golden brown buns. Let rest for a minute or two before serving.
Important Information
Nutrition Facts (Per Serving)
It is important to consider this information as approximate and not to use it as definitive health advice.
Allergy Information
Please check ingredients for potential allergens and consult a health professional if in doubt.

Leave a Comment