

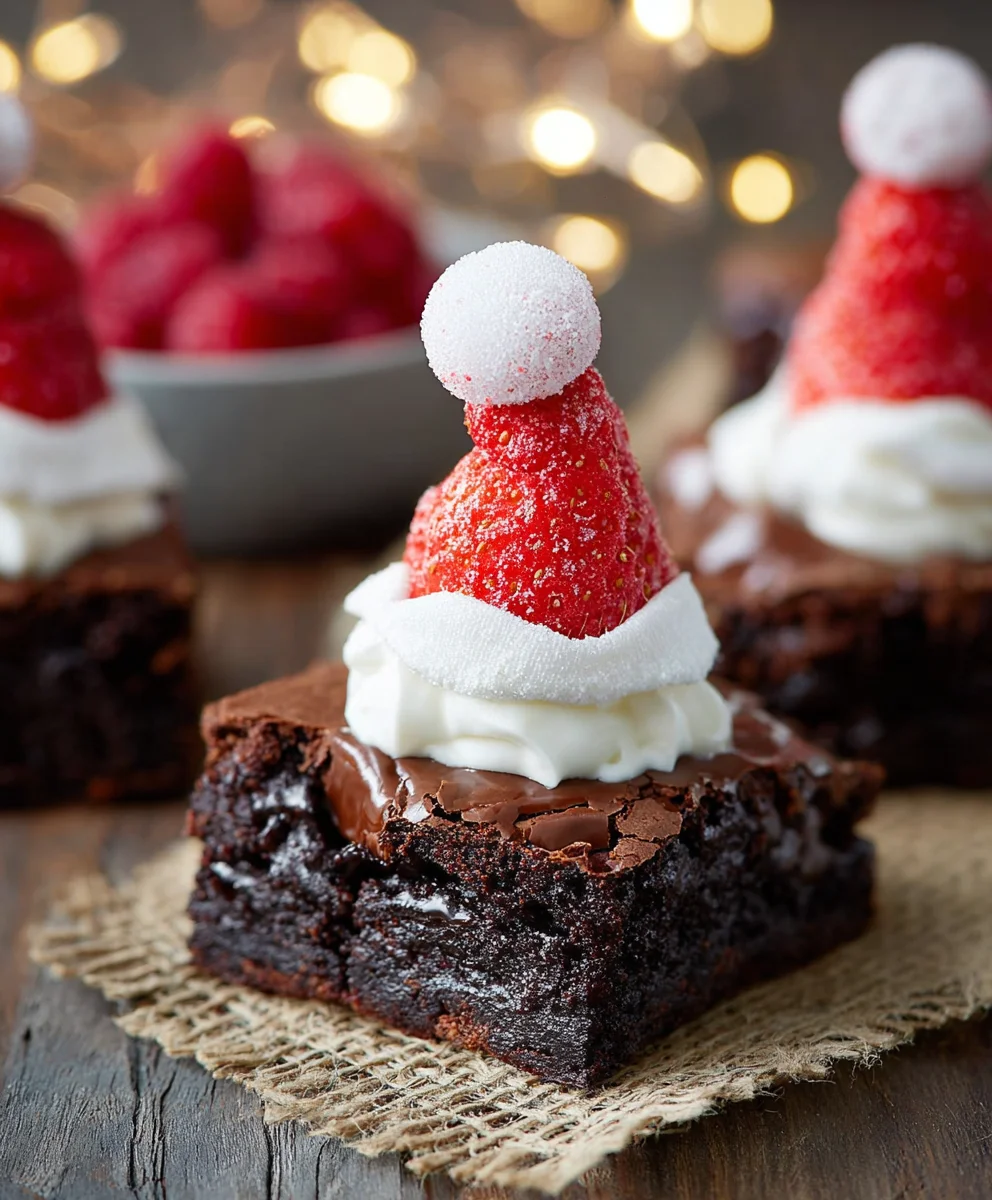
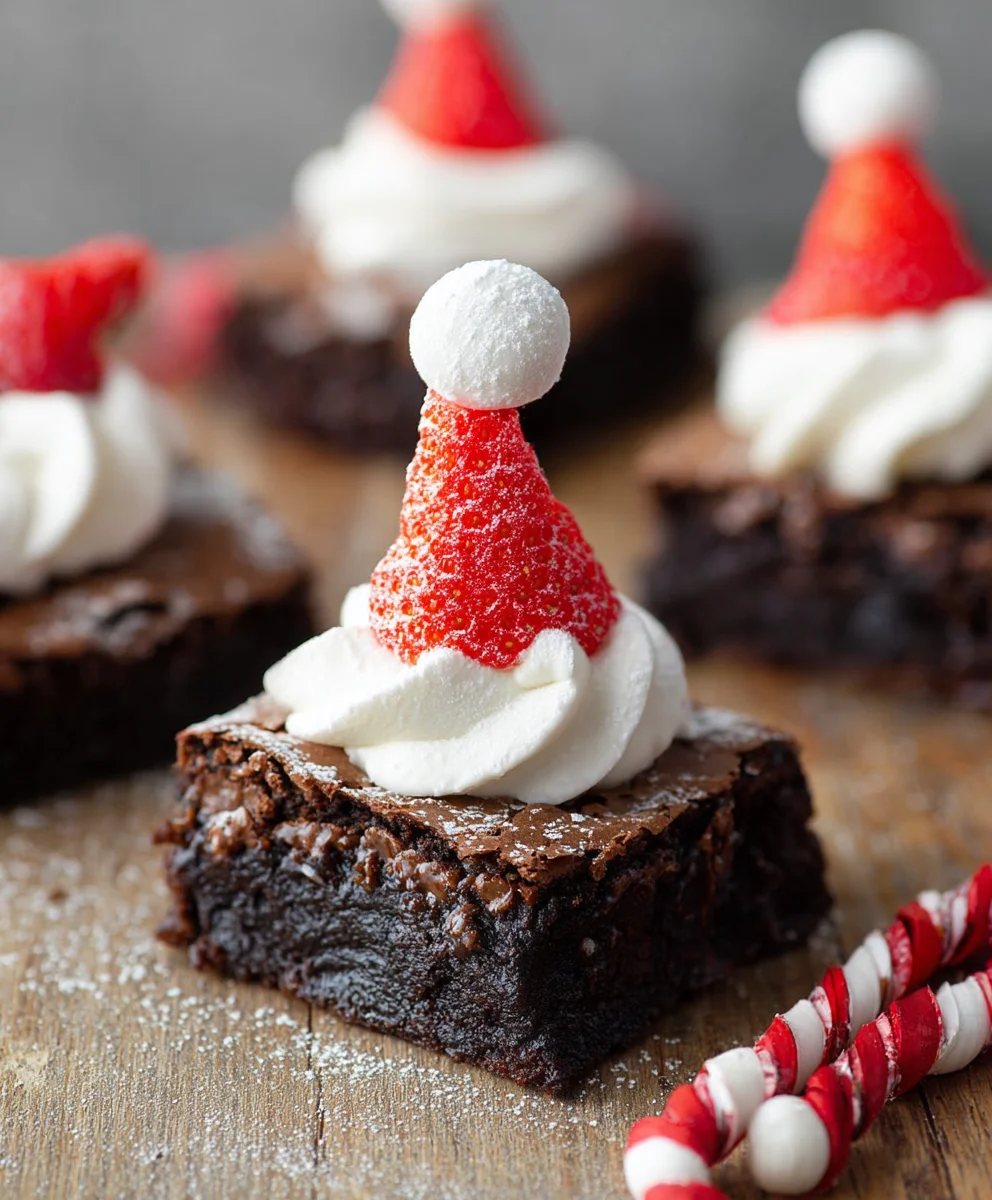
Santa Hat Brownies are more than just a festive treat; they’re an edible embodiment of holiday cheer that brings smiles to faces of all ages. Imagine biting into a rich, fudgy brownie, perfectly balanced with a creamy, sweet strawberry top. This delightful combination isn’t just visually stunning, resembling miniature Santa hats, but it also offers a flavor profile that’s universally loved. It’s that perfect blend of classic chocolate indulgence and a bright, fruity counterpoint that makes these Santa Hat Brownies so incredibly popular year after year. What truly makes them special is their effortless charm. They’re surprisingly simple to make, allowing you to create a truly magical dessert experience without spending hours in the kitchen. They’re the perfect centerpiece for any holiday gathering, a delightful addition to cookie platters, or even a thoughtful homemade gift that spreads warmth and joy.

Ingredients:
- ¾ Cup All-Purpose Flour
- ½ teaspoon Salt
- ¼ teaspoon Baking Soda
- 2 Large Eggs
- ¾ Cup Light Brown Sugar
- ¾ Cup Vegetable Oil
- 2 Tablespoons Water
- 1 teaspoon Vanilla Extract
- 1 ½ Cups Semi-Sweet Chocolate Chips, divided
- ½ Cup Vanilla Frosting
- 9 Fresh Strawberries
Baking the Brownie Base
This recipe starts with creating a rich, fudgy brownie base that will serve as the foundation for our adorable Santa Hat Brownies. To begin, preheat your oven to 350°F (175°C). Prepare an 8×8 inch baking pan by greasing it well or lining it with parchment paper, leaving an overhang on the sides to make lifting the brownies out easier later. In a medium bowl, whisk together the ¾ cup all-purpose flour, ½ teaspoon salt, and ¼ teaspoon baking soda. This dry mixture will ensure our brownies have the perfect texture.
In a separate, larger bowl, combine the 2 large eggs and ¾ cup light brown sugar. Whisk these together vigorously until the mixture is smooth and slightly lighter in color. This is where we build the fudgy richness. Next, gradually pour in the ¾ cup vegetable oil while continuing to whisk. The oil contributes to the moistness and dense texture that defines a great brownie. Stir in the 2 tablespoons of water and 1 teaspoon of vanilla extract. The water helps to activate the leavening agents and contributes to the overall texture, while the vanilla extract adds that classic, comforting aroma and flavor.
Now, it’s time to incorporate the dry ingredients into the wet. Add the flour mixture to the wet ingredients in two additions, mixing gently after each addition until just combined. Be careful not to overmix, as this can lead to tough brownies. Overmixing develops the gluten in the flour too much. Finally, gently fold in 1 cup of the semi-sweet chocolate chips. These will melt into the brownie batter, creating glorious pockets of gooey chocolate throughout. Reserve the remaining ½ cup of chocolate chips for later.
Pour the batter evenly into your prepared baking pan and spread it out with a spatula. Bake for approximately 25 to 30 minutes, or until a toothpick inserted into the center comes out with moist crumbs attached, but not wet batter. Don’t overbake! A slightly underbaked brownie is often more desirable for its fudgy texture. Once baked, remove the pan from the oven and let the brownies cool completely in the pan on a wire rack. This cooling step is crucial; trying to cut or decorate warm brownies will result in a messy, crumbly disaster. Patience is key here!
Assembling the Santa Hats
Once your brownie base has completely cooled, carefully lift it out of the pan using the parchment paper overhang. Place the brownie slab onto a clean cutting board. Now comes the fun part: transforming these brownies into festive Santa hats! You’ll need to cut the brownie into triangular shapes. The easiest way to do this is to imagine an imaginary diagonal line running from one corner of the brownie to the opposite corner. Cut along this imaginary line. Then, cut another imaginary line from the other corner to its opposite, creating four large triangles. You’ll likely get some irregular edges, which is perfectly fine. These irregular edges can be trimmed to make them look more uniform, or you can embrace the rustic charm. You should aim to get roughly 9 to 12 triangles, depending on the size of your brownie slab and how you cut them.
Next, take your 9 fresh strawberries. Wash them gently and pat them thoroughly dry with a paper towel. It’s essential that the strawberries are dry so that the frosting adheres properly. Now, prepare your Santa hat “caps.” Take the ½ cup of vanilla frosting. You can place it in a small piping bag fitted with a round tip, or simply use a butter knife or a small offset spatula. For the “furry” trim of the hat, you’ll want to create a line of frosting around the wider, base edge of each brownie triangle. Then, add a dollop of frosting at the very peak of each triangle to represent the pom-pom at the end of Santa’s hat.
Decorating the Santa Hats
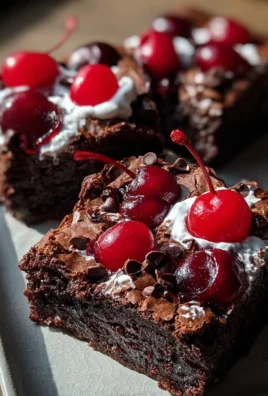
With your brownie triangles cut and your frosting ready, it’s time for the final decorative touches that make these Santa Hat Brownies so charming. Carefully place one of the dried strawberries, tip-side up, onto the peak of each brownie triangle, right on top of the frosting pom-pom you just created. The strawberry will naturally sit in the dollop of frosting. This is the iconic pointy part of Santa’s hat.
Now, let’s add the fluffy white trim. Using your piping bag or knife, carefully pipe or spread a generous line of vanilla frosting along the entire wider, bottom edge of each brownie triangle. This represents the brim of Santa’s hat. You can make this trim as thick or as thin as you like, but a slightly generous amount adds to the festive look. For an extra touch of festive sparkle, gently press a few of the reserved ½ cup of semi-sweet chocolate chips into the frosting brim of each brownie. These chocolate chips act as decorative buttons or embellishments on Santa’s hat. You can also strategically place a few more chocolate chips around the base of the strawberry if you desire. You now have a delightful batch of Santa Hat Brownies ready to spread holiday cheer!
Conclusion:
And there you have it – your very own batch of festive and utterly delicious Santa Hat Brownies! These delightful treats are more than just a dessert; they’re a little piece of holiday cheer ready to be shared. We’ve walked through the simple steps to create these adorable brownies, ensuring a rich, fudgy base topped with a vibrant strawberry and cream cheese “hat.” I hope you’ve enjoyed making them as much as I have. These Santa Hat Brownies are perfect for any holiday gathering, from a casual cookie exchange to a more formal Christmas party. Don’t be afraid to get creative with your toppings, perhaps a sprinkle of edible glitter for extra sparkle!
For serving suggestions, these brownies are fantastic on their own, but they also pair beautifully with a glass of cold milk or a warm mug of hot chocolate. They make a wonderful addition to any dessert platter, adding a pop of color and festive spirit. If you’re looking for variations, consider using different types of chocolate chips in the brownie batter for added depth of flavor, or try a white chocolate drizzle instead of the cream cheese frosting for a slightly different aesthetic. The most important thing is to have fun and infuse your baking with holiday joy. I encourage you to try this recipe and spread some sweetness this season!
Frequently Asked Questions about Santa Hat Brownies:
Q: Can I make the brownie base ahead of time?
A: Absolutely! You can bake the brownie base a day or two in advance and store it at room temperature in an airtight container. This can be a great way to break down the preparation for these Santa Hat Brownies and make assembly even quicker when you’re ready to decorate.
Q: What can I use if I don’t have cream cheese for the frosting?
A: If cream cheese isn’t your favorite or you don’t have it on hand, you can substitute it with whipped cream cheese frosting or even a simple vanilla buttercream. Just ensure it’s firm enough to hold its shape when piped into a Santa hat. Another easy option is a dollop of sweetened whipped cream.
Easy Santa Hat Brownies Festive Recipe
Adorable and festive Santa Hat Brownies made from a rich, fudgy brownie base topped with frosting and strawberries.
Ingredients
-
¾ Cup All-Purpose Flour
-
½ teaspoon Salt
-
¼ teaspoon Baking Soda
-
2 Large Eggs
-
¾ Cup Light Brown Sugar
-
¾ Cup Vegetable Oil
-
2 Tablespoons Water
-
1 teaspoon Vanilla Extract
-
1 ½ Cups Semi-Sweet Chocolate Chips, divided
-
½ Cup Vanilla Frosting
-
9 Fresh Strawberries
Instructions
-
Step 1
Preheat oven to 350°F (175°C). Prepare an 8×8 inch baking pan by greasing it or lining it with parchment paper. Whisk together flour, salt, and baking soda in a medium bowl. -
Step 2
In a larger bowl, whisk eggs and brown sugar until smooth. Gradually whisk in vegetable oil, water, and vanilla extract. -
Step 3
Add the dry ingredients to the wet ingredients in two additions, mixing gently until just combined. Fold in 1 cup of chocolate chips. -
Step 4
Pour batter into the prepared pan and bake for 25-30 minutes, or until a toothpick comes out with moist crumbs. Let cool completely. -
Step 5
Cut the cooled brownies into roughly 9-12 triangles. Wash and thoroughly dry 9 strawberries. -
Step 6
Frost the wider base edge of each brownie triangle and add a dollop of frosting at the peak. Place a dried strawberry on the peak frosting dollop. -
Step 7
Pipe or spread a line of frosting along the bottom edge of each triangle for the brim. Press reserved chocolate chips into the frosting brim.
Important Information
Nutrition Facts (Per Serving)
It is important to consider this information as approximate and not to use it as definitive health advice.
Allergy Information
Please check ingredients for potential allergens and consult a health professional if in doubt.
Leave a Comment