

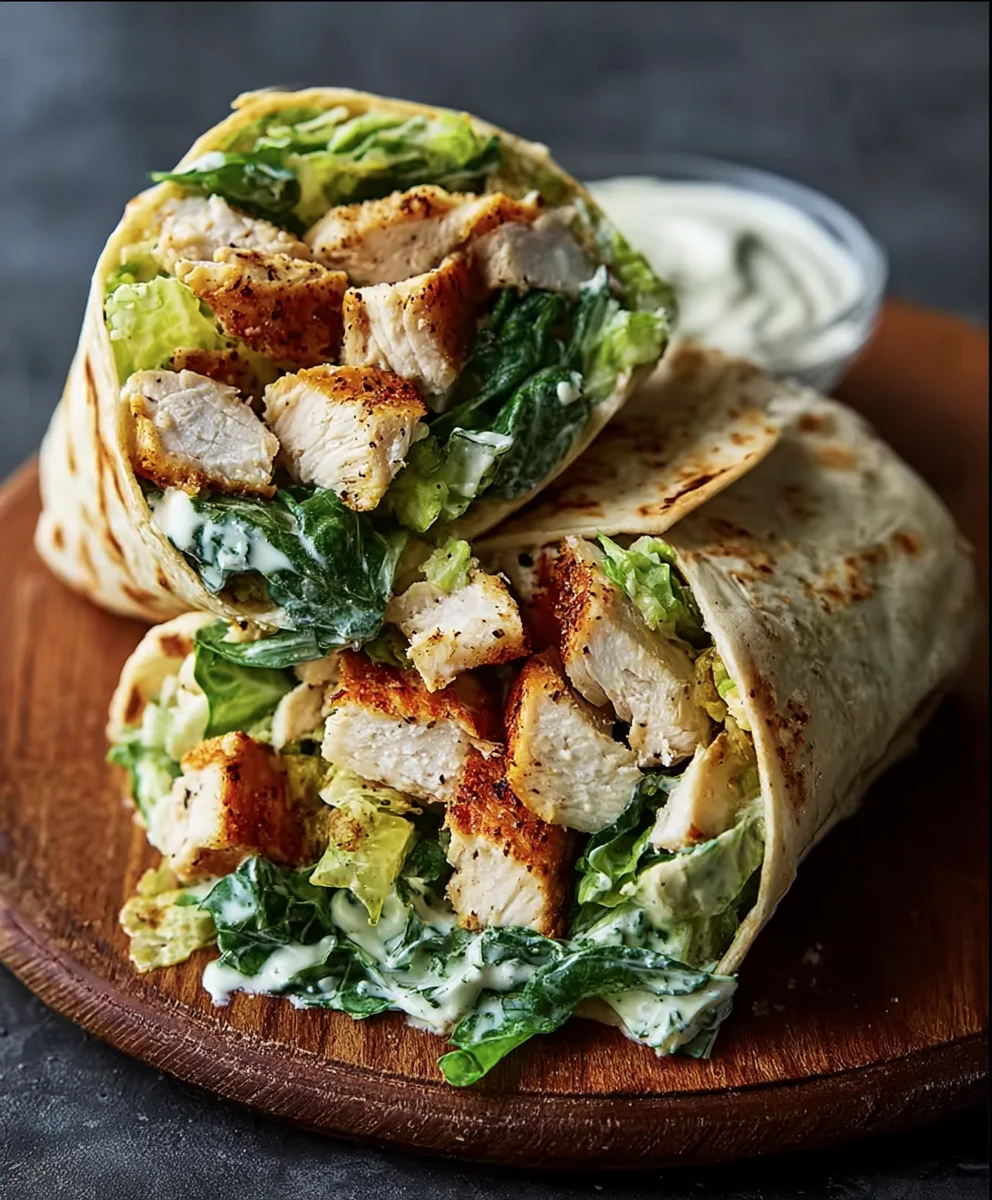
Chicken Caesar Wraps, oh, how we adore you! There’s a reason these delightful bundles of flavor have become a lunchbox staple and a go-to for a quick, satisfying meal. Is it the tender, juicy chicken? The crisp romaine lettuce? Or perhaps that irresistible, creamy Caesar dressing clinging to every bite? It’s truly the perfect harmony of textures and tastes that makes Chicken Caesar Wraps so universally loved. They offer a fantastic balance – hearty enough to quell your hunger but light enough to avoid that post-lunch slump. What truly elevates a good Chicken Caesar Wrap from great to unforgettable is the quality of ingredients and the little touches that make them sing. Forget those bland, mass-produced versions; today, we’re diving into how to craft the ultimate Chicken Caesar Wrap, a dish that will have you anticipating your next meal with pure joy and a hint of delicious anticipation.

Ingredients:
- 3 cups chopped romaine lettuce
- 1 1/2 cups chopped cooked chicken
- 1/3 cup Caesar dressing
- 1/3 cup freshly grated Parmesan cheese
- 1/2 cup homemade croutons
- Kosher salt and black pepper, to taste
- 4 flour tortillas (10-inch)
Preparing Your Chicken Caesar Wraps
The beauty of Chicken Caesar Wraps lies in their simplicity and how quickly they come together, especially if you have cooked chicken on hand. This recipe focuses on creating perfectly balanced wraps that are bursting with flavor and satisfying textures. We’ll start by ensuring our key components are ready to go, then move on to assembling these delightful wraps.
Step 1: Preparing the Salad Base
First, let’s get our romaine lettuce ready. Make sure you have thoroughly washed and dried the romaine lettuce. This is a crucial step to prevent soggy wraps. You can use a salad spinner for optimal dryness, or pat it dry with clean kitchen towels or paper towels. Once dry, chop the romaine lettuce into bite-sized pieces. Aim for pieces that are easy to manage within a wrap, about 1-inch squares. Transfer the chopped lettuce into a medium-sized mixing bowl. This will be the crisp, fresh foundation of our wraps.
Step 2: Combining the Filling Components
Now, let’s add the other elements to our bowl with the romaine lettuce. Add the 1 1/2 cups of chopped cooked chicken. You can use leftover roasted chicken, rotisserie chicken, or pan-fried chicken breast for this. Next, pour in the 1/3 cup of Caesar dressing. Make sure the dressing is evenly distributed. Gently toss the lettuce and chicken together with the dressing until everything is lightly coated. You don’t want to drown the ingredients in dressing; a light coating is perfect to bind the flavors without making it messy. Season this mixture with kosher salt and freshly ground black pepper to your personal taste. Remember, the Caesar dressing and Parmesan cheese will add saltiness, so start with a light hand and adjust as needed.
Step 3: Incorporating the Cheesy Goodness and Crunch
With the lettuce, chicken, and dressing combined, it’s time to add the finishing touches to our filling. Sprinkle the 1/3 cup of freshly grated Parmesan cheese over the chicken and lettuce mixture. The grated Parmesan will add a salty, nutty depth of flavor that is characteristic of any good Caesar dish. Now, add the 1/2 cup of homemade croutons. If your croutons are very large, you might want to give them a quick chop to ensure they are distributed evenly throughout the wraps and don’t create awkward bulky spots. Gently toss everything together again, being careful not to crush the croutons. The goal is to integrate the cheese and croutons without losing the crispness of the lettuce or the integrity of the croutons.
Step 4: Warming the Tortillas
To make our Chicken Caesar Wraps pliable and easier to roll, it’s best to warm the tortillas slightly. You have a few options here. You can warm them one at a time in a dry skillet over medium heat for about 20-30 seconds per side, just until they become soft and flexible. Alternatively, you can wrap them in a slightly damp paper towel and microwave them for about 20-30 seconds. Another method is to warm them directly over a low gas flame for a few seconds on each side, being very careful not to burn them. Warming the tortillas not only makes them easier to handle but also enhances their flavor and texture, making for a more enjoyable wrap experience.
Step 5: Assembling the Wraps
Now for the exciting part – assembling the wraps! Lay one warmed tortilla flat on a clean surface. Spoon about a quarter of the prepared chicken and romaine mixture onto the center of the tortilla, slightly towards one edge. Be mindful not to overfill the tortilla, as this can make rolling difficult and lead to spills. Once the filling is in place, fold the bottom edge of the tortilla up and over the filling. Then, fold in the sides of the tortilla. Finally, tightly roll the tortilla from the bottom upwards, tucking the filling in as you go. Repeat this process with the remaining three tortillas and filling. If you find your wraps are a little loose, you can secure them with a toothpick. For an extra touch, you could briefly sear the seam side down in a lightly oiled pan for a minute or two to help seal them and give them a nice golden finish.
Conclusion:
And there you have it – a fantastic recipe for homemade Chicken Caesar Wraps that’s sure to become a staple in your meal rotation! We’ve covered everything from perfectly cooked chicken to a creamy, tangy Caesar dressing and the satisfying crunch of romaine. These wraps are incredibly versatile, making them ideal for a quick weeknight dinner, a healthy office lunch, or even a casual get-together with friends. Don’t be afraid to get creative with your fillings; the beauty of this recipe lies in its adaptability. I truly hope you enjoy making and, more importantly, devouring these delicious wraps as much as I do!
For serving, consider pairing your wraps with a light side salad, a bowl of tomato soup, or some crispy sweet potato fries. If you’re looking to switch things up, try grilling your chicken instead of pan-searing, or add a sprinkle of parmesan cheese directly into your tortilla before filling for an extra cheesy bite. Perhaps you’d like to experiment with different greens like spinach or arugula, or even add some chopped bell peppers for a touch of sweetness and color. Whatever you choose, I encourage you to have fun with it!
Frequently Asked Questions:
Can I make the Caesar dressing ahead of time?
Absolutely! Homemade Caesar dressing stores beautifully in an airtight container in the refrigerator for up to a week. This is a great way to save time when you’re ready to assemble your Chicken Caesar Wraps.
What if I don’t have romaine lettuce?
No problem at all! While romaine offers that classic crunch, you can easily substitute it with other crisp greens like iceberg lettuce, a spring mix, or even baby spinach. Just aim for something that provides a good texture contrast.

Easy Chicken Caesar Wraps
Quick and delicious lunch wraps bursting with classic Caesar flavors.
Ingredients
-
3 cups chopped romaine lettuce
-
1 1/2 cups chopped cooked chicken
-
1/3 cup Caesar dressing
-
1/3 cup freshly grated Parmesan cheese
-
1/2 cup homemade croutons
-
Kosher salt, to taste
-
Black pepper, to taste
-
4 flour tortillas (10-inch)
Instructions
-
Step 1
Wash and dry romaine lettuce thoroughly. Chop into bite-sized pieces (about 1-inch squares) and place in a medium mixing bowl. -
Step 2
Add chopped cooked chicken and Caesar dressing to the bowl with the lettuce. Gently toss until lightly coated. Season with kosher salt and black pepper to taste. -
Step 3
Sprinkle in the freshly grated Parmesan cheese and homemade croutons (chop if large). Gently toss again to combine, being careful not to crush the croutons. -
Step 4
Warm the flour tortillas in a dry skillet over medium heat for 20-30 seconds per side until pliable, or microwave wrapped in a damp paper towel for 20-30 seconds. -
Step 5
Spoon about a quarter of the chicken mixture onto the center of a warmed tortilla, slightly towards one edge. Fold the bottom edge up, then fold in the sides, and tightly roll upwards. -
Step 6
Repeat assembly with the remaining tortillas and filling. Optionally, sear the seam side down in a lightly oiled pan for a minute or two to seal.
Important Information
Nutrition Facts (Per Serving)
It is important to consider this information as approximate and not to use it as definitive health advice.
Allergy Information
Please check ingredients for potential allergens and consult a health professional if in doubt.


Leave a Comment