

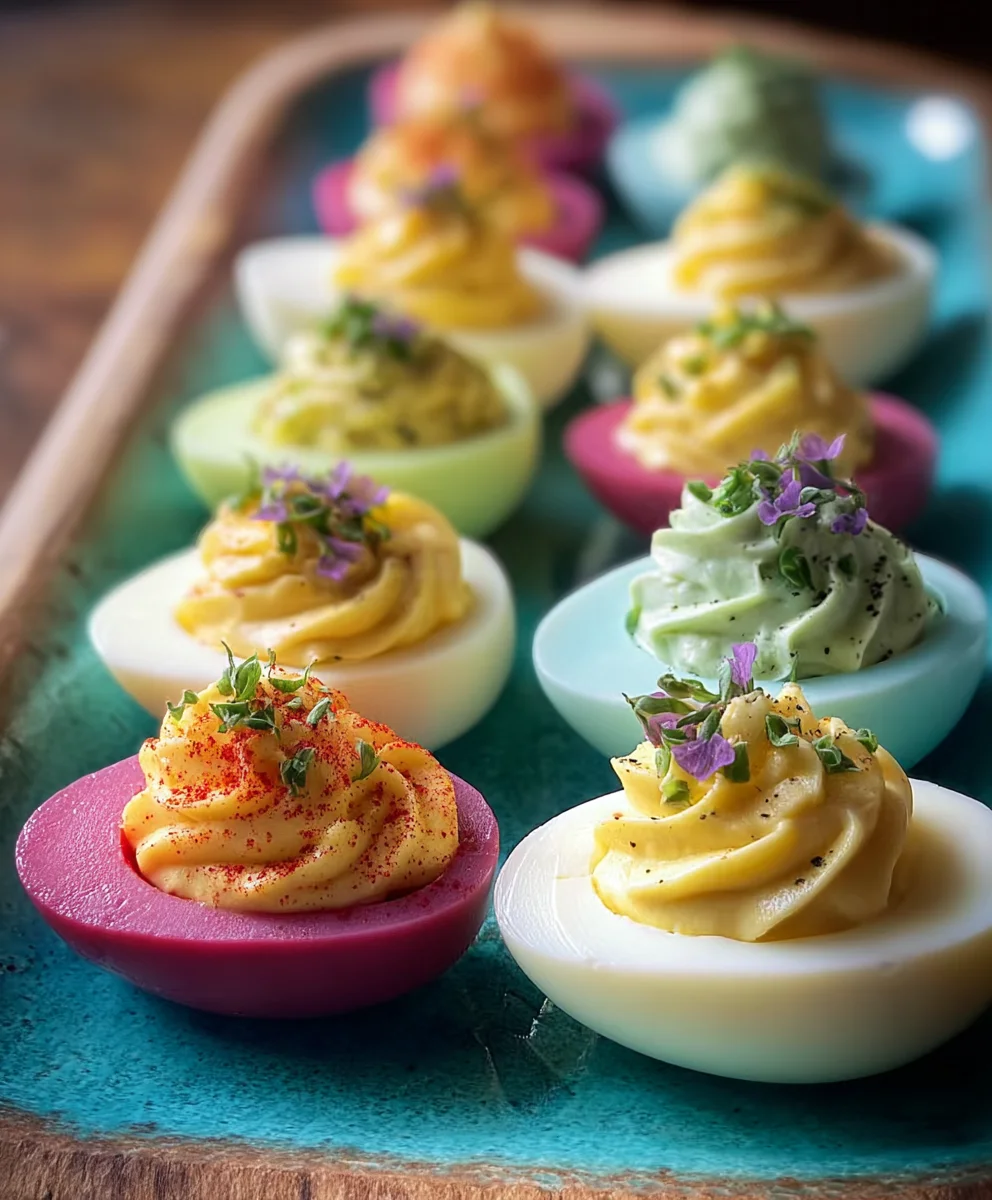
Colored Deviled Eggs are not just a treat for the palate, but a magnificent feast for the eyes, transforming any gathering into a vibrant celebration. There’s something undeniably magical about taking a beloved classic and infusing it with such playful elegance. While the humble deviled egg has graced tables for centuries, with its origins tracing back to ancient Rome and the ‘deviled’ moniker referring to their piquant, seasoned filling, this modern twist brings an exciting splash of personality that truly stands out.
I’ve always found the creamy, savory filling nestled within a perfectly cooked egg white utterly irresistible. But imagine enhancing that classic appeal with a spectrum of dazzling hues! People adore these delightful bites not only for their familiar, comforting taste and velvety smooth texture but also for their incredible ease of preparation. They are the quintessential party food, simple to serve and universally loved. However, it’s the sheer joy and surprise that Colored Deviled Eggs bring with their playful, eye-catching appearance that truly captivates everyone, making them an instant conversation starter and a guaranteed crowd-pleaser at any event.

Ingredients:
- 12 large eggs: I always opt for large eggs for a generous bite and easier handling.
- ½ cup full-fat mayonnaise: For that classic creamy texture. You can adjust this slightly based on your desired consistency.
- 2 teaspoons Dijon mustard: Adds a wonderful tang and depth of flavor that’s essential for deviled eggs.
- 1 teaspoon white vinegar: A little splash of vinegar brightens up the flavors in the filling and helps balance the richness.
- ½ teaspoon salt: Or to taste, it’s crucial for bringing out all the other flavors.
- ¼ teaspoon freshly ground black pepper: For a subtle kick and aroma.
- Paprika (smoked or sweet): For garnishing, it adds a lovely pop of color and a hint of extra flavor.
- Fresh chives or dill (finely chopped): Optional, but highly recommended for a fresh, herbaceous garnish.
- Assorted gel food coloring: This is where the magic happens for our colorful eggs! I recommend using gel colors for vibrant results – think red/pink, blue, green, purple, and even yellow if you want extra shades.
- White vinegar (for coloring bath): You’ll need extra for mixing with the food coloring to help the colors adhere better to the egg whites.
- Ice: For an essential ice bath to stop the cooking process and aid in peeling.
Preparing Your Eggs for a Colorful Transformation
Creating truly show-stopping Colored Deviled Eggs starts with perfectly cooked hard-boiled eggs. Trust me, getting this step right makes all the difference, especially when it comes to easy peeling and beautiful, intact whites.
- Boil the Eggs Just Right: Place your 12 large eggs in a single layer at the bottom of a large saucepan. I always make sure they aren’t crowded, allowing for even cooking. Fill the pan with cold water, ensuring the water level is at least an inch above the eggs. This gradual heating helps prevent cracking.
- Bring to a Rolling Boil: Place the saucepan over high heat and bring the water to a rapid, rolling boil. As soon as it reaches this vigorous boil, immediately remove the pan from the heat. Don’t let them continue to boil on the stove!
- Cover and Let Them Sit: Quickly cover the pan with a tight-fitting lid. This traps the heat and allows the eggs to gently cook through. Let the eggs sit in the hot water, undisturbed, for precisely 12 minutes. This timing is my secret for firm, fully cooked yolks that are still creamy and not chalky, perfect for our Colored Deviled Eggs.
- The All-Important Ice Bath: While your eggs are resting, prepare a large bowl filled with ice water – a generous amount of ice is key here! After the 12 minutes are up, use a slotted spoon to carefully transfer the hot eggs directly into the ice bath. Let them sit in the ice water for at least 10-15 minutes, or until they are completely cooled. This sudden temperature change not only stops the cooking process dead in its tracks but also causes the egg whites to contract, making them incredibly easy to peel. Trust me, this step is non-negotiable for beautiful, unmarred egg whites.
- Gentle Peeling for Perfect Halves: Once the eggs are fully chilled, it’s time to peel. Gently tap each egg on a hard surface to crack the shell all over. Then, carefully peel under a trickle of cool running water. The water helps to get under the membrane, allowing the shell to slide off easily without tearing the precious egg whites. You’ll be so grateful for that ice bath when you see how smoothly the shells come off! You want smooth, unblemished whites for the best results when we start coloring them for our delightful Colored Deviled Eggs.
- Slice and Separate: Using a sharp, non-serrated knife, carefully slice each peeled egg in half lengthwise. Wipe your knife clean between each slice for the neatest cut. Gently scoop out the bright yellow yolks into a medium-sized mixing bowl. Place the beautiful, empty egg white halves onto a clean plate or cutting board, ready for their vibrant transformation. Make sure to keep them separate by color for the best dyeing results.
The Fun Part: Infusing Color into Your Deviled Egg Whites
This is where our Colored Deviled Eggs truly come to life! It’s an exciting and surprisingly easy process to create a rainbow of edible delight. You’ll need several small bowls for this step, one for each color you plan to use.
- Prepare Your Coloring Baths: For each color you wish to create, take a separate small bowl. I recommend using shallow bowls or ramekins that are wide enough to comfortably fit several egg white halves in a single layer. In each bowl, combine about ½ to ¾ cup of warm water with 1 tablespoon of white vinegar. The vinegar is essential here, as it helps the food coloring bind to the protein in the egg whites, resulting in much more vibrant and even colors.
- Add Your Gel Food Coloring: Now, add your gel food coloring to each bowl. Start with about ½ to 1 teaspoon of gel color. Gel colors are highly concentrated, so a little goes a long way, but don’t be shy if you want really deep, rich hues. Stir each color mixture thoroughly until the gel is completely dissolved and the water is uniformly colored. You’ll instantly see the beautiful potential of your Colored Deviled Eggs taking shape.
- Submerge the Egg Whites: Carefully place your egg white halves, cut-side down, into the prepared coloring baths. Try not to overcrowd the bowls; give each egg white a little space to soak evenly. If you have many eggs and limited bowls, you can work in batches.
- Watch the Magic Happen (Soaking Time): This is where you control the intensity of your colors.
- For pastel shades, soak the egg whites for about 10-15 minutes.
- For medium, vibrant colors, aim for 20-30 minutes.
- For deep, jewel-toned hues, you might let them soak for 45 minutes to an hour, or even longer if you desire a very intense color. I usually aim for a good 30 minutes to get really lovely, noticeable colors for my Colored Deviled Eggs.
You can periodically check the color by gently lifting an egg white with a spoon to see its progress. If you want two-tone eggs, you could even try dipping only half the egg white!
- Dry and Prepare for Filling: Once your egg whites have reached your desired colorful intensity, carefully remove them from the coloring baths using a slotted spoon. Gently blot any excess liquid with a paper towel. Arrange the beautifully colored egg white halves, cut-side up, on a clean plate or a wire rack set over a baking sheet. Allow them to air dry for about 10-15 minutes while you prepare the filling. This drying time prevents the colors from bleeding into your creamy filling, ensuring your Colored Deviled Eggs look pristine.
Crafting the Creamy, Flavorful Filling
While your vibrant egg whites are air-drying, let’s get to work on the heart of our Colored Deviled Eggs: the rich and tangy yolk filling. This part is all about achieving that perfect balance of creaminess and flavor.
- Mash the Yolks Thoroughly: In the medium-sized bowl where you collected your egg yolks, use a fork or a potato masher to mash them until they are completely smooth and free of any lumps. You want a fine, consistent texture so your filling will be wonderfully creamy. Don’t rush this step; well-mashed yolks are the foundation of a great deviled egg filling.
- Add the Wet Ingredients: To the mashed yolks, add the mayonnaise, Dijon mustard, and white vinegar. These are the core liquid ingredients that will bring the filling together and add the signature tang.
- Season to Perfection: Sprinkle in the salt and freshly ground black pepper. Remember, you can always add more, but you can’t take it away, so start with the suggested amounts.
- Mix Until Smooth and Creamy: Now, it’s time to mix everything together. Use your fork or a spoon to vigorously stir and mash the mixture until it’s perfectly smooth and has a beautiful, creamy consistency. If it seems a little too stiff, you can add another teaspoon or two of mayonnaise to achieve your desired creaminess. Conversely, if it seems too loose, a tiny pinch more mashed yolk (if you have any spare) or even a very small amount of cream cheese can thicken it slightly, though I rarely find this necessary with my recipe.
- Taste and Adjust: This is a crucial step! Take a small spoonful of the filling and taste it. Does it need a little more salt? A touch more pepper for a kick? Perhaps another tiny splash of vinegar to brighten it up? Don’t be afraid to adjust the seasonings to your preference. The goal is a perfectly balanced, irresistibly delicious filling that will complement the colorful presentation of your Colored Deviled Eggs.
- Consider Optional Add-ins (for extra flair!): While this classic filling is fantastic on its own, sometimes I like to experiment. A tiny bit of finely chopped sweet pickle relish can add a lovely texture and tang. A dash of hot sauce (like Tabasco or Sriracha) can give it a subtle kick. Or for a smoky note, a pinch of smoked paprika mixed directly into the filling is wonderful. But for truly vibrant Colored Deviled Eggs, the classic filling really lets the colors shine.
Assembling Your Vibrant Colored Deviled Eggs
We’ve done the hard work, and now it’s time for the grand finale: assembling your visually stunning Colored Deviled Eggs. This is where your creation transforms into an edible work of art.
- Prepare Your Piping Bag: For the most elegant presentation, I highly recommend using a piping bag. You can use a disposable pastry bag with a star tip (like an Ateco 824 or 826) for a beautiful swirled filling, or even just snip off the corner of a sturdy Ziploc bag for a simpler, but still neat, mound of filling. If you don’t have a piping bag, you can certainly use two small spoons to carefully spoon the filling into each egg white half, though it might not look quite as uniform.
- Fill the Piping Bag: Open your piping bag (or Ziploc bag) and fold the top edge over a few times to create a cuff. Place the bag into a tall glass to help keep it upright and stable. Use a rubber spatula or spoon to transfer all of your delicious, creamy yolk filling into the bag. Push the filling down towards the tip, then twist the top of the bag to seal it, preventing any filling from oozing out the top.
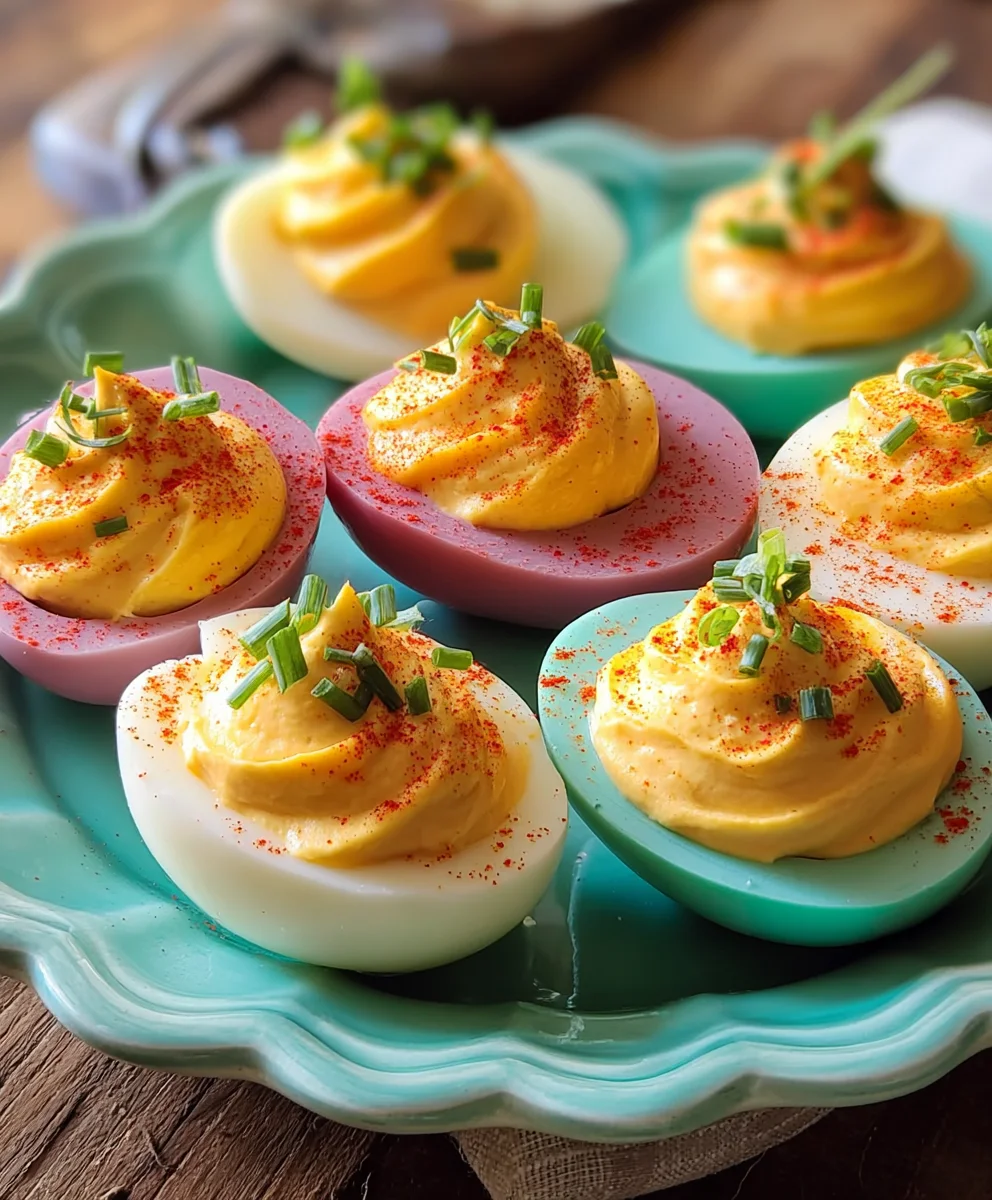
- Pipe the Filling: Pick up one of your beautifully colored egg white halves. Holding the piping bag upright, position the tip directly over the center of the egg white. Gently squeeze the bag, allowing the filling to pipe out in a controlled manner. I like to start from the outside edge and spiral inwards, or simply create a beautiful mound in the center. Fill each colored egg white half generously, creating an appealing domed or swirled top. The contrast of the creamy yellow filling against the vibrant blues, pinks, greens, and purples of your Colored Deviled Eggs is truly stunning.
- Arrange and Admire: As you fill each egg white, carefully place it onto your serving platter. I like to arrange them in a visually appealing way, perhaps grouping colors together or creating a mosaic of hues. Take a moment to admire your handiwork – these aren’t just deviled eggs; they’re a celebration of color and flavor!
Garnish and Serve Your Masterpiece
The final touches will elevate your Colored Deviled Eggs from beautiful to absolutely breathtaking. A little garnish goes a long way in adding both visual appeal and a fresh burst of flavor.
- Sprinkle with Paprika: The classic finishing touch! Lightly dust each filled deviled egg with a pinch of paprika. Smoked paprika adds a lovely depth, while sweet paprika provides a vibrant red hue. This adds another layer of color and a subtle warmth that enhances the overall presentation of your Colored Deviled Eggs.
- Add Fresh Herbs: For an extra touch of freshness and elegance, sprinkle finely chopped fresh chives or dill over your deviled eggs. The bright green of the herbs provides a wonderful contrast to the egg colors and adds a delightful aroma and herbaceous note. This is always a crowd-pleaser and makes them look incredibly professional.
- Chill Before Serving: While tempting to dive right in, Colored Deviled Eggs are best served chilled. Once garnished, cover the platter loosely with plastic wrap and refrigerate for at least 30 minutes. This allows the flavors to meld beautifully and ensures they are refreshing to eat. They can be prepared several hours in advance and stored in the refrigerator, making them perfect for parties and gatherings.
- Present with Pride: When it’s time to serve, unveil your magnificent platter of Colored Deviled Eggs. Watch as your guests marvel at the kaleidoscope of colors before they even take their first bite. These vibrant treats are not only incredibly delicious but also a feast for the eyes, sure to be the star of any spread. Enjoy the compliments!
Conclusion:
As we wrap up our delightful journey with this recipe, I truly hope you’re feeling as inspired and excited as I am about the prospect of creating these culinary masterpieces. This isn’t just a recipe; it’s an invitation to transform a classic into an absolute showstopper, a vibrant celebration of flavor and creativity that I guarantee will leave a lasting impression on anyone lucky enough to try them. I firmly believe that every kitchen, regardless of skill level, deserves the joy of presenting something truly extraordinary, and these eggs deliver exactly that without demanding hours of complicated effort. Imagine the faces of your guests, their eyes widening in surprise and delight as they encounter the unexpected burst of color before even taking the first delicious bite. That “wow” factor? It’s simply priceless, and it’s something I’ve personally experienced time and time again when sharing these with friends and family.
What makes this recipe a must-try, beyond its undeniable visual appeal, is its incredible ability to elevate any occasion. We’re not just talking about taste here – though the creamy, savory filling is certainly perfected – we’re talking about an entire experience. From the simple satisfaction of dying the egg whites in your chosen hues to the artistic flair of piping the filling, every step is designed to be enjoyable and rewarding. These are the appetizers that spark conversations, the vibrant bites that anchor a memorable spread, and the dishes that subtly tell your guests, “I put thought and love into this.” They embody both elegance and whimsy, striking a beautiful balance that’s often hard to achieve in simple finger foods. Trust me when I say that once you see the reaction these generate, you’ll understand why they’re quickly becoming my go-to for almost every gathering.
Beyond the Plate: Serving and Variations
Now that you’re convinced these are a must-make, let’s talk about making them truly your own. The beauty of these Colored Deviled Eggs lies not only in their striking appearance but also in their adaptability. For serving, think beyond the conventional platter. Imagine a vibrant array of these eggs arranged artfully on a dark slate or wooden board, perhaps nestled amongst fresh sprigs of dill or parsley, adding to their natural charm. They are an absolute sensation for spring and summer potlucks, garden parties, and especially holiday brunches like Easter, where their playful colors fit right in. But don’t limit them to daytime events! Picture them as a sophisticated starter for an evening cocktail party or a festive addition to a holiday buffet, with colors tailored to the season – deep reds and greens for Christmas, or oranges and purples for Halloween. The possibilities are truly endless, and each presentation offers a new layer of visual delight.
And when it comes to variations, this recipe is a blank canvas for your culinary imagination. While our core recipe delivers a perfectly balanced classic flavor, don’t hesitate to experiment with the filling. For a spicy kick, a pinch of cayenne pepper or a dash of hot sauce like Sriracha can transform the flavor profile. If you’re a fan of herbs, finely chopped fresh dill, chives, or even a hint of tarragon can add an aromatic complexity that’s simply divine. Smoky paprika, instead of plain, will lend a wonderful depth, especially when paired with crispy bacon bits crumbled on top. For a tangy twist, consider adding a touch more relish or even finely minced capers. And for those feeling truly adventurous, a spoonful of mashed avocado can add an extra layer of creaminess and a subtle, earthy note, though it might affect the vibrancy of your colored yolks if mixed in directly. Don’t be afraid to play with different garnishes either – a sprinkle of everything bagel seasoning, a tiny dollop of caviar for an opulent touch, or even a microgreen sprout can elevate your eggs from delicious to truly gourmet. Each small alteration offers a fresh new take on this already fantastic base.
Your Culinary Adventure Awaits!
So, what are you waiting for? I wholeheartedly encourage you to roll up your sleeves, gather your ingredients, and embark on this incredibly rewarding culinary adventure. This recipe for colorful deviled eggs is more than just instructions; it’s an opportunity to infuse your cooking with joy, creativity, and a dash of unexpected charm. Trust your instincts, have fun with the vibrant colors, and don’t be afraid to personalize the flavors to your own palate. I promise, the satisfaction of creating these beautiful, delectable bites is immense, and the praise you’ll receive will be well worth the effort. Once you’ve made them, I would absolutely love to hear about your experience! Did you discover a new favorite color combination? Did you add a unique ingredient to the filling that became an instant hit? Please, don’t keep your triumphs to yourself! Share your photos, your tips, and your feedback. Let’s build a community of colorful deviled egg enthusiasts together. Happy cooking, and prepare to amaze!
Vibrant Colored Deviled Eggs
Transform classic deviled eggs into a visually stunning, vibrant treat perfect for any gathering. This fun and easy recipe creates eye-catching, delicious bites that are a guaranteed crowd-pleaser and conversation starter for themes like baby showers, holidays, or sports teams.
Ingredients
-
12 large eggs
-
½ cup mayonnaise
-
2 tsp Dijon mustard
-
1 tsp white vinegar (for filling)
-
½ tsp salt
-
¼ tsp black pepper
-
Paprika (smoked or sweet), for garnish
-
Fresh chives or dill, finely chopped (optional garnish)
-
Assorted gel food coloring
-
Extra white vinegar (for coloring bath)
-
Ice
Instructions
-
Step 1
Place 12 large eggs in a single layer in a saucepan, cover with cold water (1 inch above eggs). Bring to a rapid boil, then immediately remove from heat, cover, and let sit for 12 minutes. Prepare a large ice bath. -
Step 2
Transfer hot eggs to the ice bath; chill for 10-15 minutes until completely cool. Gently tap and peel eggs under cool running water for smooth whites. -
Step 3
Slice each peeled egg in half lengthwise. Scoop out yolks into a medium bowl and place egg white halves on a clean plate. -
Step 4
For each desired color, combine ½-¾ cup warm water with 1 tbsp white vinegar in a small bowl. Add ½-1 tsp gel food coloring and stir until dissolved. -
Step 5
Submerge egg white halves, cut-side down, into coloring baths. Soak for 10-15 minutes for pastels, 20-30 minutes for vibrant colors, or 45-60+ minutes for deep hues. Remove and blot excess liquid. -
Step 6
Arrange colored egg white halves cut-side up on a plate or wire rack; air dry for 10-15 minutes while preparing the filling. -
Step 7
Mash yolks until smooth. Add mayonnaise, Dijon mustard, 1 tsp white vinegar, salt, and black pepper. Mix vigorously until smooth and creamy. Taste and adjust seasoning. -
Step 8
Transfer filling to a piping bag with a star tip (or a Ziploc bag with a snipped corner). Pipe filling generously into each colored egg white half. -
Step 9
Arrange filled eggs on a platter. Lightly dust with paprika and sprinkle with fresh chives or dill, if desired. Cover loosely and refrigerate for at least 30 minutes before serving.
Important Information
Nutrition Facts (Per Serving)
It is important to consider this information as approximate and not to use it as definitive health advice.
Allergy Information
Please check ingredients for potential allergens and consult a health professional if in doubt.


Leave a Comment