

Reeses Peanut Butter Cup Roll Cake – just hearing those words sends a thrill down my spine. If you’re anything like me, the mere mention of that iconic chocolate and peanut butter pairing conjures up a sense of pure, unadulterated joy.
A dessert that’s more than just a treat—it’s an experience.
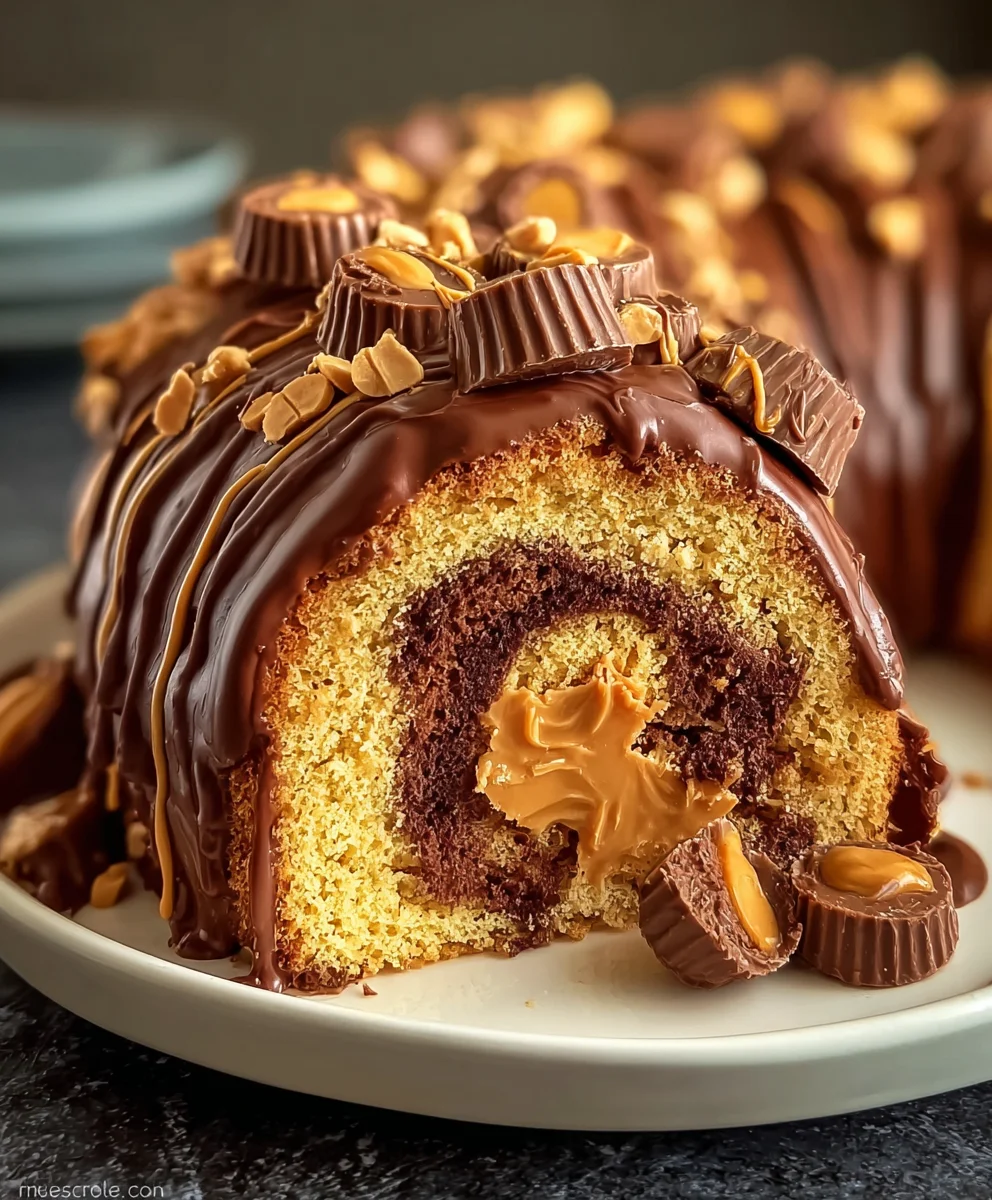
Imagine a perfectly moist, tender chocolatey sponge cake, gently rolled around a rich, incredibly creamy peanut butter filling, and then adorned with generous amounts of crunchy, crushed Reese’s Peanut Butter Cups. It’s truly a celebration in every single slice, delivering both visual delight and an explosion of flavor.
The legendary combination of chocolate and peanut butter has captivated taste buds for generations, finding its ultimate expression in the universally adored Reese’s Peanut Butter Cup. This exquisite roll cake pays a heartfelt homage to that beloved classic, masterfully transforming a simple candy into a sophisticated, show-stopping dessert that celebrates the profound joy of homemade indulgence. People absolutely adore this dish because it delivers on every single front: the tender texture of the cake, the smooth and intensely peanut buttery cream, and the delightful surprise of real Reese’s pieces nestled within each bite. It’s a nostalgic treat that feels incredibly luxurious, making it perfect for special occasions or simply elevating a cherished family gathering. I find its stunning visual appeal, with those distinct, elegant swirls, almost as satisfying as its unforgettable taste. This Reeses Peanut Butter Cup Roll Cake truly embodies the pinnacle of dessert perfection, offering a symphony of sweet and salty flavors that leaves everyone craving another slice.

Ingredients:
For the Chocolate Cake Roll:
- ¾ cup (90g) all-purpose flour
- ½ cup (45g) unsweetened natural cocoa powder
- 1 teaspoon baking powder
- ½ teaspoon baking soda
- ¼ teaspoon salt
- 4 large eggs, separated (whites and yolks)
- ¾ cup (150g) granulated sugar, divided
- ½ teaspoon vanilla extract
- ¼ cup (60ml) whole milk, at room temperature
- ¼ cup (60ml) hot water
- Powdered sugar, for dusting
For the Peanut Butter Cream Cheese Filling:
- 8 ounces (226g) cream cheese, softened to room temperature
- ½ cup (113g) unsalted butter, softened to room temperature
- 1 cup (250g) creamy peanut butter (I love using a good quality, no-stir variety for this!)
- 1 teaspoon vanilla extract
- 2 cups (240g) powdered sugar, sifted
- ½ cup (120ml) heavy cream, chilled
For the Chocolate Ganache Drizzle:
- 4 ounces (113g) good quality semi-sweet chocolate, finely chopped
- ½ cup (120ml) heavy cream
- 1 tablespoon (14g) unsalted butter
- ¼ teaspoon vanilla extract
For Decoration and Assembly:
- 10-12 mini Reeses Peanut Butter Cups, chopped into small pieces (about ½ cup total)
- 6-8 whole mini Reeses Peanut Butter Cups, for garnishing the top of your magnificent Reeses Peanut Butter Cup Roll Cake
- Additional chopped Reeses Peanut Butter Cups or crumbled regular Reeses Cups, if desired, for extra indulgence!
Preparing the Chocolate Cake Roll:
- Preheat and Prepare Your Pan: First things first, let’s get our oven ready. Preheat your oven to 375°F (190°C). For the cake pan, you’ll need a standard 10×15-inch jelly roll pan. This is crucial for achieving the perfect thickness for rolling. Line the bottom of your pan with parchment paper, allowing a slight overhang on the longer sides. This overhang acts as “handles” later, making it easier to lift the baked cake. Give the parchment paper and the exposed sides of the pan a light spray with non-stick baking spray, then dust it evenly with a little bit of all-purpose flour or cocoa powder, tapping out any excess. This ensures your cake will release effortlessly.
- Combine Dry Ingredients: In a medium bowl, whisk together your ¾ cup of all-purpose flour, ½ cup of unsweetened cocoa powder, 1 teaspoon of baking powder, ½ teaspoon of baking soda, and ¼ teaspoon of salt. I like to use a whisk to really get everything well combined and break up any lumps. Setting this aside for now.
- Whip the Egg Yolks and Sugar: In a large mixing bowl, using an electric mixer, beat your four egg yolks with ½ cup of the granulated sugar until the mixture becomes pale yellow, thick, and has increased in volume. This usually takes about 3-4 minutes on medium-high speed. You want it to look light and airy, almost like a fluffy cloud! Stir in the ½ teaspoon of vanilla extract here.
- Gently Fold in Dry and Wet: Gradually add the dry ingredient mixture to the egg yolk mixture, alternating with the ¼ cup of whole milk and ¼ cup of hot water. Begin and end with the dry ingredients. Mix on low speed until just combined. Be careful not to overmix; we want to keep that delicate texture. The batter will be thick at this stage.
- Create a Meringue: In a separate, very clean, large bowl (cleanliness is key here for proper meringue!), beat your four egg whites with an electric mixer on medium speed until soft peaks form. Gradually add the remaining ¼ cup of granulated sugar, one tablespoon at a time, continuing to beat until the egg whites are glossy and form stiff peaks. When you lift the beaters, the peaks should hold their shape firmly. This meringue is what will give our cake its incredible lightness and flexibility, making it perfect for rolling.
- Fold Meringue into Batter: Now for the delicate part! Gently fold about one-third of the egg white mixture into the chocolate batter to lighten it up. Then, carefully fold in the remaining egg whites in two additions. Use a spatula and a gentle, cutting and folding motion. We’re trying to incorporate the air from the egg whites without deflating them, which is vital for a light and pliable cake. Don’t overmix; a few streaks of white are perfectly fine.
- Bake to Perfection: Carefully transfer your beautiful batter to the prepared jelly roll pan. Gently spread it into an even layer using an offset spatula, making sure it reaches all corners. This ensures uniform baking and a perfectly flat surface for rolling. Bake for about 12-15 minutes, or until the cake springs back lightly when touched in the center and a wooden skewer inserted comes out clean. Be careful not to overbake, as this can lead to a dry cake that’s difficult to roll.
- The “Roll” While Warm: This step is critical for a successful Reeses Peanut Butter Cup Roll Cake! As soon as the cake comes out of the oven, immediately sprinkle a clean kitchen towel (or a piece of parchment paper larger than your cake) generously with powdered sugar. Invert the hot cake onto the sugared towel. Gently peel off the parchment paper that was on the bottom of the cake. Starting from one of the shorter ends, carefully roll the cake (along with the towel) into a tight log. Place the rolled cake, seam-side down, on a wire rack and let it cool completely to room temperature. This “training” of the cake while it’s warm prevents it from cracking later when you fill it. It’s truly a magical transformation!
Crafting the Peanut Butter Cream Cheese Filling:
- Soften Your Stars: Ensure your 8 ounces of cream cheese and ½ cup of unsalted butter are at true room temperature. This is incredibly important for a smooth, lump-free filling. If they’re too cold, you’ll end up with a chunky mess.
- Cream Cheese and Butter Base: In a large mixing bowl, beat the softened cream cheese and butter with an electric mixer on medium speed until the mixture is light, fluffy, and completely smooth. Scrape down the sides of the bowl often to ensure everything is incorporated. This usually takes about 2-3 minutes.
- Introduce the Peanut Butter: Add 1 cup of creamy peanut butter and 1 teaspoon of vanilla extract to the cream cheese mixture. Continue beating on medium speed until well combined and smooth. The aroma at this stage is absolutely heavenly!
- Sweeten and Smooth: Gradually add the 2 cups of sifted powdered sugar to the mixture, beating on low speed until it’s fully incorporated. Once all the sugar is in, increase the speed to medium-high and beat for another 2-3 minutes, until the filling is wonderfully light, fluffy, and airy. The sifting step for the powdered sugar helps prevent lumps, ensuring a silky-smooth texture for your Reeses Peanut Butter Cup Roll Cake filling.
- Whip the Heavy Cream: In a separate, chilled bowl, whip your ½ cup of cold heavy cream with clean beaters until stiff peaks form. Watch it closely; it can go from perfect to over-whipped (and grainy) quite quickly!
- Fold for Lightness: Gently fold the whipped cream into the peanut butter cream cheese mixture. Use a rubber spatula and a light hand to preserve the airiness of both components. You want a beautifully light and fluffy filling that will melt in your mouth. Don’t overmix, or you risk deflating the cream and making the filling denser.
- Chill for Firmness: Cover the bowl with plastic wrap and refrigerate the peanut butter cream cheese filling for at least 30 minutes. This chilling time helps the filling firm up slightly, making it much easier to spread evenly and preventing it from oozing out when you roll the cake.
Making the Rich Chocolate Ganache Drizzle:
- Chop Your Chocolate: Take your 4 ounces of good quality semi-sweet chocolate and finely chop it. The finer the chop, the faster and more evenly it will melt. Place the chopped chocolate in a heatproof bowl.
- Heat the Cream: In a small saucepan, heat ½ cup of heavy cream over medium heat until it just begins to simmer around the edges. Do not let it come to a rolling boil.
- Pour and Melt: Immediately pour the hot cream over the chopped chocolate in the bowl. Let it sit undisturbed for about 5 minutes. This allows the hot cream to slowly melt the chocolate. After 5 minutes, gently whisk the mixture from the center outwards until it is completely smooth and glossy.
- Enrich the Ganache: Stir in 1 tablespoon of unsalted butter and ¼ teaspoon of vanilla extract until the butter is fully melted and incorporated, making your ganache extra luxurious and shiny.
- Cool to Perfection: Allow the ganache to cool for about 15-20 minutes at room temperature, stirring occasionally. You want it to be thick enough to drizzle beautifully but still pourable. If it gets too thick, you can gently warm it over a double boiler or in the microwave in very short bursts (5-10 seconds) until it reaches the desired consistency.
Assembling Your “Reeses Peanut Butter Cup Roll Cake”:
- Unroll the Cake: Once your chocolate cake roll has completely cooled, carefully unroll it from the towel onto a piece of fresh parchment paper or directly onto a clean work surface. Be gentle here, as the cake is delicate. It should lie flat without cracking, thanks to our initial warm roll!
- Spread the Filling: Retrieve your chilled peanut butter cream cheese filling. Using an offset spatula, spread an even layer of the filling over the entire surface of the cake, leaving about a ½-inch border on all sides. This border helps prevent the filling from squishing out too much when you roll it. Don’t be shy with the filling; it’s a star component of this Reeses Peanut Butter Cup Roll Cake!
- Add the Reeses Crunch: Sprinkle your ½ cup of finely chopped mini Reeses Peanut Butter Cups evenly over the peanut butter filling. This adds a fantastic texture and an extra burst of that iconic peanut butter chocolate flavor with every bite.
- Reroll the Cake: Starting from one of the shorter ends, carefully and gently reroll the cake into a tight log. Take your time and be firm but not aggressive. You can use the parchment paper underneath to help guide and tighten the roll. Try to keep the roll as consistent as possible.
- Chill the Masterpiece: Once rolled, place the cake, seam-side down, on a serving platter or a cutting board. Cover it loosely with plastic wrap and refrigerate for at least 1-2 hours, or ideally, overnight. This chilling time is essential. It allows the cake and filling to firm up, making it much easier to slice cleanly, and it also lets the flavors meld together beautifully.
- Drizzle with Ganache: After the cake has thoroughly chilled, it’s time for the chocolate ganache drizzle. If your ganache has become too firm, gently reheat it until it’s a smooth, pourable consistency. Using a spoon or a piping bag with the tip snipped off, drizzle the rich chocolate ganache artistically over the top of your Reeses Peanut Butter Cup Roll Cake. Let some drip down the sides for a truly decadent look.
- Decorate with Reeses: While the ganache is still a little wet, arrange the 6-8 whole mini Reeses Peanut Butter Cups on top of the cake. You can also sprinkle additional chopped Reeses Peanut Butter Cups or crumbled regular Reeses Cups around the edges or in the center for an even more celebratory finish. This is where your inner cake decorator can really shine!
- Final Chill (Optional, but Recommended): For the cleanest slices and to allow the ganache to set, I recommend giving your decorated Reeses Peanut Butter Cup Roll Cake one last chill in the refrigerator for about 15-30 minutes.
- Slice and Serve: When you’re ready to serve this glorious Reeses Peanut Butter Cup Roll Cake, use a sharp, thin knife (I often warm mine under hot water and wipe it clean between slices) to cut it into beautiful, individual portions. Each slice reveals that stunning spiral of chocolate cake, creamy peanut butter filling, and crunchy Reeses bits. Enjoy the absolute joy of this homemade treat!
<h2>Conclusion:</h2>
<p>Well, my friends, we’ve reached the sweet end of our journey, and I genuinely hope you’re as excited as I am about what we’ve just discussed! If there’s one recipe that I could implore you to try this year, it’s truly this one. This isn’t just any dessert; it’s an experience, a delightful fusion of all the elements we adore about one of America’s favorite candy treats, transformed into a sophisticated yet utterly comforting baked good. We’re talking about the incredible Reeses Peanut Butter Cup Roll Cake, a masterpiece that balances the rich, creamy peanut butter filling with a moist, tender chocolate sponge, all rolled into a beautiful spiral that promises a wow-factor with every single slice. It’s the kind of dessert that looks impressive, tastes heavenly, and yet, I promise you, is entirely achievable in your own kitchen. The magic lies in the contrasting textures and the harmonious blend of sweet and salty notes that dance on your palate. Imagine the joy of serving a dessert that earns gasps of admiration and then groans of pure bliss from your guests. That’s the power of this roll cake, and it’s a power you now hold.</p>
<h4>Elevate Your Reeses Peanut Butter Cup Roll Cake Experience</h4>
<p>While this cake is an absolute showstopper on its own, there are so many wonderful ways to personalize it and make it uniquely yours, or to simply enhance the serving experience. For an ultimate indulgence, I absolutely love to serve a slice slightly chilled, allowing the peanut butter filling to firm up just a touch, which creates a lovely contrast with the soft, yielding chocolate cake. A generous scoop of premium vanilla bean ice cream melting alluringly alongside a slightly warm slice is pure decadence – the cold creaminess against the rich cake is a match made in heaven that truly has to be experienced to be believed. Or, for the true chocolate fiends among us, a delicate drizzle of warm chocolate ganache or a light, artful dusting of cocoa powder can take things to another level of sophisticated sweetness. <strong>Don’t be afraid to experiment with your toppings and garnishes!</strong> A sprinkle of finely chopped roasted peanuts or miniature Reese’s Pieces can add an extra delightful crunch and a playful visual nod to its iconic inspiration. For those who enjoy a bit of coffee with their dessert, a strong, aromatic espresso or a creamy latte makes for a wonderfully sophisticated pairing, cutting through the sweetness beautifully and leaving a satisfying aftertaste.</p>
<p>Thinking about variations to impress even more? If you’re feeling particularly adventurous and creative, you could certainly try using different types of chocolate for your cake batter – a darker chocolate for a more intense, less sweet flavor profile, or even a luscious milk chocolate for an even sweeter, milder base that appeals to all ages. For the star of the show, the peanut butter filling, while I adore the classic, you could experiment with a tiny hint of cinnamon or even a surprisingly delightful pinch of cayenne pepper for a subtle spicy kick that remarkably complements the rich peanut butter flavor. If you’re catering to different tastes or hosting a large gathering, consider making individual mini roll cakes! These are fantastic for parties, allowing for easy portion control and a charming presentation. Simply bake thinner cake layers, roll them up smaller, and decorate them individually for a personalized touch. This <strong>Reeses Peanut Butter Cup Roll Cake</strong> is incredibly versatile, making it perfect for literally any occasion, from a casual family dessert night to a grand holiday centerpiece. Imagine it gracing your Thanksgiving table, bringing cheer to a birthday celebration, or simply elevating an ordinary Tuesday – it fits right in and instantly becomes the undisputed star of the show, guaranteed to gather compliments.</p>
<h5>Your Culinary Adventure Awaits!</h5>
<p>Now that you have all the insights, tips, and tricks, there’s truly nothing holding you back from creating this magnificent dessert. I wholeheartedly encourage you to roll up your sleeves, gather your ingredients with enthusiasm, and dive into the utterly delightful process of creating this incredible dessert in your very own kitchen. <strong>Baking is an art, and this Reeses Peanut Butter Cup Roll Cake is your canvas, waiting for your personal touch.</strong> Don’t be intimidated by the rolling technique; it’s genuinely much simpler than it looks, and I promise you, even if your first attempt isn’t perfectly symmetrical or has a tiny crack, it will still taste absolutely phenomenal and disappear in minutes. The true joy of baking lies not just in the breathtaking final product, but in the entire journey itself – the comforting aroma filling your kitchen, the eager anticipation as it bakes to perfection, and the immense satisfaction of creating something truly special and delicious with your own two hands. This cake is designed to bring radiant smiles, spark lively conversation, and create lasting, cherished memories around any table it graces.</p>
<p>Once you’ve experienced the magic and shared the sheer delight of this cake, please, please, please come back and share your triumph with me and our community! I absolutely adore seeing your magnificent creations and hearing all about your experiences, whether big or small. Did you add a unique, inventive twist that you simply must tell everyone about? Was it an absolute smash hit at your dinner party or family gathering? What was your favorite part of the entire baking process, from mixing to serving? Share your photos and comments below or on your favorite social media platform using relevant hashtags. Let’s build a vibrant community of enthusiastic bakers who aren’t afraid to tackle a showstopping dessert and truly revel in their culinary achievements. Your valuable feedback, creative ideas, and inspiring stories not only make my day but also inspire me and countless other readers to keep trying new things and push their boundaries in the kitchen. So go forth, bake with passion, creativity, and love, and prepare to be utterly amazed by the sheer delight and appreciative reactions that is this exceptional and unforgettable roll cake. I can’t wait to hear all about it, so come back and tell me everything! Happy baking, my friends!</p>
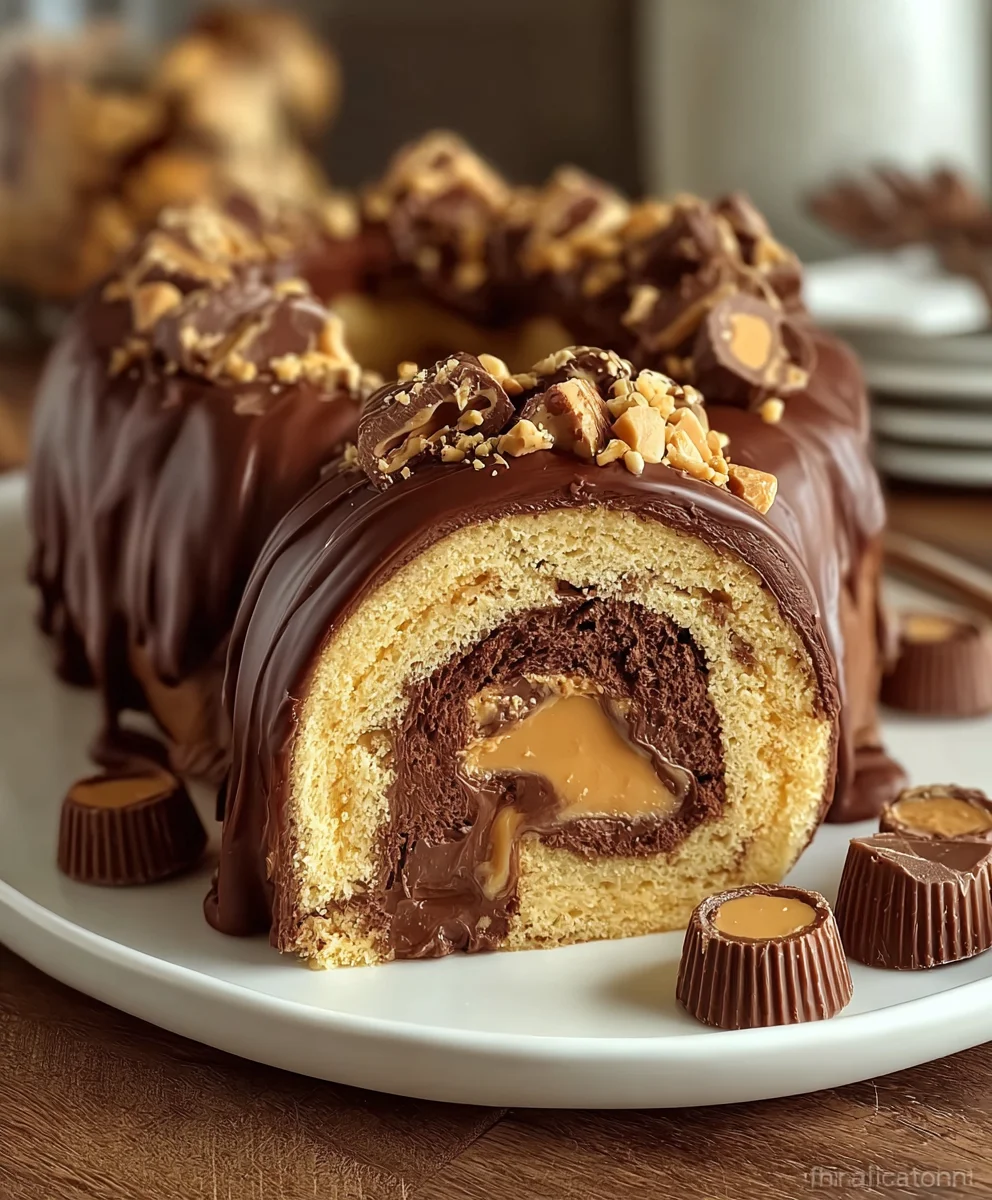
Reese’s Peanut Butter Cup Roll Cake
A decadent chocolate roll cake filled with creamy peanut butter and topped with a luscious ganache, garnished with Reese’s Peanut Butter Cups. This irresistible dessert features a soft, fluffy chocolate cake rolled with creamy peanut butter filling, perfect for any special occasion.
Ingredients
-
¾ cup (90g) all-purpose flour
-
½ cup (45g) unsweetened natural cocoa powder
-
1 teaspoon baking powder
-
½ teaspoon baking soda
-
¼ teaspoon salt
-
4 large eggs, separated
-
¾ cup (150g) granulated sugar, divided
-
½ teaspoon vanilla extract
-
¼ cup (60ml) whole milk
-
¼ cup (60ml) hot water
-
Powdered sugar, for dusting
-
8 ounces (226g) cream cheese, softened
-
½ cup (113g) unsalted butter, softened
-
1 cup (250g) creamy peanut butter
-
1 teaspoon vanilla extract
-
2 cups (240g) powdered sugar, sifted
-
½ cup (120ml) heavy cream, chilled
-
4 ounces (113g) semi-sweet chocolate, finely chopped
-
½ cup (120ml) heavy cream
-
1 tablespoon (14g) unsalted butter
-
¼ teaspoon vanilla extract
-
10-12 mini Reese’s Peanut Butter Cups, chopped (about ½ cup)
-
6-8 whole mini Reese’s Peanut Butter Cups
-
Additional chopped Reese’s Peanut Butter Cups or crumbled regular Reese’s Cups (optional)
Instructions
-
Step 1
Preheat oven to 375°F (190°C). Line a 10×15-inch jelly roll pan with parchment, spray, and dust with flour/cocoa. In a medium bowl, whisk together flour, cocoa, baking powder, baking soda, and salt. Set aside. -
Step 2
In a large bowl, beat egg yolks with ½ cup granulated sugar for 3-4 minutes until pale and thick. Stir in ½ teaspoon vanilla extract. -
Step 3
Gradually add dry ingredient mixture to egg yolk mixture, alternating with milk and hot water. Mix on low speed until just combined. The batter will be thick. -
Step 4
In a separate clean bowl, beat egg whites on medium speed until soft peaks form. Gradually add the remaining ¼ cup granulated sugar, beating until glossy, stiff peaks form. -
Step 5
Gently fold one-third of the egg white mixture into the chocolate batter to lighten it, then carefully fold in the remaining egg whites in two additions using a spatula. Do not overmix. -
Step 6
Carefully transfer batter to the prepared pan and spread evenly. Bake for 12-15 minutes, or until the cake springs back when lightly touched and a skewer comes out clean. Do not overbake. -
Step 7
Immediately sprinkle a clean kitchen towel or parchment generously with powdered sugar. Invert the hot cake onto the sugared surface. Gently peel off the parchment from the cake. Starting from a shorter end, carefully roll the cake (with the towel/parchment) into a tight log. Place seam-side down on a wire rack and let cool completely to room temperature. -
Step 8
Ensure cream cheese and unsalted butter are at room temperature. In a large bowl, beat them together with an electric mixer until light, fluffy, and smooth (2-3 minutes). Scrape down sides as needed. -
Step 9
Add creamy peanut butter and 1 teaspoon vanilla extract to the cream cheese mixture; beat until well combined and smooth. Gradually add sifted powdered sugar on low speed until incorporated, then increase to medium-high and beat for 2-3 minutes until light and fluffy. -
Step 10
In a separate chilled bowl, whip cold heavy cream until stiff peaks form. Gently fold the whipped cream into the peanut butter cream cheese mixture using a rubber spatula until just combined. -
Step 11
Cover the bowl with plastic wrap and refrigerate the filling for at least 30 minutes to firm up. -
Step 12
Place finely chopped semi-sweet chocolate in a heatproof bowl. In a small saucepan, heat ½ cup heavy cream until it just simmers around the edges. Pour hot cream over chocolate, let sit 5 minutes, then whisk until smooth and glossy. Stir in 1 tablespoon unsalted butter and ¼ teaspoon vanilla extract until melted and incorporated. Allow ganache to cool for 15-20 minutes, stirring occasionally, until thick enough to drizzle. -
Step 13
Once the chocolate cake roll is completely cooled, carefully unroll it onto fresh parchment paper. Spread an even layer of the chilled peanut butter filling over the entire surface, leaving a ½-inch border. Sprinkle ½ cup of chopped mini Reese’s Peanut Butter Cups evenly over the filling. -
Step 14
Starting from a shorter end, carefully and gently reroll the cake into a tight log. Place the cake, seam-side down, on a serving platter or cutting board. Cover loosely with plastic wrap and refrigerate for at least 1-2 hours, or ideally, overnight, to firm up. -
Step 15
After chilling, if ganache is too firm, gently reheat until pourable. Drizzle the chocolate ganache artistically over the top of the cake. While ganache is still wet, arrange 6-8 whole mini Reese’s Peanut Butter Cups on top. Optionally, sprinkle additional chopped Reese’s around the edges. -
Step 16
For the cleanest slices, refrigerate the decorated cake for another 15-30 minutes. Use a sharp, thin knife (warmed and wiped clean between slices) to cut into individual portions. Serve and enjoy!
Important Information
Nutrition Facts (Per Serving)
It is important to consider this information as approximate and not to use it as definitive health advice.
Allergy Information
Please check ingredients for potential allergens and consult a health professional if in doubt.


Leave a Comment