

Strawberry Cookies are more than just a sweet treat; they are a delightful burst of summer encapsulated in every single bite. I vividly remember the first time I perfected my recipe, and the sheer joy it brought to everyone who tasted them. These aren’t your ordinary, run-of-the-mill confections; they offer a unique twist on a beloved classic, blending the comforting chewiness of a cookie with the vibrant, fresh sweetness of ripe strawberries. While cookies themselves boast a long and varied history across cultures, these particular Strawberry Cookies bring a touch of modern freshness, often associated with home baking and the desire to infuse everyday snacks with natural fruit flavors.
What truly makes people fall in love with this dish? It’s the captivating balance of textures – a tender, soft interior yielding to a subtle crispness at the edges – combined with the unmistakable aroma and taste of real strawberries. They’re incredibly versatile, perfect for a cozy afternoon snack, an elegant dessert addition, or a thoughtful homemade gift. I promise you, once you try these incredible Strawberry Cookies, you’ll understand why they’ve quickly become a cherished favorite in my kitchen and will undoubtedly become one in yours too.

Ingredients:
For the Irresistible Strawberry Cookies:
- 2 ½ cups (300g) all-purpose flour, spooned and leveled, then sifted. Sifting is key for a tender crumb!
- 1 teaspoon baking powder
- ½ teaspoon baking soda
- ¼ teaspoon fine sea salt
- 1 cup (226g) unsalted butter, at room temperature (softened), but not melted. I usually take mine out an hour or two before I start.
- 1 ½ cups (300g) granulated sugar
- 1 large egg, at room temperature
- 1 large egg yolk, at room temperature. This adds richness and chewiness!
- 1 teaspoon pure vanilla extract. Good quality vanilla makes a difference!
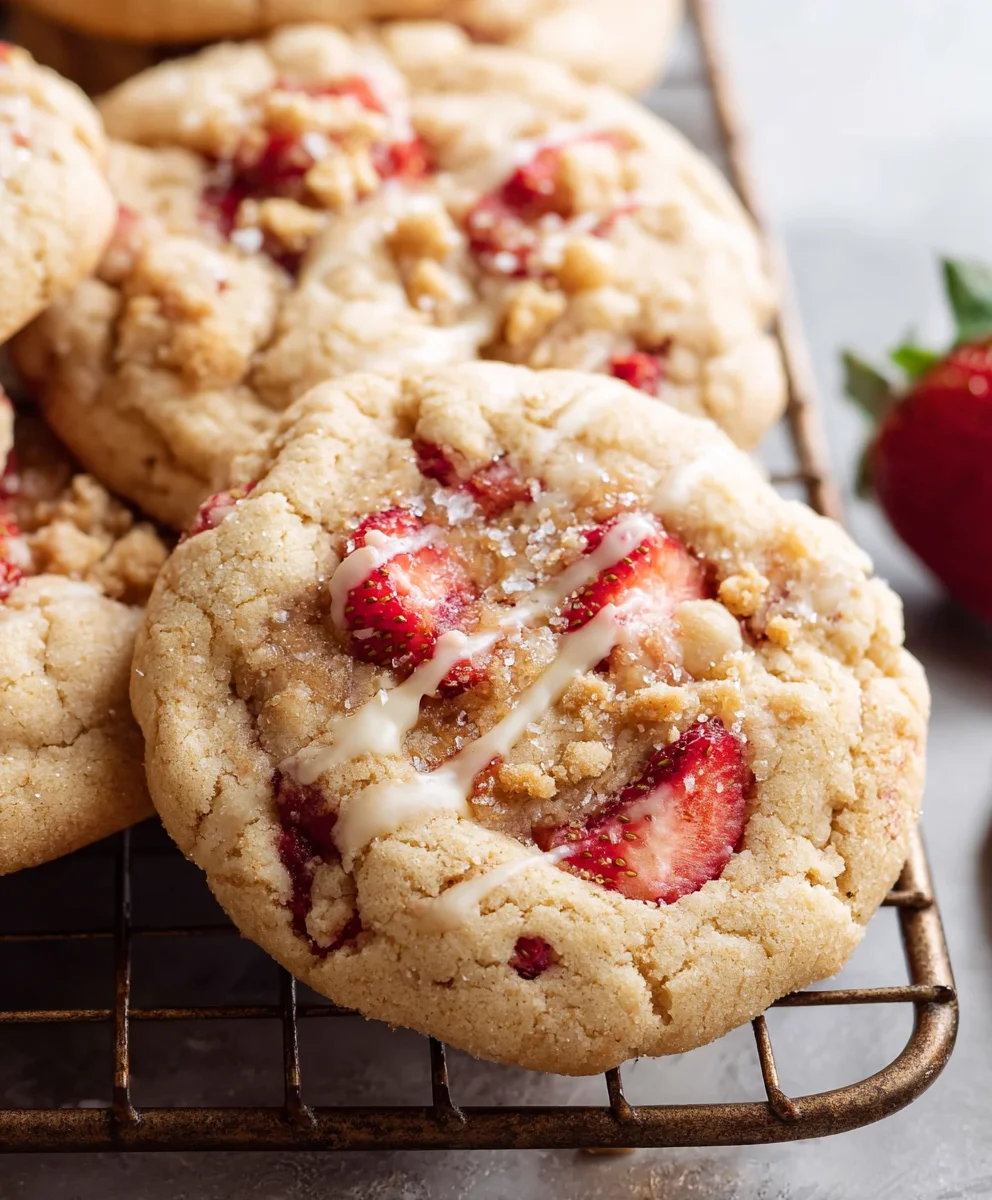
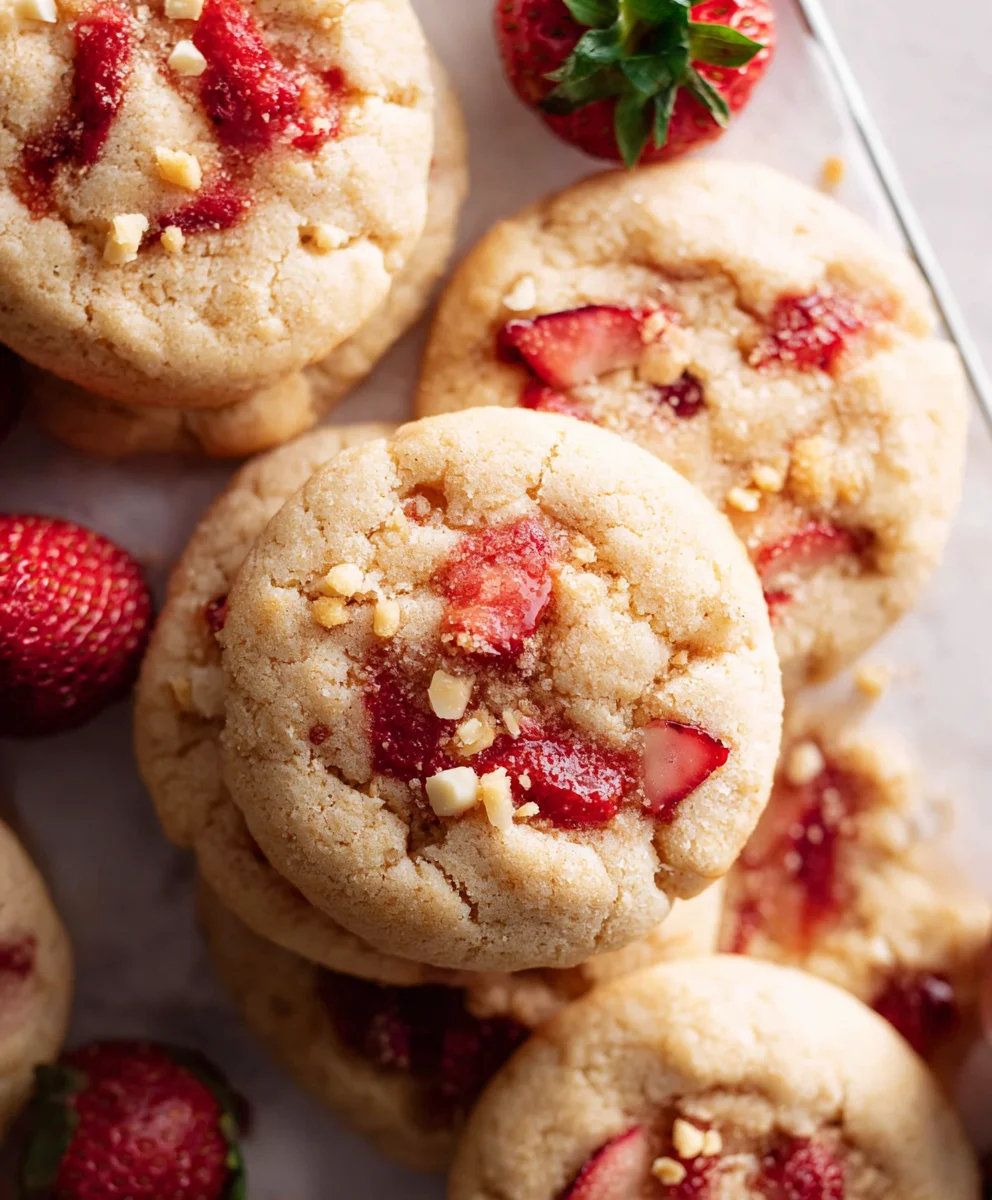
- 1 cup (approximately 150g) fresh strawberries, finely diced. Choose ripe, fragrant strawberries for the best flavor. Aim for pieces no larger than pea-sized.
- ½ cup (approximately 15g) freeze-dried strawberries, crushed into small pieces or a coarse powder. These are wonderful for an intense strawberry punch without adding extra moisture.
For the Dreamy Strawberry Glaze:
- 2 cups (240g) powdered sugar (confectioners’ sugar), sifted. Sifting prevents lumps!
- ¼ cup (approximately 60ml) fresh strawberry puree. This will come from about 3-4 large fresh strawberries, blended until smooth.
- 1-2 teaspoons fresh lemon juice, to taste. Just a touch brightens the flavor beautifully.
- Pinch of fine sea salt. Don’t skip this, it balances the sweetness!
Instructions:
Phase 1: Preparing Your Kitchen and Gathering Ingredients
- Preheat your oven and prepare your baking sheets: First things first, let’s get that oven ready! Preheat your oven to 350°F (175°C). While it’s heating up, line two large baking sheets with parchment paper or silicone baking mats. This prevents sticking and ensures even baking, which is vital for beautiful Strawberry Cookies. I always recommend parchment paper for easy cleanup and consistent results.
- Measure and prepare dry ingredients: In a medium bowl, whisk together your sifted all-purpose flour, baking powder, baking soda, and fine sea salt. Whisk them together thoroughly for about 30 seconds to a minute; this ensures all the leavening agents and salt are evenly distributed throughout the flour mixture. Set this bowl aside for now.
- Prepare your fresh strawberries: Wash your fresh strawberries thoroughly and pat them completely dry. Hull them and then finely dice them. We’re aiming for very small pieces, no larger than a green pea. Larger pieces can introduce too much moisture and make the cookies spread excessively. Once diced, you can gently toss them with a tiny sprinkle of that extra flour you measured out; this can help them distribute better in the dough and prevent them from sinking to the bottom. Set these aside.
- Crush freeze-dried strawberries: If you’re using whole freeze-dried strawberries, gently crush them. You can place them in a resealable plastic bag and use a rolling pin to break them down into small pieces or a coarse powder. Alternatively, a food processor can do this quickly, but be careful not to turn them into too fine a dust if you prefer some texture. This step is optional but adds an incredible burst of concentrated strawberry flavor and a lovely pink hue to our cookies.
Phase 2: Crafting the Strawberry Cookie Dough
- Cream the butter and sugar: In the bowl of your stand mixer fitted with the paddle attachment, or using a large mixing bowl and a handheld electric mixer, cream together the softened unsalted butter and granulated sugar on medium speed. Beat for a full 3-5 minutes, scraping down the sides of the bowl occasionally, until the mixture is visibly lighter in color and has a wonderfully fluffy, almost airy texture. This creaming process is crucial for introducing air into your dough, which contributes to a tender, cake-like cookie. Don’t rush this step!
- Add the egg, egg yolk, and vanilla: Once your butter and sugar mixture is light and fluffy, add the large egg and the egg yolk, one at a time, beating well after each addition until fully incorporated. Follow this with the pure vanilla extract, mixing until just combined. Scrape down the sides of the bowl again to ensure everything is evenly mixed. The mixture might look a little curdled at this point, but don’t worry, it will come together.
- Gradually add the dry ingredients: With your mixer on low speed, gradually add the whisked dry ingredients (flour, baking powder, baking soda, salt) to the wet mixture in two additions. Mix just until no dry streaks of flour remain after each addition. It’s incredibly important not to overmix at this stage! Overmixing the flour can develop the gluten too much, leading to tough, chewy cookies instead of the soft, melt-in-your-mouth texture we’re aiming for. As soon as you see no more dry flour, stop mixing.
- Gently fold in the fresh and freeze-dried strawberries: Remove the bowl from the mixer and, using a rubber spatula, gently fold in the finely diced fresh strawberries and the crushed freeze-dried strawberries. Be very careful and use a light hand here. You want to distribute them evenly without mashing the fresh strawberries or overworking the dough. Just a few folds until they are nicely incorporated.
- Chill the cookie dough: This is a step I implore you not to skip! Cover the bowl with plastic wrap and refrigerate the cookie dough for at least 30 minutes to 1 hour. Chilling the dough solidifies the butter, which helps prevent the cookies from spreading too much in the oven, resulting in a thicker, chewier cookie. It also allows the flavors to meld beautifully, intensifying that wonderful strawberry essence. If your kitchen is particularly warm, or if you prefer a really thick cookie, you can chill for up to 2 hours.
Phase 3: Baking the Perfect Strawberry Cookies
- Scoop the cookie dough: Once the dough is nicely chilled, retrieve it from the refrigerator. Using a 1.5-inch cookie scoop (about 1.5-2 tablespoons of dough per cookie), scoop rounded balls of dough and place them about 2 inches apart on your prepared baking sheets. I find using a scoop ensures all your Strawberry Cookies are uniform in size, which leads to even baking. If you don’t have a scoop, you can roll them by hand.
- Bake the Strawberry Cookies: Place one baking sheet at a time into your preheated oven. Bake for 10-12 minutes, or until the edges are lightly golden brown and the centers are just set but still look soft. They might not look fully done in the center, but trust me, they will continue to set as they cool. Overbaking will lead to dry cookies, and we definitely don’t want that! The baking time can vary depending on your oven, so keep a close eye on them, especially during the first batch.
- Cool the cookies: Once baked, remove the baking sheets from the oven and let the cookies cool on the sheets for about 5 minutes. This brief cooling period allows them to firm up slightly without sticking. After 5 minutes, carefully transfer the cookies to a wire cooling rack to cool completely. They must be completely cool before glazing, otherwise, your beautiful strawberry glaze will just melt right off!
Phase 4: Whipping Up the Luscious Strawberry Glaze
- Prepare the fresh strawberry puree: While your cookies are cooling, let’s make that glorious strawberry glaze! Take about 3-4 large fresh strawberries (or enough to yield ¼ cup of puree). Wash and hull them, then blend them in a small food processor or with an immersion blender until completely smooth. If you prefer a very smooth glaze without any tiny strawberry seeds, you can push the puree through a fine-mesh sieve, but I often leave the seeds in for a more rustic, fresh look.
- Mix the glaze ingredients: In a medium bowl, combine the sifted powdered sugar, the fresh strawberry puree, the fresh lemon juice, and the tiny pinch of fine sea salt. Whisk everything together until the glaze is completely smooth and free of lumps.
- Adjust the glaze consistency: The consistency of your glaze is important! It should be thick enough to cling to the cookies but thin enough to drizzle or spread easily. If it’s too thick, add another teaspoon of strawberry puree or lemon juice, one drop at a time, until you reach your desired consistency. If it’s too thin, whisk in a tablespoon more of sifted powdered sugar until it thickens up. I like mine to be a bit thick so it forms a nice opaque layer.
Phase 5: Glazing and Finishing Your Strawberry Cookies
- Glaze the cooled Strawberry Cookies: Once your cookies are completely cool to the touch (this is non-negotiable for a perfect glaze!), you have a couple of options for applying the glaze. You can gently dip the top of each cookie into the bowl of glaze, allowing any excess to drip off before placing it back on the wire rack. Alternatively, you can use a spoon to drizzle the glaze decoratively over each cookie. For a really professional look, you can transfer the glaze to a piping bag with a small round tip and pipe intricate designs.
- Allow the glaze to set: After glazing, let the cookies sit on the wire rack at room temperature for at least 30 minutes to 1 hour, or until the glaze has fully set and hardened. This ensures the glaze won’t smudge when you stack or handle your beautiful Strawberry Cookies. If you’re feeling fancy, you can sprinkle a few more crushed freeze-dried strawberries or even some finely chopped fresh mint leaves on top of the wet glaze for an extra pop of color and flavor.
- Serve and store: Once the glaze is set, your magnificent Strawberry Cookies are ready to be devoured! I find these cookies are best enjoyed the day they are made, but they store wonderfully. You can store leftover Strawberry Cookies in an airtight container at room temperature for up to 3-4 days. If your kitchen is very warm, or if you want to extend their freshness, you can store them in the refrigerator for up to a week. Just be sure to bring them back to room temperature before serving for the best texture and flavor. These cookies also freeze exceptionally well for up to 2-3 months without the glaze; simply thaw and glaze before serving. They make a fantastic gift or a delightful treat for any occasion! Enjoy every single bite of these soft, sweet, and wonderfully fruity creations.
Conclusion:
Well, friends, we’ve reached the sweet finale, and I genuinely hope you’re as excited as I am about the prospect of these incredible treats gracing your kitchen. What we’ve just explored isn’t just another cookie recipe; it’s an invitation to experience pure, unadulterated joy in every bite. I firmly believe this recipe for our delightful Strawberry Cookies stands head and shoulders above many others, not just for its vibrant appearance and irresistible aroma, but for the profound simplicity with which it delivers complex, fresh flavors. This isn’t merely a dessert; it’s a celebration of natural goodness, perfectly encapsulated in a tender, chewy package.
Think about it: that perfect balance of soft, chewy interior married with slightly crisp edges, bursting with the natural sweetness and subtle tang of real strawberries. It’s a sensory symphony that transports you to sun-drenched days, no matter the season outside your window. I’ve refined this recipe over countless batches to ensure that every single cookie emerges from your oven as a miniature masterpiece. It’s the kind of treat that looks effortlessly elegant, yet is remarkably straightforward to create, making it ideal for seasoned bakers and enthusiastic novices alike. You’ll be utterly amazed at the vibrant pink hues and the delightful fragrance that fills your home – a true testament to the power of fresh ingredients. These cookies are not just delicious; they are a feast for the eyes and the nose, promising an unforgettable experience long before the first bite. They truly embody everything wonderful about homemade baking: warmth, comfort, and an undeniable touch of magic.
Elevate Your Experience: Serving Suggestions
Now, while these cookies are absolutely divine straight off the cooling rack, still warm and wonderfully fragrant, I do have some serving suggestions that can elevate them even further. For a truly indulgent experience, try pairing them with a scoop of premium vanilla bean ice cream; the way the cold cream melts slightly into the warm cookie is pure bliss, creating a textural and temperature contrast that is simply heavenly. They also make a fantastic accompaniment to your morning coffee or a relaxing afternoon tea – imagine dunking a soft, strawberry-infused cookie into a steaming mug! For a lighter, yet equally delightful option, serve them alongside a dollop of freshly whipped cream, perhaps with a sprinkle of finely chopped mint for a touch of freshness that brightens the entire plate. Don’t hesitate to crumble a few over a simple yogurt parfait for a texture and flavor boost, transforming a mundane breakfast or snack into something extraordinary. These cookies are also a fantastic addition to any dessert platter, standing out with their unique color and aroma.
Creative Twists: Delicious Variations
Feeling a little adventurous and want to put your own spin on these already incredible treats? These Strawberry Cookies are wonderfully versatile. Consider incorporating a handful of high-quality white chocolate chips into the dough for an added layer of sweetness and creaminess that complements the strawberries beautifully – it’s a flavor combination that’s truly out of this world. A tiny hint of lemon zest, just a quarter teaspoon, can brighten the strawberry flavor even more, adding a subtle sparkle and a touch of complexity to each bite. For a more festive touch, you could drizzle them with a simple glaze made from powdered sugar and a tiny bit of fresh strawberry juice, creating an even prettier presentation that’s perfect for special occasions. Or, for those truly special gatherings, layer them with lemon curd and fresh cream for a deconstructed trifle effect – truly spectacular and sure to impress your guests! You could even experiment with different extracts, like almond or rosewater, to add another dimension to the classic strawberry flavor. The possibilities are truly endless once you have this fantastic base recipe.
I am so incredibly excited for you to try this recipe. It’s more than just baking; it’s about creating moments, sharing happiness, and making memories that linger long after the last crumb is gone. I truly hope these Strawberry Cookies become a cherished staple in your home, bringing smiles to everyone who tastes them and becoming a go-to for celebrations big and small. Please, don’t keep your culinary triumphs a secret! Once you’ve baked your batch, I would absolutely love for you to share your experiences with me. Did you try a fun variation? What was your favorite part of the process? Did they disappear faster than you expected? Snap a photo, leave a comment, or tell me all about your baking adventure. Your feedback is invaluable, and it truly warms my heart to see my recipes come to life in your kitchens. Go ahead, preheat that oven, gather your ingredients, and let the magic happen! I can’t wait to hear all about your delicious journey and see the beautiful cookies you create.
Strawberry Cookies: Soft, Chewy, & Irresistibly Fruity!
A delightful burst of summer in every bite, these Strawberry Cookies offer a unique twist on a beloved classic. Blending comforting chewiness with the vibrant, fresh sweetness of ripe strawberries, they are perfect for any occasion.
Ingredients
-
½ cup granulated sugar
-
1 cup + 1 tbsp light brown sugar, packed
-
2 ½ cups all-purpose flour
-
½ teaspoon baking powder
-
4 tbsp canola or vegetable oil
-
½ teaspoon clear vanilla extract
-
⅔ cup diced fresh strawberries
-
1 teaspoon lemon juice
-
12 tbsp unsalted butter, room temperature
-
1 large egg, room temperature
-
1 large egg yolk, room temperature
-
1 teaspoon vanilla extract
Instructions
-
Step 1
Preheat oven to 350°F (175°C) and line two large baking sheets with parchment paper. In a medium bowl, whisk together 2 ½ cups all-purpose flour and ½ teaspoon baking powder until well combined. Set aside. -
Step 2
Wash, hull, and finely dice ⅔ cup fresh strawberries into pea-sized pieces. Pat them completely dry to prevent excess moisture in the dough. Set aside. -
Step 3
In a stand mixer with the paddle attachment, cream together 12 tbsp softened unsalted butter, 4 tbsp canola or vegetable oil, ½ cup granulated sugar, and 1 cup + 1 tbsp packed light brown sugar on medium speed for 3-5 minutes, until the mixture is light, fluffy, and visibly lighter in color. Scrape down the sides of the bowl as needed. -
Step 4
To the creamed mixture, add 1 large egg and 1 large egg yolk, one at a time, beating well after each addition. Mix in ½ teaspoon clear vanilla extract, 1 teaspoon vanilla extract, and 1 teaspoon lemon juice until just combined. Scrape down the bowl. -
Step 5
With the mixer on low speed, gradually add the whisked dry ingredients (flour and baking powder) to the wet mixture in two additions. Mix only until no dry streaks of flour remain after each addition. Be careful not to overmix, as this can lead to tough cookies. -
Step 6
Remove the bowl from the mixer. Using a rubber spatula, gently fold in the finely diced fresh strawberries until evenly distributed throughout the dough. Cover the bowl with plastic wrap and refrigerate the cookie dough for at least 30 minutes to 1 hour. Chilling helps prevent spreading. -
Step 7
Once the dough is chilled, scoop rounded balls of dough (about 1.5-2 tablespoons each) and place them about 2 inches apart on your prepared baking sheets. Bake one baking sheet at a time in the preheated oven for 10-12 minutes, or until the edges are lightly golden brown and the centers are just set but still look soft. -
Step 8
Remove baking sheets from the oven and let the cookies cool on the sheets for about 5 minutes. This allows them to firm up. Then, carefully transfer the cookies to a wire cooling rack to cool completely. -
Step 9
Once cooled, your Strawberry Cookies are ready to enjoy! Store leftover cookies in an airtight container at room temperature for up to 3-4 days. For extended freshness, they can be stored in the refrigerator for up to a week; bring to room temperature before serving for the best texture and flavor.
Important Information
Nutrition Facts (Per Serving)
It is important to consider this information as approximate and not to use it as definitive health advice.
Allergy Information
Please check ingredients for potential allergens and consult a health professional if in doubt.


Leave a Comment