

Pumpkin Pie — just the name evokes images of crisp autumn days, family gatherings, and the cozy warmth of the holiday season. For me, few desserts capture the essence of fall quite like a perfectly baked slice of this beloved classic. It’s not merely a dessert; it’s a cherished tradition, deeply rooted in American culinary history, especially synonymous with Thanksgiving feasts and harvest celebrations.
There’s a reason why this iconic treat holds such a special place in our hearts and on our tables. Is it the impossibly smooth, custardy filling that melts in your mouth? Or perhaps the intoxicating blend of cinnamon, nutmeg, ginger, and cloves that sings of comfort and home? I believe it’s the magical combination of these elements, wrapped in a flaky, golden crust, that makes Pumpkin Pie utterly irresistible. Each bite is a nostalgic journey, a perfect balance of sweet earthiness and aromatic spice that truly embodies the spirit of autumn. Join me as we uncover the secrets to baking this quintessential seasonal delight that everyone adores.

Ingredients:
-
For the Perfect Flaky Pie Crust:
- 2 ½ cups (300g) all-purpose flour: I always recommend using a good quality unbleached flour. It makes a difference!
- 1 teaspoon salt: Just a touch to enhance the flavor of the crust.
- 1 cup (226g) unsalted butter, very cold and cut into ½-inch cubes: Keeping your butter super cold is the absolute secret to a flaky crust. Don’t skip this!
- ½ cup (120ml) ice water, plus more if needed: Have extra on hand, but add sparingly. The colder, the better!
-
For the Silky Smooth Pumpkin Pie Filling:
- 1 (15-ounce / 425g) can pumpkin puree: Make sure it’s 100% pure pumpkin puree and not pumpkin pie filling. They are very different!
- 1 cup (200g) granulated sugar: For that perfect sweetness balance.
- ½ cup (100g) packed light brown sugar: Adds a lovely caramel note and depth of flavor that I absolutely adore in a good Pumpkin Pie.
- 2 large eggs, plus 1 large egg yolk: The extra yolk helps make the filling incredibly rich and prevents it from becoming too watery. Make sure they are at room temperature for better incorporation.
- 1 ½ teaspoons ground cinnamon: The quintessential spice for a classic Pumpkin Pie.
- ¾ teaspoon ground ginger: Adds a warm, zesty kick.
- ½ teaspoon ground nutmeg: Freshly grated nutmeg, if you have it, is a game-changer!
- ¼ teaspoon ground cloves: A little goes a long way to add a beautiful aromatic depth.
- ¼ teaspoon salt: Crucial for balancing the sweetness and enhancing all those wonderful spices.
- 1 ½ cups (360ml) heavy cream or evaporated milk: I often use evaporated milk for a more traditional, slightly lighter texture, but heavy cream makes it incredibly decadent. Both are excellent!
- 1 teaspoon vanilla extract: Pure vanilla extract is always my preference for that extra layer of warmth and aroma.
-
Essential Equipment You’ll Need:
- 9-inch pie plate
- Large mixing bowls
- Whisk and rubber spatula
- Rolling pin
- Parchment paper or aluminum foil
- Pie weights or dried beans/rice (for blind baking)
- Measuring cups and spoons
- Electric mixer (optional, but helpful for the crust)
The Journey to Your Best Pumpkin Pie Begins:
Preparing the Flaky Pie Crust:
Crafting your own pie crust for a Pumpkin Pie might sound intimidating, but I promise you, it’s incredibly rewarding and genuinely simple once you get the hang of it. The key to a truly outstanding Pumpkin Pie often starts with a homemade, buttery, flaky crust. It provides a delightful textural contrast to the smooth, creamy filling.
- Combine Dry Ingredients: In a large mixing bowl, whisk together the 2 ½ cups all-purpose flour and 1 teaspoon salt. Make sure it’s thoroughly combined. This initial step ensures an even distribution of salt throughout the crust.
- Cut in Cold Butter: Add the very cold, cubed unsalted butter to the flour mixture. Using a pastry blender, your fingertips, or a food processor, cut the butter into the flour until the mixture resembles coarse crumbs with some pea-sized pieces of butter still visible. This is absolutely critical: do not overwork the butter. Those small pieces of butter are what create the pockets of steam during baking, leading to that coveted flaky texture. I find using my fingertips works best as I can feel the consistency, but a food processor can do the job quickly if you pulse it carefully.
- Add Ice Water Gradually: Slowly drizzle in ½ cup of ice water, one tablespoon at a time, mixing gently after each addition. I usually use a rubber spatula or my hands for this. The dough should just come together when squeezed, but it shouldn’t be sticky or wet. You might not need all of the water, or you might need a tiny bit more – humidity plays a role. The goal is to add just enough water to bring the dough together.
- Form and Chill the Dough: Gather the dough into a cohesive ball, then flatten it into a disk about 1-inch thick. Wrap it tightly in plastic wrap. Now, comes the patience part: refrigerate the dough for at least 1 hour, or preferably 2 hours. This chilling period allows the gluten to relax, making the dough easier to roll out, and keeps the butter cold, which is essential for flakiness. I often make my pie crust the day before to save time.
- Roll Out the Dough: On a lightly floured surface, roll out the chilled dough into a 12-inch circle, about ⅛-inch thick. I like to start from the center and roll outwards, rotating the dough frequently to prevent sticking and ensure an even thickness. If the dough starts to get too warm and sticky, pop it back into the fridge for 10-15 minutes.
- Fit into Pie Plate: Carefully transfer the rolled-out dough to your 9-inch pie plate. You can do this by gently rolling the dough around your rolling pin and unrolling it over the plate. Gently ease the dough into the plate, ensuring it fits snugly without stretching, which can lead to shrinkage during baking. Trim any excess dough, leaving about a ½-inch overhang.
- Crimp the Edges: Fold the overhanging dough under itself to create a thick edge. Then, using your thumb and forefinger (or a fork), crimp the edges decoratively. This not only looks beautiful but also helps to contain the filling and prevent the crust from collapsing. Place the pie crust-lined plate back into the refrigerator for another 30 minutes. This second chill is super important for preventing shrinkage during blind baking.
- Preheat Oven and Prepare for Blind Baking: Preheat your oven to 400°F (200°C). While the oven is preheating, remove the chilled pie crust from the refrigerator. Line the inside of the chilled pie crust with parchment paper or aluminum foil, making sure it covers the edges to prevent burning. Fill the liner with pie weights, dried beans, or rice. These weights prevent the crust from bubbling up and shrinking.
- Blind Bake the Crust: Bake the crust for 15 minutes with the weights. This initial bake helps to set the crust. Carefully remove the pie weights and parchment paper/foil. Return the crust to the oven and bake for another 5-7 minutes, or until the bottom is light golden and looks dry. This step ensures a crispy bottom crust for your Pumpkin Pie, preventing sogginess from the wet filling. Let the blind-baked crust cool completely on a wire rack while you prepare the filling.
Crafting the Irresistible Pumpkin Pie Filling:
The heart of any great Pumpkin Pie is its filling – rich, smooth, and perfectly spiced. This section will guide you through creating a luscious filling that will impress everyone.
- Preheat Oven for Pie: Reduce the oven temperature to 375°F (190°C). This lower temperature is ideal for baking the custard-like filling gently, preventing cracks.
- Combine Sugars and Spices: In a large mixing bowl, whisk together the granulated sugar, light brown sugar, ground cinnamon, ground ginger, ground nutmeg, ground cloves, and salt. Whisking them together first helps to break up any clumps of brown sugar and ensures the spices are evenly distributed.
- Add Wet Ingredients: To the sugar and spice mixture, add the 15-ounce can of pumpkin puree, 2 large eggs, and 1 large egg yolk. Whisk these ingredients together until everything is well combined and the mixture is smooth. I really take my time here to ensure there are no lumps, especially from the brown sugar.
- Incorporate Cream and Vanilla: Gradually whisk in the 1 ½ cups of heavy cream (or evaporated milk) and 1 teaspoon of vanilla extract until the filling is perfectly smooth and has a consistent color. Avoid over-mixing, as this can incorporate too much air, which might lead to cracks in your finished Pumpkin Pie. Just mix until combined.
- Prepare for Baking: Place your cooled, blind-baked pie crust on a baking sheet. This makes it much easier to transfer the pie in and out of the oven, especially once it’s filled.
Baking Your Beautiful Pumpkin Pie:
Baking a Pumpkin Pie to perfection requires a careful hand and attention to detail. We want a beautifully set filling with no cracks, and a golden, unburnt crust.
- Pour the Filling: Carefully pour the pumpkin pie filling into the cooled, blind-baked pie crust. You might find it easiest to pour the filling directly into the crust once it’s already on the oven rack, to avoid any spills during transfer.
- Bake the Pie: Bake in the preheated 375°F (190°C) oven for 50-60 minutes. Baking times can vary slightly depending on your oven, so I always rely on visual cues.
- Monitor and Prevent Over-Browning: After about 25-30 minutes of baking, check the crust edges. If they are browning too quickly, loosely tent the edges with aluminum foil or use a pie crust shield. This is a common issue with baking any custard pie, and a simple shield can save your crust from burning.
- Check for Doneness: The Pumpkin Pie is done when the edges of the filling are set, but the center still has a slight, gentle wobble when you lightly jiggle the pie plate. A knife inserted about 1 inch from the crust should come out clean. Inserting a knife directly into the center can sometimes cause cracks, so I prefer the jiggle test or checking near the edge. Do not overbake, as this is the primary cause of cracks in the surface of your beautiful Pumpkin Pie.
- Cool Completely: Carefully remove the pie from the oven and transfer it to a wire rack. Allow the Pumpkin Pie to cool completely at room temperature for at least 2-3 hours. This cooling time is absolutely crucial for the filling to set properly and prevent it from collapsing. Patience is key here!
Serving Your Homemade Pumpkin Pie:
After all your hard work and patience, it’s time to enjoy the fruits of your labor! A well-chilled Pumpkin Pie tastes infinitely better, as the flavors meld and the texture becomes perfectly firm yet creamy.
- Chill Before Serving: Once the pie has cooled to room temperature, transfer it to the refrigerator and chill for at least 4 hours, or preferably overnight. Chilling allows the filling to fully firm up, making for clean slices and a truly delightful eating experience.
- Slice and Serve: When you’re ready to serve, use a sharp knife that has been run under hot water and wiped clean for each slice. This will give you beautifully neat pieces of your homemade Pumpkin Pie.
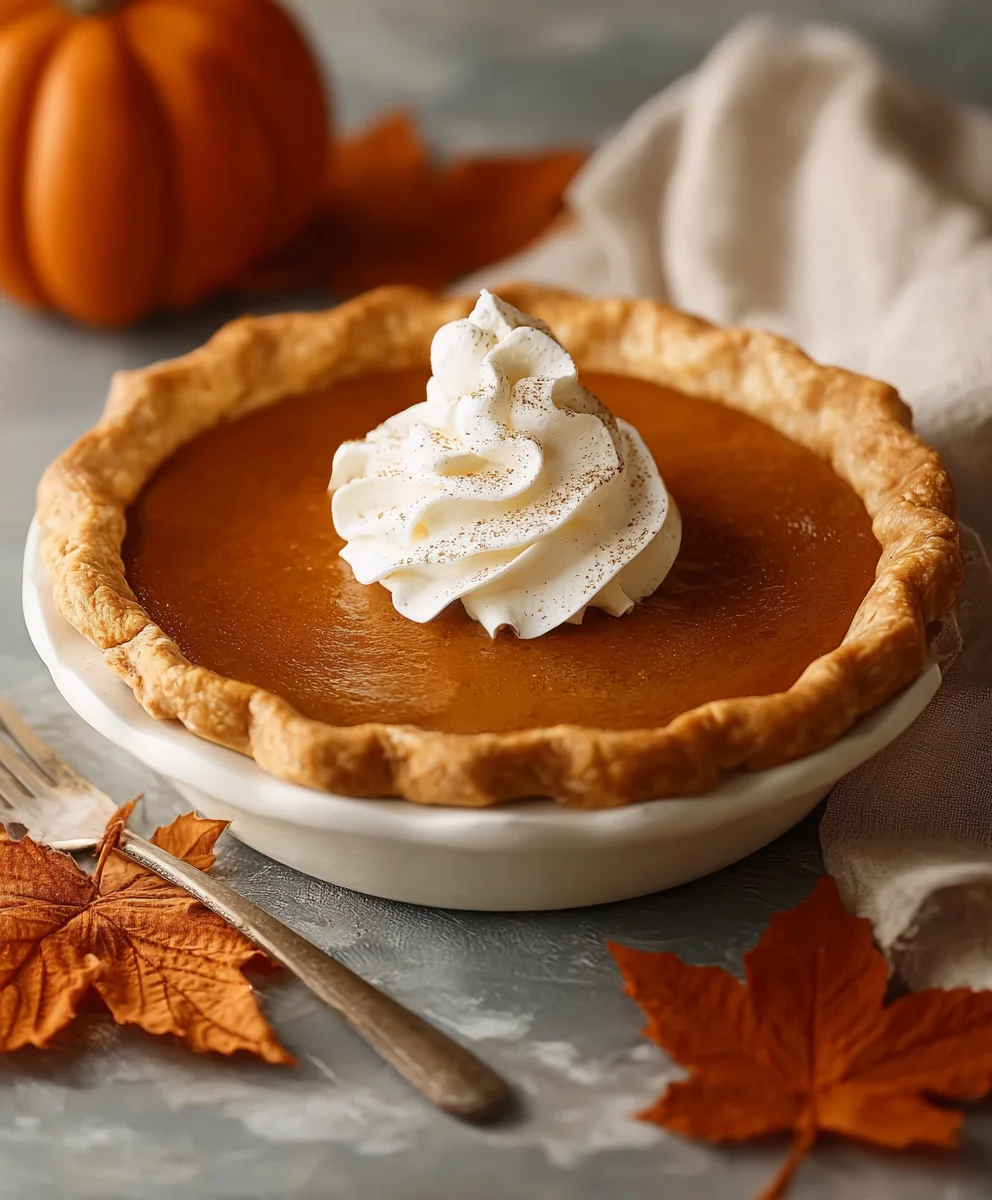
- Garnish and Enjoy: Serve your glorious Pumpkin Pie with a generous dollop of freshly whipped cream, a sprinkle of cinnamon, or even a scoop of vanilla bean ice cream. The creamy topping provides a wonderful contrast to the rich, spiced filling. This truly elevates the experience of enjoying a slice of homemade Pumpkin Pie.
- Storage: Any leftover Pumpkin Pie should be stored in an airtight container in the refrigerator for up to 3-4 days. While it’s best enjoyed fresh, I find that the flavors sometimes deepen overnight.
There you have it! A truly magnificent homemade Pumpkin Pie that will undoubtedly become a treasured recipe in your kitchen. This detailed approach ensures every step is covered, leading you to a perfectly baked, incredibly flavorful dessert. Happy baking, my friends!
Conclusion:
As we reach the sweet culmination of our culinary journey, I truly hope you’re feeling inspired and ready to bring this incredible recipe to life in your own kitchen. I’ve poured my heart into crafting what I believe is not just a dessert, but an experience – a truly memorable Pumpkin Pie that will undoubtedly earn a permanent spot in your recipe collection. This isn’t merely another pie; it’s a testament to the comforting power of home baking, a symphony of flavors that manages to be both familiar and utterly exceptional. From the moment the aroma fills your home to that first glorious bite, you’ll understand why I am so passionate about sharing this particular rendition.
What makes this recipe a must-try, you ask? It’s the impeccable balance we’ve achieved – a smooth, custard-like filling that’s rich without being overly dense, perfectly spiced to warm your soul, and encased in a buttery, flaky crust that shatters with every forkful. We’ve meticulously balanced the sweetness, allowing the natural, earthy notes of the pumpkin to shine through, complemented by a whisper of cinnamon, nutmeg, ginger, and just a hint of cloves. It’s the kind of pie that evokes cherished memories and creates new ones, making every gathering feel a little more special. Trust me when I say, once you taste this, you’ll find yourself craving its distinctive warmth and comfort again and again. It’s a recipe designed for success, even for those who might feel a little intimidated by pie making. I promise, the effort is minimal compared to the incredible reward you’ll savor.
Elevating Your Pumpkin Pie Experience:
While this pie is absolutely divine on its own, a blank canvas of autumnal delight, I always love to offer a few suggestions to take your dessert to the next level or to adapt it to your personal taste. For a classic presentation, a generous dollop of freshly whipped cream, perhaps infused with a hint of vanilla or a dash of maple syrup, is always a winner. You could also serve it alongside a scoop of premium vanilla bean ice cream, allowing the cold creaminess to contrast beautifully with the warm, spiced pie. For an extra touch of elegance and crunch, consider garnishing each slice with a sprinkle of toasted pecans or a delicate dusting of cinnamon. If you’re feeling adventurous, a drizzle of homemade caramel sauce or a spiced rum glaze could add an exciting new dimension to the flavor profile, making each bite an exploration of deliciousness. Don’t be afraid to experiment with your favorite toppings!
Fun Variations to Try:
Beyond the serving suggestions, this recipe is wonderfully versatile if you’re keen to experiment. Imagine a ginger snap crust replacing the traditional pastry for a spicy, crisp base. Or, for those who love a bit of texture, a pecan streusel topping, baked on during the last few minutes, would add a delightful crunch and nutty flavor. You could even bake this recipe into individual mini pies, perfect for portion control or for a charming dessert bar at your next get-together. For a truly decadent twist, consider folding a tablespoon of bourbon or spiced rum into the filling just before baking – it adds a sophisticated depth of flavor that is simply irresistible. Each variation offers a new way to enjoy the beloved flavors of this classic dessert, ensuring that it never gets old. I encourage you to think of this recipe not as a rigid set of rules, but as a fantastic foundation for your own culinary creativity.
So, what are you waiting for? Gather your ingredients, put on your favorite apron, and embark on this delightful baking adventure. I truly believe that the act of creating something delicious from scratch, especially a comforting dessert like this, is one of life’s simplest yet most profound joys. Don’t be shy – dive in! I am incredibly excited for you to experience the magic of this recipe. Once you’ve baked and tasted your glorious pie, I would absolutely love to hear about your experience. Please, share your thoughts in the comments section below, or even better, snap a photo and share it with your friends and family. Let me know what you loved most, any variations you tried, or how it became the star of your table. Your feedback and stories genuinely inspire me, and I can’t wait to celebrate your baking success. Happy baking, and enjoy every single slice of your homemade masterpiece!
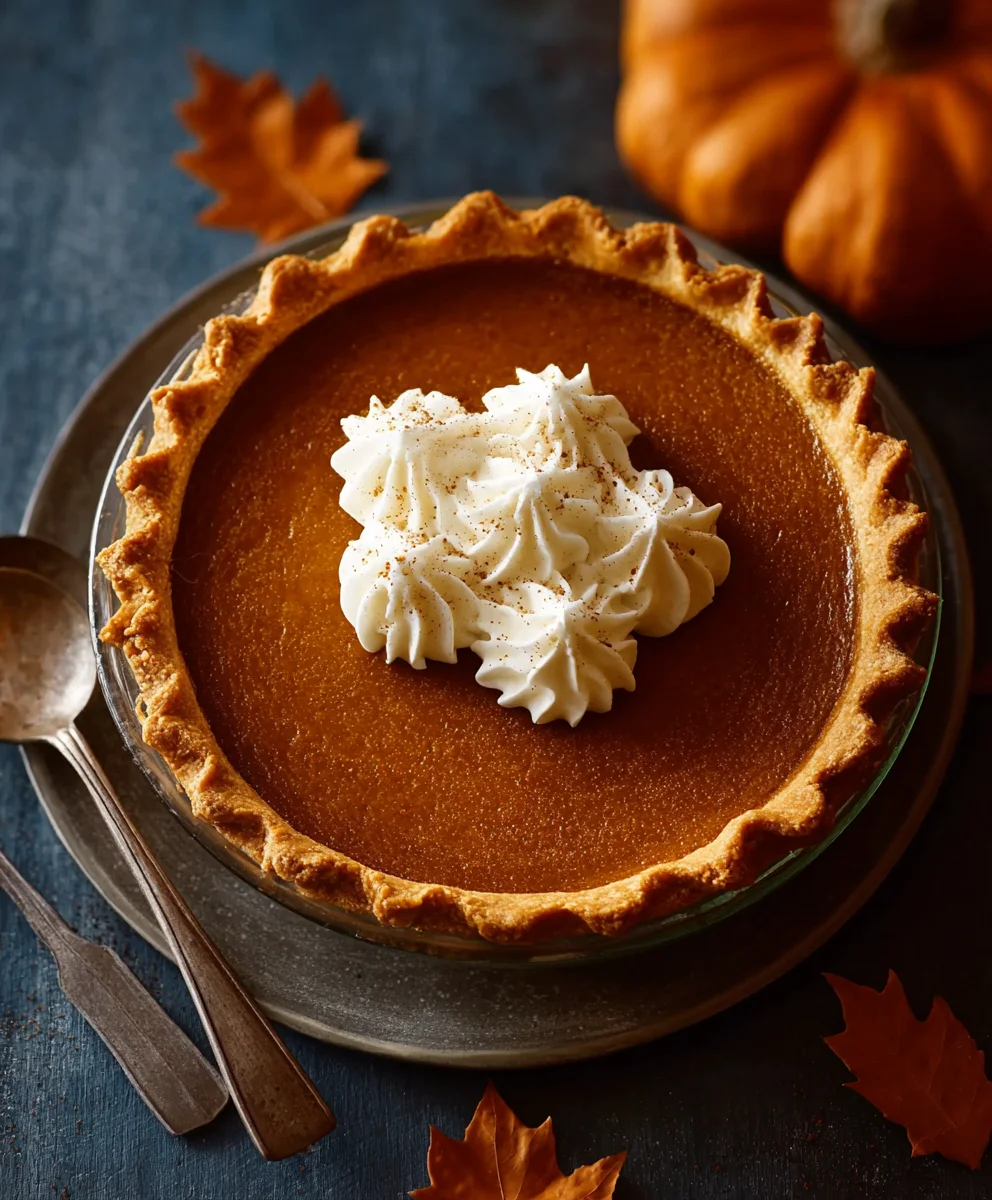
Perfect Pumpkin Pie: Your New Favorite Holiday Dessert!
Capture the essence of fall with this perfect pumpkin pie! Featuring a smooth, custardy filling bursting with warm spices in a flaky, golden crust, it’s a beloved classic for any holiday table.
Ingredients
-
1 ¼ cups all-purpose flour
-
½ tsp salt
-
1 tbsp sugar
-
½ cup (1 stick) unsalted butter, cold & cubed
-
3–4 tbsp ice water
-
1 (15 oz) can pumpkin purée
-
¾ cup packed brown sugar
-
2 large eggs + 1 egg yolk
-
1 cup evaporated milk
-
½ tsp salt
-
1 tsp ground cinnamon
-
½ tsp ground ginger
-
¼ tsp ground nutmeg
-
⅛ tsp ground cloves
Instructions
-
Step 1
Combine 1 ¼ cups flour, ½ tsp salt, and 1 tbsp sugar. Cut in ½ cup cold unsalted butter until pea-sized crumbs. Gradually add 3–4 tbsp ice water, mixing until dough forms. Form into a disk, wrap, and chill 1-2 hours. -
Step 2
Roll dough to a 12-inch circle. Fit into a 9-inch pie plate, trim excess, crimp edges, and chill 30 minutes. -
Step 3
Preheat oven to 400°F (200°C). Line crust with parchment/foil and fill with pie weights. Bake for 15 minutes. Remove weights and liner; bake for another 5-7 minutes until light golden. Let the crust cool completely. -
Step 4
Reduce oven temperature to 375°F (190°C). In a bowl, whisk together ¾ cup brown sugar, ½ tsp salt, 1 tsp cinnamon, ½ tsp ginger, ¼ tsp nutmeg, and ⅛ tsp cloves. Add 1 (15 oz) can pumpkin purée, 2 large eggs, and 1 egg yolk; whisk until smooth. Gradually whisk in 1 cup evaporated milk until combined. -
Step 5
Pour filling into the cooled crust on a baking sheet. Bake for 50-60 minutes at 375°F (190°C), tenting crust edges with foil if browning too quickly. Pie is done when edges are set and the center has a slight wobble. Do not overbake. -
Step 6
Cool completely on a wire rack for 2-3 hours, then chill in the refrigerator for at least 4 hours (preferably overnight). -
Step 7
Slice with a sharp, hot knife and serve with whipped cream. Store leftovers refrigerated for 3-4 days.
Important Information
Nutrition Facts (Per Serving)
It is important to consider this information as approximate and not to use it as definitive health advice.
Allergy Information
Please check ingredients for potential allergens and consult a health professional if in doubt.


Leave a Comment