

Rudolph Cheese Ball Recipe – what could be more delightful for your holiday gathering? As the festive season approaches, we often seek out dishes that not only tantalize the taste buds but also bring a genuine smile to everyone’s face. This charming appetizer is precisely that—a showstopper that combines incredibly creamy, savory flavors with an undeniable dose of Christmas cheer. The humble cheese ball has long been a beloved staple at parties, a testament to its irresistible combination of rich textures and versatile flavors, often prepared ahead of time to ease holiday stress.
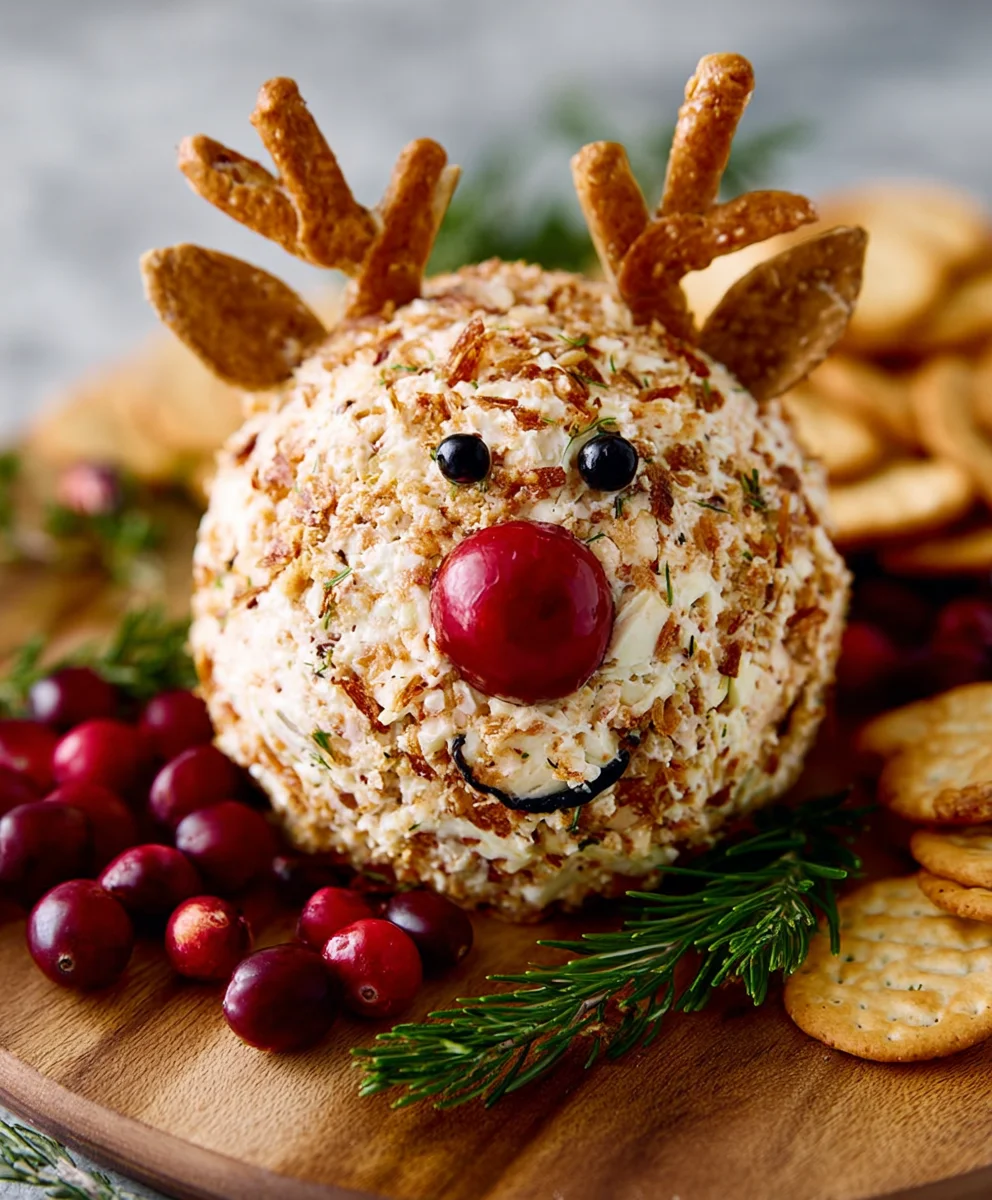
This particular Rudolph Cheese Ball Recipe elevates a classic to an art form, transforming a simple appetizer into a whimsical, edible centerpiece.
People adore this dish not just for its incredible taste and smooth, spreadable texture, which pairs perfectly with crackers or crudités, but also for its heartwarming and utterly adorable visual appeal. It’s the perfect blend of nostalgic comfort food and festive fun, making it an absolute must-have for your upcoming celebrations. I’m excited to share how you can easily create this joyful treat!

Ingredients:
- For the Cheese Ball Base:
- 16 ounces (two 8-ounce blocks) cream cheese, softened to room temperature
- 2 cups sharp cheddar cheese, freshly shredded (I highly recommend shredding your own for the best texture!)
- 1/2 cup finely chopped green onions or chives, divided (some for the mix, some for garnish)
- 1 tablespoon Worcestershire sauce
- 1 teaspoon garlic powder
- 1/2 teaspoon onion powder
- 1/4 teaspoon freshly ground black pepper
- Pinch of cayenne pepper (optional, for a subtle kick!)
- For Rudolph’s Features and Garnish:
- Approximately 20-30 small pretzel twists or mini pretzel rods (for antlers – you’ll need two sturdy ones for the main antlers and extra for “branches” if desired)
- 1 large red bell pepper, cut into a circle for Rudolph’s nose, or one large cherry tomato
- 2 large black olives, sliced in half, or two small pimento-stuffed green olives (for eyes)
- Fresh parsley or a sprinkle of additional chives, finely chopped (for garnish around the base)
- For Serving:
- An assortment of crackers, baguette slices, pita chips, or vegetable sticks
Preparing the Cheese Ball Base
-
Softening the Cream Cheese:
First things first, let’s get our cream cheese perfectly softened. This is a crucial step for achieving that smooth, lump-free cheese ball texture we all love. Take your two 8-ounce blocks of cream cheese out of the refrigerator at least an hour before you plan to start mixing. If you’re in a hurry (we’ve all been there!), you can carefully unwrap the cream cheese and place it in a microwave-safe bowl. Microwave on low power (about 50%) for 15-20 second intervals, stirring well after each, until it’s pliable but not melted. You want it soft enough to mix easily, not runny.
-
Shredding the Cheddar:
While the cream cheese is softening, tackle the cheddar cheese. While pre-shredded cheese is convenient, for this Rudolph Cheese Ball Recipe, I strongly encourage you to shred your own block of sharp cheddar. Pre-shredded cheeses often contain anti-caking agents that can slightly alter the texture and melt of your cheese ball, making it less creamy. Using a box grater or a food processor with a shredding attachment, finely shred your 2 cups of sharp cheddar. This finer shred will incorporate more smoothly into the cream cheese mixture.
-
Combining the Cheeses and Seasonings:
Now for the fun part – mixing! In a large mixing bowl, combine your softened cream cheese, freshly shredded sharp cheddar, and about half of your finely chopped green onions or chives (reserving the rest for garnish). Add in the Worcestershire sauce, garlic powder, onion powder, freshly ground black pepper, and the optional pinch of cayenne pepper. The Worcestershire sauce adds a wonderful depth of savory flavor, while the garlic and onion powders ensure every bite is perfectly seasoned. Don’t skip these seasonings; they truly elevate the flavor profile of our Rudolph Cheese Ball!
-
Mixing for Perfection:
Using a sturdy spoon, spatula, or even a stand mixer fitted with the paddle attachment, mix all the ingredients together until they are thoroughly combined and smooth. If using a stand mixer, start on low speed to prevent a cloud of cheese and seasoning from escaping, then increase to medium-low. Scrape down the sides of the bowl frequently to ensure everything is incorporated evenly. Continue mixing until there are no streaks of cream cheese or unmixed seasonings, and the mixture is uniform in color and texture. This might take 3-5 minutes, ensuring a perfectly homogenous and spreadable cheese ball.
Shaping and Chilling Our Rudolph Cheese Ball
-
Forming Rudolph’s Head:
Once your cheese mixture is perfectly blended, it’s time to sculpt our festive friend! Lay out a large piece of plastic wrap or parchment paper on your clean work surface. Transfer the entire cheese mixture onto the center of the plastic wrap. Gather the edges of the plastic wrap and begin to gently press and shape the mixture into an oval or teardrop shape. Think of it as a slightly elongated ball, wider at the base where Rudolph’s head would be, and tapering slightly towards the top where the antlers will go. The key is to create a smooth, compact form that will hold its shape beautifully. Use the plastic wrap to help you compress and smooth the surface. This creates the basic foundation for our Rudolph Cheese Ball.
-
The Importance of Chilling:
This next step is absolutely non-negotiable for a successful Rudolph Cheese Ball. Once you’ve achieved your desired shape, wrap the cheese ball tightly in the plastic wrap, ensuring it’s completely sealed. Place it in the refrigerator for a minimum of 2-3 hours, or ideally, overnight. Chilling is essential for two main reasons: it allows the flavors to meld and deepen, creating a more delicious taste, and it firms up the cheese ball so it will hold its shape perfectly when you decorate it and later serve it. If it’s not firm enough, your decorations might sink or slide off. Patience here will be rewarded!
Decorating Our Festive Rudolph
-
Preparing the Decor:
When your cheese ball has thoroughly chilled and is firm to the touch, it’s time for the creative part! Gather all your Rudolph features. If using a red bell pepper for the nose, carefully slice a round, slightly thick piece (about 1/4 inch) from the side of the pepper. For the eyes, slice your black olives in half lengthwise. Have your pretzels ready. Take your cheese ball out of the refrigerator and carefully unwrap it. Place it on your chosen serving platter.
-
Attaching Rudolph’s Antlers:
Begin by gently inserting two sturdy pretzel twists or mini pretzel rods into the top, narrower end of the cheese ball, positioned to look like antlers. Angle them slightly outwards. Don’t push them too deep, just enough so they are secure. If you want more elaborate antlers, you can carefully break smaller pretzel pieces and insert them into the main pretzel rods or directly into the cheese ball for branches. Be gentle to avoid cracking the cheese ball. This is where Rudolph truly starts to come to life!
-
Adding Rudolph’s Iconic Nose:
Next, we add the star of the show – Rudolph’s bright red nose! Take your red bell pepper circle or cherry tomato and gently press it onto the front, slightly lower-middle portion of the cheese ball. If using a bell pepper, you might need to trim the back a little to ensure it sits flush against the cheese ball. If it feels a bit unstable, a tiny dab of cream cheese (from a fresh block, not mixed) can act as edible glue on the back of the pepper to help it adhere. This vibrant red pop is instantly recognizable and makes our Rudolph Cheese Ball irresistible!
-
Placing the Eyes:
Now for Rudolph’s expressive eyes. Carefully position the halved black olives just above and slightly to the sides of the red nose. Gently press them into the cheese ball to secure them. You can play around with the exact placement to give your Rudolph a friendly, slightly surprised, or mischievous look! The black olives provide excellent contrast against the cheese.
-
Garnishing the Base:
To finish our festive presentation, take the remaining finely chopped green onions, chives, or fresh parsley and sprinkle it generously around the base of the Rudolph Cheese Ball on the platter. This adds a lovely touch of color, mimicking grass or snowy ground, and provides an extra layer of flavor for those who love fresh herbs. It also helps to visually anchor our cheese ball on the platter. This final touch truly makes the presentation pop!
Serving Suggestions and Storage Tips
-
Presenting Your Masterpiece:
Your beautiful Rudolph Cheese Ball is now ready to steal the show! Arrange an assortment of your favorite dippers around the platter. Think crisp crackers, crusty baguette slices (toasted or fresh), sturdy pita chips, or a colorful array of vegetable sticks like carrot sticks, celery sticks, and bell pepper strips. The variety ensures there’s something for everyone and adds to the festive spread. A well-presented Rudolph Cheese Ball is not just a dish; it’s a centerpiece!
-
Encouraging Guests to Dive In:
Guests can simply use a small knife or spreader to take a portion of the cheese ball and then spread it onto their chosen dipper. Remind them gently not to pull too hard on the antlers as they are decorative and delicious but not designed for heavy lifting! This Rudolph Cheese Ball Recipe is perfect for holiday gatherings, potlucks, or any festive occasion where you want to add a touch of whimsy and flavor.
-
Storing Leftovers:
Should you be lucky enough to have any Rudolph Cheese Ball left over (which is rare, trust me!), gently remove the pretzel antlers and any other perishable decorations like the bell pepper nose, as they might become soggy or lose their crispness. Wrap the remaining cheese ball tightly in fresh plastic wrap, ensuring no air can get to it, and store it in an airtight container in the refrigerator. It will stay fresh and delicious for up to 3-5 days. When ready to serve again, simply re-decorate with fresh pretzels and nose. Proper storage ensures you can enjoy this delightful treat for a few more days!

Conclusion:
And there you have it, my friends! We’ve reached the end of our festive culinary journey, but the real fun is just beginning. This isn’t just another appetizer recipe; it’s a guaranteed showstopper, a conversation starter, and quite frankly, the easiest way to inject a massive dose of holiday cheer into any gathering. I truly believe this
Rudolph Cheese Ball Recipe is an absolute must-try for so many reasons. It’s incredibly simple to assemble, requiring no baking and minimal fuss, yet it delivers maximum impact both visually and gastronomically. Just imagine the smiles when your guests see that adorable, edible Rudolph gracing your snack table! It’s creamy, savory, and perfectly balanced, making it universally appealing – from the pickiest eaters to the most seasoned foodies. This isn’t just food; it’s an experience, a delightful moment of shared joy that will undoubtedly become a cherished part of your holiday traditions for years to come.
One of the beautiful things about this recipe is its incredible versatility, not only in terms of flavor but also in how you choose to present and enjoy it. When it comes to serving, you have a plethora of options to truly make this Rudolph shine. I highly recommend offering a diverse platter of dippers. Think beyond basic crackers! A variety of crackers, from buttery Ritz to hearty whole-grain options, or even artisanal pita crisps, each offering a unique textural contrast, will be a huge hit. For a lighter, healthier option, crisp vegetable sticks like crunchy carrot and celery sticks, vibrant bell pepper strips, or refreshing cucumber slices are fantastic. Apple and pear slices also provide a wonderful sweet and tangy counterpoint to the rich, savory cheese ball, creating an unexpected but delightful flavor pairing that I absolutely adore. And for a more substantial bite, thinly sliced and lightly toasted baguette rounds are simply divine. Don’t be afraid to mix and match; the more variety, the better the dipping experience for everyone!
Elevate Your Rudolph: Creative Variations!
But wait, there’s more! The magic of this recipe extends to its adaptability. While the base recipe is perfect as is, I always encourage you to put your own spin on things. Want a little kick? Try adding a pinch of cayenne pepper or finely diced pickled jalapeños to the cheese mixture for a subtle heat that awakens the palate. For an extra layer of gourmet flavor, consider incorporating a tablespoon of finely chopped fresh chives or dill into the mix; their aromatic notes will truly sing. If you’re a garlic lover like me, a touch more garlic powder or even a teaspoon of roasted garlic paste will deepen the savory profile beautifully. And for a slightly different texture, folding in a quarter cup of finely chopped pecans or walnuts adds a delightful crunch, either mixed throughout the cheese or used as an additional textural coating around the outside. You could even get creative with Rudolph’s features – perhaps a cherry tomato for a super vibrant nose, or sprigs of fresh rosemary for more natural-looking antlers. The possibilities are truly endless, and each variation simply enhances the joy of creating and sharing this festive treat.
Make It Your Own and Share the Joy!
So, what are you waiting for? Take this recipe, gather your ingredients, and get ready to create some holiday magic. I promise you, this isn’t just about making a cheese ball; it’s about crafting memories, sparking laughter, and bringing smiles to the faces of everyone you share it with. It’s remarkably forgiving, so even if you’re new to the kitchen, you’ll find it incredibly easy and rewarding. Once you’ve whipped up your own adorable Rudolph, I would absolutely love to hear about your experience! Did you stick to the classic? Did you venture into new flavor territories with your own ingenious variations? What did your guests think? Please, don’t be shy! Share your photos, your tips, and your stories with me. You can tell me all about it in the comments below or even share your creations on social media. I am genuinely excited to see all the wonderful ways you bring this festive appetizer to life. Happy holidays, happy cooking, and most importantly, happy eating!
Rudolph Cheese Ball Recipe
A whimsical and delicious Rudolph-themed cheese ball, perfect for holiday gatherings. Combines creamy, savory flavors with festive cheer.
Ingredients
-
28 oz cream cheese, softened
-
3 1/2 cups sharp cheddar cheese, shredded
-
1 oz ranch seasoning mix
-
1 1/2 cups crushed pecans
-
2 black olives
-
1 cherry tomato
-
2 original sized pretzels
Instructions
-
Step 1
Soften cream cheese to room temperature and shred sharp cheddar cheese. -
Step 2
In a large mixing bowl, combine the softened cream cheese, shredded cheddar cheese, and 1 oz ranch seasoning mix. Mix until smooth and well combined. -
Step 3
Spread 1 1/2 cups crushed pecans on a piece of parchment paper. Roll the cheese mixture in the pecans to coat completely. -
Step 4
Shape the pecan-coated cheese mixture into an oval or teardrop form. Wrap it tightly in plastic wrap and chill in the refrigerator for at least 2-3 hours, or ideally overnight, until firm. -
Step 5
Once thoroughly chilled, unwrap the cheese ball and place it on your chosen serving platter. Gently insert the 2 original sized pretzels into the top, narrower end of the cheese ball for Rudolph’s antlers. -
Step 6
Press the cherry tomato onto the front, slightly lower-middle portion of the cheese ball for Rudolph’s bright red nose. Position the 2 halved black olives just above the nose for the eyes, gently pressing them to secure. -
Step 7
Serve your Rudolph Cheese Ball immediately with an assortment of crackers, baguette slices, or vegetable sticks. For storing leftovers, remove perishable decorations, wrap the remaining cheese ball tightly, and refrigerate for up to 3-5 days; re-decorate before serving again.
Important Information
Nutrition Facts (Per Serving)
It is important to consider this information as approximate and not to use it as definitive health advice.
Allergy Information
Please check ingredients for potential allergens and consult a health professional if in doubt.
Leave a Comment