

Italian Sub Squares are a revelation for anyone who adores the classic deli sandwich but craves a more convenient, party-friendly format. I remember the first time I encountered this brilliant twist; it was at a lively family gathering, and the platter of vibrant, layered squares disappeared in minutes. The traditional Italian sub, a culinary icon born from resourceful Italian-American communities adapting their hearty flavors to the American deli scene, has always been a symbol of robust taste and shared enjoyment. These squares take that beloved essence—the perfect symphony of cured meats, sharp cheeses, crisp vegetables, and zesty dressing nestled within soft, delicious bread—and transform it into an incredibly accessible and visually appealing dish.
People absolutely adore this dish because it captures everything wonderful about a submarine sandwich without the potential mess. The delightful combination of savory, salty meats, the tangy bite of pickled peppers, the creamy richness of provolone, and the fresh crunch of lettuce all harmonize beautifully within each bite-sized square. It’s perfect for meal prepping, a casual lunch, or as the undisputed star of any potluck or game-day spread. Preparing these Italian Sub Squares offers a unique blend of convenience and gourmet satisfaction, making it a truly irresistible option for any occasion where delicious, easy-to-eat food is a must.

Ingredients:
-
For the Homemade Dough:
- All-Purpose Flour: 4 cups, plus extra for dusting. I find that using a good quality unbleached flour makes all the difference in the final texture of our Italian Sub Squares, providing a tender yet sturdy base.
- Active Dry Yeast: 2 ¼ teaspoons (one standard packet). Always double-check the expiration date on your yeast; fresh yeast is key for a good rise!
- Warm Water: 1 ½ cups (between 105-115°F / 40-46°C). This specific temperature range is crucial for activating the yeast properly. Water that’s too hot can kill the yeast, while water that’s too cold might not activate it sufficiently, impacting the rise of your delicious Italian Sub Squares.
- Granulated Sugar: 1 tablespoon. Just a touch to help “feed” our yeast and contribute to that beautiful golden-brown crust we all love. It also adds a subtle hint of sweetness to the dough itself.
- Olive Oil: 3 tablespoons, plus more for greasing the bowl and baking sheet. I always reach for extra virgin olive oil here for its rich, fruity flavor which permeates the dough, adding another layer of authenticity to our Italian Sub Squares.
- Salt: 1 ½ teaspoons. Don’t skimp on the salt; it’s a fundamental flavor enhancer for the dough, balancing the sweetness and enriching the overall taste profile. Without it, the dough would taste bland.
-
For the Irresistible Italian Sub Squares Filling:
- Provolone Cheese: 8 ounces, thinly sliced. I love the sharp, nutty, and slightly pungent flavor that provolone brings to these squares; it melts wonderfully and creates a delightful gooey texture.
- Genoa Salami: 6 ounces, thinly sliced. Look for a good quality salami from your deli counter; its rich, savory, and slightly garlicky notes are a star in any authentic Italian sub, and these Italian Sub Squares are no exception.
- Capicola (Hot or Mild): 6 ounces, thinly sliced. Whether you prefer the fiery kick of hot capicola or the milder, rich pork flavor of its mild counterpart, this cured meat adds a fantastic layer of complexity and texture.
- Pepperoni: 4 ounces, thinly sliced. A classic! Its familiar slightly spicy and smoky flavor is a beloved addition that instantly says “Italian.”
- Deli Ham: 4 ounces, thinly sliced. This provides a nice, mild, and tender base layer that complements the bolder flavors of the other cured meats without overpowering them.
- Red Onion: ½ medium, thinly sliced. For a bit of pungent crunch and a vibrant color, red onion is indispensable. Its sharp bite mellows beautifully when baked.
- Banana Peppers: ½ cup, sliced (from a jar). Their tangy sweetness and mild heat are a must for me in these Italian Sub Squares. They provide that signature pickled kick that brightens the whole dish.
- Roasted Red Peppers: ½ cup, drained and sliced. These add a sweet, smoky depth and a wonderful tender texture that contrasts nicely with the other fillings.
- Fresh Spinach or Arugula: 2 cups. For a fresh, peppery bite and a lovely pop of color and freshness. Arugula offers a more pungent, spicy note, while spinach is milder. Choose what you love!
- Dried Oregano: 1 teaspoon. Essential for that classic Italian herb aroma and earthy flavor that ties all the components of our Italian Sub Squares together.
- Red Pepper Flakes: ½ teaspoon (optional, for a kick). If you like a little extra warmth and spice, these are a fantastic addition that elevates the overall flavor profile. I always add them!
-
For the Zesty Glaze and Toppings:
- Egg: 1 large, beaten (for egg wash). This simple wash gives our Italian Sub Squares a beautiful, golden-brown, shiny crust, making them look as delicious as they taste.
- Sesame Seeds: 1 tablespoon (optional, for topping). Adds a lovely texture, a subtle nutty flavor, and that classic sub roll aesthetic to the top of our squares.
- Grated Parmesan Cheese: 2 tablespoons (optional, for topping). For an extra savory, salty, and umami kick right on top of our already flavorful Italian Sub Squares. It creates a delicious, slightly crispy crust.
- Red Wine Vinegar: 2 tablespoons. The tangy backbone of our glaze, providing a crucial acidic counterpoint to the rich, savory filling.
- Olive Oil: 2 tablespoons. Helps to emulsify the glaze, adding richness and a silky texture while complementing the flavors of the filling.
- Garlic Powder: ½ teaspoon. Because garlic truly makes everything better! It infuses the glaze with a gentle, aromatic warmth without the raw bite of fresh garlic.
- Dried Italian Herbs: ½ teaspoon. A delightful blend of basil, oregano, rosemary, and thyme that brings a harmonious and complex herbal note to the glaze, echoing the flavors within the sub.
- Salt and Freshly Ground Black Pepper: To taste, for the glaze. These seasonings are vital for brightening and balancing the flavors of the glaze, ensuring it perfectly complements our Italian Sub Squares.
Preparing the Dough for Your Italian Sub Squares
- Activate the Yeast: In a large mixing bowl, I like to combine the warm water (remember, that 105-115°F range is perfect – too hot will kill the yeast, too cold won’t activate it), granulated sugar, and active dry yeast. Give it a gentle stir with a spoon, just enough to mix them, and then let it sit undisturbed for about 5-10 minutes. You’ll know it’s alive and well when it gets delightfully foamy and bubbly on top – that’s the yeast waking up and telling us it’s ready to work its magic for our Italian Sub Squares! If you don’t see any foam or bubbles, your yeast might be old, or your water temperature was off, and it’s best to start over with fresh yeast and properly warmed water. This initial activation is a crucial step for a light and airy dough.
- Mix the Dough: Once your yeast is visibly active and bubbly, I pour in the 3 tablespoons of olive oil and add the salt directly into the bowl. Gradually, I start adding the all-purpose flour, about 1 cup at a time, mixing with a sturdy wooden spoon or, ideally, using a stand mixer fitted with a dough hook on low speed. As the dough comes together, it will start to form a shaggy, somewhat sticky ball. Keep adding flour until the dough pulls away from the sides of the bowl cleanly and forms a somewhat sticky, but manageable, ball. For me, this usually takes about 3 ½ to 4 cups of flour, but humidity levels, the specific brand of flour, and even atmospheric pressure can affect the exact amount needed, so trust your judgment and the dough’s texture here. It’s better to err on the side of slightly sticky than too dry.
- Knead to Perfection: Turn the dough out onto a lightly floured surface. Now comes the fun part – kneading! I knead the dough by hand for 8-10 minutes, using a push-fold-turn motion, or until it’s smooth, elastic, and springs back slowly when you gently poke it with your finger. If you’re using a stand mixer, let it do the work for about 6-8 minutes on medium-low speed. The goal here is to develop the gluten, which is what gives our “Italian Sub Squares” their wonderful structure and characteristic chewiness. Don’t be afraid to add a very small amount of extra flour if it’s excessively sticky and clinging to your hands or the counter, but resist the urge to add too much, or your dough will become tough and dense. A well-kneaded dough is the foundation of a truly great baked good.
- First Rise: Lightly grease a clean large bowl with a little olive oil. Place the kneaded dough ball into the bowl, turning it once to coat it all over with the oil. This crucial step prevents a dry crust from forming on your dough as it rises. Cover the bowl tightly with plastic wrap or a clean, damp kitchen towel. Now, find a warm, draft-free spot in your kitchen and let the dough rise for 1 to 1 ½ hours, or until it has visibly doubled in size. A slightly warm oven (turned off, of course!) with the light on can be a great place for this if your kitchen is cool. This slow, patient rise is vital as it builds flavor, texture, and airiness into our dough, making for truly exceptional Italian Sub Squares. Don’t rush this step!
- Prepare for Shaping: Once the dough has proudly doubled in size, gently punch it down with your fist to release the accumulated air. This step is incredibly satisfying and prepares the dough for the next stage. Turn the dough out onto a lightly floured surface. At this point, I like to give it a quick, gentle knead for about 30 seconds, just enough to work out any remaining large air bubbles and create a uniform texture. Then, I divide the dough in half. This perfectly prepares it for shaping into the base and top layer of our delicious Italian Sub Squares.
Assembling the Hearty Italian Sub Squares Filling
- Preheat and Prep the Pan: While the dough is briefly resting and you’re getting ready to roll it out, I preheat my oven to 375°F (190°C). Then, I generously grease a standard 9×13-inch baking dish with olive oil or line it completely with parchment paper for incredibly easy cleanup later. If you’re using parchment, make sure it extends up the sides a bit, creating “handles” to lift the baked squares out effortlessly. This will be the cozy home for our magnificent Italian Sub Squares.
- Roll Out the First Dough Layer: On a lightly floured surface, I take one half of the dough and roll it out into a rectangle that is roughly 10×14 inches, or slightly larger than the dimensions of my 9×13-inch baking dish. The ideal thickness should be about ¼ inch. Carefully transfer this first, bottom layer of dough to the prepared baking dish. Gently press it into the bottom and slightly up the sides, creating a sturdy vessel for all our fillings. Don’t worry if it’s not perfectly even or if it shrinks back a little; you can adjust and gently stretch it into place. This forms the essential, flavorful foundation for our Italian Sub Squares.
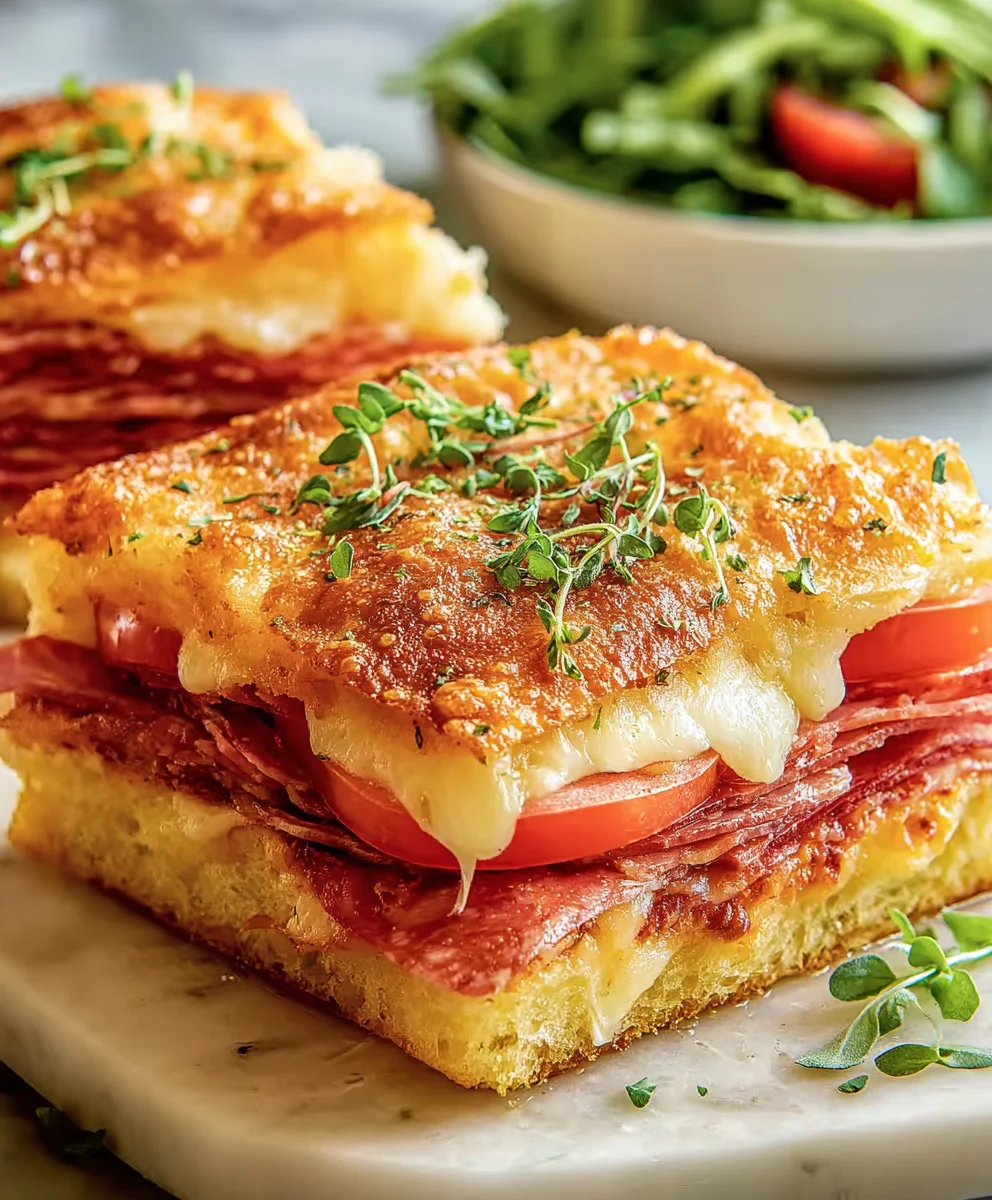
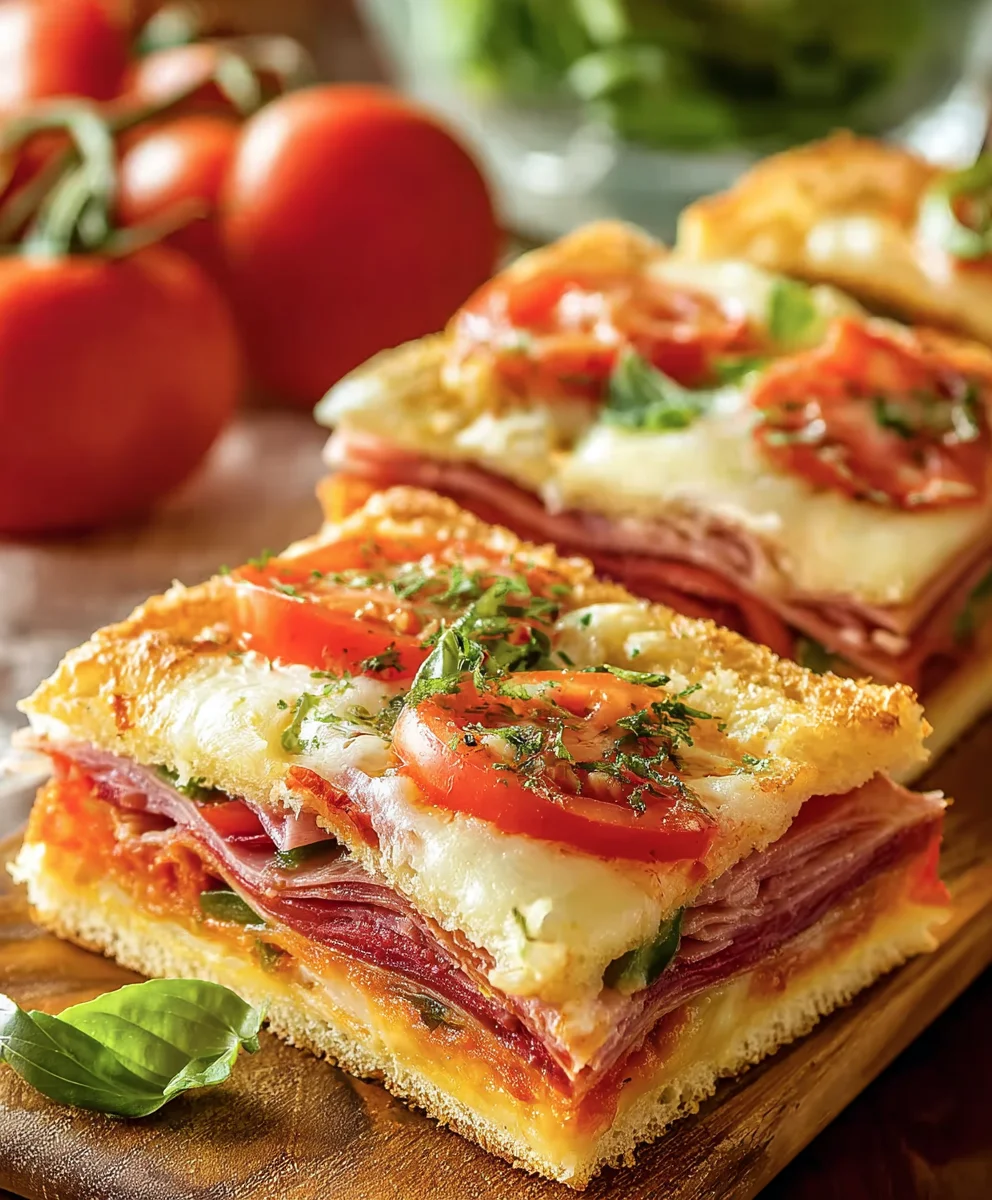
- Layer the Meats and Cheese: Now for the good stuff – the building of the incredible flavors! I start by arranging half of the provolone cheese slices evenly over the bottom layer of dough. This creates a delightful cheesy base. Then, I meticulously layer on all of the delicious deli meats – the Genoa salami, capicola, pepperoni, and deli ham. I like to spread them out in an overlapping fashion so every single bite of our Italian Sub Squares gets a fantastic mix of these savory flavors and textures. This hearty meat layer is what truly defines and elevates our “Italian Sub Squares.”
- Add the Veggies and Herbs: Over the glorious meat layer, I evenly sprinkle the thinly sliced red onion, the tangy banana peppers, and the sweet, smoky roasted red peppers. These vibrant additions provide a wonderful tangy, sweet, and pungent counterpoint to the richness of the cured meats. Then, I evenly scatter the dried oregano, ensuring its earthy aroma is distributed throughout. If I’m feeling brave (which I usually am!), I add the red pepper flakes for that extra kick. Finally, I lay down a generous, fresh layer of spinach or arugula. This adds a fantastic burst of freshness, a lovely peppery bite (especially with arugula), and a pop of beautiful green color that brightens the whole dish.
- Top with More Cheese: To perfectly bind everything together and add another layer of creamy, melt-in-your-mouth goodness, I top the vegetables and herbs with the remaining half of the provolone cheese slices. This final cheese layer is crucial; it will melt beautifully during baking, creating a delicious, savory “glue” that holds all the amazing components of our Italian Sub Squares together, ensuring every bite is cohesive and utterly satisfying.
Layering and Baking Your Flavorful Italian Sub Squares
- Top with Second Dough Layer: Take the second half of your prepared dough and roll it out into another rectangle, similar in size to the first (approximately 10×14 inches and about ¼ inch thick). Carefully drape this second, top dough layer over the abundant filling in the baking dish. Gently, but firmly, pinch and seal the edges of the top dough layer to the bottom dough layer all around the perimeter of the dish. This creates a secure “envelope” for our Italian Sub Squares, ensuring all the delicious filling stays perfectly contained inside during baking. For an extra decorative touch and added sealing power, you can even crimp the edges with the tines of a fork.
- Prepare for Baking: In a small bowl, whisk the egg with a tablespoon of water to create a simple yet effective egg wash. Using a pastry brush, generously brush the entire top surface of the dough with this egg wash. This magical coating is what will give our Italian Sub Squares a beautiful, glossy, golden-brown crust, making them look incredibly appealing. If you’re using them, now is the perfect time to sprinkle the sesame seeds and grated Parmesan cheese evenly over the top for an extra layer of savory flavor and delightful texture. I find the sesame seeds lend it that classic bakery-style sub roll look, and the Parmesan adds a salty, umami kick that is just divine and crisps up wonderfully.
- Cut and Vent: Using a sharp knife or a pizza cutter, gently score the top dough layer into squares or rectangles. I usually aim for 12-16 squares, depending on how large I want each individual serving of my Italian Sub Squares to be. It’s important not to cut all the way through the dough at this stage, just enough to make a clear demarcation for easy slicing after baking. Also, be sure to poke a few small holes in the top dough layer with a fork or the tip of a sharp knife. These small vents are absolutely crucial as they allow steam to escape during baking, preventing the dough from puffing up excessively and ensuring a wonderfully even bake and a flat, appealing top crust.
- Bake Until Golden: Carefully place the baking dish into your preheated oven. Bake for 30-40 minutes, or until the top crust is a magnificent, deep golden brown and the cheese inside is visibly bubbly and perfectly melted. The exact baking time can vary slightly depending on the nuances of your specific oven, so I always recommend keeping a watchful eye on it, especially towards the end of the baking cycle. You are aiming for that perfect crispness on the outside and a thoroughly cooked, deliciously flavorful interior for your Italian Sub Squares. If you notice the top browning too quickly before the filling is fully heated, you can loosely tent it with a piece of aluminum foil for the last 10-15 minutes of baking to prevent over-browning.
- Rest Before Slicing: Once baked to perfection, remove the Italian Sub Squares from the oven and, as tempting as it is to dig in immediately, let them rest in the baking dish for at least 10-15 minutes before attempting to slice them. This resting period is incredibly important because it allows the molten filling to set slightly and prevents all the delicious melted cheese and meats from oozing out uncontrollably when you cut into it. It also allows the internal temperatures to equalize throughout the squares, resulting in a more cohesive, less messy, and ultimately more enjoyable final product. Patience here will be rewarded!
Finishing Touches and Serving Your Perfect Italian Sub Squares
- Prepare the Zesty Glaze: While the Italian Sub Squares are taking their essential rest, it’s the perfect opportunity to whip up our simple yet incredibly impactful glaze. In a small bowl, combine the red wine vinegar, olive oil, garlic powder, and dried Italian herbs. Whisk vigorously with a fork or a small whisk until the mixture is well combined and slightly emulsified. Taste it and adjust with a pinch of salt and freshly ground black pepper as needed to your preference. This vibrant glaze provides a crucial tangy, herbaceous, and aromatic counterpoint to the rich, savory, and cheesy filling, truly elevating the entire experience of our Italian Sub Squares.
- Glaze and Serve: Once the Italian Sub Squares have adequately rested, carefully remove them from the baking dish (if you used parchment paper, you can simply lift them out easily onto a cutting board). Now, generously brush or drizzle the prepared red wine vinegar glaze over the warm squares. The warmth of the bread will help the glaze absorb beautifully into the crust, infusing every bite with that irresistible tang and herb flavor that perfectly mimics the dressing you’d find on a traditional Italian sub. Don’t be shy with the glaze; it makes a huge difference!
- Final Slicing: Using a very sharp knife or a pizza cutter, slice along the scored lines to separate your beautiful Italian Sub Squares into individual portions. If your initial scoring wasn’t deep enough, you might need to press a little more firmly to get through the crust and filling. I always take a moment to admire the incredible layers of deliciousness before eagerly diving in – the vibrant colors of the meats and peppers, the gooey cheese, and that golden crust are truly a sight to behold!
- Enjoy Immediately: Serve your “Italian Sub Squares” warm or at room temperature. They are incredibly versatile and make an absolutely fantastic and satisfying meal all on their own, a superb and hearty appetizer for any party or gathering, or a wonderfully satisfying addition to any picnic spread. The harmonious combination of the soft, savory dough, the generous layers of zesty Italian meats and cheeses, the crisp fresh vegetables, and the bright, tangy glaze creates a culinary experience that truly captures the essence of a classic Italian sub, but in a convenient, easy-to-handle, and shareable square format. These are truly a crowd-pleaser and have become a beloved staple in my kitchen whenever I’m craving those authentic deli flavors in a comforting, baked form. Leftovers, if you’re lucky enough to have any, can be stored in an airtight container in the refrigerator for up to 3 days and are absolutely delicious reheated slightly in the oven or enjoyed cold as a quick snack or lunch.
Conclusion:
Oh, my friends, we’ve reached the end of our culinary journey for today, but truly, this is just the beginning of your delicious adventure! I genuinely believe that this recipe is more than just a meal; it’s a game-changer for anyone looking to bring big, bold flavors to their table with minimal fuss. Think about it: all the glorious, zesty, savory, and satisfying elements of your favorite deli sandwich, transformed into a convenient, crowd-pleasing baked delight. It’s the perfect blend of crunchy edges, soft interior, gooey melted cheese, and that irresistible tang from the dressing, all infused into every single bite. I know I might sound a little biased, but I’ve seen the look on people’s faces when they take that first bite, and it’s always pure joy. This isn’t just a recipe; it’s a gateway to easy entertaining, stress-free weeknight dinners, and guaranteed empty platters at potlucks. It truly simplifies the art of serving a substantial, flavor-packed dish that appeals to almost everyone.
What truly makes these Italian Sub Squares a must-try is their incredible balance of textures and tastes. We’re talking about that perfect harmony between the fresh, crisp vegetables, the robust, salty cured meats, and the melt-in-your-mouth cheese, all cradled by a perfectly toasted, yet still tender, bread base. The aroma alone as it bakes is enough to make anyone’s mouth water, filling your kitchen with the irresistible scent of garlic, oregano, and simmering meats. It takes the beloved Italian sub experience and elevates it, making it oven-baked perfection that’s ideal for sharing. Plus, the ease of preparation means you spend less time in the kitchen and more time enjoying the company of those you’re feeding, which, in my book, is always a win. It feels gourmet, but it’s deceptively simple, making you look like a culinary superstar without breaking a sweat.
Serving Suggestions and Creative Variations:
Now, let’s talk about how you can make these incredible squares even more versatile and uniquely yours. While they are absolutely divine straight out of the oven, cut into generous squares, they also make fantastic leftovers (though I doubt you’ll have any!). They’re perfect for lunchboxes the next day, tasting equally wonderful at room temperature. As for serving them, they’re a standalone star, but a simple green salad with a light vinaigrette or a bowl of crunchy potato chips makes for an excellent companion. For a party, slice them into smaller, bite-sized portions for easy grabbing. They are the ultimate game-day snack, picnic addition, or even a casual weeknight dinner solution when you want something comforting but exciting.
But wait, there’s more! The beauty of this recipe lies in its adaptability. Don’t be afraid to experiment and personalize it:
-
Cheese Choices: While provolone is classic, try adding slices of fresh mozzarella, nutty fontina, or even a sprinkle of grated Parmesan or Pecorino Romano for an extra layer of salty depth.
-
Meat Mix-Ups: Feel free to swap in other deli favorites like spicy capicola, thinly sliced prosciutto, or even some roasted turkey or ham if you prefer a milder flavor profile. A vegetarian version is also fantastic; simply layer with roasted red peppers, marinated artichoke hearts, grilled zucchini, and plenty of cheese, perhaps with a pesto base.
-
Veggie Additions: Before baking, consider adding thin slices of bell peppers, banana peppers for a bit of a kick, Kalamata olives, or a layer of fresh spinach. After baking, a scattering of fresh basil leaves or thinly sliced red onion can add a beautiful finish.
-
Dressing Drizzles: My homemade Italian dressing is wonderful, but you could also drizzle with a balsamic glaze after baking for a touch of sweetness and tang, or even a dash of hot sauce if you like extra heat.
-
Bread Base: While focaccia-style bread works beautifully, you could also use a sturdy ciabatta, a thick-crust pizza dough, or even a pre-baked flatbread for a slightly different texture and feel.
Seriously, I am so incredibly excited for you to try this recipe. It truly is one of my go-to’s, and I just know it’s going to become one of yours too. There’s something truly special about bringing people together over good food, and these Italian Sub Squares have a magical way of doing just that. So, please, gather your ingredients, fire up that oven, and treat yourself and your loved ones to this fantastic meal. And when you do, I would absolutely love to hear about your experience! Did you stick to the script, or did you put your own creative spin on it? What were your favorite additions or substitutions? Please, share your stories, your photos, and your delicious triumphs with me. Your feedback and personal touches inspire me and our whole community of home cooks. Happy cooking, and bon appétit!
Italian Sub Squares: Flavorful Beef Deli Sandwich Bites
Italian Sub Squares transform the beloved classic deli sandwich into a convenient, party-friendly format. This recipe captures the savory, salty beef meats, tangy pickled peppers, creamy provolone, and fresh crunch of lettuce, all harmonizing within soft, delicious bread squares. Perfect for meal prepping, a casual lunch, or as a crowd-pleasing dish for any gathering.
Ingredients
-
4 cups All-Purpose Flour, plus extra for dusting
-
2 ¼ tsp Active Dry Yeast
-
1 ½ cups Warm Water (105-115°F)
-
1 tbsp Granulated Sugar
-
3 tbsp Olive Oil, plus more for greasing
-
1 ½ tsp Salt
-
8 oz Provolone Cheese, thinly sliced
-
6 oz Beef Salami, thinly sliced
-
6 oz Beef Pastrami (Hot or Mild), thinly sliced
-
4 oz Beef Pepperoni, thinly sliced
-
4 oz Deli Beef, thinly sliced
-
½ medium Red Onion, thinly sliced
-
½ cup Sliced Banana Peppers (from a jar)
-
½ cup Drained, sliced Roasted Red Peppers
-
2 cups Fresh Spinach or Arugula
-
1 tsp Dried Oregano
-
½ tsp Red Pepper Flakes (optional)
-
1 large Egg, beaten (for egg wash)
-
1 tbsp Sesame Seeds (optional)
-
2 tbsp Grated Parmesan Cheese (optional)
-
2 tbsp Red Wine Vinegar
-
2 tbsp Olive Oil
-
½ tsp Garlic Powder
-
½ tsp Dried Italian Herbs
-
Salt and Freshly Ground Black Pepper, to taste
Instructions
-
Step 1
In a large bowl, combine warm water, sugar, and yeast. Let sit for 5-10 minutes until foamy. -
Step 2
Add 3 tbsp olive oil and salt to the yeast mixture. Gradually add flour, mixing until a shaggy ball forms. Knead on a lightly floured surface for 8-10 minutes (or 6-8 minutes in a stand mixer) until smooth and elastic. -
Step 3
Lightly grease a bowl with olive oil, add dough, turning to coat. Cover and let rise in a warm, draft-free spot for 1-1.5 hours, or until doubled in size. -
Step 4
Punch down dough, then divide in half. Preheat oven to 375°F (190°C). Grease a 9×13-inch baking dish with olive oil or line with parchment paper. -
Step 5
Roll one dough half into a 10×14-inch rectangle (approx. ¼ inch thick). Carefully press into the prepared baking dish, extending slightly up the sides. -
Step 6
Layer half of the provolone cheese over the dough. Arrange Beef Salami, Beef Pastrami, Beef Pepperoni, and Deli Beef over the cheese. Top with red onion, banana peppers, roasted red peppers, oregano, and optional red pepper flakes. Finish with spinach/arugula and the remaining provolone cheese. -
Step 7
Roll the second dough half into another 10×14-inch rectangle. Carefully drape over the filling. Pinch and seal the edges of the top and bottom dough layers together around the perimeter of the dish. -
Step 8
Whisk 1 egg with 1 tbsp water for an egg wash; brush generously over the top dough. Sprinkle with optional sesame seeds and grated Parmesan. -
Step 9
Gently score the top dough into 12-16 squares/rectangles (do not cut all the way through). Poke a few small holes in the top dough with a fork to vent steam during baking. -
Step 10
Bake for 30-40 minutes, or until the top crust is golden brown and the cheese inside is visibly bubbly and melted. -
Step 11
Remove from oven and let rest in the dish for 10-15 minutes. Meanwhile, prepare the glaze: whisk red wine vinegar, 2 tbsp olive oil, garlic powder, dried Italian herbs, salt, and pepper. Brush or drizzle generously over the warm squares. -
Step 12
Slice along the scored lines into individual portions using a sharp knife or pizza cutter. Serve warm or at room temperature.
Important Information
Nutrition Facts (Per Serving)
It is important to consider this information as approximate and not to use it as definitive health advice.
Allergy Information
Please check ingredients for potential allergens and consult a health professional if in doubt.


Leave a Comment