

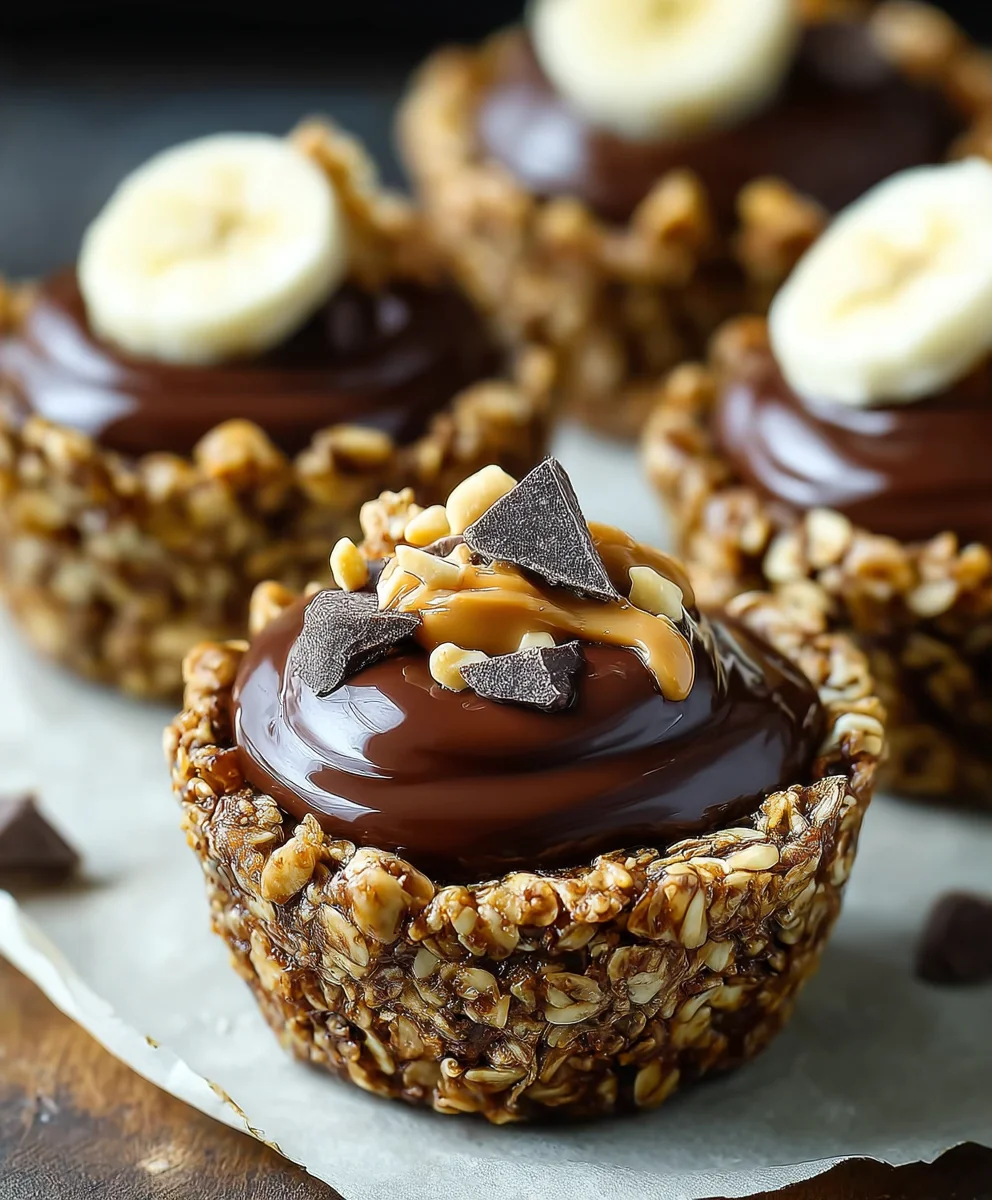
Chocolate Granola Cups with Peanut Butter Filling are more than just a simple treat; they represent a harmonious marriage of textures and tastes that has captivated snack enthusiasts and dessert lovers alike. Have you ever yearned for a creation that offers the satisfying crunch of wholesome granola, the luxurious depth of rich chocolate, and the smooth, comforting embrace of creamy peanut butter, all perfectly contained in one delightful bite? This recipe promises to deliver exactly that, transforming humble ingredients into an exceptional culinary experience that feels both indulgent and surprisingly straightforward to prepare.
While the individual components like granola and the classic pairing of chocolate and peanut butter have long held esteemed places in our hearts, their ingenious combination into convenient, individual cups is a modern marvel. People absolutely adore this dish not only for its irresistible flavor profile—a perfect balance of sweet and salty, nutty and rich—but also for its incredible versatility and ease. They are an ideal grab-and-go breakfast, a satisfying mid-day snack, or a charming dessert that caters to almost any occasion. I’ve always found tremendous joy in sharing recipes that bring such simple pleasure, and I am thrilled to guide you through the process of creating your very own irresistible Chocolate Granola Cups with Peanut Butter Filling.

Ingredients:
Creating these delightful chocolate granola cups with creamy peanut butter filling is surprisingly simple, relying on just six core ingredients for that perfect balance of crunch, sweetness, and satisfying richness. Here’s what you’ll need to gather from your pantry:
- 3 cups (about 300g) plain rolled oats granola: I always opt for a good quality, plain granola without too many extra bells and whistles. You want something that provides a nice, hearty crunch but isn’t overly sweet or flavored already, so it can beautifully absorb the chocolate coating.
- 1 ½ cups (about 250g) semi-sweet chocolate chips: These will form the delicious chocolate binder for our granola cups. You can certainly experiment with dark chocolate chips if you prefer a more intense chocolate flavor, or even milk chocolate for a sweeter profile.
- ¼ cup (about 60ml) virgin coconut oil: This magic ingredient plays a double role. It helps bind the granola mixture together, ensuring our cups hold their shape beautifully, and it also gives the melted chocolate a silky-smooth consistency, making it easy to coat the granola.
- ¼ cup (about 60ml) pure maple syrup: While some recipes might call for honey, I find maple syrup offers a wonderfully nuanced sweetness that pairs perfectly with both chocolate and peanut butter, without overpowering the natural flavors. It also acts as another binder for our granola base.
- 1 cup (about 250g) creamy natural peanut butter: For the heart of our cups! I highly recommend using natural peanut butter that’s just peanuts and maybe a touch of salt, as it tends to be runnier and easier to work with. If yours is very thick, don’t worry, I’ll share a tip on warming it up.
- 1 teaspoon pure vanilla extract: A small but mighty addition that elevates the flavor of our peanut butter filling, adding a comforting warmth and depth that really ties all the elements together.
- 2 medium fresh bananas: (Optional, for topping) Sliced bananas add a lovely touch of freshness, natural sweetness, and a pop of color, making these cups even more appealing. They are truly the perfect complement to the chocolate and peanut butter.
Equipment You’ll Need:
Before we dive into the fun part of mixing and molding, let’s quickly gather the tools that will make this process a breeze. Having everything laid out and ready to go always makes cooking more enjoyable and efficient, especially for a no-bake recipe like this:
- Standard 12-cup muffin tin: This is crucial for shaping our granola cups. A standard size works perfectly, allowing for a good portion size that’s satisfying but not overwhelming.
- Paper or silicone muffin liners: While not strictly mandatory, I absolutely swear by these. They make removing the finished granola cups incredibly easy, preventing sticking and ensuring those perfectly formed edges. Plus, they make for a neater grab-and-go snack!
- Microwave-safe mixing bowls: You’ll need at least two – one for melting chocolate and combining the granola mixture, and another for preparing the peanut butter filling.
- Spatula or sturdy spoon: Essential for mixing the granola and for pressing it into the muffin tin.
- Small measuring cup with a flat bottom: This is my secret weapon for creating uniform and firm granola cups with neat indentations for the filling. Any small, sturdy measuring cup (like a ¼ or ½ cup measure) will do.
- Measuring cups and spoons: For accurately portioning all our delicious ingredients.
- Whisk or fork: For combining the peanut butter filling ingredients.
- Wire rack: Handy for letting the cups chill or just for general cooling if you were to bake them (though we won’t be doing that here!).
Making Your Delicious Chocolate Granola Cups:
Let’s get started on creating these wonderful “Chocolate Granola Cups with Peanut Butter Filling!” The beauty of this recipe lies in its simplicity and the minimal effort required for such a satisfying result. We’ll break it down into easy, manageable steps, ensuring you get perfect cups every time.
Preparing the Crunchy Granola Shells:
This is where our journey begins – crafting the sturdy, chocolate-coated granola base that will hold our creamy peanut butter filling. It’s a quick process, but each step is important for achieving that ideal crunch and structure.
-
Get Your Muffin Tin Ready:
First things first, let’s prepare our muffin tin. Line all 12 cups of your standard muffin tin with paper or silicone muffin liners. I really can’t stress enough how much easier this makes the entire process of removing your finished granola cups. While it’s technically possible to skip the liners and grease the muffin tin well, you risk the cups sticking, and their delicate nature might make them prone to breaking when you try to pry them out. Using liners guarantees beautifully intact cups that are a joy to unwrap. Take your time with this initial step; a well-prepared tin is the foundation for success.
-
Melt the Chocolate and Coconut Oil:
Next, grab a medium-sized microwave-safe bowl. Into this bowl, add your semi-sweet chocolate chips and the virgin coconut oil. We want to melt these two together until they are perfectly smooth and fully combined. You can do this in the microwave, heating in 30-second intervals and stirring thoroughly after each interval. It’s crucial not to overheat the chocolate, as it can seize or become grainy. Stirring frequently helps distribute the heat evenly and prevents scorching. Alternatively, if you prefer, you can use a double boiler method on the stovetop. Simply place the bowl over a saucepan of simmering water, ensuring the bottom of the bowl doesn’t touch the water, and stir until melted. Once you have a velvety, glossy chocolate mixture, you’re ready for the next step.
-
Combine Granola with the Chocolate Magic:
Now for the fun part! Pour your plain rolled oats granola into the bowl with the melted chocolate and coconut oil. Add your pure maple syrup at this stage as well. Using a sturdy spatula or spoon, gently fold and stir the mixture until every single piece of granola is thoroughly coated. You want to see that rich chocolate coating adhering to all the granola, creating a sticky, cohesive blend. This even coating is key to ensuring your granola cups hold together beautifully and have that delightful chocolatey crunch throughout. Don’t rush this step; ensure everything is well-integrated.
-
Form the Granola Cups:
This is where we give our granola cups their iconic shape. Spoon an even amount of the chocolate-granola mixture into each of the 12 lined muffin cups. I typically aim for about 2-3 tablespoons per cup, but you can adjust slightly based on how thick you want your shells. Once the mixture is in, take that small measuring cup with a flat bottom (a ¼-cup or ½-cup measure works perfectly). Use it to firmly press the granola mixture down into the bottom and up the sides of each muffin liner, forming a sturdy cup shape with a distinct well in the center for our filling. This pressing action is vital for creating a compact, solid base that won’t crumble. The harder and more evenly you press, the more stable your cups will be. Make sure the walls are relatively even in thickness around the sides.
-
Chill the Granola Shells:
Once all your granola cups are formed, it’s time for them to take a little nap in the refrigerator. Transfer the entire muffin tin to the fridge and let them chill for at least 15-20 minutes. This chilling period is crucial because it allows the coconut oil and chocolate to firm up, setting the granola mixture into solid, stable shells. While the cups will be slightly fragile when first removed from the pan, they will firm up significantly during this chilling process and even more after we add the filling. A well-chilled shell is much easier to work with and ensures your final product holds its shape perfectly.
Crafting the Creamy Peanut Butter Filling & Final Assembly:
With our granola shells perfectly set and chilling, it’s time to prepare the luscious peanut butter filling that makes these cups truly irresistible. This step is even quicker than the last, leading us to the grand finale of assembly.
-
Prepare the Creamy Peanut Butter Filling:
While your granola shells are chilling, grab another medium bowl. Into this bowl, spoon your creamy natural peanut butter. Add the pure vanilla extract. At this point, I often like to add a tiny pinch of fine sea salt, perhaps an eighth of a teaspoon, just to help balance the sweetness and really bring out the rich peanut butter flavor. Mix everything together until it’s well combined and smooth. Now, here’s an important tip: if your peanut butter is quite thick and not easily spreadable or pipeable, don’t fret! You can warm it gently in the microwave. Heat it in 10-15 second bursts, stirring well after each interval, until it reaches a wonderfully creamy, slightly more liquid consistency that’s perfect for filling our cups. Be careful not to overheat it, as it can separate.
-
Fill the Chilled Granola Cups:
Once your granola shells are firm and your peanut butter filling is ready, it’s time for assembly! Carefully remove the muffin tin from the refrigerator. Spoon or pipe the creamy peanut butter filling into the well of each granola cup. I aim to fill them almost to the top, leaving just a small margin. You can use a small spoon to gently smooth out the top of the peanut butter, ensuring an even and appealing surface. The contrast between the firm, chocolatey granola and the smooth, rich peanut butter is truly a delight, so make sure each cup gets a generous helping.
-
Top with Fresh Banana Slices (Optional but Highly Recommended!):
If you’re using fresh banana slices as a topping – and I highly recommend you do for an extra layer of flavor and texture – now’s the time to add them. Carefully place one or two thin slices of banana on top of the peanut butter filling in each cup. The natural sweetness and slight tang of the banana provide a beautiful counterpoint to the richness of the chocolate and peanut butter. It also adds a fresh, vibrant element that makes these cups feel even more wholesome and delightful, especially if you’re serving them for breakfast or as a lighter snack.
-
Final Chill to Set Everything:
We’re almost there! Once all your cups are filled and optionally topped, transfer the muffin tin back to the refrigerator. This final chill is essential. Allow the cups to firm up for at least another 30 minutes, or even an hour. This extended chilling period ensures that the peanut butter filling sets nicely, making the entire cup sturdy and easy to handle. It also allows all the flavors to meld together beautifully, giving you a perfectly cohesive and delicious treat. You’ll know they’re ready when the peanut butter feels firm to the touch and the cups can be easily lifted from the muffin liners.
-
Serve and Enjoy Your Masterpiece:
Once your “Chocolate Granola Cups with Peanut Butter Filling” are thoroughly chilled and set, it’s time to enjoy the fruits of your labor! Gently lift each cup out of the muffin tin by its liner. You can serve these delightful cups immediately, experiencing that perfect balance of crunchy granola, smooth peanut butter, and the optional fresh sweetness of banana. These cups are truly my breakfast hero on busy mornings, but they also make a perfect afternoon snack with coffee or tea when you need a little energy boost. For an elevated dessert version, you could even drizzle a little extra melted chocolate over the top before serving to make them extra special.
Tips for Perfect Chocolate Granola Cups:
While the recipe itself is straightforward, a few insider tips can elevate your chocolate granola cups from great to absolutely phenomenal. These are the little nuggets of wisdom I’ve gathered over countless batches, ensuring consistent perfection every time.
Choosing Your Ingredients Wisely:
- Granola Selection: The type of granola you choose truly impacts the final texture of your cups. I always recommend a plain, relatively chunky rolled oats granola. Avoid overly sugary or finely ground granolas, as they might become too dense or too sweet once combined with the chocolate and maple syrup. If your granola has very large clusters, you might want to gently break them up slightly so they fit better into the muffin tin and create a more uniform base. A good quality, hearty granola ensures that satisfying crunch in every bite.
- Chocolate Quality Matters: While semi-sweet chocolate chips are my go-to for their balanced sweetness, don’t be afraid to experiment with the type of chocolate. High-quality dark chocolate (around 60-70% cocoa) can add a sophisticated depth, especially if you prefer a less sweet treat. For a sweeter profile, milk chocolate chips work wonderfully. Just remember that different chocolates melt at slightly different rates, so keep a close eye on them during the melting process.
- Peanut Butter Consistency is Key: Natural creamy peanut butter is generally ideal for this recipe because it tends to be runnier. However, if your peanut butter is very thick or stiff, it can be a challenge to spread smoothly. That’s why the tip about gently warming it in the microwave is so important! Just a few seconds can transform it into a wonderfully creamy, pourable consistency, making filling the cups a breeze. If your peanut butter is extra oily, you might want to give it a good stir before measuring to ensure consistency.
- Sweetener Alternatives: While maple syrup is my preferred binder and sweetener, you can easily substitute it with honey or agave nectar. Each will impart a slightly different flavor profile, but all will work effectively to bind the granola mixture and add that touch of sweetness. If using a very thick honey, you might warm it slightly with the coconut oil to help it combine more easily.
Mastering the Assembly Process:
- Pressing for Perfection: Don’t underestimate the importance of pressing the granola mixture firmly into the muffin tin. This is crucial for creating sturdy cups that won’t fall apart when you remove them or bite into them. Using a small measuring cup with a flat bottom is a game-changer for this step, as it allows you to apply even pressure and create a consistent well for your filling. The firmer you press, the more stable your finished cups will be.
- Dealing with Fragile Cups: Remember, the cups will be slightly fragile when first removed from the pan, especially if they haven’t been chilled sufficiently. Don’t worry if they feel a little delicate initially; they firm up significantly once the peanut butter filling is added and they undergo a second round of chilling in the refrigerator. Patience here is a virtue – allow them adequate time to set.
- Avoiding Sticky Situations: Muffin liners are truly your best friend for this recipe. They ensure a clean release every time and prevent any frustration of your beautiful cups sticking to the tin. If you absolutely must go without liners, make sure to grease your muffin tin meticulously with a neutral oil or cooking spray, but be prepared for a slightly trickier removal process.
Storage and Serving Suggestions:
- Optimal Storage: These chocolate granola cups with peanut butter filling keep beautifully! Store them in an airtight container in the refrigerator for up to a week. The cold helps maintain their firm texture and prevents them from becoming soft. For longer storage, you can freeze them for up to 3 months. I often make a double batch and freeze half for emergency snacks or quick breakfasts. Just let frozen cups thaw in the refrigerator overnight or at room temperature for about 30 minutes before enjoying.
- Serving Versatility: These cups are incredibly versatile. They are, as the name suggests, perfect for breakfast on the go, providing lasting energy thanks to the granola and peanut butter. They also make a fantastic afternoon snack with coffee or tea when you need a little energy boost. For a delightful brunch spread, serve them alongside fresh fruit and yogurt. If you’re looking to elevate them into a dessert, a drizzle of extra melted chocolate or a sprinkle of flaky sea salt over the top before serving adds a touch of gourmet flair.
- Flavor Variations: Don’t be afraid to get creative! While I love the classic chocolate, peanut butter, and banana combination, you could easily adapt this recipe. Consider adding a pinch of cinnamon to your granola mixture for a warm spice note. You could also sprinkle in some shredded coconut, mini chocolate chips, or chopped nuts (like almonds or pecans) into the granola base for extra texture and flavor. For the filling, a thin layer of fruit jam beneath the peanut butter could add a sweet and tart surprise, or you could swirl in a bit of melted white chocolate for a different flavor profile. The possibilities are endless!
Conclusion:
Oh, my goodness, if you’ve made it this far, then you’re just moments away from experiencing a true game-changer in the world of simple, satisfying treats! I truly believe that the recipe we’ve explored today isn’t just another snack idea; it’s a revelation. These aren’t just any ordinary dessert bites; these are the kind of treats that will have friends and family asking for the recipe, believing you spent hours slaving away in the kitchen, when in reality, they’re wonderfully straightforward to whip up. The absolute magic of this recipe lies in its brilliant combination of textures and flavors. Imagine the irresistible crunch of the chocolate granola shell, giving way to that smooth, creamy, melt-in-your-mouth peanut butter filling, all harmoniously balanced with just the right touch of sweetness. It’s a symphony for your taste buds, a little moment of bliss in every single bite.
One of the main reasons I consider this recipe an absolute must-try is its incredible versatility and sheer deliciousness. Whether you’re craving something sweet after a long day, looking for an energy-boosting snack to get you through the afternoon slump, or searching for the perfect, hassle-free dessert to bring to a potluck, these amazing bites fit the bill perfectly. They strike that coveted balance between indulgent and wholesome, making them a fantastic choice for nearly any occasion. Plus, let’s be honest, who can resist the timeless pairing of chocolate and peanut butter? It’s a classic for a reason, and in this format, it truly shines. The ease of preparation, requiring no baking and minimal effort, also makes it an ideal project for budding chefs or anyone short on time but unwilling to compromise on taste. These Chocolate Granola Cups with Peanut Butter Filling are not just a recipe; they’re an experience.
Now, let’s talk about how you can make these delightful treats even more your own or enjoy them in different ways. While they are utterly perfect as is, I love playing around with variations and serving suggestions. For a delightful breakfast or brunch offering, imagine serving these alongside a fresh fruit platter and a steaming cup of coffee or tea. The robust flavors of the cups pair beautifully with the lightness of fresh berries or sliced bananas. As an afternoon pick-me-up, grab one straight from the fridge – their cool, firm texture is incredibly refreshing. For dessert, a sprinkle of flaky sea salt on top before serving elevates the flavors even further, adding a sophisticated touch that truly makes the chocolate and peanut butter sing.
Thinking about variations? Oh, the possibilities are endless! Don’t feel limited to classic peanut butter. Almond butter, cashew butter, or even a sunflower seed butter (for nut-free options!) would work wonderfully, each adding its own unique nutty nuance. You could also experiment with different types of chocolate chips in your granola base – dark chocolate for a richer flavor, milk chocolate for extra sweetness, or even white chocolate for a creamier contrast. For an extra textural element, try folding in some chopped nuts (like pecans or walnuts) into your granola mixture, or perhaps some dried cranberries or raisins for a fruity twist. A sprinkle of shredded coconut on top before chilling also adds a lovely tropical note and visual appeal. For those who love a bit of spice, a tiny pinch of cayenne pepper mixed into the peanut butter filling can offer an unexpected and delightful kick! Truly, these are designed to be customized to your heart’s content.
My dear readers, I genuinely hope that this recipe has sparked joy and curiosity in you. There’s nothing quite like the satisfaction of creating something delicious with your own hands, and I promise you, the reward of tasting these will be immense. So, please, gather your ingredients, set aside a little time, and dive into making these incredible Chocolate Granola Cups with Peanut Butter Filling. I am so confident you’ll adore them. Once you’ve tried them, I would absolutely love to hear about your experience! Did you stick to the original recipe, or did you venture into some exciting variations? What did your family and friends think? Share your thoughts, your photos, and your triumphs in the comments below. Your feedback truly brightens my day and helps our community grow. Happy creating, and even happier eating!
People Also Ask:
Are Chocolate Granola Cups with Peanut Butter Filling healthy?
While this recipe definitely falls into the “treat” category, it can be a relatively healthier alternative to many store-bought desserts, especially if you choose your ingredients wisely! Using natural peanut butter with no added sugar, high-quality dark chocolate, and whole-grain granola can boost the nutritional profile. It’s packed with healthy fats, some protein from the peanut butter, and fiber from the granola. Like all treats, moderation is key, but these offer a delicious and satisfying way to curb a sweet craving without going overboard.
How long do these Chocolate Granola Cups last and how should I store them?
These delightful cups keep remarkably well! Stored in an airtight container in the refrigerator, they will stay fresh and delicious for up to 5-7 days. For even longer storage, you can freeze them for up to 1-2 months. If freezing, I recommend placing them on a baking sheet lined with parchment paper until firm, then transferring them to a freezer-safe bag or container to prevent them from sticking together. Thaw them in the refrigerator or at room temperature for a few minutes before enjoying.
Can I make these Chocolate Granola Cups with a different nut butter?
Absolutely! This recipe is incredibly versatile when it comes to nut butters. Almond butter, cashew butter, or even a mixed nut butter would work beautifully, each imparting its own unique flavor profile. For those with nut allergies, sunflower seed butter (like SunButter) is an excellent, delicious, and safe alternative. Just ensure your chosen nut butter is smooth and creamy for the best filling texture.
Do I need a special muffin tin for these, or can I use cupcake liners?
A standard 12-cup muffin tin is ideal for achieving the perfect cup shape. However, if you don’t have one, you can absolutely use silicone muffin liners or paper cupcake liners placed on a flat baking sheet for stability. If using paper liners, you might find the granola doesn’t hold its cup shape quite as rigidly, but the taste and overall experience will still be fantastic!
Can I make these vegan or gluten-free?
Yes, you can easily adapt this recipe to be both vegan and gluten-free! To make them vegan, ensure your chocolate chips are dairy-free (many dark chocolate varieties are), use a vegan butter substitute or coconut oil for the granola base, and choose a vegan-friendly granola. For a gluten-free version, simply use your favorite certified gluten-free granola. Always double-check ingredient labels to ensure they meet your dietary requirements.
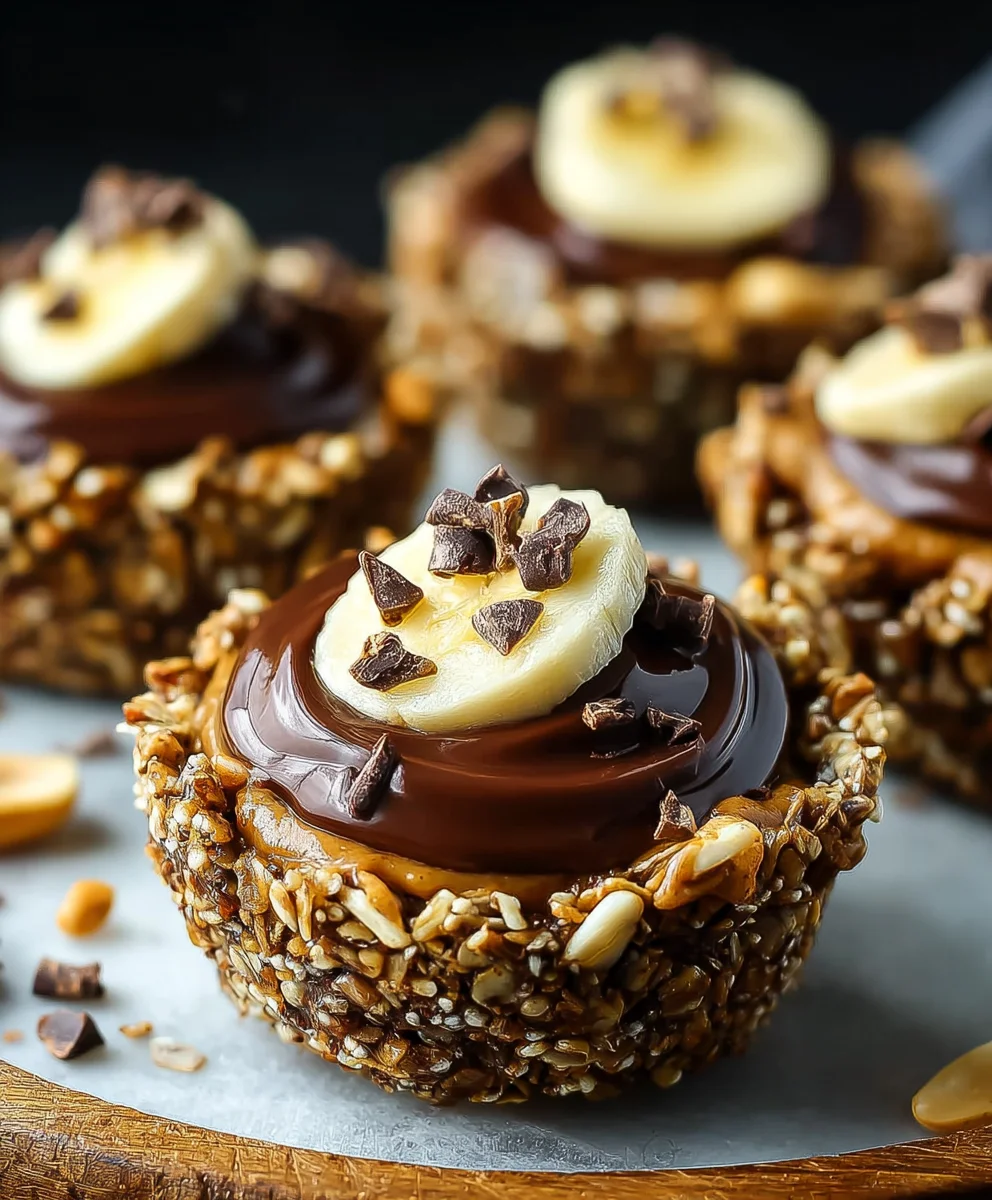
Easy Chocolate Granola Cups with Creamy Peanut Butter
Chocolate-coated granola cups filled with creamy peanut butter and topped with fresh banana. A no-bake, 6-ingredient treat that’s perfect for breakfast on-the-go or a satisfying snack.
Ingredients
-
3 cups (300g) plain rolled oats granola
-
1 ½ cups (250g) semi-sweet chocolate chips
-
¼ cup (60ml) virgin coconut oil
-
¼ cup (60ml) pure maple syrup
-
1 cup (250g) creamy natural peanut butter
-
1 teaspoon pure vanilla extract
-
2 medium fresh bananas (optional, for topping)
Instructions
-
Step 1
Line all 12 cups of a standard muffin tin with paper or silicone muffin liners. -
Step 2
In a microwave-safe bowl, melt chocolate chips and virgin coconut oil. Heat in 30-second intervals, stirring thoroughly after each, until smooth. Alternatively, use a double boiler. -
Step 3
Add granola and pure maple syrup to the melted chocolate mixture. Stir with a spatula until all granola is thoroughly coated and sticky. -
Step 4
Spoon 2-3 tablespoons of the chocolate-granola mixture into each lined muffin cup. Use a small measuring cup with a flat bottom to firmly press the mixture down into the bottom and up the sides, forming a sturdy cup shape with a well. -
Step 5
Transfer the muffin tin to the refrigerator and chill for at least 15-20 minutes, allowing the shells to firm up. -
Step 6
While shells chill, combine creamy natural peanut butter and pure vanilla extract in another medium bowl. Mix until smooth. If peanut butter is too thick, warm gently in the microwave in 10-15 second bursts, stirring until creamy and spreadable. -
Step 7
Remove chilled granola shells from the refrigerator. Spoon or pipe the creamy peanut butter filling into the well of each granola cup, filling almost to the top. -
Step 8
If using, carefully place one or two thin slices of fresh banana on top of the peanut butter filling in each cup. -
Step 9
Return the muffin tin to the refrigerator. Chill for at least another 30 minutes to an hour, or until the peanut butter filling is set and the cups are sturdy. -
Step 10
Gently lift each cup out of the muffin tin by its liner. Serve immediately. Store leftovers in an airtight container in the refrigerator for up to a week, or freeze for up to 3 months (thaw in refrigerator or at room temperature for 30 minutes before enjoying).
Important Information
Nutrition Facts (Per Serving)
It is important to consider this information as approximate and not to use it as definitive health advice.
Allergy Information
Please check ingredients for potential allergens and consult a health professional if in doubt.
Leave a Comment