

Apple Crisp. Just hearing those two words conjures up images of cozy autumn evenings, the scent of cinnamon and baked apples wafting through the air, and a warm dessert waiting to be scooped into a bowl, ideally with a generous dollop of vanilla ice cream. I truly believe there’s something inherently magical about this classic American dessert that transcends seasons, though it certainly shines brightest when crisp autumn apples are at their peak. It’s a dish that beautifully marries simplicity with profound flavor, offering a comforting hug in every single bite. There’s a very good reason this humble dessert has stood the test of time, becoming a beloved staple in homes across the country.
A Beloved Classic: The Enduring Appeal of Apple Crisp
While often compared to its close cousin, the apple crumble, the Apple Crisp has undeniably carved out its own beloved niche, particularly within North American culinary traditions. Historically, recipes for similar baked fruit desserts became especially popular during wartime, when ingredients for traditional pie crusts were scarce, leading to the innovation of simpler, yet equally delicious, streusel-like toppings. The true genius of the crisp lies in its signature topping – a delightful blend of oats, flour, sugar, and butter that bakes into a golden, crunchy crust, providing the perfect textural contrast to the tender, spiced apples beneath. People adore this dish not just for its incredible sweet-tart balance and comforting warmth, but also for its relatively straightforward preparation compared to a full pie, making it an accessible yet impressive treat for any home baker. It’s truly the kind of dessert that gathers friends and family around the table, fostering warmth and happy memories with every delicious spoonful.

Ingredients:
- ⅔ cup all-purpose flour
- ⅔ cup old-fashioned oats
- ⅔ cup light brown sugar
- ½ tsp salt
- ½ tsp ground cinnamon
- ½ cup unsalted butter, melted
- 6 cups peeled, thinly sliced apples (Honeycrisp, Pink Lady, or Fuji recommended)
- 3 tbsp apple juice (or orange juice)
- ¼ cup granulated sugar
- 2 tbsp all-purpose flour
- ¾ tsp ground cinnamon
- 1 tsp pure vanilla extract
Preparing for Perfection: Initial Steps and Oven Warm-up
- Before we dive into creating this masterpiece, let’s get our workspace ready! I always start by preheating my oven to a cozy 375°F (190°C). This ensures that when our apple crisp is ready to bake, the oven is at the optimal temperature to achieve that perfect golden-brown topping and tender fruit.
- Next, you’ll want to grab a 9×13 inch baking dish (or a similar 3-quart capacity dish). I find this size perfect for accommodating all those delicious apples and ensuring an even bake. You don’t usually need to grease the dish for apple crisp, as the bubbling fruit filling tends to prevent sticking, but if you’re particularly worried, a light spray of cooking oil won’t hurt.
- I like to ensure all my ingredients are measured out and ready to go. This “mise en place” approach truly makes the cooking process smoother and more enjoyable. It means less frantic searching for ingredients and more focused time on crafting our dish.
Crafting the Irresistible Crispy Oat Topping
This is where the magic begins for our crunchy counterpoint to the soft apples. The topping is deceptively simple, yet it’s the textural contrast that elevates the entire dish. I adore how the oats toast and the brown sugar caramelizes, creating a truly comforting aroma as it bakes.
- In a medium-sized mixing bowl, we’re going to combine all the dry ingredients for our glorious crisp topping. This includes ⅔ cup all-purpose flour, ⅔ cup old-fashioned oats, ⅔ cup light brown sugar, ½ tsp salt, and ½ tsp ground cinnamon. I always make sure to lightly pack the brown sugar into my measuring cup to ensure I get the right sweetness and moisture for the topping. The flour provides structure, the oats give it that quintessential chewiness and nutty flavor, the brown sugar adds deep, molasses-rich sweetness, the salt balances everything out, and the cinnamon? Well, that’s just essential for that warm, inviting aroma we all love in a dessert like this.
- Using a whisk or a fork, give these dry ingredients a good stir until they are thoroughly combined. You want to make sure the cinnamon and salt are evenly distributed throughout the flour, oats, and sugar so every bite of your topping is perfectly seasoned.
- Now for the fun part – incorporating the butter! Pour in your ½ cup unsalted butter, melted, over the dry mixture. I find it’s best to drizzle it evenly over the surface rather than pouring it all in one spot, as this makes mixing a bit easier.
- Using a fork or your fingertips, gently mix the melted butter into the dry ingredients. The goal here is to create a crumbly mixture that still holds together when you press it, but also easily breaks apart. You’ll see little clumps form, which is exactly what we want for that uneven, rustic crisp texture. Avoid overmixing; we don’t want a paste, but rather a shaggy, sandy consistency with distinct lumps. These lumps are what will become wonderfully crisp and golden brown in the oven. Once you’ve achieved this delightful crumbly texture, set the bowl aside. This topping is ready to wait patiently for its moment to shine.
Crafting the Rich and Spiced Apple Filling
The heart of our apple crisp lies in its tender, perfectly spiced apple filling. The choice of apples is crucial here, and I’ve found that a mix of sweet-tart varieties like Honeycrisp, Pink Lady, or Fuji truly sings in this recipe, holding their shape while becoming incredibly soft and flavorful. This section is all about getting those apples ready to burst with flavor.
- Let’s talk apples! You’ll need 6 cups of peeled, thinly sliced apples. This usually translates to about 6-8 medium-sized apples, depending on their size. Peeling them ensures a smoother texture in the final dish without any tough skins. For slicing, I aim for about ¼-inch thick slices. This thickness allows the apples to cook down to a tender consistency without becoming mushy, and it ensures an even distribution of apple in every bite. If your slices are too thick, they might remain a bit firm; too thin, and they could turn to applesauce. A consistent slice is key!
- Place your beautifully prepared apple slices into a large mixing bowl. This bowl needs to be big enough to comfortably toss the apples with our delightful seasoning mixture.
- Now, let’s infuse these apples with incredible flavor. Drizzle 3 tbsp apple juice (or orange juice) over the apple slices. The juice isn’t just for flavor; it also helps to prevent the apples from browning while you’re preparing them and adds a touch of moisture, which will steam the apples as they bake, helping them to soften beautifully. I often opt for apple juice for a consistent apple flavor, but orange juice can add a lovely subtle citrus note if you prefer.
- Next, sprinkle in ¼ cup granulated sugar. This sugar works with the natural sugars in the apples to create a luscious, sweet base for the filling. It also contributes to the beautiful caramelization that happens during baking.
- To help thicken the juices released by the apples and prevent a watery crisp, add 2 tbsp all-purpose flour. This simple trick ensures your apple crisp has a wonderfully spoonable, syrupy filling rather than a thin, runny one.
- For that iconic warm flavor profile, add ¾ tsp ground cinnamon. Cinnamon and apples are a match made in heaven, and this amount provides a delightful warmth without overpowering the natural apple flavor.
- Finally, and I truly believe this is a game-changer, stir in 1 tsp pure vanilla extract. Vanilla adds a depth of flavor that rounds out the spices and fruit, making the apple filling taste even richer and more complex. Don’t skip this ingredient; it makes a noticeable difference!
- Using a large spoon or your clean hands (which I find works best for gentle mixing), toss all the ingredients together in the bowl until the apple slices are evenly coated with the sugar, flour, cinnamon, and vanilla mixture. Make sure every slice gets some of that glorious coating. This ensures that each piece of fruit is bursting with flavor and cooks evenly. You’ll notice the apples start to glisten, indicating they are perfectly prepared for baking.
Assembling and Baking Your Golden Apple Crisp
We’ve prepared our perfect topping and our luscious apple filling; now it’s time to bring them together and send them off to the oven for their transformation. The aroma that will soon fill your kitchen is one of the most comforting smells imaginable!
- Carefully transfer the seasoned apple slices into your prepared 9×13 inch baking dish. I like to spread them out evenly, making sure they form a relatively flat layer. This allows them to cook consistently and provides a good base for our topping. Don’t worry if they pile up a bit; they will cook down considerably in the oven.
- Now, take your bowl of crumbly oat topping and sprinkle it evenly over the top of the apple filling. I usually use my hands to distribute it, gently crumbling any larger pieces as I go. You want a uniform layer of that delicious crisp mixture covering all the apples, so every spoonful gets that delightful crunch. Resist the urge to press it down firmly; a loose, airy topping will bake up much crispier.
- Place the baking dish onto a baking sheet, especially if your dish tends to bubble over (which is a good sign, by the way!). This prevents any potential messes in your oven.
- Carefully place your apple crisp into the preheated 375°F (190°C) oven. Now, the waiting game begins! We’ll be baking it for approximately 40-50 minutes.
-
During the baking process, keep an eye on it. You’re looking for a few key indicators of doneness:
- The topping should be beautifully golden brown and wonderfully crisp. It should look toasted and inviting.
- The apple filling should be visibly bubbling around the edges of the dish. This indicates that the fruit juices are hot and the flour is doing its work to thicken them.
- To be absolutely sure the apples are tender, I sometimes carefully insert a thin, sharp knife or a skewer into the center of the crisp (through a gap in the topping, if possible). It should slide in easily, indicating the apples are soft and perfectly cooked. If they still feel firm, give it another 5-10 minutes.
If you notice the topping browning too quickly before the apples are tender, you can loosely tent the dish with aluminum foil for the last 10-15 minutes of baking.
- Once your apple crisp has reached peak golden, bubbly perfection, carefully remove it from the oven. The smell will be absolutely divine, trust me!
- This next step is crucial for the best texture: Allow the apple crisp to cool on a wire rack for at least 15-20 minutes before serving. I know, I know, it’s hard to wait when it smells so good, but this cooling time allows the filling to set up properly. If you cut into it too soon, the filling will be very runny. A little patience ensures a perfectly scoopable and delicious crisp. The topping will also become even crispier as it cools slightly.
Serving Suggestions, Storage, and Reheating Tips
Congratulations! You’ve just created a truly exceptional apple crisp. Now, let’s talk about how to best enjoy it and keep it delicious for days to come.
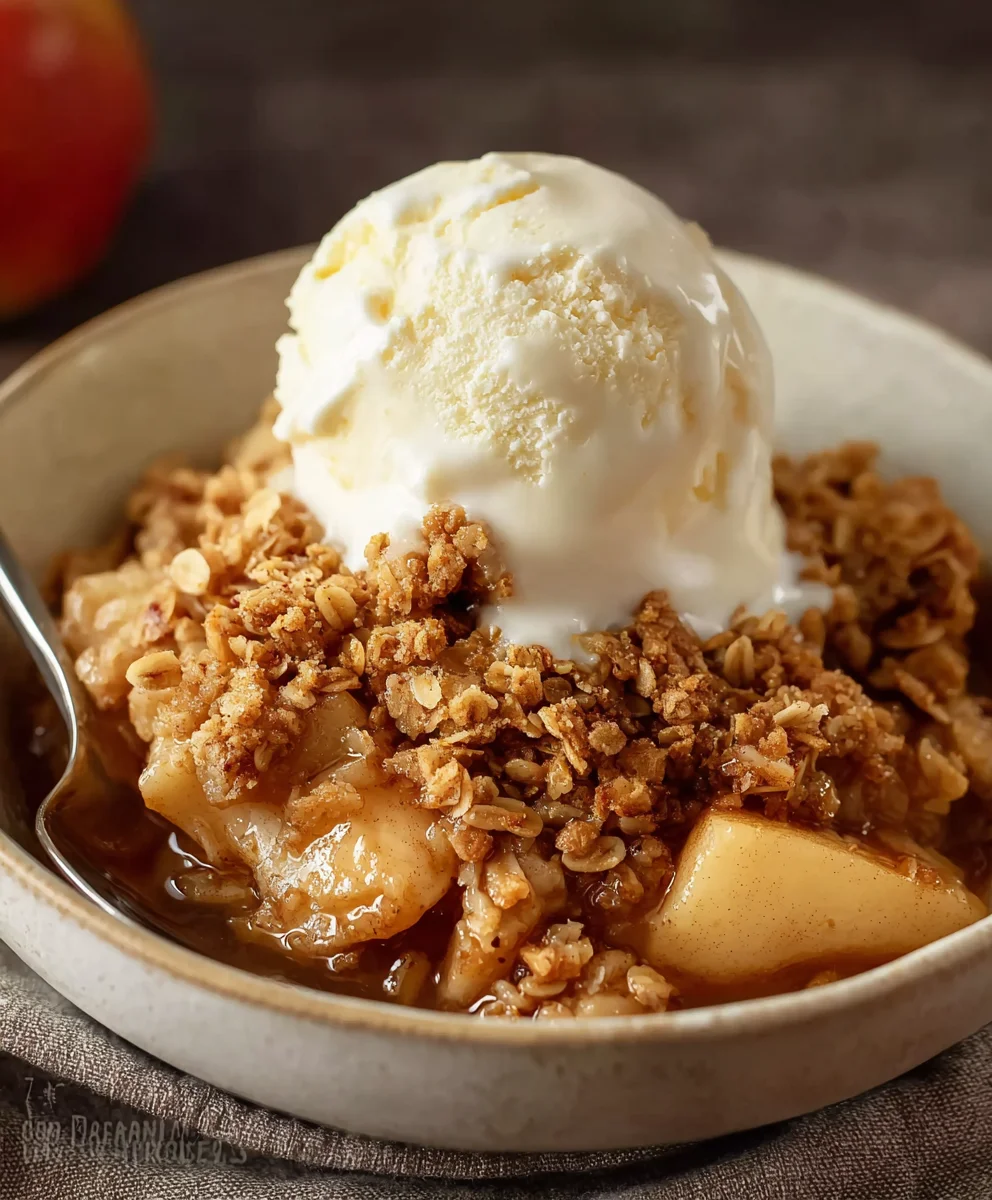
- My favorite way to serve this homemade apple crisp is warm, straight from the oven (after that essential cooling period!). It’s absolutely heavenly on its own, but for an extra special treat, I highly recommend serving it with a generous scoop of vanilla bean ice cream. The cold, creamy ice cream melting into the warm, spiced apples and crunchy topping is an experience not to be missed. Other fantastic accompaniments include a dollop of fresh whipped cream, a drizzle of caramel sauce, or even a sprinkle of toasted pecans for added texture.
- If you happen to have any leftovers (a rare occurrence in my house!), you can store the apple crisp in an airtight container in the refrigerator for up to 3-4 days.
- To reheat, I usually place individual servings in the microwave for 30-60 seconds, or you can warm the entire dish in an oven preheated to 350°F (175°C) for about 15-20 minutes, or until heated through and the topping is crisp again. I love how a quick reheat can bring back that fresh-baked aroma and taste. Just be mindful not to overheat, which can dry out the apples.
This Apple Crisp recipe truly embodies comfort and warmth. It’s perfect for a cozy autumn evening, a holiday gathering, or simply whenever you crave a heartwarming, homemade dessert. The balance of tender, spiced apples with that irresistible crispy oat topping makes it a perennial favorite, and I’m confident it will become a cherished recipe in your kitchen too!
<h2>Conclusion:</h2>
<p>And there you have it, my friends! We’ve journeyed through the simple steps of creating something truly magical in your kitchen. This isn’t just any dessert; it’s a warm hug, a comforting embrace, and a symphony of flavors all rolled into one irresistible dish. I truly believe that once you’ve experienced the golden, buttery crumble topping giving way to tender, spiced apples, you’ll understand why this recipe isn’t just a suggestion, but a culinary imperative. It’s the kind of treat that transforms an ordinary evening into something special, making memories with every delicious bite. Imagine the aroma filling your home – that sweet, cinnamon-infused scent promising pure bliss. It’s that exact moment, when the <strong>Apple Crisp</strong> emerges from the oven, bubbling and fragrant, that you realize you’ve created something truly extraordinary with minimal effort. It’s a testament to simple ingredients coming together in perfect harmony, a dessert that speaks to the soul and satisfies the deepest cravings for warmth and sweetness. This isn’t just baking; it’s crafting joy, one bubbling, golden dish at a time.</p>
<p>But the journey doesn’t end when the last spoonful is savored! This glorious Apple Crisp is incredibly versatile, making it perfect for a multitude of occasions and preferences. While it’s absolutely divine on its own, served straight from the baking dish, I highly recommend elevating the experience with a few delightful additions. A generous scoop of premium vanilla bean ice cream, melting slowly over the warm fruit and crisp topping, is an unparalleled indulgence. The contrast between the cold creaminess and the hot, spiced apples is simply heavenly, creating a dance of temperatures and textures in your mouth. For those who prefer something lighter, a dollop of freshly whipped cream, perhaps lightly sweetened with a touch of maple syrup, or a drizzle of crème fraîche adds a touch of elegance without overwhelming the natural flavors of the fruit. Don’t limit it to dessert, either! I’ve been known to enjoy a smaller portion with my morning coffee or as a delightful afternoon snack, perhaps even with a spoonful of plain Greek yogurt for a slightly healthier twist that still feels incredibly indulgent. It’s surprisingly adaptable, proving that comfort food can fit into many moments of your day, from a celebratory dinner to a cozy solo treat.</p>
<p>And why stop at just apples? While this classic recipe celebrates the crispness and sweetness of apples, don’t hesitate to experiment and make it uniquely yours. Consider adding a handful of fresh cranberries for a tart counterpoint, especially during the holiday season, or mixing in some chopped pears for a different texture and sweetness profile that complements the apples beautifully. A sprinkle of chopped pecans or walnuts over the topping just before baking adds an extra layer of crunch and nutty flavor that is simply irresistible, lending a deeper complexity to each bite. For a spicier kick, a pinch of freshly ground nutmeg, a touch of ground cloves, or even a hint of cardamom can deepen the overall aromatic profile, transforming the familiar into something new and exciting. You could even play with entirely different fruit combinations – ripe peaches in the summer, mixed berries for a vibrant burst of color and flavor, or even a tropical twist with pineapple and coconut. The possibilities are truly endless, allowing you to tailor this comforting dessert to whatever fruits are in season or whatever your heart desires. It’s a canvas for your culinary creativity, inviting you to explore and discover new favorite variations that will keep your taste buds happily engaged.</p>
<p>So, what are you waiting for? I wholeheartedly encourage you to roll up your sleeves, gather your ingredients, and dive into making this wonderful Apple Crisp. It’s more than just a recipe; it’s an experience, a tradition waiting to be started in your own home. Trust me, the smiles and satisfied sighs from everyone who tastes it will be your ultimate reward. There’s a profound satisfaction in creating something so utterly delicious from scratch, something that brings warmth and happiness to those you share it with, or even just to yourself on a quiet evening. Once you’ve baked it, tasted it, and fallen in love with it, I would absolutely love to hear about your adventure! Please share your thoughts, your photos, and any delightful variations you came up with in the comments below. Did you serve it with a special topping? Did you add a secret ingredient that made it uniquely yours? Your experiences inspire me and the entire cooking community, showing us all the wonderful ways this classic can be enjoyed. Let’s celebrate the joy of home baking together. Happy baking, and enjoy every single incredible bite!</p>
<h3>Frequently Asked Questions about Apple Crisp</h3>
<h4>How do you keep Apple Crisp from getting soggy?</h4>
<p>The key to preventing a soggy apple crisp lies in a few tricks. First, don’t overcook your apples; they should be tender but still hold some shape. Second, ensure your topping is properly baked to a golden brown and crisp texture, which creates a protective barrier. Lastly, if you’re making it ahead, store the topping and apple filling separately if possible, or assemble just before baking. A little bit of cornstarch or flour tossed with the apples can also help absorb excess moisture and create a thicker, more flavorful filling.</p>
<h4>Can Apple Crisp be made ahead of time?</h4>
<p>Absolutely! You can prepare the apple filling and the crisp topping separately a day or two in advance. Store the apple mixture in an airtight container in the refrigerator and the topping in a separate container at room temperature. When you’re ready to bake, simply assemble them in the baking dish and pop it into the oven. This makes entertaining a breeze! If you bake the entire crisp ahead of time, it’s best to reheat it gently in the oven to restore the crispness of the topping, rather than using a microwave.</p>
<h4>How long does Apple Crisp last?</h4>
<p>Properly stored, leftover apple crisp will last for about 3-4 days in the refrigerator. Make sure to cover it tightly with plastic wrap or aluminum foil. While it’s best enjoyed warm and freshly baked, it’s still quite delicious cold or gently reheated. For reheating, a few minutes in a moderate oven (around 300°F/150°C) is ideal to crisp up the topping again and warm the fruit through. You can also use a microwave for a quicker, though slightly softer, result.</p>
<h4>What kind of apples are best for Apple Crisp?</h4>
<p>For the best apple crisp, I recommend using a mix of sweet and tart apples that hold their shape well during baking. Granny Smith apples are a classic choice for their tartness and firm texture, which balances the sweetness of the dish. You can pair them with sweeter varieties like Honeycrisp, Fuji, Braeburn, or Gala for a more complex and nuanced flavor profile. Avoid apples that turn mushy quickly, like Red Delicious or Macintosh, as they can result in a soupy filling.</p>
<h4>Can I use other fruits in this recipe?</h4>
<p>Absolutely! This crisp recipe is incredibly adaptable and encourages creativity. While apples are traditional, you can easily substitute or combine them with other fruits. Pears, peaches (especially in summer!), mixed berries (strawberries, blueberries, raspberries), plums, or even rhubarb make fantastic crisp fillings. Just adjust the sugar content slightly depending on the natural sweetness or tartness of your chosen fruit. A combination of apples and berries is particularly delicious, offering a wonderful balance of flavors and textures!</p>

Classic Apple Crisp Recipe – Easy & Delicious Dessert!
Apple Crisp is a classic dessert that brings together tender, cinnamon-spiced apples and a crunchy oat crumble. This comforting dish is easy to prepare and is the perfect end to any meal, especially during the fall. The sweetness of the apples combined with the buttery, crunchy topping makes each bite irresistible. Whether you serve it warm with a scoop of vanilla ice cream or enjoy it on its own, this apple crisp is sure to delight your taste buds. Perfect for family dinners, potlucks, or whenever you need a cozy, homemade dessert. Apple Crisp is a heartwarming dessert that combines tender, spiced apples with a crunchy, buttery oat topping. The recipe is simple yet delicious, making it perfect for gatherings, family dinners, or just a cozy night in. Each bite brings a mix of soft, sweet apples and a satisfying crunch from the topping.
Ingredients
-
⅔ cup all-purpose flour
-
⅔ cup old-fashioned oats
-
⅔ cup light brown sugar
-
½ tsp salt
-
½ tsp ground cinnamon
-
½ cup unsalted butter, melted
-
6 cups peeled, thinly sliced apples (Honeycrisp, Pink Lady, or Fuji recommended)
-
3 tbsp apple juice
-
¼ cup granulated sugar
-
2 tbsp all-purpose flour
-
¾ tsp ground cinnamon
-
1 tsp pure vanilla extract
Instructions
-
Step 1
Preheat oven to 375°F (190°C). Prepare a 9×13 inch (3-quart) baking dish. -
Step 2
In a medium bowl, combine ⅔ cup all-purpose flour, ⅔ cup old-fashioned oats, ⅔ cup light brown sugar, ½ tsp salt, and ½ tsp ground cinnamon. Stir well. Pour ½ cup melted unsalted butter over the dry mixture. Mix with a fork until crumbly, forming distinct lumps. Set aside. -
Step 3
In a large mixing bowl, combine 6 cups peeled, thinly sliced apples with 3 tbsp apple juice, ¼ cup granulated sugar, 2 tbsp all-purpose flour, ¾ tsp ground cinnamon, and 1 tsp pure vanilla extract. Toss until apples are evenly coated. -
Step 4
Transfer the seasoned apple slices evenly into the prepared baking dish. Sprinkle the crumbly oat topping over the apples, ensuring an even layer. Place the dish on a baking sheet. Bake in the preheated 375°F (190°C) oven for 40-50 minutes, or until the topping is golden brown, the apple filling is visibly bubbling, and the apples are tender when pierced with a knife. If topping browns too quickly, loosely tent with foil. -
Step 5
Carefully remove from oven and let cool on a wire rack for at least 15-20 minutes before serving. This allows the filling to set. Serve warm, ideally with vanilla bean ice cream, whipped cream, or caramel sauce. Store leftovers in an airtight container in the refrigerator for 3-4 days. Reheat individual servings in the microwave or the whole dish in an oven at 350°F (175°C) for 15-20 minutes.
Important Information
Nutrition Facts (Per Serving)
It is important to consider this information as approximate and not to use it as definitive health advice.
Allergy Information
Please check ingredients for potential allergens and consult a health professional if in doubt.


Leave a Comment