

Chocolate Fudge Bars are, in my humble opinion, one of life’s most exquisite simple pleasures. There is something truly magical about these dense, chewy squares of pure chocolate bliss that resonates deeply with almost everyone. I distinctly remember the first time I tasted a perfectly crafted one — the intense, rich chocolate flavor, the satisfying chewiness, and the way it seemed to melt delightfully on the tongue, leaving an unforgettable impression. While the history of fudge itself dates back to American college kitchens in the late 19th century, evolving into various forms, the convenience and sheer delight of Chocolate Fudge Bars quickly made them a beloved classic in homes across the globe. People adore this dish not only for its undeniably decadent taste but also for that incredibly satisfying, moist, and chewy texture that sets it apart from a mere brownie. These bars are the ideal solution for satisfying a profound chocolate craving, a perfect addition to any potluck, or simply a convenient, joyful treat to brighten an ordinary day. I am confident that the recipe I am about to share will allow you to recreate this beloved, nostalgic taste with remarkable ease and deliver that familiar comfort right into your kitchen.

Ingredients:
Creating truly irresistible Chocolate Fudge Bars begins with a careful selection of ingredients. I always find that using high-quality chocolate makes all the difference, lending a depth of flavor that is simply unparalleled. Here’s what you’ll need to make these wonderfully rich and chewy treats:
- For the Chocolate Fudge Bar Base:
- 1 cup (226g) unsalted butter, melted
- 8 ounces (226g) high-quality semi-sweet chocolate, finely chopped or chocolate chips
- 1 ½ cups (300g) granulated sugar
- ½ cup (100g) packed light brown sugar
- 4 large eggs, at room temperature
- 2 teaspoons pure vanilla extract
- 1 cup (120g) all-purpose flour, spooned and leveled
- ¾ cup (75g) unsweetened cocoa powder (Dutch-processed for a darker, milder flavor, or natural for a more intense chocolatey tang)
- ½ teaspoon salt
- For the Decadent Fudge Topping:
- ½ cup (113g) unsalted butter, softened
- 3 cups (360g) powdered sugar (confectioners’ sugar), sifted
- ½ cup (50g) unsweetened cocoa powder (matching the type used for the base if possible)
- ¼ cup (60ml) whole milk or heavy cream
- 1 teaspoon pure vanilla extract
- Pinch of salt
- Optional Garnishes:
- Flaky sea salt (a wonderful contrast to the sweetness)
- Chocolate shavings or mini chocolate chips
Preparing the Chocolate Fudge Bar Base
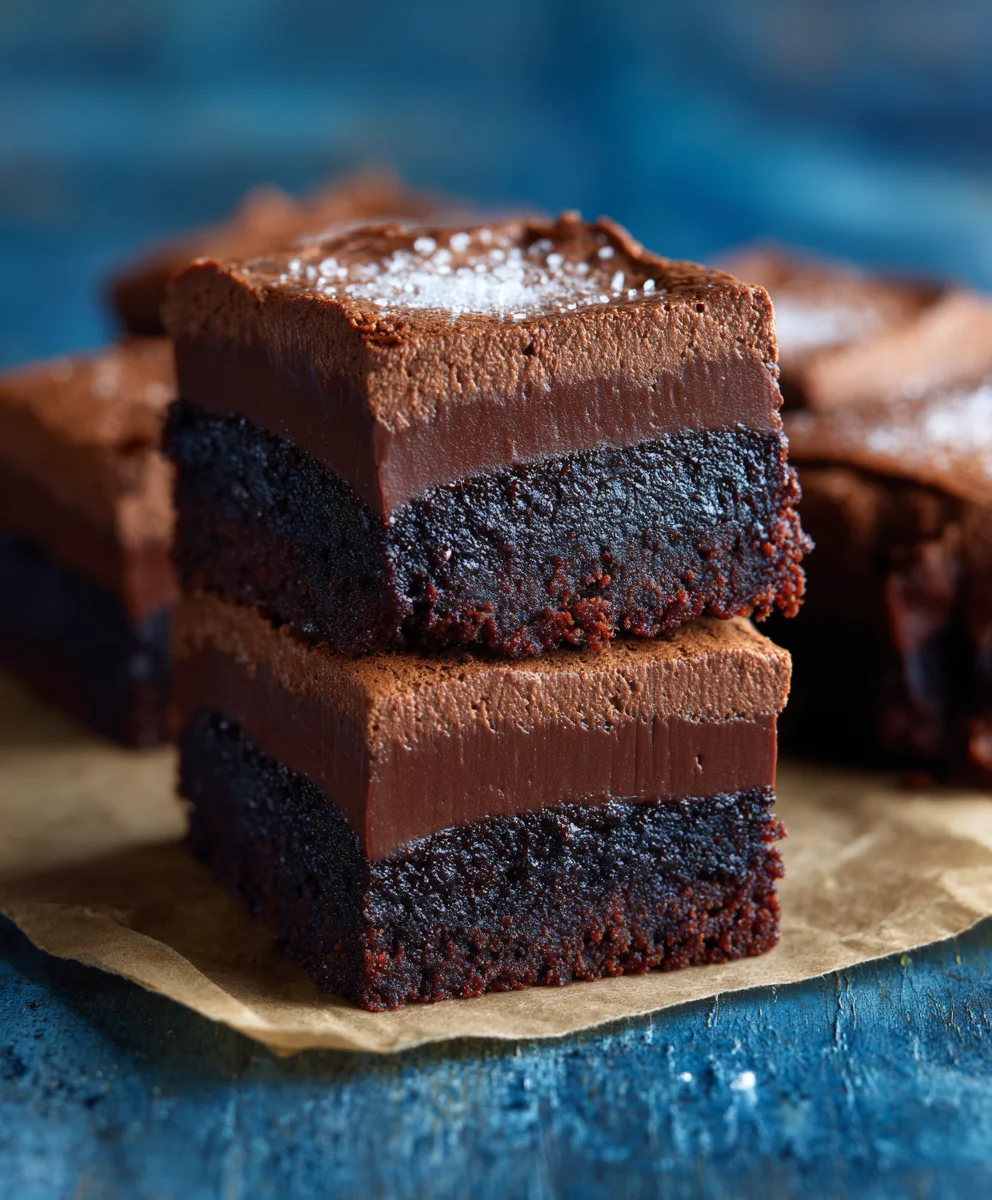
The foundation of our Chocolate Fudge Bars is a dense, chewy, and intensely chocolatey brownie-like base. It’s critical not to overbake this layer, as we want it to remain wonderfully moist and fudgy. I always tell my friends that the key to a perfect brownie is to pull it from the oven when it still looks a little underdone in the center – that’s when you know you’re headed for fudgy perfection!
- Preheat and Prepare: First things first, let’s get our oven ready. Preheat your oven to 350°F (175°C). Then, prepare a 9×13-inch baking pan. I like to line mine with parchment paper, leaving an overhang on the sides. This creates a convenient sling to lift the cooled bars out of the pan later, making for incredibly clean cuts. Lightly grease the parchment paper with baking spray or butter. This step is a small one, but it makes a huge difference in ease of removal!
-
Melt Butter and Chocolate: In a medium heatproof bowl, combine the 1 cup of melted unsalted butter and the 8 ounces of finely chopped semi-sweet chocolate. You have a couple of options here:
- Double Boiler Method: Set the bowl over a saucepan of simmering water (make sure the bottom of the bowl doesn’t touch the water). Stir frequently until the chocolate is fully melted and smooth. This is my preferred method as it offers gentle, controlled melting.
- Microwave Method: Alternatively, you can melt the mixture in the microwave. Heat in 30-second intervals, stirring well after each, until smooth. Be careful not to overheat the chocolate, as it can seize.
Once melted, remove from heat and let it cool slightly for about 5-10 minutes. This cooling step is important; we don’t want to scramble our eggs later!
- Whisk Wet Ingredients: In a large mixing bowl, combine the granulated sugar, light brown sugar, eggs, and vanilla extract. Whisk vigorously for about 2-3 minutes. You’re aiming for a mixture that is light in color and slightly thickened. This process incorporates air into the eggs and sugars, which contributes to the brownies’ chewiness and crinkly top. It also helps dissolve the sugar, preventing a grainy texture.
- Combine Wet Mixtures: Gently pour the slightly cooled melted chocolate mixture into the egg and sugar mixture. Whisk until just combined and smooth. Be careful not to overmix at this stage; we just want everything incorporated into a uniform, glossy batter.
- Sift Dry Ingredients: In a separate medium bowl, whisk together the all-purpose flour, unsweetened cocoa powder, and salt. Sifting the dry ingredients, especially the cocoa powder, ensures there are no lumps and that everything is evenly distributed in the batter. This is a small step that really improves the texture of your Chocolate Fudge Bars.
- Gently Fold in Dry Ingredients: Add the dry ingredient mixture to the wet chocolate mixture. Using a rubber spatula, gently fold until just combined. It’s crucial not to overmix here. Overmixing develops the gluten in the flour, which can lead to tough brownies. Stop folding as soon as you no longer see streaks of dry flour. A few small lumps are perfectly fine!
-
Bake to Perfection: Pour the batter evenly into your prepared 9×13-inch baking pan. Smooth the top with your spatula. Transfer the pan to the preheated oven and bake for 25-30 minutes.
Don’t Overbake!
The best way to tell if the base is done is to insert a wooden skewer or toothpick into the center. It should come out with moist crumbs attached, but not wet batter. If it comes out completely clean, you’ve likely overbaked it. Remember, these are fudgy brownies, not cakey ones!
- Cooling the Base: Once baked, remove the pan from the oven and place it on a wire rack to cool completely. Allowing the base to cool significantly, though not necessarily entirely, before adding the topping is important. A slightly warm base is fine for the topping to meld, but a hot one will melt the topping too quickly and create a mess. I usually let mine cool for at least an hour.
Preparing the Decadent Fudge Topping
Now, for the glorious part that truly makes these “Chocolate Fudge Bars” live up to their name – the rich, smooth, and incredibly decadent fudge topping! This is what takes our delicious brownie base and elevates it to something truly extraordinary. It’s a simple process, but the results are utterly luxurious.
- Soften the Butter: In a medium mixing bowl, place the ½ cup of softened unsalted butter. It’s important that the butter is truly softened, not melted, so it can cream properly with the powdered sugar. If it’s too cold, you’ll have lumps; if it’s melted, the frosting will be too thin.
- Add Cocoa and Liquid: Add the ½ cup of unsweetened cocoa powder and the ¼ cup of whole milk or heavy cream to the softened butter. Using heavy cream will result in an even richer and creamier topping, which I highly recommend for ultimate indulgence.
- Gradually Add Powdered Sugar: Now, begin adding the 3 cups of sifted powdered sugar, one cup at a time, beating with an electric mixer on low speed after each addition. Sifting the powdered sugar beforehand is key to avoiding lumps in your fudge topping. If you add it all at once, you’ll end up with a huge cloud of sugar dust! Once all the sugar is incorporated, the mixture will be quite thick.
-
Whip to Creaminess: Increase the mixer speed to medium-high and beat for 2-3 minutes. During this time, the topping will transform from a thick, slightly crumbly mixture into a smooth, fluffy, and spreadable fudge.
Achieving the Perfect Consistency
If the fudge topping seems too thick, you can add an additional teaspoon or two of milk or cream, one at a time, until it reaches your desired consistency. If it’s too thin, you can beat in a bit more sifted powdered sugar. Remember, we want it spreadable but firm enough to hold its shape once chilled.
- Incorporate Vanilla and Salt: Finally, add the 1 teaspoon of pure vanilla extract and the pinch of salt. Beat for another 30 seconds until fully incorporated. The vanilla enhances the chocolate flavor, and the salt balances the sweetness, making the fudge even more irresistible. Give it a taste – you might find yourself wanting to eat it straight from the bowl!
Assembling and Cooling the Chocolate Fudge Bars
This is where our two incredible components come together to create the magnificent Chocolate Fudge Bars we’ve been dreaming of. Patience is a virtue in this final stage, as proper cooling and chilling are essential for clean, perfect slices.
- Spread the Fudge Topping: Once your chocolate fudge bar base has cooled significantly (it can still be slightly warm to the touch, which helps the topping meld beautifully, but definitely not hot), carefully spread the decadent fudge topping evenly over the entire surface. I use an offset spatula for this; it makes spreading incredibly easy and creates a smooth, professional-looking finish. Take your time to get an even layer from edge to edge.
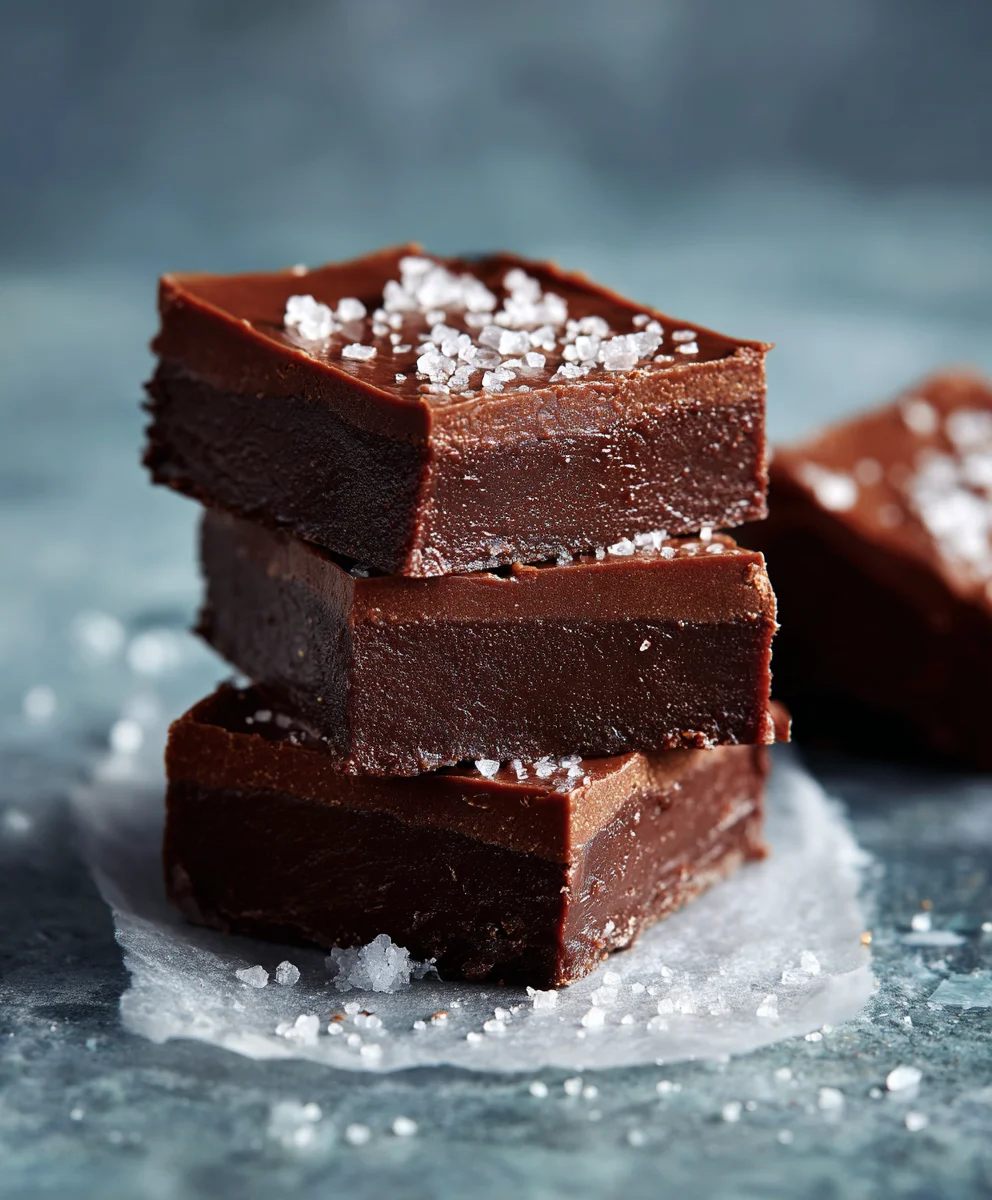
- Optional Garnish: If you’re using any optional garnishes like flaky sea salt or chocolate shavings, now is the time to sprinkle them over the wet fudge topping. The salt adds a wonderful savory contrast that truly enhances the rich chocolate flavor, creating a gourmet touch for your Chocolate Fudge Bars.
-
Chill Thoroughly: This step is non-negotiable for achieving perfect, neat slices. Place the entire pan of assembled Chocolate Fudge Bars into the refrigerator to chill for at least 2-3 hours, or even better, overnight.
Why Chilling is Crucial:
Chilling allows both the brownie base and the fudge topping to firm up completely. This firmness is what will enable you to cut clean, sharp edges without the bars falling apart or the topping smearing. It also intensifies the fudginess of both layers!
-
Cut into Bars: Once thoroughly chilled, remove the pan from the refrigerator. Using the parchment paper overhang, carefully lift the entire slab of Chocolate Fudge Bars out of the pan and place it onto a cutting board.
For the cleanest cuts, I recommend using a large, sharp knife. Heat the knife under hot water, wipe it dry, and then make your first cut. Reheat and wipe the knife clean after every few cuts. This prevents the fudge from sticking to the blade and gives you beautifully defined edges.
Cut the large slab into your desired bar size. I usually aim for 2-inch by 2-inch squares, yielding about 24 bars, but you can go smaller for bite-sized treats or larger for a truly indulgent dessert.
- Serve and Enjoy: Arrange your magnificent Chocolate Fudge Bars on a serving platter. While they are best enjoyed at room temperature for the ultimate soft, fudgy texture, they will hold their shape better if kept slightly cool. Get ready for rave reviews!
Tips for Perfect Chocolate Fudge Bars and Storage
To ensure your Chocolate Fudge Bars are consistently amazing, and to help you troubleshoot any common issues, I’ve gathered a few extra tips based on my experience. These small details can elevate your baking and make you a true bar-baking superstar!
- Don’t Overbake the Base: I cannot stress this enough! Overbaking is the number one culprit behind dry, cakey brownies instead of the dense, fudgy base we desire for our Chocolate Fudge Bars. Trust the toothpick test: moist crumbs, not wet batter, and certainly not a clean toothpick. A slightly underbaked center will continue to cook as it cools, resulting in that dreamy fudgy texture.
- Room Temperature Eggs: Using room temperature eggs for the base batter is important. They incorporate more easily and evenly into the mixture, creating a smoother emulsion and a more consistent texture in the final product. If you forget to take them out ahead of time, a quick trick is to place them in a bowl of warm (not hot!) water for 5-10 minutes.
- Quality Ingredients Matter: For such a chocolate-centric dessert, the quality of your chocolate and cocoa powder truly shines through. Opt for good quality semi-sweet chocolate (around 60% cacao) and a rich, unsweetened cocoa powder. Dutch-processed cocoa will give you a darker color and a less acidic, smoother chocolate flavor, while natural cocoa powder offers a more intense, slightly brighter chocolate taste. Either works wonderfully, so choose what you prefer for your Chocolate Fudge Bars.
- Clean Knife for Cutting: As mentioned in the assembly steps, a hot, clean knife is your best friend when cutting chilled Chocolate Fudge Bars. This trick prevents tearing and crumbling, giving you picture-perfect, sharp-edged squares. Don’t skip reheating and wiping after each cut!
-
Storage: Once cut, your delicious Chocolate Fudge Bars should be stored in an airtight container.
- Room Temperature: They can last for 2-3 days at cool room temperature. If your kitchen is warm, they might soften, but will still be delicious.
- Refrigerator: For longer storage and firmer bars, keep them in the refrigerator for up to a week. Just let them come to room temperature for about 15-20 minutes before serving for the best texture.
- Freezer: These bars freeze exceptionally well! Wrap individual bars tightly in plastic wrap, then place them in a freezer-safe bag or container. They can be frozen for up to 2-3 months. Thaw them in the refrigerator overnight or at room temperature for a few hours.
-
Flavor Variations: Don’t be afraid to experiment with your Chocolate Fudge Bars!
- Nuts: Fold in a cup of chopped walnuts or pecans into the base batter for added crunch and flavor.
- Espresso Powder: Add a teaspoon of instant espresso powder to the base batter to deepen and enhance the chocolate flavor without making it taste like coffee. It’s a secret weapon for chocoholics!
- Different Extracts: Instead of or in addition to vanilla, try a few drops of almond extract or peppermint extract for a festive twist.
- Topping Fun: Sprinkle with toasted shredded coconut, mini M&Ms, or even a drizzle of caramel sauce before chilling for extra flair.
- Batch Size Adjustment: This recipe is designed for a 9×13-inch pan. If you’re using an 8×8-inch or 9×9-inch pan, you’ll want to halve the recipe. Be aware that baking times will also need to be adjusted (likely shorter), so keep a close eye on your brownies.
There you have it! With these detailed steps and helpful tips, you’re well on your way to creating the most incredible Chocolate Fudge Bars that will surely be a hit with everyone who tries them. Happy baking, my friends!
Conclusion:
And there you have it! We’ve journeyed together through the simple steps of creating what I genuinely believe will become your new go-to dessert. These aren’t just any dessert bars; they are a truly irresistible indulgence that promises to satisfy even the most profound chocolate cravings. What makes this recipe an absolute must-try, in my humble opinion, is the exquisite balance it strikes: a deeply rich, intense chocolate flavor paired with that perfect, melt-in-your-mouth fudgy texture and a delightful chewiness that keeps you coming back for more. It’s the kind of treat that feels incredibly decadent, yet is surprisingly straightforward to prepare, making it a stellar choice for both seasoned bakers and complete novices alike. I’ve refined this recipe to ensure maximum flavor impact with minimal fuss, meaning you spend less time in the kitchen and more time savoring every glorious bite. This isn’t just baking; it’s creating moments of pure joy, whether it’s for a quiet evening at home or a lively gathering with loved ones.
When it comes to serving these magnificent creations, the possibilities are truly endless, limited only by your imagination! While a simple square of these decadent treats is absolutely perfect as is, perhaps dusted lightly with a touch of cocoa powder or powdered sugar for an elegant finish, don’t hesitate to elevate the experience. Imagine a warm square, fresh from a quick zap in the microwave, served alongside a scoop of premium vanilla bean ice cream. The contrast of the warm, gooey richness against the cold, creamy sweetness is pure magic. For another delightful pairing, consider a generous dollop of freshly whipped cream, perhaps infused with a hint of espresso or a splash of bourbon, to complement the deep chocolate notes without overwhelming them. A scattering of fresh raspberries or sliced strawberries can also provide a wonderful, tart counterpoint, cutting through the richness and adding a vibrant burst of color and flavor. For those who appreciate a salty-sweet combination, a delicate sprinkle of flaky sea salt over the top before serving truly enhances the chocolate’s complexity, bringing out an unexpected depth.
Creative Twists and Flavor Adventures:
But why stop there? This recipe for Chocolate Fudge Bars is incredibly versatile, inviting you to experiment and make it uniquely your own. For an added textural dimension and a boost of nutty flavor, try folding in a cup of toasted chopped pecans or walnuts into the batter before baking; the crunch against the soft fudge is simply divine. If you’re a fan of a little zest, a teaspoon of finely grated orange zest can brighten the chocolate notes beautifully, while a touch of peppermint extract (about half a teaspoon) transforms them into a festive, refreshing treat perfect for the holidays. For an even deeper, more complex chocolate profile, consider adding a teaspoon of instant espresso powder to your dry ingredients; it won’t make your bars taste like coffee, but it will intensify the chocolate flavor in an astonishing way. You could also swirl in a spoonful of creamy peanut butter or softened cream cheese before baking for a marbled effect and an extra layer of flavor. Feeling adventurous? A tiny pinch of cayenne pepper can introduce a subtle, warming kick that will surprise and delight your taste buds!
I genuinely hope that you feel inspired to roll up your sleeves and give this recipe a try. There’s an unparalleled satisfaction that comes from creating something so utterly delicious with your own hands, and I promise you, the smiles and compliments you’ll receive will make every moment worthwhile. Don’t be afraid to experiment with my serving suggestions or get creative with your own variations; that’s part of the fun of baking! Once you’ve baked these incredible Chocolate Fudge Bars, I would absolutely love to hear about your experience. Did you add a unique twist? What did your family and friends think? Please don’t hesitate to share your thoughts, your successes, and even your photos in the comments section or wherever you connect with our baking community. Your feedback and creativity not only inspire me but also help other aspiring bakers. So, go forth, bake with joy, and prepare to fall head over heels for these heavenly bars. Happy baking, my friends!
Decadent Chocolate Fudge Bars: Quick & Easy Sweet Treat
Chocolate Fudge Bars are one of life’s most exquisite simple pleasures. These dense, chewy squares of pure chocolate bliss resonate deeply with almost everyone. People adore this dish not only for its undeniably decadent taste but also for that incredibly satisfying, moist, and chewy texture that sets it apart from a mere brownie. These bars are the ideal solution for satisfying a profound chocolate craving, a perfect addition to any potluck, or simply a convenient, joyful treat to brighten an ordinary day.
Ingredients
-
1 cup (226g) unsalted butter, melted (for base)
-
8 oz (226g) semi-sweet chocolate, chopped (for base)
-
1 ½ cups (300g) granulated sugar (for base)
-
½ cup (100g) packed light brown sugar (for base)
-
4 large eggs, at room temperature (for base)
-
2 tsp pure vanilla extract (for base)
-
1 cup (120g) all-purpose flour (for base)
-
¾ cup (75g) unsweetened cocoa powder (for base)
-
½ tsp salt (for base)
-
½ cup (113g) unsalted butter, softened (for topping)
-
3 cups (360g) powdered sugar, sifted (for topping)
-
½ cup (50g) unsweetened cocoa powder (for topping)
-
¼ cup (60ml) whole milk or heavy cream (for topping)
-
1 tsp pure vanilla extract (for topping)
-
Pinch of salt (for topping)
-
Flaky sea salt (optional garnish)
-
Chocolate shavings or mini chocolate chips (optional garnish)
Instructions
-
Step 1
Preheat oven to 350°F (175°C). Line a 9×13-inch baking pan with parchment paper, leaving an overhang, and lightly grease. -
Step 2
Melt 1 cup butter and 8 oz chocolate in a heatproof bowl over simmering water (double boiler) or in 30-second intervals in the microwave until smooth. Cool slightly for 5-10 minutes. -
Step 3
In a large bowl, whisk granulated sugar, light brown sugar, eggs, and 2 tsp vanilla extract vigorously for 2-3 minutes until light in color and slightly thickened. -
Step 4
Gently pour the slightly cooled melted chocolate mixture into the egg mixture. Whisk until just combined and smooth. -
Step 5
In a separate bowl, whisk together flour, ¾ cup cocoa powder, and ½ tsp salt. Sift to ensure no lumps. -
Step 6
Add dry ingredients to the wet mixture. Gently fold with a rubber spatula until just combined, being careful not to overmix. Stop when no streaks of dry flour remain. -
Step 7
Pour batter evenly into the prepared pan and smooth the top. Bake for 25-30 minutes. A wooden skewer inserted into the center should come out with moist crumbs, not wet batter. Do not overbake. -
Step 8
Remove from oven and cool completely on a wire rack for at least an hour before adding the topping. -
Step 9
In a medium mixing bowl, place ½ cup softened unsalted butter. Add ½ cup cocoa powder and ¼ cup milk or heavy cream. -
Step 10
Gradually add 3 cups sifted powdered sugar, one cup at a time, beating with an electric mixer on low speed after each addition until combined. The mixture will be thick. -
Step 11
Increase mixer speed to medium-high and beat for 2-3 minutes until smooth, fluffy, and spreadable. If too thick, add a teaspoon of milk; if too thin, add more powdered sugar. -
Step 12
Add 1 tsp vanilla extract and a pinch of salt. Beat for 30 seconds until fully incorporated. -
Step 13
Once the base is cooled, spread the fudge topping evenly over the entire surface using an offset spatula. -
Step 14
If desired, sprinkle with flaky sea salt or chocolate shavings/chips over the wet fudge topping. -
Step 15
Chill the pan in the refrigerator for at least 2-3 hours, or overnight, to allow both layers to firm up completely for clean cuts. -
Step 16
Once thoroughly chilled, lift the entire slab of bars out of the pan using the parchment paper overhang onto a cutting board. Use a large, sharp knife, heated under hot water and wiped dry after every few cuts, to cut into desired bar sizes (e.g., 2-inch by 2-inch squares). -
Step 17
Serve and enjoy! Store in an airtight container at room temperature for 2-3 days, or in the refrigerator for up to a week. Bars can also be frozen for 2-3 months.
Important Information
Nutrition Facts (Per Serving)
It is important to consider this information as approximate and not to use it as definitive health advice.
Allergy Information
Please check ingredients for potential allergens and consult a health professional if in doubt.


Leave a Comment