

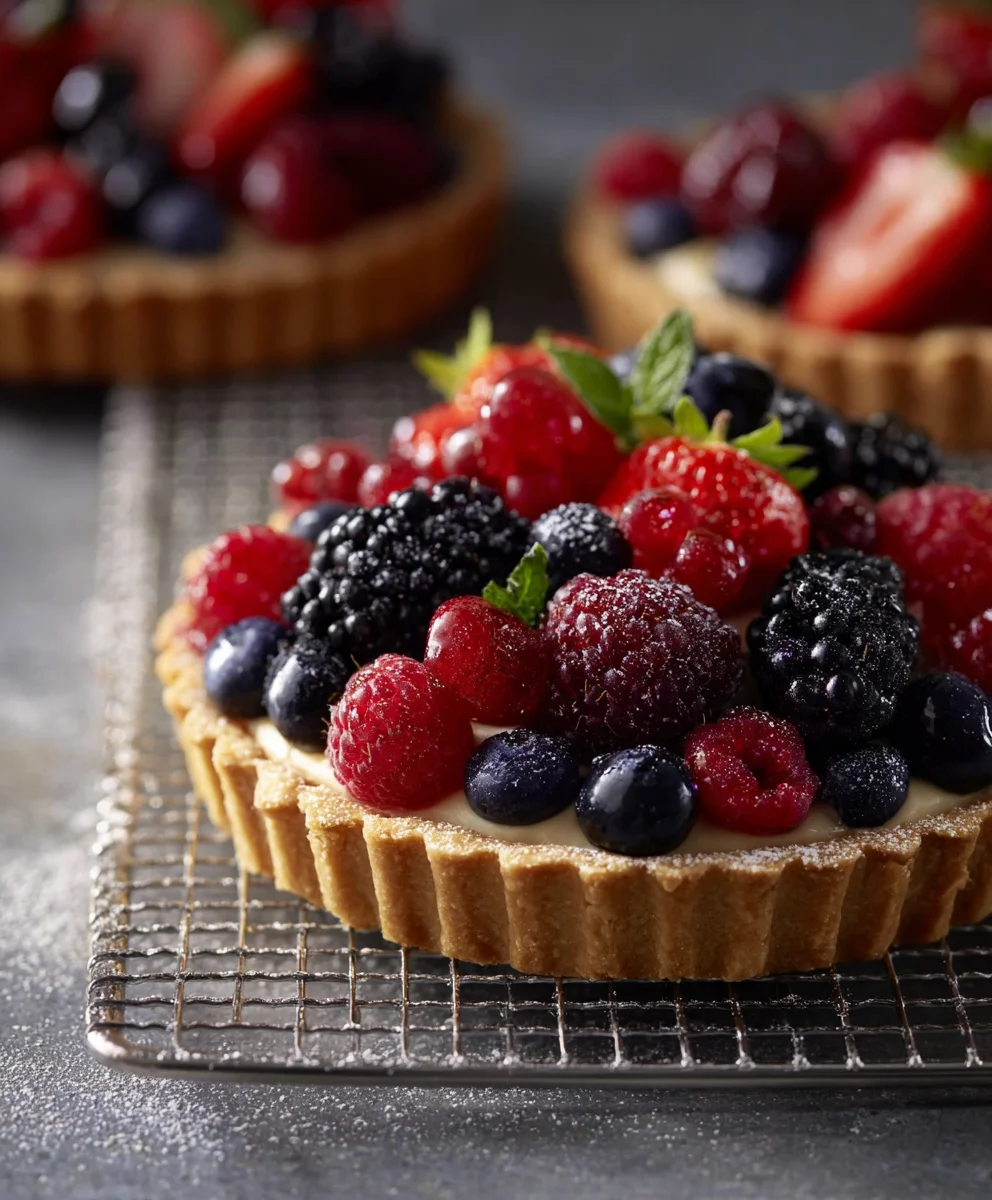
Mixed Berry Tart. There’s something undeniably magical about a dessert that not only captivates the eye with its vibrant, jewel-toned fruits but also delights the palate with every single bite. This exquisite Mixed Berry Tart is more than just a sweet treat; it’s an experience, a true celebration of nature’s bounty and culinary artistry. While tarts themselves boast a rich European heritage, evolving from savory pies to the delicate, fruit-laden masterpieces we adore today, the beauty of a berry tart lies in its timeless appeal and universal charm.
People absolutely adore this dish for countless reasons. Its perfect harmony of flavors, blending the natural sweetness of ripe berries with a subtle tang, all nestled within a crisp, buttery crust and a smooth, creamy filling, is simply irresistible. Whether you’re marking a special occasion, hosting a casual brunch, or simply craving a moment of pure, unadulterated bliss, our Mixed Berry Tart promises to be the showstopper. It offers both elegance and a comforting familiarity, making it a beloved choice for seasoned bakers and dessert enthusiasts alike. Get ready to embark on a delightful baking journey that culminates in a truly unforgettable dessert.

Ingredients:
-
For the Sweet Tart Crust (Pâte Sablée):
- 1 ¼ sticks (140g) unsalted butter, very cold and cut into ½-inch cubes
- 2 cups (240g) all-purpose flour, plus more for dusting
- ½ cup (100g) granulated sugar
- ¼ teaspoon fine sea salt
- 1 large egg yolk
- 2-3 tablespoons ice water, as needed
- Pie weights, dried beans, or uncooked rice for blind baking
-
For the Silky Pastry Cream (Crème Pâtissière):
- 2 cups (480ml) whole milk
- ½ cup (100g) granulated sugar, divided
- 4 large egg yolks
- ¼ cup (30g) cornstarch
- 2 tablespoons (16g) all-purpose flour
- 2 tablespoons (28g) unsalted butter, cold and cut into small pieces
- 1 teaspoon pure vanilla extract
- Pinch of fine sea salt
-
For the Vibrant Mixed Berry Topping:
- 1 cup (150g) fresh strawberries, hulled and halved or quartered (depending on size)
- 1 cup (150g) fresh blueberries
- 1 cup (125g) fresh raspberries
- 1 cup (150g) fresh blackberries
- Optional: a few sprigs of fresh mint for garnish
-
For the Optional Berry Glaze/Nappage:
- 2-3 tablespoons apricot jam or red currant jelly
- 1 tablespoon water or berry liqueur (like Chambord or Cointreau)
Preparing the Flaky Tart Crust (Pâte Sablée)
- Combine Dry Ingredients: I always start by gathering my ingredients, ensuring the butter is truly cold—this is paramount for a tender, flaky crust. In a large mixing bowl, I gently whisk together the 2 cups of all-purpose flour, ½ cup of granulated sugar, and ¼ teaspoon of fine sea salt. Whisking ensures these dry elements are thoroughly combined, preventing any pockets of unmixed ingredients later on.
- Cut in Cold Butter: Next, I add the very cold, cubed unsalted butter to my dry mixture. Using my fingertips, a pastry blender, or even a food processor (pulsing briefly), I work the butter into the flour until the mixture resembles coarse crumbs. It’s essential to work quickly here to minimize handling and prevent the butter from melting. You should still see some pea-sized pieces of butter remaining; these pockets of butter are what create those wonderful flaky layers when the tart bakes.
- Add Egg Yolk and Ice Water: In a small separate bowl, I whisk the single large egg yolk with 2 tablespoons of ice water. I then pour this liquid mixture over the flour and butter crumbs. Using a fork, I gently mix until the dough just begins to come together. If the dough still seems too dry or isn’t cohesive enough, I add the remaining tablespoon of ice water, one teaspoon at a time, until a shaggy dough forms. I always remind myself not to overmix, as too much gluten development will result in a tough crust. The goal is just to bring it together.
- Form and Chill the Dough: I turn the shaggy dough out onto a lightly floured surface and gently gather it into a flat disc. I wrap this disc tightly in plastic wrap and refrigerate it for at least 1 hour, but ideally 2 hours. This chilling step is absolutely crucial for two reasons: it allows the butter to firm up again, making the dough much easier to roll out, and it gives the gluten a chance to relax, which prevents excessive shrinkage during baking.
- Preheat Oven and Prepare Tart Pan: While my precious dough is chilling, I preheat my oven to 375°F (190°C). I then lightly grease a 9-inch (23 cm) fluted tart pan with a removable bottom. A removable bottom is a godsend for getting your beautiful Mixed Berry Tart out in one piece!
- Roll Out the Dough: Once the dough is properly chilled, I unwrap it and place it on a lightly floured surface. Using a rolling pin, I roll out the dough into a 12-inch (30 cm) circle, aiming for a thickness of about 1/8-inch. To ensure even rolling and prevent sticking, I make sure to lift and rotate the dough frequently, adding a tiny bit more flour underneath if needed.
- Fit into Tart Pan: Carefully, I transfer the rolled-out dough to the prepared tart pan. The easiest way to do this is to gently roll the dough around your rolling pin and then unroll it over the pan. I then gently press the dough into the bottom and up the sides of the pan, ensuring it’s snugly fitted into all the fluted edges. I trim any excess dough from the edges either by using a sharp knife or by rolling the rolling pin over the top of the pan to create a clean edge. If any small cracks appear while I’m pressing, I simply patch them up with a little bit of the trimmed excess dough.
- Second Chill and Blind Bake: I prick the bottom of the dough all over with a fork; this prevents it from puffing up too much. Then, I place the tart shell back in the refrigerator for another 20-30 minutes. This second chill is super important as it really helps prevent the crust from shrinking too much during its initial bake. After this chill, I line the crust with a piece of parchment paper or aluminum foil and fill it with pie weights, dried beans, or even uncooked rice. This process, known as blind baking, is essential for a crisp, evenly baked crust. I bake it for 15-20 minutes, or until the edges begin to turn a very light golden brown.
- Remove Weights and Finish Baking: I carefully remove the parchment paper and pie weights. Then, I return the tart shell to the oven and bake for an additional 10-15 minutes, or until the bottom is beautifully golden brown and appears dry. A perfectly blind-baked crust is the absolute foundation for a truly incredible Mixed Berry Tart. Once baked, I transfer the hot crust to a wire rack and let it cool completely before I even think about filling it. Patience is key!
Crafting the Velvety Pastry Cream (Crème Pâtissière)
- Heat Milk: For a lusciously smooth pastry cream, I start by combining the 2 cups of whole milk with half of the granulated sugar (¼ cup or 50g) in a medium saucepan. I heat this mixture over medium heat, stirring occasionally to dissolve the sugar, until it just comes to a gentle simmer. I watch carefully and make sure not to let it boil over. Once I see tiny bubbles forming around the edges of the pan, I remove it from the heat.
- Whisk Egg Yolks and Dry Ingredients: In a separate large, heatproof bowl, I whisk together the remaining granulated sugar (¼ cup or 50g) with the 4 large egg yolks until the mixture is pale yellow and creamy. Then, I sift in the ¼ cup of cornstarch and 2 tablespoons of all-purpose flour. Sifting prevents lumps and helps create a smoother cream. I whisk vigorously until the mixture is completely smooth and forms a thick, pale yellow paste.
- Temper the Yolks: This is a absolutely critical step to prevent the eggs from scrambling. While whisking the egg yolk mixture constantly and vigorously, I slowly pour about half of the hot milk mixture into the egg yolk mixture in a thin, steady stream. This gradually brings the temperature of the yolks up, without cooking them, a technique known as tempering. Don’t stop whisking during this step!
- Combine and Cook: Once the yolks are tempered, I pour the entire egg yolk mixture back into the saucepan with the remaining hot milk. I place the saucepan back over medium heat and continue to whisk constantly and vigorously. You’ll notice the cream will begin to thicken quite rapidly, usually within 2-4 minutes. I make sure to scrape the bottom and sides of the pan frequently with my whisk to prevent any scorching. I continue to cook and whisk until the cream is very thick, has a pudding-like consistency, and comes to a full boil for about 1 minute. Boiling helps activate the starches and ensures the cream holds its shape beautifully.
- Add Butter and Vanilla: I immediately remove the saucepan from the heat and whisk in the cold, cubed unsalted butter and the 1 teaspoon of pure vanilla extract until they are fully incorporated and the cream is smooth and glossy. The butter adds incredible richness and a beautiful sheen to the pastry cream. I also add a tiny pinch of fine sea salt here; it really enhances all the other flavors.
- Strain and Chill: To guarantee an ultra-smooth, professional-quality pastry cream, I press the hot cream through a fine-mesh sieve into a clean bowl. This step removes any potential lumps or bits of cooked egg that might have formed. I then immediately cover the surface of the pastry cream directly with plastic wrap. This is crucial to prevent a “skin” from forming as it cools. I let it cool at room temperature for a bit, then transfer it to the refrigerator for at least 3-4 hours, or preferably overnight, until it is completely chilled and firm. A well-chilled pastry cream is absolutely essential for a stable and beautiful Mixed Berry Tart.
Assembling Your Gorgeous Mixed Berry Tart
- Prepare the Pastry Cream: Once my blind-baked tart crust is completely cool and my pastry cream is thoroughly chilled and firm, I take the pastry cream out of the refrigerator. At this point, it will be quite stiff, almost like firm pudding. I give it a good whisk or beat it gently with a spatula for a minute or two until it becomes wonderfully smooth, creamy, and spreadable again. This makes it much easier to work with and ensures a lovely, light texture in the finished tart.
- Fill the Tart Shell: I carefully spoon the re-whipped pastry cream into the cooled tart crust. Using an offset spatula or the back of a spoon, I spread the cream evenly across the bottom of the tart shell, making sure to reach all the way to the edges. I aim for a smooth, level surface, ensuring there are no air pockets underneath.
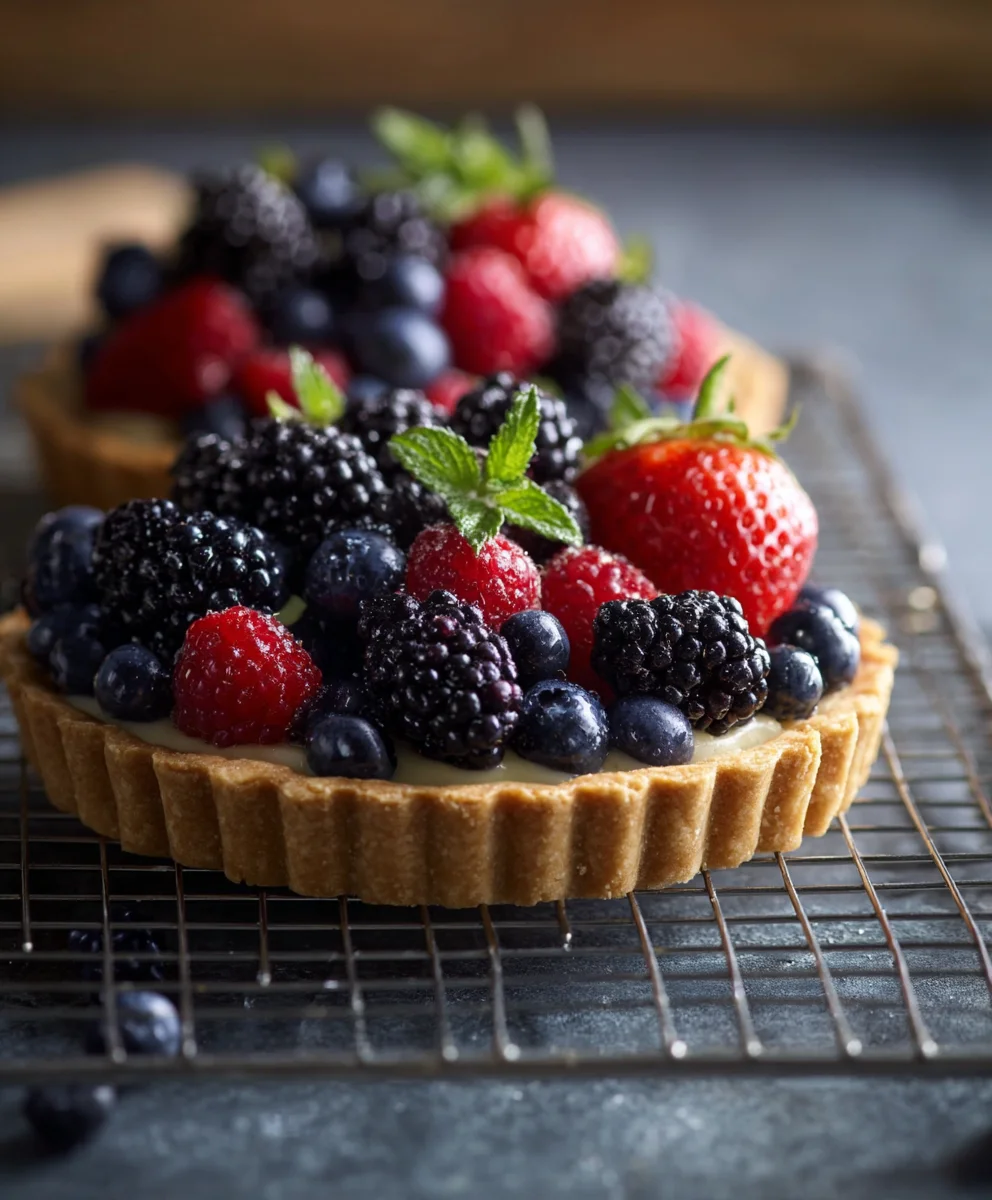
- Arrange the Fresh Berries: Now for the truly artistic and vibrant part – arranging the beautiful fresh mixed berries! This is where our “Mixed Berry Tart” really comes to life and shows off its incredible appeal. I start by gently washing and thoroughly drying all the berries; it’s incredibly important that the berries are completely dry to prevent them from making the glaze or cream watery. I arrange the hulled and halved strawberries, blueberries, raspberries, and blackberries artfully on top of the pastry cream. I love to mix and match colors and sizes, creating a visually appealing pattern. Sometimes I arrange them in neat concentric circles, other times in more organic clusters. There’s truly no wrong way to do it; just make it look inviting and abundant! I make sure to cover the entire surface of the cream with a generous, colorful layer of berries.
- Prepare the Optional Berry Glaze: If I choose to add a glaze, which I highly recommend for both its gorgeous shine and its ability to protect the fresh berries, I prepare it now. In a small saucepan or a microwave-safe bowl, I combine the 2-3 tablespoons of apricot jam or red currant jelly with the 1 tablespoon of water or berry liqueur. I heat this mixture gently over low heat or in the microwave for about 30 seconds, stirring until the jam is fully melted and smooth. Then, for a perfectly clear and professional-looking finish, I strain the warm glaze through a fine-mesh sieve to remove any fruit pieces or lumps.
- Apply the Glaze: Using a clean pastry brush, I gently brush the warm, strained glaze over the arranged fresh berries. I take my time to ensure I cover each berry lightly, giving the entire tart a beautiful, professional-looking sheen. The glaze not only adds a lovely, reflective shine but also helps to prevent the berries from drying out and keeps them looking and tasting fresh for longer. It acts like a protective, edible varnish.
- Final Chill (Optional but Recommended): For the very best results, allowing the flavors to meld beautifully and for the components to fully set, I like to chill the assembled Mixed Berry Tart in the refrigerator for at least 30 minutes before serving. This also helps the pastry cream and glaze to fully firm up, making for cleaner, more precise slices.
- Garnish and Serve: Just before serving, I might add a few fresh mint sprigs for a touch of vibrant green and a lovely aromatic flourish. To serve, I carefully remove the tart from its pan by pushing up the removable bottom. I slice it with a sharp knife, ideally one that has been dipped in hot water and wiped clean between each slice for the cleanest, most elegant cuts.
- Storage: Any leftover Mixed Berry Tart should be stored in an airtight container in the refrigerator for up to 2-3 days. While it’s truly at its peak and best enjoyed the day it’s made, it will still be delightfully delicious for a couple of days. Enjoy every vibrant, creamy bite!
Conclusion:
And there you have it, my dear fellow bakers and dessert enthusiasts! As we wrap up our delightful journey through this recipe, I truly hope you’re feeling inspired and excited to roll up your sleeves and get baking. This isn’t just another dessert; it’s a celebration of fresh flavors, a testament to the simple joy of creating something beautiful and delicious with your own hands. We’ve explored the magic that happens when plump, ripe berries meet a perfectly crisp, buttery crust, resulting in a treat that is as pleasing to the eye as it is to the palate. It’s a dessert that speaks of summer picnics, cozy afternoon tea, and elegant dinner parties all at once, making it incredibly versatile for any occasion you can imagine.
Why is this recipe an absolute must-try, you ask? Well, beyond its undeniable aesthetic appeal, which will undoubtedly earn you gasps of admiration from your guests, it’s the impeccable balance of flavors that truly sets it apart. The natural sweetness of the berries, enhanced by just a hint of sugar, is perfectly offset by their inherent tartness, creating a vibrant explosion of taste in every single bite. The crust, golden and flaky, provides the ideal textural contrast, melting in your mouth and leaving you yearning for just one more sliver. It’s light yet satisfying, refreshing yet comforting, and genuinely addictive in the very best way. Trust me, once you experience the sheer delight of this dessert, you’ll understand why it quickly becomes a cherished favorite in any household.
Elevate Your Dessert Experience: Serving Suggestions
Now, let’s talk about taking this masterpiece from great to absolutely unforgettable. While magnificent on its own, a slice of this tart can be wonderfully complemented by a few simple additions. For a touch of creamy indulgence, a generous dollop of freshly whipped cream, lightly sweetened and perhaps infused with a whisper of vanilla or almond extract, is simply divine. The cool, velvety cream provides a luxurious counterpoint to the tart’s vibrant fruitiness. Alternatively, a scoop of premium vanilla bean ice cream, slowly melting into the warm tart, creates a delightful temperature and texture contrast that is truly heavenly. If you prefer something with a little tang, a spoonful of crème fraîche offers a sophisticated, slightly sour note that beautifully cuts through the sweetness and richness. For a final flourish of elegance, consider a light dusting of powdered sugar just before serving – it adds a delicate, snowy finish that is visually stunning. This tart is also wonderful served at room temperature, allowing the full spectrum of berry flavors to shine, but a slightly chilled slice on a warm day is equally refreshing. I’ve even been known to enjoy a small slice with my morning coffee; who says tart isn’t for breakfast?
Unleash Your Creativity: Exciting Variations to Try
One of the aspects I adore most about baking is the freedom to personalize and experiment, and this recipe is incredibly forgiving and adaptable. While the classic presentation is undoubtedly perfect, don’t hesitate to put your own unique spin on it. For a seasonal twist, consider swapping out some of the mixed berries for other fruits that are in season. Imagine a delicate blend of peaches and raspberries in late summer, or a delightful combination of plums and blackberries in early autumn. You could even incorporate a layer of thinly sliced apples underneath the berries for an added layer of texture and a hint of autumnal warmth. As for the crust, while my preferred buttery shortcrust is a winner, you could try a crushed ginger snap crust for a spicy kick, or an almond flour crust for a gluten-friendly, nutty alternative. Feel free to enhance the filling further; a hint of lemon zest or a few drops of almond extract can truly elevate the flavor profile, adding another layer of aromatic complexity. You might even consider a balsamic glaze drizzle for a sophisticated, unexpected finish that complements the berries beautifully. Don’t be afraid to play around with different spices too – a touch of cinnamon or cardamom in the filling can introduce a wonderfully cozy aroma.
So, there you have it – all the reasons why I firmly believe this recipe deserves a prime spot in your baking repertoire. It’s truly a showstopper, a conversation starter, and most importantly, an incredibly delicious treat that embodies joy and freshness. I cannot stress enough how much I encourage you to set aside some time, gather your ingredients, and embark on this wonderful baking adventure. Experience the satisfaction of creating something so beautiful and incredibly tasty from scratch. Once you’ve pulled that golden, fragrant Mixed Berry Tart out of your oven, bask in the aroma and the anticipation. Take that first bite and let the flavors transport you.
And when you do, please, please, please share your creations with me! I absolutely adore seeing your culinary triumphs. Tag me in your photos, tell me about your serving suggestions, or describe any wonderful variations you came up with. Your experiences and insights are invaluable and inspire me every day. Happy baking, my friends, and may your kitchens always be filled with the sweet scent of success!
Mixed Berry Tart
An exquisite Mixed Berry Tart recipe, featuring a crisp, buttery crust and a smooth, creamy filling, topped with vibrant, jewel-toned fruits. This dessert is a true celebration of nature’s bounty and culinary artistry, perfect for special occasions or a moment of pure bliss.
Ingredients
-
1 1/4 cups whole milk
-
6 tablespoons granulated sugar
-
Seeds from 1/2 vanilla bean or 1/2 tsp vanilla extract
-
5 large egg yolks
-
3 tablespoons cornstarch
-
8 ounces cream cheese
-
1 cup unsalted butter
-
1/4 cup granulated sugar
-
1/4 cup brown sugar
-
1/4 cup honey
-
2 cups all-purpose flour
-
1/2 cup whole wheat flour
-
1/2 tsp salt
-
1/2 tsp baking soda
Instructions
-
Step 1
In a bowl, cream 1 cup softened unsalted butter with 1/4 cup granulated sugar, 1/4 cup brown sugar, and 1/4 cup honey until light. Whisk together 2 cups all-purpose flour, 1/2 cup whole wheat flour, 1/2 tsp salt, and 1/2 tsp baking soda. Gradually add dry ingredients to butter mixture, mixing until just combined. Form dough into a disc, wrap, and chill for at least 1-2 hours. -
Step 2
Preheat oven to 375°F (190°C). Lightly grease a 9-inch tart pan. Roll chilled dough to a 12-inch circle and fit into the prepared tart pan. Trim excess dough and prick the bottom with a fork. Chill for another 20-30 minutes. Line crust with parchment paper, fill with pie weights, and blind bake for 15-20 minutes until edges are light golden. Remove weights and bake for another 10-15 minutes until the bottom is golden brown. Cool completely on a wire rack. -
Step 3
In a saucepan, heat 1 1/4 cups whole milk with 3 tablespoons granulated sugar until it just comes to a gentle simmer. In a separate bowl, whisk 5 large egg yolks with 3 tablespoons cornstarch, the remaining 3 tablespoons granulated sugar, and vanilla (bean seeds or extract) until pale. Temper the egg mixture by slowly whisking in half of the hot milk. Pour the tempered mixture back into the saucepan with the remaining milk. Cook over medium heat, whisking constantly and vigorously, until the cream is very thick and boils for 1 minute. -
Step 4
Remove from heat and immediately whisk in 8 ounces softened cream cheese until fully incorporated and smooth. Strain the cream through a fine-mesh sieve into a clean bowl. Cover the surface directly with plastic wrap to prevent a skin from forming. Chill in the refrigerator for at least 3-4 hours, or preferably overnight, until completely chilled and firm. -
Step 5
Once the tart crust is cool and the cream filling is chilled, re-whisk the cream until smooth and spreadable. Spoon the cream evenly into the cooled tart crust. Arrange fresh mixed berries (strawberries, blueberries, raspberries, blackberries) artfully on top of the cream, ensuring berries are completely dry. -
Step 6
For the optional glaze: In a small saucepan, combine 2-3 tablespoons apricot jam or red currant jelly with 1 tablespoon water or non-alcoholic berry syrup. Heat gently until melted and smooth. Strain the warm glaze through a fine-mesh sieve. Gently brush the glaze over the arranged fresh berries for shine and protection. -
Step 7
Chill the assembled tart in the refrigerator for at least 30 minutes before serving to allow flavors to meld and components to set. Garnish with fresh mint sprigs if desired. Store any leftovers in an airtight container in the refrigerator for up to 2-3 days.
Important Information
Nutrition Facts (Per Serving)
It is important to consider this information as approximate and not to use it as definitive health advice.
Allergy Information
Please check ingredients for potential allergens and consult a health professional if in doubt.
Leave a Comment