

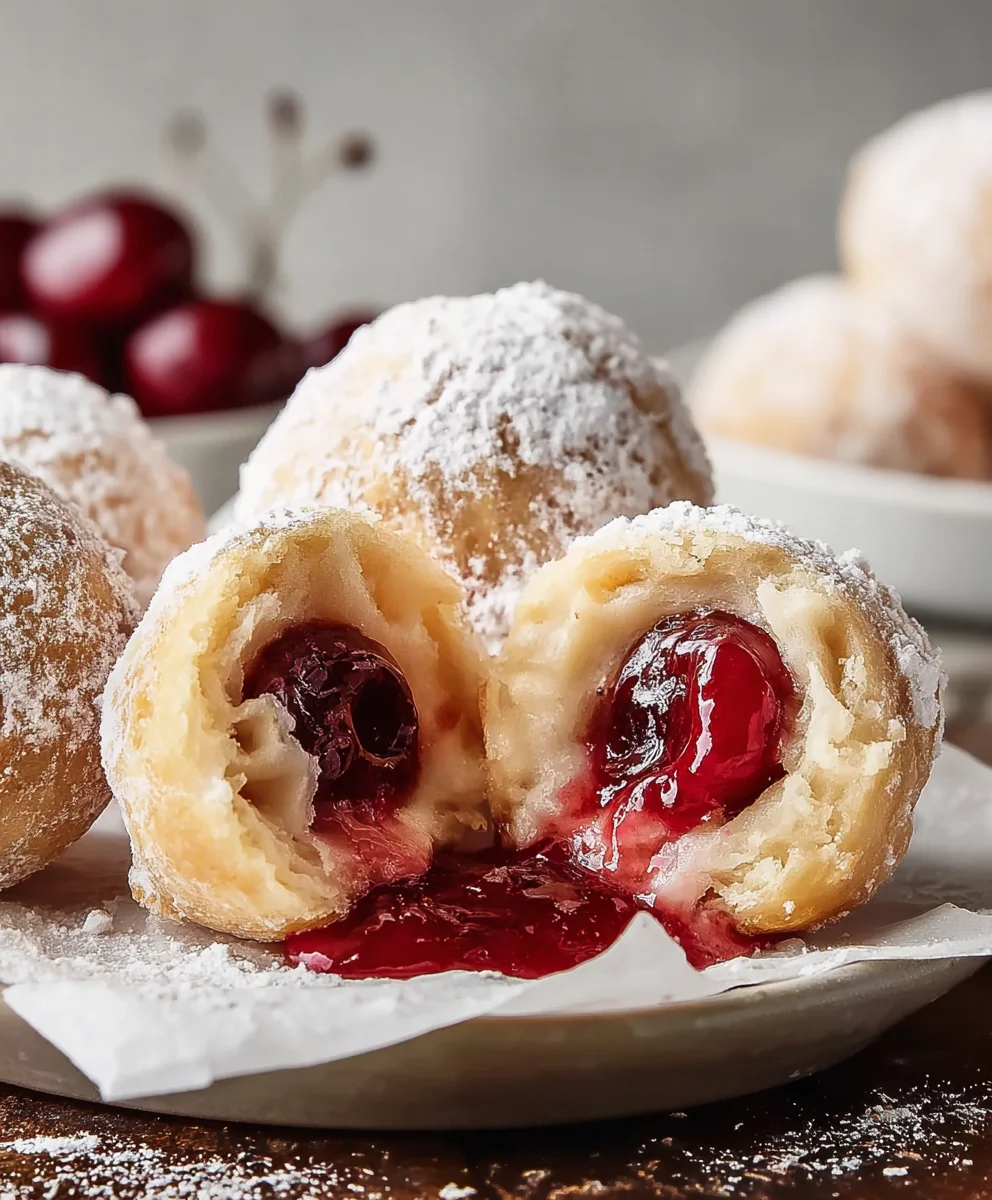
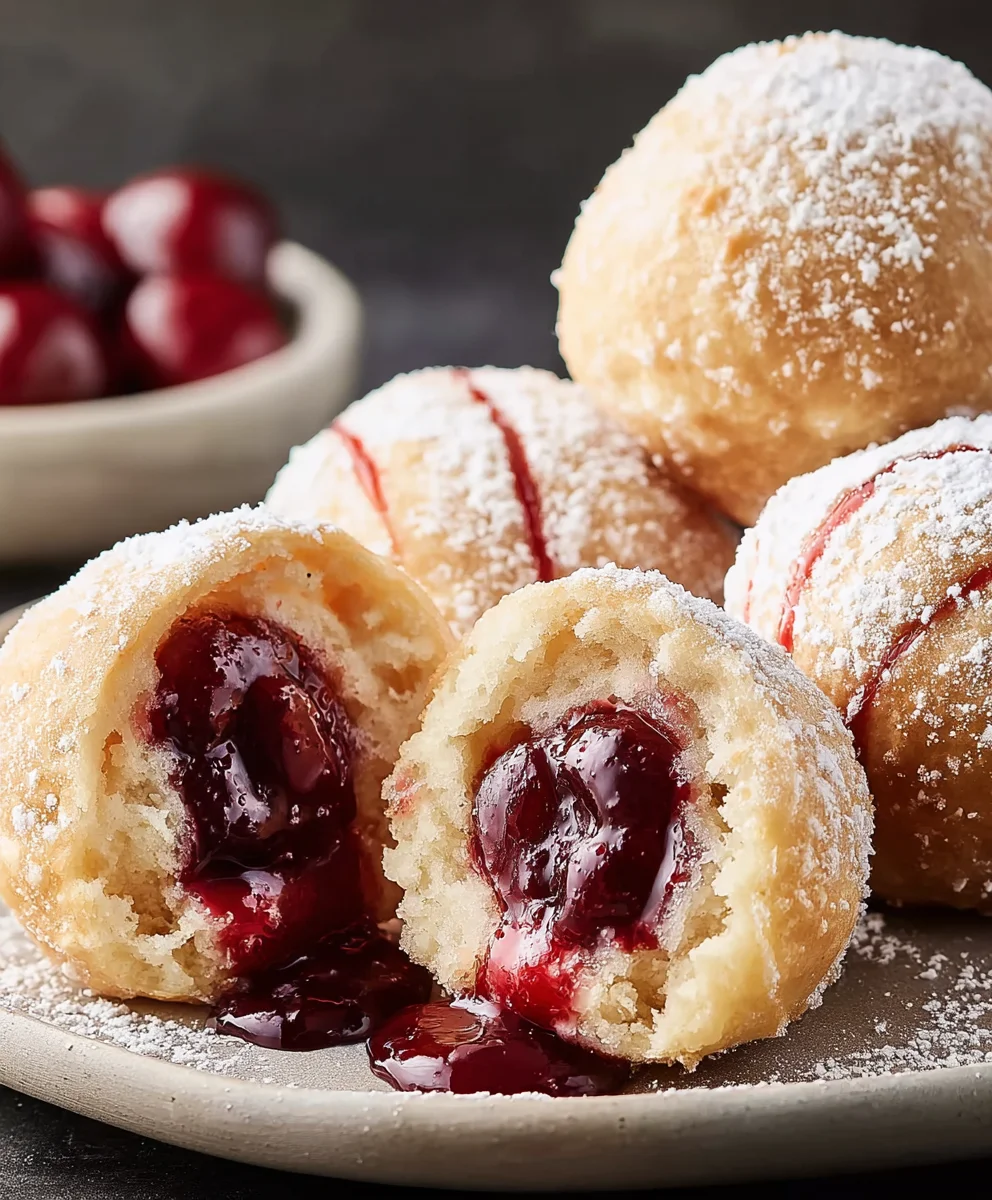
Cherry Pie Bombs are more than just a delightful treat; they are miniature explosions of pure bliss, encapsulating the quintessential comfort and joy of a classic cherry pie in a bite-sized package. We all have those cravings, those moments when only the sweet, tart burst of cherries mingled with flaky pastry will do. And that’s precisely where these incredible Cherry Pie Bombs shine. Forget the fuss of rolling out a giant pie crust or waiting for a whole dessert to bake. These little wonders deliver all that beloved flavor and texture with an irresistible convenience. What truly makes them special is their ability to capture the soul of homemade pie – the vibrant fruit, the golden crust, the hint of warmth – in a perfectly portioned, utterly satisfying form. Get ready to fall in love with dessert all over again.

Ingredients:
- Vegetable oil, for frying
- 16.3 ounces Grands “Big” biscuits, flaky
- 21 ounces cherry pie filling
- 2 cups powdered sugar
- ¼ cup milk
- 1 tablespoon light corn syrup
Preparing the Cherry Pie Filling
First, we need to get our cherry pie filling ready to go. Open up your can of cherry pie filling and give it a gentle stir. You want to make sure the cherries are evenly distributed and that the syrupy goodness is well mixed. This filling is the heart of our Cherry Pie Bombs, so a little attention here will go a long way. If your filling seems a little too thick, you can add a tiny splash of water – just a teaspoon or so – to loosen it up slightly, making it easier to work with.
Assembling the Cherry Pie Bombs
Now for the fun part: assembling these delightful little bombs! Open your can of Grands “Big” biscuits. Carefully separate each biscuit. You’ll notice they are already pretty large, which is perfect for creating a satisfyingly sized treat. Take one biscuit and gently flatten it out with your hands or a rolling pin, aiming for a circle about 4-5 inches in diameter. Don’t worry if it’s not perfectly round; rustic charm is part of the appeal!
Once you have your flattened biscuit, spoon about 1 to 1.5 tablespoons of the prepared cherry pie filling into the center. Be generous, but don’t overfill, or it will be difficult to seal properly. Now, take another flattened biscuit and place it on top of the filling. Your goal is to create a sealed pocket of delicious cherry goodness.
Press the edges of the two biscuits together firmly to seal them. You can use the tines of a fork to create a decorative crimped edge, which not only looks great but also ensures a secure seal, preventing any of that glorious cherry filling from escaping during frying. Repeat this process with the remaining biscuits and cherry filling until you have a batch of plump, sealed Cherry Pie Bombs.
Frying the Cherry Pie Bombs
It’s time to bring these bombs to life with a golden-brown crisp! Pour enough vegetable oil into a deep pot or Dutch oven to reach a depth of about 2-3 inches. Heat the oil over medium heat until it reaches approximately 350°F (175°C). Using a thermometer is the most accurate way to ensure the oil is at the correct temperature. If the oil is too cool, the biscuits will absorb too much oil and become greasy. If it’s too hot, they’ll brown too quickly on the outside and remain doughy on the inside.
Carefully, using a slotted spoon or spider strainer, lower 2-3 Cherry Pie Bombs into the hot oil at a time. Do not overcrowd the pot, as this will lower the oil temperature and result in uneven cooking. Fry them for about 2-3 minutes per side, or until they are a beautiful golden-brown color. You’ll see them puff up and become wonderfully crispy.
Using your slotted spoon, gently lift the fried Cherry Pie Bombs out of the oil and place them on a plate lined with paper towels. This will help absorb any excess oil, leaving you with a perfectly crisp exterior. Let them cool for just a minute or two before moving on to the glaze.
Making the Glaze
While our Cherry Pie Bombs are cooling slightly, let’s whip up a simple yet divine glaze to take them to the next level. In a medium bowl, whisk together the powdered sugar and milk until you have a smooth, pourable glaze. If the glaze is too thick, add another teaspoon of milk at a time until it reaches your desired consistency. If it’s too thin, add a little more powdered sugar.
To add a touch of shine and extra sweetness, stir in the tablespoon of light corn syrup. This will give the glaze a beautiful glossy finish and a delightful texture. The corn syrup also helps prevent the glaze from becoming too hard, ensuring a lovely soft coating on your warm bombs.
Glazing and Serving
With your Cherry Pie Bombs still warm (but not piping hot, so the glaze doesn’t melt off completely), it’s time to drizzle them with the prepared glaze. You can either dip the tops of the bombs into the glaze or use a spoon to generously drizzle the glaze over them. Let the excess glaze drip off for a moment before placing them on a serving platter. For an extra festive touch, you can even sprinkle a few extra colorful sprinkles on top of the wet glaze before it sets. Serve these warm, and be prepared for them to disappear in a flash. These Cherry Pie Bombs are a delightful handheld treat that brings the comforting taste of cherry pie in an irresistible, fried, and glazed package!
Conclusion:
And there you have it! Your delightful homemade Cherry Pie Bombs are ready to impress. We’ve walked through each simple step, from preparing the flaky pastry to creating that sweet and tart cherry filling. These bite-sized bursts of cherry goodness are perfect for any occasion, whether it’s a holiday gathering, a potluck, or just a special treat for yourself. The aroma alone is enough to make your kitchen feel like a cozy bakery. I encourage you to try this recipe; it’s surprisingly straightforward and the results are incredibly rewarding.
For serving, consider dusting your warm Cherry Pie Bombs with a little powdered sugar or a light drizzle of vanilla glaze. They are also fantastic served with a scoop of vanilla bean ice cream for a delightful contrast in temperature and texture. Don’t be afraid to get creative with variations! You could try adding a pinch of cinnamon or a splash of almond extract to the cherry filling for a different flavor profile, or even experiment with different types of berries alongside the cherries.
Frequently Asked Questions:
Can I make the Cherry Pie Bombs ahead of time?
Yes, you can! You can prepare the unbaked Cherry Pie Bombs and refrigerate them for up to 24 hours before baking. For longer storage, you can freeze the unbaked bombs on a baking sheet until solid, then transfer them to an airtight container or freezer bag. Bake them directly from frozen, adding a few extra minutes to the baking time.
What kind of cherries should I use for the filling?
You can use either fresh or frozen cherries. If using frozen cherries, make sure to thaw them and drain off any excess liquid before incorporating them into the filling to avoid a soggy crust. Sweet cherries will yield a sweeter pie bomb, while tart cherries (like Montmorency) will provide that classic, slightly tangy cherry pie flavor.
My pastry isn’t as flaky as yours. What could I be doing wrong?
Ensuring your butter and water are ice cold is crucial for flaky pastry. Avoid overworking the dough, as this can develop the gluten too much, resulting in a tough crust. Also, make sure your oven is preheated to the correct temperature to allow for proper puffing of the pastry.
Cherry Pie Bombs-Easy Dessert Recipe
Easy and delicious cherry pie bombs made with flaky biscuits and a sweet cherry filling, fried to golden perfection and drizzled with a simple glaze.
Ingredients
-
Vegetable oil, for frying
-
16.3 ounces Grands “Big” biscuits, flaky
-
21 ounces cherry pie filling
-
2 cups powdered sugar
-
1/4 cup milk
-
1 tablespoon light corn syrup
Instructions
-
Step 1
Prepare the cherry pie filling by opening the can and gently stirring to ensure an even distribution of cherries and syrup. Add a teaspoon of water if the filling is too thick. -
Step 2
Open the can of biscuits and separate each one. Gently flatten each biscuit into a circle about 4-5 inches in diameter. Spoon 1 to 1.5 tablespoons of cherry pie filling into the center of one flattened biscuit. Top with another flattened biscuit and press the edges firmly to seal. Crimp with a fork for a secure seal. -
Step 3
Heat vegetable oil in a deep pot or Dutch oven to approximately 350°F (175°C). Carefully lower 2-3 cherry pie bombs into the hot oil at a time, ensuring not to overcrowd the pot. -
Step 4
Fry the cherry pie bombs for 2-3 minutes per side, or until golden brown and puffed up. Remove from oil with a slotted spoon and place on a plate lined with paper towels to drain excess oil. -
Step 5
While the bombs cool slightly, prepare the glaze. Whisk together powdered sugar and milk until smooth and pourable. Stir in light corn syrup for shine and texture. Adjust consistency with more milk or powdered sugar as needed. -
Step 6
Drizzle the glaze over the warm cherry pie bombs. Serve immediately and enjoy these delightful handheld treats.
Important Information
Nutrition Facts (Per Serving)
It is important to consider this information as approximate and not to use it as definitive health advice.
Allergy Information
Please check ingredients for potential allergens and consult a health professional if in doubt.

Leave a Comment