

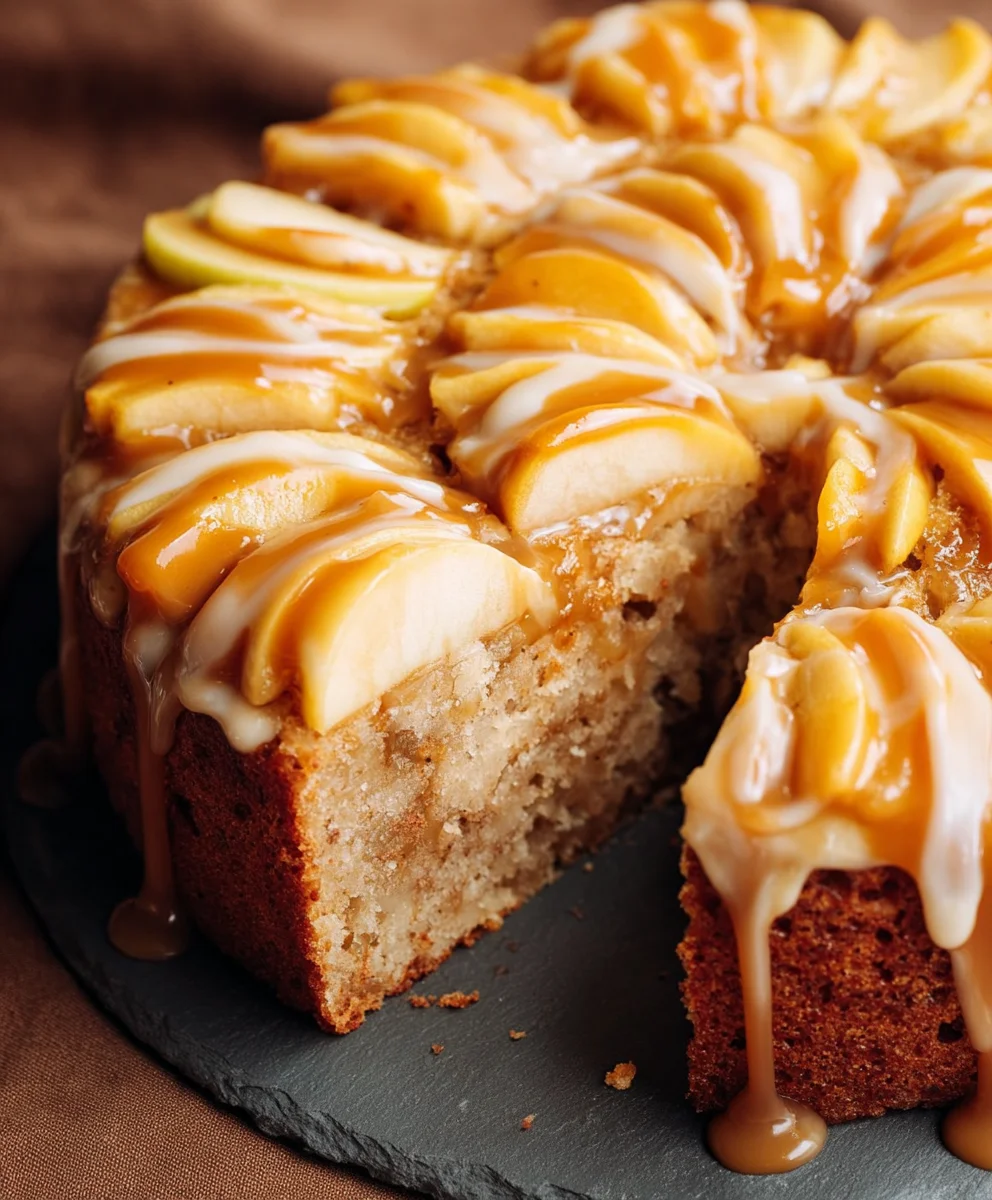
Caramel Apple Cake is more than just a dessert; it’s a warm embrace on a cool autumn day, a culinary masterpiece that perfectly encapsulates the magic of the season. Imagine sinking your fork into a slice where tender, moist cake meets sweet-tart apples, all enrobed in a luscious, homemade caramel. This delightful creation beautifully merges the beloved traditions of crisp fall apples and rich, buttery caramel, a pairing that has delighted palates for centuries and evokes nostalgic memories of harvest festivals and cozy family gatherings. It’s this comforting familiarity, combined with an irresistible depth of flavor, that makes our Caramel Apple Cake a true standout. I find that people adore this dish not only for its incredible taste – the perfect balance of cinnamon-spiced cake, soft fruit, and gooey sweetness – but also for its incredibly satisfying texture and the sheer joy it brings to any table. We invite you to experience the ultimate autumnal indulgence.

Ingredients:
- For the Caramel Apple Cake Layers:
- 3 cups (360g) all-purpose flour, spooned and leveled for the lightest crumb. This careful measuring technique is essential for a tender, not tough, texture in your delicious Caramel Apple Cake.
- 2 teaspoons baking soda, a key leavening agent that reacts with the buttermilk to help our cake rise beautifully and create that perfect airy structure.
- 1 teaspoon ground cinnamon, lending that quintessential warm apple pie spice aroma and flavor that perfectly complements the apples.
- ½ teaspoon ground nutmeg, adding a touch of aromatic depth and a subtle hint of warmth that makes the spices in your Caramel Apple Cake truly sing.
- ¼ teaspoon ground allspice, for a complex, nuanced warmth that ties all the autumnal flavors together without being overpowering.
- 1 teaspoon salt, to balance the sweetness of the sugars and apples, enhancing all the other wonderful flavors in our cake.
- 1 cup (226g) unsalted butter, softened to room temperature. This is crucial for successful creaming with the sugars, ensuring a smooth, emulsified batter that holds air for a lighter cake.
- 1 ½ cups (300g) granulated sugar, providing essential sweetness and contributing to the cake’s moistness and delicate crumb.
- ½ cup (100g) packed light brown sugar, adding a touch of molasses flavor, extra moisture, and a deeper, richer sweetness that pairs wonderfully with the apples in this Caramel Apple Cake.
- 3 large eggs, at room temperature. Room temperature eggs emulsify better with the fats in the batter, leading to a more uniform texture and a higher, more consistent rise.
- 1 teaspoon pure vanilla extract, a foundational flavor enhancer that adds warmth and depth to nearly every sweet recipe, including our fantastic Caramel Apple Cake.
- 1 cup (240ml) buttermilk, at room temperature. Buttermilk reacts with the baking soda to create a wonderfully tender texture and contributes a slight, pleasant tang that brightens the cake’s flavor.
- 4 cups (about 3-4 medium-sized) firm apples, peeled, cored, and diced into ½-inch pieces. I love using Honeycrisp, Granny Smith, or Fuji for their excellent texture and balanced sweetness and tartness, which are absolutely perfect for a robust and flavorful Caramel Apple Cake.
- Optional: 1 tablespoon lemon juice, to toss with your diced apples if you’re not adding them to the batter immediately, preventing them from browning and keeping them looking fresh.
- For the Homemade Salted Caramel Sauce:
- ½ cup (113g) unsalted butter, cut into small cubes for quicker melting. This butter forms the rich, creamy base of our decadent caramel sauce.
- 1 cup (200g) packed light brown sugar, the primary sweetener and flavor component for our luxurious, deep-flavored caramel.
- ½ cup (120ml) heavy cream, warmed slightly. You can pop it in the microwave for 30 seconds to a minute; warming it helps prevent the caramel from seizing when added, ensuring a silky-smooth sauce.
- 1 teaspoon pure vanilla extract, for that classic, aromatic caramel flavor that is truly irresistible.
- ½ teaspoon sea salt, to create that perfect balance of sweet and savory, transforming a good caramel into an absolutely irresistible salted caramel masterpiece. You might want a little more or less depending on your personal preference for saltiness!
- For Assembly and Garnish:
- ½ cup chopped pecans or walnuts, toasted for extra crunch, depth of flavor, and a beautiful presentation. These nuts provide a delightful textural contrast to the soft cake and luscious caramel.
- Extra caramel sauce for drizzling, if desired. Because, let’s be honest, can you ever have too much caramel on a Caramel Apple Cake?
Prepping Your Apples and Dry Ingredients for the Perfect Caramel Apple Cake
- Prepare Your Apples: First things first, let’s get those beautiful apples ready for their starring role! Carefully peel, core, and dice your chosen apples into small, uniform ½-inch pieces. I always aim for consistent sizing so they cook evenly throughout the cake and soften just enough without turning to mush. If you anticipate a short delay before adding them to the batter, toss them gently with a tablespoon of lemon juice to prevent any unwanted browning. This little trick ensures they look as appealing as they taste in your finished Caramel Apple Cake. Set them aside for now; they’ll be folded into our glorious cake batter soon, bringing their sweet-tart magic.
- Preheat Your Oven and Prepare Pans: Before we dive into mixing, let’s get our oven ready to welcome our cake. Preheat your oven to a precise 350°F (175°C). Next, take two 9-inch round cake pans and thoroughly grease them, then dust them lightly with flour. For an extra layer of non-stick insurance and to guarantee easy removal of your delicate cake layers, I highly recommend lining the bottoms of the pans with parchment paper circles. This step is incredibly important for ensuring your beautiful Caramel Apple Cake layers come out perfectly intact and makes cleanup a breeze.
- Whisk Dry Ingredients: In a medium bowl, combine your measured all-purpose flour, baking soda, ground cinnamon, ground nutmeg, ground allspice, and salt. Take your time to whisk these dry ingredients together thoroughly for about 30 seconds to a minute. Mixing them exceptionally well at this stage ensures that the leavening agents and spices are evenly distributed throughout the batter, preventing any pockets of unmixed flour or an uneven distribution of spice in one bite of your finished Caramel Apple Cake. This is a small but incredibly crucial step for achieving a uniformly flavored and beautifully textured result.
Crafting the Moist and Flavorful Caramel Apple Cake Batter
- Cream Butter and Sugars: In a large mixing bowl, using an electric mixer (either a stand mixer fitted with the paddle attachment or a robust handheld mixer), cream together the softened unsalted butter, granulated sugar, and packed light brown sugar on medium speed. Beat them vigorously until the mixture is visibly light, fluffy, and pale in color, which usually takes a good 3-5 minutes. This creaming process is vital as it incorporates air into the butter, and these air pockets are what help give our Caramel Apple Cake its wonderful light and tender texture. Make sure to scrape down the sides of the bowl occasionally with a rubber spatula to ensure everything is thoroughly combined and no pockets of uncreamed butter or sugar remain.
- Add Eggs and Vanilla: Now, one at a time, beat in the large eggs into the creamed butter and sugar mixture, mixing well after each individual addition. It’s important to allow each egg to fully incorporate and emulsify into the mixture before adding the next one. This prevents the batter from separating and ensures a smooth consistency. Once all the eggs are incorporated, beat in the pure vanilla extract. The mixture might look a little curdled at this point, but don’t worry, that’s perfectly normal and will sort itself out as we continue adding ingredients. Continue to beat until the mixture is smooth and well emulsified, taking on a shiny appearance.
- Alternate Dry and Wet Ingredients: This is a key stage for developing the cake’s texture. We’ll gradually add the dry ingredients mixture (from step 3) and the buttermilk to our wet mixture, alternating between the two. Begin by adding about one-third of the dry ingredients to the creamed mixture and mix on the lowest speed until just combined – you should barely see any streaks of flour. Then, pour in half of the buttermilk and mix on low speed until just incorporated. Repeat this process: add another third of the dry ingredients, then the remaining buttermilk, and finally, the last third of the dry ingredients. Be careful not to overmix the batter at this stage! Overmixing develops the gluten in the flour too much, which can lead to a tough, dense, and dry Caramel Apple Cake. We’re aiming for a tender, moist crumb, so mix only until no visible streaks of flour remain, then stop.
- Fold in the Diced Apples: With a large rubber spatula, gently fold in your prepared diced apples into the cake batter. Take care to distribute them evenly throughout the batter. You want apples in every single bite of this fantastic Caramel Apple Cake! The apples will add natural sweetness, wonderful moisture, and a delightful textural contrast as they soften beautifully during baking, releasing their flavors into the cake.
Baking Your Caramel Apple Cake to Golden Perfection
- Divide and Bake: With your magnificent Caramel Apple Cake batter ready, divide it evenly between your two prepared 9-inch cake pans. You can use a kitchen scale for absolute precision if you like, but eyeballing it usually works just fine. Use an offset spatula or the back of a spoon to gently spread the batter out evenly to the edges of the pans, ensuring an even surface for baking. This promotes even cooking and level cake layers.
- Bake Until Golden: Carefully transfer the cake pans to your preheated oven. Bake for approximately 30-35 minutes. To test for doneness, insert a wooden skewer or toothpick into the very center of the cakes; it should come out clean or with only a few moist crumbs attached. Remember, every oven is a little different and can vary in temperature, so keep a close eye on your cakes, especially towards the end of the baking time! The cakes should be beautifully golden brown on top and spring back lightly when gently touched in the center.
- Cooling Process: Once baked to perfection, remove the cakes from the oven and place them on a wire rack to cool in their pans for about 10-15 minutes. This initial cooling period allows the cakes to set and firm up a bit, making them much easier to handle without crumbling. After this time, carefully invert the cakes onto the wire rack, remove the pans, and gently peel off the parchment paper circles from the bottoms. Allow the cake layers to cool completely, and I mean completely, at room temperature before you even think about frosting or assembling them. Attempting to frost or assemble warm cakes will result in a messy, sliding disaster, and nobody wants that for their beautiful, hard-earned Caramel Apple Cake! Patience here is a virtue that will be greatly rewarded.
Whipping Up the Irresistible Homemade Salted Caramel Sauce
- Melt Butter and Sugar: In a medium, heavy-bottomed saucepan (this helps prevent scorching), melt the ½ cup of unsalted butter over medium heat. Once the butter has completely melted and is shimmering, add the 1 cup of packed light brown sugar. Stir constantly with a whisk or a heat-proof spatula until the sugar has completely dissolved and the mixture is smooth and syrupy. This usually takes about 2-3 minutes of continuous stirring.
- Bring to a Boil: Continue to cook the mixture, stirring occasionally to prevent sticking, until it comes to a rolling boil. Once it reaches a full, bubbly boil, let it boil for exactly one minute. Do not skip this crucial step, as it’s essential for the caramel’s final texture, thickness, and rich, deep flavor! It allows the sugar to reach the right temperature for perfect caramelization.
- Whisk in Cream and Vanilla: Carefully remove the saucepan from the heat. Now, slowly and steadily pour in the warmed heavy cream while whisking continuously. The mixture will bubble up vigorously and might release a lot of steam, so be prepared and keep a safe distance! Keep whisking until the caramel is completely smooth, luscious, and thoroughly combined. Finally, stir in the pure vanilla extract and the sea salt. Give it a taste and adjust the salt if you wish; I sometimes add a tiny pinch more to really make the flavors pop.
- Cool the Caramel: Pour the finished salted caramel sauce into a clean, heatproof jar or bowl. Let it cool completely at room temperature. As it cools, it will thicken to a gloriously pourable and wonderfully spreadable consistency, absolutely perfect for drizzling over and filling our Caramel Apple Cake. If you’re in a bit of a hurry, you can pop it in the fridge for about 30 minutes, but remember to give it a good stir every 10 minutes or so to ensure even cooling and to prevent it from getting too firm and difficult to work with. This homemade caramel is a true game-changer and elevates the entire Caramel Apple Cake experience from great to truly unforgettable!
Assembling Your Magnificent Caramel Apple Cake
- Level the Cake Layers (Optional but Recommended): Once your cake layers are completely cool to the touch, you might find that they have a slight dome on top. For a truly professional-looking and stable layered cake, I recommend leveling them using a long, serrated knife or a specialized cake leveler. This creates perfectly flat surfaces, making your layered Caramel Apple Cake look much neater and preventing it from leaning. I find this step incredibly satisfying and definitely worth the extra minute or two for a pristine finish!
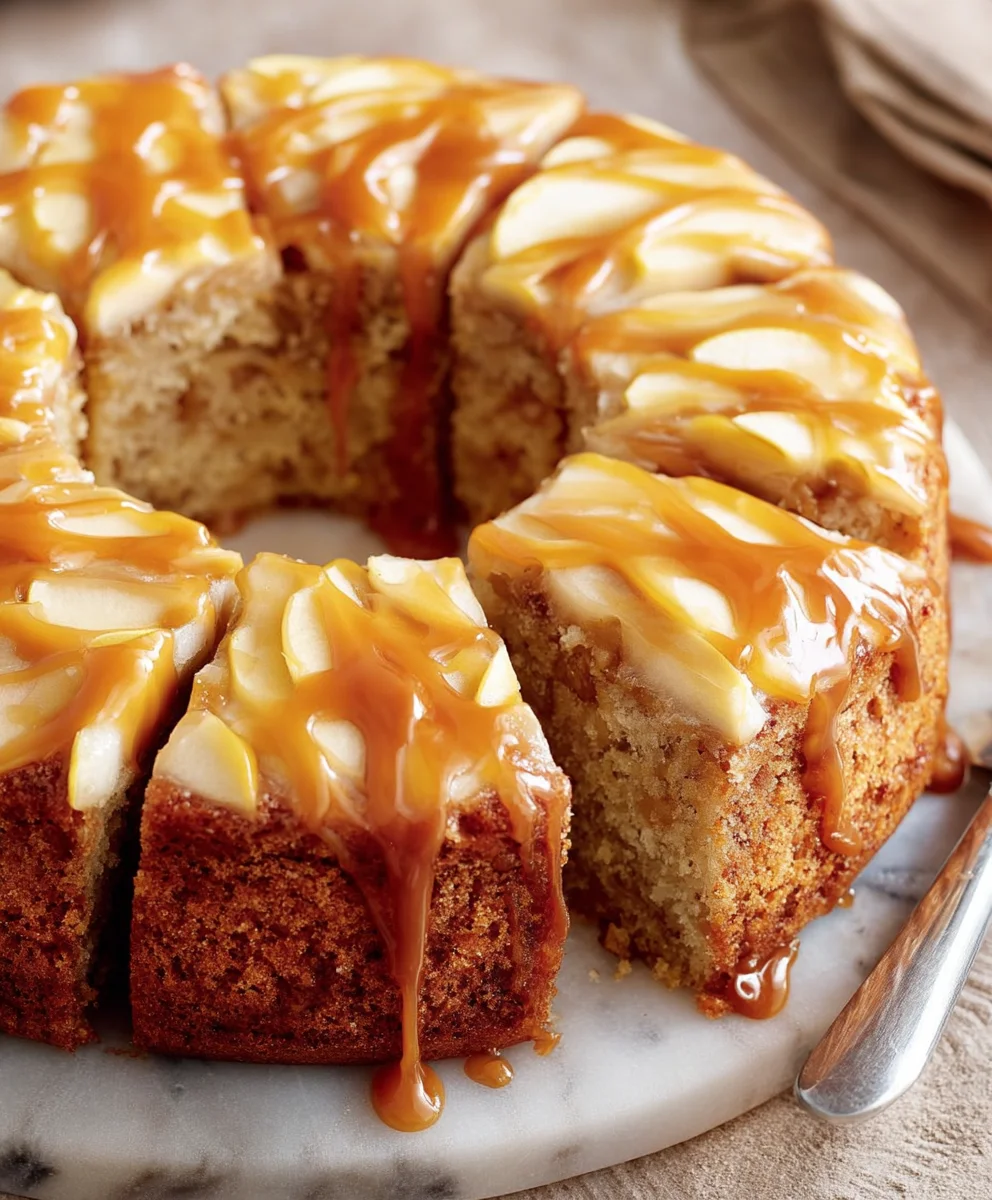
- First Layer and Caramel Filling: Place one of your beautiful cake layers onto your chosen serving plate or cake stand. For a little extra stability and to prevent the cake from sliding, you can dab a small amount of caramel sauce or even a tiny bit of frosting on the plate before gently setting the cake layer down. Now, generously spread about ½ to ¾ cup of your cooled homemade salted caramel sauce evenly over the top of this first cake layer. Spread it almost to the very edges, creating a wonderful, gooey layer of caramel.
- Second Layer and Top with Caramel: Carefully place the second cake layer directly on top of the first, aligning it as best you can for a straight and even cake. Gently press down on the top layer to secure it firmly to the caramel filling. Now comes the showstopper: pour the remaining salted caramel sauce directly over the top of the entire cake. Allow the caramel to slowly and luxuriously drip down the sides for a beautiful, rustic, and incredibly inviting look. You can use an offset spatula to help guide the drips or create a smoother top surface, depending on the aesthetic you’re aiming for with your stunning Caramel Apple Cake.
- Garnish and Serve: Finally, sprinkle your toasted chopped pecans or walnuts over the top of the caramel-covered cake. This not only adds a fantastic crunch and nutty flavor that pairs wonderfully with the apples and caramel, but also provides a beautiful visual contrast. If you saved a little extra caramel, now’s the perfect time for a final, artistic drizzle across the top – go on, make it extra decadent!
- Chilling and Enjoying: For the absolute best results and to allow all those incredible flavors to meld beautifully, I highly recommend letting the Caramel Apple Cake sit for at least 30 minutes at room temperature before slicing, allowing the caramel to fully set and penetrate the cake slightly. You can also chill it in the refrigerator for a firmer caramel, which makes for cleaner slices, then let it come back to room temperature for about an hour before serving for optimal flavor and texture. Slice into generous pieces and prepare to indulge in what I promise will be the most incredible Caramel Apple Cake you’ve ever tasted! This cake is perfect for special occasions, family gatherings, or simply treating yourself to a truly delightful and comforting dessert. Enjoy every single, glorious bite of your homemade Caramel Apple Cake!
Conclusion:
And there you have it, my friends! We’ve journeyed through the delightful process of creating what I truly believe is not just a dessert, but an experience. This recipe isn’t just about combining ingredients; it’s about crafting moments, celebrating the seasons, and bringing genuine warmth to your home. If you’ve been searching for that quintessential autumn treat that impresses without the stress, you’ve found your match. This isn’t merely a cake; it’s a hug in dessert form, a symphony of flavors that manages to be both familiar and utterly captivating all at once. I promise you, once you taste that first moist, tender bite, bursting with spiced apple and rich, buttery caramel, you’ll understand exactly why I’m so enthusiastic about this particular bake.
Why This Caramel Apple Cake Is Your Next Baking Obsession
What makes this particular rendition of Caramel Apple Cake an absolute must-try? It’s a combination of several magical elements. Firstly, the texture is unparalleled. We’ve worked to ensure that every slice is incredibly moist, tender, and never dry, thanks to the perfect balance of wet and dry ingredients and the natural moisture from the apples. Secondly, the flavor profile is a harmonious blend of sweet and tart, with the bright apple notes beautifully complemented by warming cinnamon and nutmeg, all culminating in that luscious, homemade caramel drizzle that creates pools of sticky, sweet perfection. It’s comforting, sophisticated, and incredibly satisfying. You get that wonderful contrast of soft cake with the slight bite of apple pieces, all enveloped in that unforgettable caramel embrace. It truly embodies the spirit of cozy gatherings, making it ideal for holiday meals, family brunches, or simply a delightful weekend treat to uplift your spirits. It’s a recipe that yields truly impressive results, giving you all the glory of a showstopping dessert with a surprisingly straightforward process.
Elevate Your Dessert Experience: Serving Suggestions & Creative Variations
Now, let’s talk about how to truly make this cake shine and how you can put your own unique spin on it. While it’s absolutely divine on its own, especially when served slightly warm, here are a few suggestions to take your Caramel Apple Cake to the next level. A generous scoop of vanilla bean ice cream, melting gently over a warm slice, is a classic pairing that never disappoints. The cold, creamy ice cream against the warm, spiced cake is pure bliss. Alternatively, a dollop of freshly whipped cream, perhaps infused with a touch of cinnamon or maple syrup, adds a lovely lightness. For a simpler elegance, a light dusting of powdered sugar or a few extra swirls of homemade caramel sauce right before serving can elevate its presentation. This cake is also fantastic with a robust cup of coffee or a comforting mug of spiced tea, making it perfect for an afternoon pick-me-up or a leisurely breakfast on a crisp morning. Don’t be afraid to experiment! You could sprinkle in a handful of toasted pecans or walnuts into the batter for an added layer of crunch and nutty flavor. For a richer, tangier note, consider adding a thin layer of cream cheese frosting on top instead of just the caramel, or even swirl some cream cheese mixture into the batter before baking for a marbled effect. If you’re feeling adventurous, try different apple varieties – Granny Smith for a tarter bite, or Honeycrisp for a sweeter, firmer texture. You could even bake this recipe into cupcakes for individual servings, adjusting the baking time accordingly, or use a Bundt pan for an even more dramatic presentation. The possibilities for customization are truly endless!
So, what are you waiting for? I wholeheartedly encourage you to roll up your sleeves, gather your ingredients, and embark on this delicious baking adventure. Trust me, the aroma alone as this cake bakes will fill your home with an undeniable sense of comfort and anticipation. And when that first perfect slice is served, you’ll know exactly why this recipe is so special. Once you’ve experienced the magic of this Caramel Apple Cake, I would absolutely love to hear about it! Please don’t hesitate to share your baking journey, your triumphs, and any clever variations you come up with. Tag me in your photos, leave a comment below, or send me a message – I genuinely can’t wait to see your beautiful creations and hear your thoughts. Happy baking, my friends!
Caramel Apple Cake
A delightful caramel apple cake that captures the essence of autumn. Tender, moist cake meets sweet-tart apples, all enrobed in a luscious, homemade caramel sauce.
Ingredients
-
90g granulated sugar (for caramel)
-
1 tablespoon water (for caramel)
-
25g butter (for caramel)
-
100g heavy cream (for caramel)
-
Pinch of salt (for caramel)
-
240g all-purpose flour
-
1 ¼ teaspoon baking powder
-
¼ teaspoon baking soda
-
½ teaspoon salt
-
1 teaspoon ground cinnamon
-
¼ teaspoon ground allspice
-
100g granulated sugar (for cake)
-
100g dark brown sugar
-
200g apples, grated
-
110g vegetable oil, room temperature
Instructions
-
Step 1
Peel, core, and grate 200g apples. Preheat oven to 350°F (175°C). Grease and flour two 9-inch round cake pans, lining bottoms with parchment paper. Set aside. -
Step 2
In a medium bowl, whisk together 240g all-purpose flour, 1 ¼ tsp baking powder, ¼ tsp baking soda, ½ tsp salt, 1 tsp ground cinnamon, and ¼ tsp ground allspice until well combined. -
Step 3
In a large bowl, combine 110g vegetable oil, 100g granulated sugar, and 100g dark brown sugar. Whisk thoroughly until fully combined. -
Step 4
Stir the grated apples into the wet sugar-oil mixture until evenly distributed. -
Step 5
Gradually add the whisked dry ingredients to the wet mixture, mixing on low speed until just combined and no streaks of flour remain. Do not overmix to ensure a tender cake. -
Step 6
Divide the batter evenly between the two prepared 9-inch cake pans. Bake for approximately 30-35 minutes, or until a wooden skewer inserted into the center comes out clean. Cakes should be golden brown. -
Step 7
Remove cakes from the oven and cool in their pans on a wire rack for 10-15 minutes. Then, invert cakes onto the wire rack, remove pans and parchment paper, and allow them to cool completely at room temperature. -
Step 8
In a heavy-bottomed saucepan, combine 90g granulated sugar and 1 tablespoon water. Heat over medium-low, stirring until the sugar dissolves completely. Increase heat to medium-high and boil without stirring until the mixture turns golden amber (approx. 5-8 minutes). Do not burn. -
Step 9
Remove the saucepan from the heat. Carefully whisk in 25g butter until it has completely melted and is incorporated into the sugar mixture. -
Step 10
Slowly pour in 100g warm heavy cream while whisking vigorously. The mixture will bubble up and release steam. Continue whisking until the caramel is smooth and well combined. -
Step 11
Stir in a pinch of salt. Pour the finished salted caramel sauce into a clean, heatproof jar or bowl and let it cool completely at room temperature until it thickens to a pourable consistency. -
Step 12
Once cake layers are completely cool, (optional: level cake tops with a serrated knife for a flat surface). Place one cake layer on a serving plate or stand. Generously spread about ½ to ¾ cup of the cooled homemade salted caramel sauce evenly over the top of this first layer. -
Step 13
Carefully place the second cake layer directly on top, aligning it. Gently press down. Pour the remaining salted caramel sauce directly over the top of the entire cake, allowing it to drip down the sides for a rustic look. -
Step 14
For best results, let the assembled cake sit at room temperature for at least 30 minutes to allow the caramel to set and meld with the cake. Alternatively, chill in the refrigerator for a firmer caramel, then let it return to room temperature for an hour before serving for optimal flavor and texture. Slice and enjoy your homemade Caramel Apple Cake!
Important Information
Nutrition Facts (Per Serving)
It is important to consider this information as approximate and not to use it as definitive health advice.
Allergy Information
Please check ingredients for potential allergens and consult a health professional if in doubt.
Leave a Comment