

Banana Pudding Cheesecake Cones Recipe – are you ready for a dessert experience that will redefine your perception of deliciousness? I’m absolutely thrilled to share with you a truly innovative creation that takes two beloved comfort food classics – the creamy, sweet indulgence of banana pudding and the rich, tangy decadence of cheesecake – and playfully packages them into a delightful, portable ice cream cone. Forget everything you thought you knew about dessert because this fusion is not just a treat; it’s a celebration of textures and flavors that will captivate your palate.
The inspiration for this unique concoction draws from deep roots. Banana pudding, a quintessential Southern American dessert, evokes memories of family gatherings and Sunday dinners with its layers of ripe bananas, vanilla wafers, and sweet custard. Cheesecake, on the other hand, boasts an ancient history, evolving from simple honey cakes to the sophisticated, creamy dessert we adore today.
Why settle for one classic when you can have a harmonious blend of both, presented in a fun, grab-and-go format?
This dish offers the ultimate convenience and a delightful surprise in every bite, delivering that familiar taste with an exciting new twist.
I genuinely believe you’ll adore this Banana Pudding Cheesecake Cones Recipe not just for its novelty, but for its perfect balance. Imagine the smooth, sweet banana-infused cheesecake filling, dotted with soft banana pieces and perhaps a crumble of vanilla wafers, all nestled within a crisp, golden cone. It’s the ideal dessert for parties, picnics, or simply a joyful afternoon indulgence, promising a symphony of creamy, crunchy, and utterly satisfying flavors. Get ready to impress everyone with this ingenious and incredibly tasty dessert!

Ingredients:
- For the Vanilla Wafer Crumble:
- 2 cups (about 5 ounces) vanilla wafers, finely crushed
- 4 tablespoons (1/2 stick) unsalted butter, melted
- 1 tablespoon granulated sugar
- 1/4 teaspoon ground cinnamon (optional, but I love the hint it adds!)
- For the Banana Cheesecake Filling:
- 3 (8-ounce) packages cream cheese, full-fat, softened to room temperature
- 1 cup granulated sugar
- 1/4 cup light brown sugar, packed
- 1/4 cup sour cream, full-fat, room temperature
- 2 teaspoons pure vanilla extract
- 1/2 teaspoon ground cinnamon
- Pinch of salt
- 3 large eggs, room temperature
- 1/2 cup ripe banana puree (from about 1-2 medium ripe bananas, mashed well)
- 1 tablespoon fresh lemon juice (to prevent banana browning)
- For Assembling and Garnishing:
- 12-18 sugar cones or waffle cones (depending on size and how generously you fill them)
- 2-3 ripe but firm bananas, sliced into thin rounds for layering and garnish
- 1/2 cup whipped cream or homemade whipped topping (optional, for garnish)
- Extra vanilla wafers, crushed or whole, for garnish
- A light drizzle of caramel sauce or chocolate sauce (optional, for extra flair!)
For the Vanilla Wafer Crumble:
- Prepare Your Vanilla Wafers: To begin our journey toward delicious Banana Pudding Cheesecake Cones Recipe, we’ll start with the delightful vanilla wafer crumble. First, you’ll need to finely crush your vanilla wafers. I find the easiest way to achieve a consistent crumb is to place the wafers in a large zip-top bag and use a rolling pin to crush them. You can also use a food processor; just pulse until you have fine crumbs, being careful not to over-process them into a paste. We’re aiming for a texture similar to fine graham cracker crumbs, without any large chunks remaining. This ensures a pleasant texture in every bite.
- Combine with Butter and Sugar: In a medium bowl, combine your finely crushed vanilla wafers with the melted unsalted butter, granulated sugar, and the optional (but highly recommended by me!) ground cinnamon. Stir everything together thoroughly until all the crumbs are evenly moistened by the butter. The mixture should resemble wet sand and hold together slightly when pressed. The butter is key here, as it helps bind the crumbs and adds a rich, buttery flavor that complements the cheesecake beautifully.
- Optional Toasting for Extra Crunch: While not strictly necessary, if you desire an extra layer of crunch and a deeper flavor, you can lightly toast your crumble. Spread the mixture evenly on a baking sheet lined with parchment paper. Bake in a preheated oven at 300°F (150°C) for about 8-10 minutes, or until it’s fragrant and slightly golden brown. Keep a close eye on it, as it can burn quickly due to the sugar content. Once baked, remove it from the oven and let it cool completely on the baking sheet. As it cools, it will crisp up wonderfully. If you skip this step, simply set your crumble aside for assembly; the melted butter will still provide a nice texture.
For the Banana Cheesecake Filling:
- Prepare the Banana Puree: This step is critical for infusing that authentic banana pudding flavor into our cheesecake. Take your ripe bananas and mash them thoroughly with a fork, or process them in a food processor until completely smooth. You want a puree, not chunks. Immediately stir in the fresh lemon juice. The lemon juice is vital as it prevents the banana puree from browning and keeps that lovely, fresh banana color and flavor vibrant in your cheesecake. Set this aside.
- Cream the Cream Cheese and Sugars: In a very large mixing bowl, or the bowl of a stand mixer fitted with the paddle attachment, combine the softened cream cheese, granulated sugar, and packed light brown sugar. It’s absolutely essential that your cream cheese is at room temperature. If it’s too cold, you’ll end up with lumps, and nobody wants a lumpy cheesecake! Beat on medium-low speed until the mixture is incredibly smooth, creamy, and free of any lumps. This will take about 3-5 minutes. Make sure to stop and scrape down the sides and bottom of the bowl frequently with a rubber spatula to ensure everything is incorporated evenly. This initial creaming sets the foundation for a perfectly smooth cheesecake texture.
- Incorporate Sour Cream and Flavorings: Once your cream cheese mixture is perfectly smooth, add the room temperature sour cream, pure vanilla extract, ground cinnamon, and a pinch of salt. Continue to beat on low speed until these ingredients are just combined. Be careful not to overmix at this stage; we simply want everything to be incorporated. The sour cream adds a wonderful tang and contributes to the creamy, rich texture of the cheesecake, while the vanilla and cinnamon enhance the overall flavor profile.
- Add the Eggs: Now, add the large eggs, one at a time. After each egg, beat on very low speed just until it is incorporated into the batter. This is perhaps one of the most important steps for cheesecake success. Do not overmix the eggs! Overmixing incorporates too much air, which can cause your cheesecake to puff up significantly during baking and then crack when it cools. We want a dense, creamy texture, not an airy one. Scrape down the bowl after each egg addition to ensure uniformity.
- Fold in the Banana Puree: Finally, gently fold in your prepared banana puree (with the lemon juice) into the cheesecake batter. Use a rubber spatula and mix just until the banana puree is evenly distributed. You don’t want to beat it in with the mixer, as this could lead to overmixing the eggs. The goal here is to maintain that smooth, luscious consistency while evenly distributing the wonderful banana flavor throughout the cheesecake. Your filling should now be wonderfully aromatic and beautifully smooth.
For Assembling the Banana Pudding Cheesecake Cones:
- Prepare Your Cones: This Banana Pudding Cheesecake Cones Recipe truly shines in its presentation. Before you start filling, lay out your sugar cones or waffle cones on a clean work surface. If you plan to serve these immediately or within a few hours, you don’t need to do anything extra. However, if you’re making these ahead of time, I highly recommend a trick to prevent the cones from becoming soggy. You can melt a bit of white chocolate or milk chocolate and brush a thin layer on the inside of each cone, especially towards the bottom. Let it set completely (you can pop them in the fridge for a few minutes). This creates a barrier that protects the cone from moisture from the cheesecake filling and fresh bananas.
- Slice Your Bananas for Layering: Take your 2-3 firm but ripe bananas and slice them into thin, even rounds. These slices will be layered within the cones, adding texture and bursts of fresh banana flavor. If you’re concerned about browning, you can lightly toss them in a tiny bit of lemon juice, but since they’ll be encased in the filling, it’s often not strictly necessary for the interior layers. Have these ready and accessible.
- Start the Layering Process – Crumble Base: Hold a cone firmly. Using a small spoon, carefully place about 1 to 1 ½ tablespoons of your vanilla wafer crumble at the very bottom of each cone. Gently press it down with the back of the spoon or your finger to create a compact base. This crumble layer provides that classic banana pudding texture and a delightful crunch to start each bite.
- Add Banana Slices: Next, carefully arrange 2-3 slices of fresh banana on top of the crumble layer, pressing them gently against the sides of the cone if possible, or just layering them flat. This visual appeal will be lovely when someone bites into the cone, seeing those distinct layers.
- Pipe or Spoon in Cheesecake Filling: Now for the star of the show! Spoon your banana cheesecake filling into a large piping bag fitted with a large round or star tip. If you don’t have a piping bag, a large zip-top bag with one corner snipped off will work just as well, or you can simply use a spoon. Pipe or spoon a generous amount of the banana cheesecake filling over the banana slices and crumble layer, filling the cone about halfway. Gently tap the cone on your work surface a few times to settle the filling and remove any major air pockets.
- Continue Layering: Repeat the layering process. Add another small layer of vanilla wafer crumble (about 1 tablespoon), followed by 2-3 more fresh banana slices. Then, pipe or spoon more cheesecake filling on top, filling the cone almost to the brim. You want a nice, domed top, but leave a little space if you plan on adding more garnishes. Ensure each layer is distributed evenly for a balanced flavor profile in every bite.
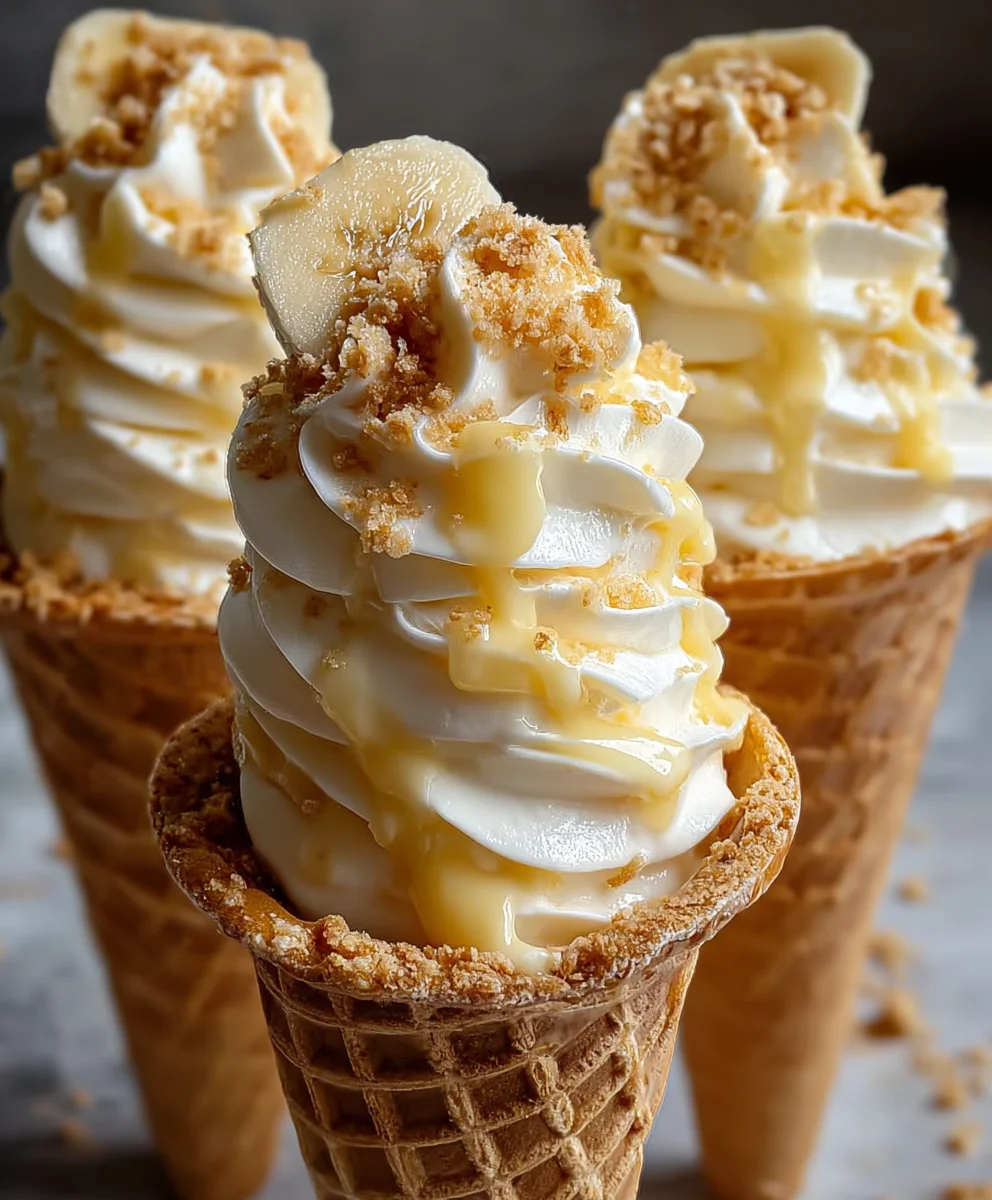
- Top with Final Touches: For a beautiful finish, pipe or spoon a final dollop of the cheesecake filling, forming a nice peak. Then, sprinkle a little more of the vanilla wafer crumble on top. You can also place a fresh banana slice or two on the very top, or even a whole mini vanilla wafer for that classic banana pudding aesthetic. This meticulous layering is what makes our Banana Pudding Cheesecake Cones Recipe so special and appealing.
Chilling and Serving:
- The Importance of Chilling: Once your Banana Pudding Cheesecake Cones are assembled, the most crucial step is chilling. These cones need a minimum of 4-6 hours in the refrigerator to allow the cheesecake filling to fully set. Chilling not only ensures the perfect creamy, firm texture of the cheesecake, but it also allows the flavors to meld and deepen. Rushing this step will result in a messy, unset filling, which is not what we want after all that effort! I recommend placing the filled cones upright in a sturdy box or a deep dish so they don’t tip over. You can also use a muffin tin if your cones fit snugly.
- Garnish Before Serving (Optional): While the cones are delicious as they are after chilling, you can elevate them further just before serving. A generous dollop of freshly whipped cream on top adds an extra layer of decadence and creaminess that perfectly complements the banana cheesecake. You can also add a final sprinkle of crushed vanilla wafers, a fresh banana slice, or even a light drizzle of caramel or chocolate sauce for an extra touch of gourmet elegance. These small additions truly make this Banana Pudding Cheesecake Cones Recipe presentation-ready.
- Serving Suggestions: Serve these delightful cones chilled directly from the refrigerator. They are perfect for parties, picnics, or simply as a special dessert treat. The individual portion size makes them easy to handle and enjoy, minimizing the need for plates and forks – perfect for a grab-and-go dessert experience!
- Storage: If you have any leftover Banana Pudding Cheesecake Cones (which is unlikely, trust me!), they should be stored upright in an airtight container in the refrigerator. They are best enjoyed within 1-2 days. Beyond that, the cones may start to soften, and the fresh banana slices might begin to brown. However, the flavors will still be fantastic for a few days, so don’t hesitate to savor them!
<h2>Conclusion:</h2>
<p>So, there you have it! We’ve journeyed through the creation of a dessert that is truly a celebration of flavor, texture, and pure joy. This isn’t just another sweet treat; it’s an experience, a delightful fusion that takes everything you love about classic banana pudding and decadent cheesecake, then wraps it all up in a fun, portable, and utterly irresistible package. <strong>I genuinely believe this "Banana Pudding Cheesecake Cones Recipe" is a must-try for anyone who appreciates innovative desserts</strong> and isn’t afraid to step a little outside the traditional dessert box. It delivers that comforting, nostalgic hug of banana pudding, elevated by the creamy richness of cheesecake, all nestled within the satisfying crunch of a waffle cone.</p>
<p>What makes this recipe so special, in my opinion, is its unique blend of familiar flavors presented in a delightfully unexpected way. You get the best of all worlds: the sweet, ripe bananas, the silky, tangy cheesecake filling, the delicate vanilla wafers, and that wonderful crispness from the cone. Every single bite offers a symphony of sensations that will tantalize your taste buds. It’s perfect for casual gatherings, impressive enough for a party, and, honestly, just a fantastic indulgence for yourself after a long week. <h5>It’s a dessert that invites smiles and sparks conversations.</h5></p>
<p>Now, let’s talk about making this recipe your own! While the core elements are divine as is, there are so many ways you can customize your Banana Pudding Cheesecake Cones. For an extra layer of decadence, consider drizzling a little warm caramel or chocolate sauce over the top just before serving. A sprinkle of finely chopped toasted pecans or walnuts would add a wonderful nutty crunch, complementing the banana beautifully. If you’re feeling adventurous, you could even experiment with different types of cones – maybe a chocolate-dipped waffle cone for an even richer profile, or mini waffle cones for a bite-sized party treat. For a touch of sophistication, consider adding a tiny swirl of freshly whipped cream and a mint leaf on top.</p>
<p>Beyond toppings, think about variations within the filling itself. While bananas are king here, a swirl of passion fruit puree or a few diced strawberries could offer an intriguing fruity twist, though I’d recommend keeping the banana as the primary star. If you want to make it even more decadent for adults, a tiny splash of banana liqueur or rum in the cheesecake filling could add an exciting depth of flavor. For those with dietary considerations, gluten-free waffle cones are readily available, and sugar substitutes can be used in the filling if you’re mindful of sugar intake. <h4>The possibilities for personalizing this dessert are truly endless</h4>, allowing you to cater to any preference or occasion.</p>
<p>My biggest hope after you’ve read through this recipe is that you feel inspired to head into your kitchen and give it a try. <strong>Seriously, you won’t regret it!</strong> The process is surprisingly straightforward, and the reward is absolutely worth every minute spent. There’s a unique satisfaction that comes from creating something so delicious and visually appealing from scratch. And once you’ve whipped up your batch of these incredible cones, I would absolutely love to hear all about your experience! Did you stick to the original recipe, or did you add your own creative flair? What was your favorite part? Did your family and friends love them as much as I think they will? <h5>Please, share your stories, your triumphs, and even your funny kitchen anecdotes!</h5> Post a picture online and tag me, or simply drop a comment below. Your feedback and creativity inspire me and others in this wonderful community of food lovers. Happy baking, my friends, and enjoy every single delightful bite!</p>

Banana Pudding Cheesecake Cones Recipe
These Banana Pudding Cheesecake Cones redefine deliciousness by blending the creamy, sweet indulgence of banana pudding with the rich, tangy decadence of cheesecake, all in a delightful, portable ice cream cone. Perfect for parties or a joyful treat, this innovative recipe was a huge hit at a daughter’s end-of-year party, offering a fun, grab-and-go dessert solution that eliminates the need for plates or forks.
Ingredients
-
2 cups (5 oz) vanilla wafers, finely crushed
-
4 tablespoons (1/2 stick) unsalted butter, melted
-
1 tablespoon granulated sugar
-
1/4 teaspoon ground cinnamon (optional, for crumble)
-
3 (8-ounce) packages cream cheese, full-fat, softened to room temperature
-
1 cup granulated sugar
-
1/4 cup light brown sugar, packed
-
1/4 cup sour cream, full-fat, room temperature
-
2 teaspoons pure vanilla extract
-
1/2 teaspoon ground cinnamon
-
Pinch of salt
-
3 large eggs, room temperature
-
1/2 cup ripe banana puree (from 1-2 medium ripe bananas, mashed well)
-
1 tablespoon fresh lemon juice
-
12-18 sugar cones or waffle cones
-
2-3 ripe but firm bananas, sliced into thin rounds
-
1/2 cup whipped cream or homemade whipped topping (optional, for garnish)
-
Extra vanilla wafers, crushed or whole (for garnish)
-
A light drizzle of caramel sauce or chocolate sauce (optional, for garnish)
Instructions
-
Step 1
Finely crush vanilla wafers. In a bowl, combine crushed wafers, melted butter, 1 tbsp granulated sugar, and 1/4 tsp cinnamon. Mix well. (Optional: Toast on a baking sheet at 300°F (150°C) for 8-10 mins; cool completely.) -
Step 2
Mash ripe bananas until smooth; immediately stir in 1 tbsp fresh lemon juice to prevent browning. Set aside. -
Step 3
In a large mixing bowl, beat softened cream cheese, 1 cup granulated sugar, and light brown sugar on medium-low until smooth and lump-free (3-5 mins), scraping the bowl frequently. -
Step 4
Add sour cream, vanilla extract, 1/2 tsp cinnamon, and salt; beat on low until just combined. Add eggs one at a time, beating on very low speed until just incorporated after each. Avoid overmixing. -
Step 5
Gently fold the prepared banana puree into the cheesecake batter with a rubber spatula until evenly distributed. Do not use the mixer for this step. -
Step 6
Lay out cones. (Optional: Brush the inside of cones with melted white/milk chocolate and let set to prevent sogginess.) Slice 2-3 firm bananas. Place 1-1.5 tbsp crumble at the bottom of each cone, pressing gently. Arrange 2-3 banana slices over the crumble. Pipe or spoon cheesecake filling halfway. Layer with 1 tbsp more crumble and 2-3 more banana slices. Fill cones almost to the brim with cheesecake filling, forming a dome. Top with extra crumble, a banana slice, or a mini vanilla wafer. -
Step 7
Chill assembled cones upright in the refrigerator for a minimum of 4-6 hours until the cheesecake filling is fully set. Before serving, optionally garnish with whipped cream, more crushed wafers, fresh banana slices, or caramel/chocolate sauce. Serve chilled directly from the refrigerator. Store leftovers upright in an airtight container in the refrigerator for 1-2 days.
Important Information
Nutrition Facts (Per Serving)
It is important to consider this information as approximate and not to use it as definitive health advice.
Allergy Information
Please check ingredients for potential allergens and consult a health professional if in doubt.
Leave a Comment