

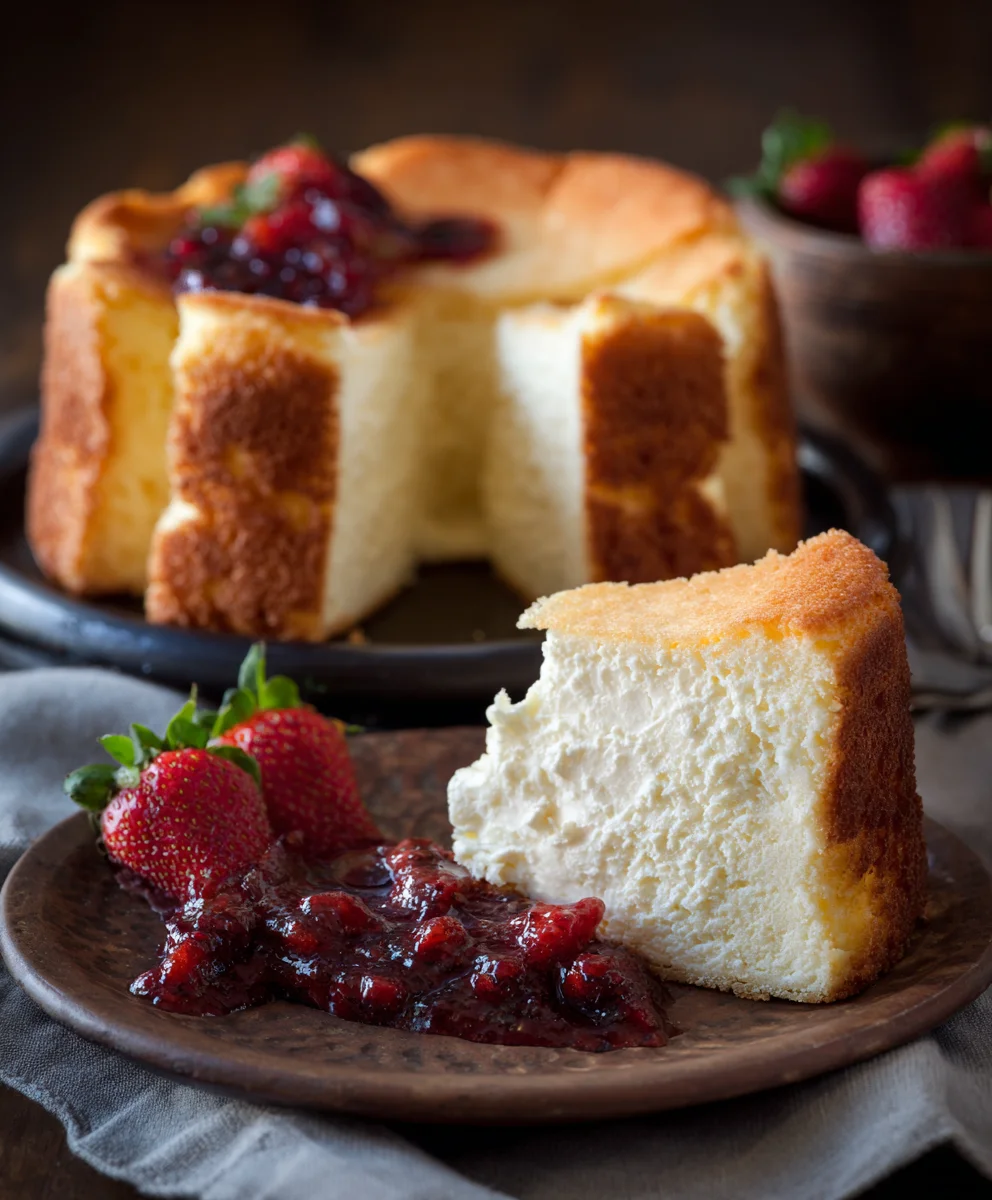
Cheesecake With Pound Cake Center is more than just a dessert; it’s a culinary revelation that promises to surprise and delight your taste buds with every single bite. Imagine the velvety smooth, tangy richness of a classic cheesecake beautifully fused with the dense, buttery crumb of a perfect pound cake – not merely served alongside each other, but rather intertwined within a single, extraordinary creation. When I first discovered this ingenious concept, I was immediately captivated by its potential to elevate two beloved comfort desserts into something truly spectacular and utterly unique.
While the history of cheesecake dates back to ancient Greece and the pound cake finds its distinct origins in European kitchens, famously named for its equal-part ingredients, this particular fusion represents a masterful modern innovation. It’s a testament to how traditional favorites can evolve, offering a delightful and unexpected twist on familiar flavors that will leave a lasting impression.
Why This Unique Combination is Irresistible
What truly makes the Cheesecake With Pound Cake Center so utterly irresistible is the delightful textural journey it offers with every single forkful. One moment, you are savoring the cool, creamy decadence characteristic of a well-made cheesecake, and the very next, your palate is introduced to the comforting, moist chew of a buttery pound cake. This harmonious blend ensures a balanced sweetness and a truly memorable, multi-layered experience that is destined to become a show-stopping favorite for any special occasion or simply a luxurious treat you’ll crave again and again.

Ingredients:
-
For the Pound Cake Center:
- 1/2 cup (113g) unsalted butter, softened to room temperature
- 1 cup (200g) granulated sugar
- 2 large eggs, at room temperature
- 1 1/2 teaspoons pure vanilla extract
- 1 1/2 cups (180g) all-purpose flour, sifted
- 1 1/2 teaspoons baking powder
- 1/4 teaspoon salt
- 1/2 cup (120ml) whole milk, at room temperature
-
For the Graham Cracker Crust:
- 1 1/2 cups (180g) graham cracker crumbs (from about 10-12 full sheets)
- 1/4 cup (50g) granulated sugar
- 6 tablespoons (85g) unsalted butter, melted
-
For the Cheesecake Batter:
- 4 (8-ounce) packages full-fat cream cheese (about 900g total), softened to room temperature
- 1 1/2 cups (300g) granulated sugar
- 1/4 cup (30g) all-purpose flour
- 1 tablespoon pure vanilla extract
- 1/2 teaspoon lemon zest (optional, but highly recommended for brightness)
- Pinch of salt
- 4 large eggs, at room temperature
- 1 cup (240g) full-fat sour cream, at room temperature
-
For Garnish (Optional):
- Fresh berries (strawberries, raspberries, blueberries)
- Whipped cream
- Powdered sugar for dusting
Preparing the Pound Cake Center
- Preheat Oven and Prepare Pan: My first step is to get the oven ready. I preheat my oven to 350°F (175°C). Then, I lightly grease and flour a small loaf pan, ideally about 8×4 inches or even a smaller mini loaf pan if I want a more compact center. I find lining the bottom with parchment paper also helps immensely with easy removal later. The goal here is to create a delightful, slightly dense pound cake that will serve as the core of our magnificent Cheesecake With Pound Cake Center.
- Cream Butter and Sugar: In a large mixing bowl, using an electric mixer, I beat the softened unsalted butter and granulated sugar together on medium-high speed until the mixture is light, fluffy, and pale in color. This usually takes about 3-5 minutes. It’s crucial to get this step right because it incorporates air, which contributes to the pound cake’s tender crumb. Scrape down the sides of the bowl as needed to ensure everything is well combined.
- Incorporate Eggs and Vanilla: Next, I add the large eggs, one at a time, beating well after each addition. It’s important to let each egg fully incorporate into the butter-sugar mixture before adding the next. This prevents the batter from curdling and ensures a smooth, cohesive base. After the eggs are fully mixed in, I stir in the pure vanilla extract. The vanilla will infuse the pound cake with a warm, comforting aroma and flavor that perfectly complements the rich cheesecake.
- Combine Dry Ingredients: In a separate medium bowl, I whisk together the sifted all-purpose flour, baking powder, and salt. Sifting the flour beforehand makes it lighter and helps prevent lumps, resulting in a smoother batter. The baking powder will give our pound cake a gentle lift, while the salt balances the sweetness.
- Alternate Dry and Wet Ingredients: With the mixer on low speed, I gradually add the dry ingredients to the wet ingredients, alternating with the whole milk. I begin and end with the dry ingredients. For example, I’ll add about a third of the flour mixture, mix until just combined, then half of the milk, mix, another third of the flour, the remaining milk, and finally the last third of the flour. It’s vital not to overmix the batter at this stage. Overmixing can develop the gluten in the flour too much, leading to a tough, dry pound cake. I stop mixing as soon as no streaks of flour are visible.
- Bake the Pound Cake: I pour the batter evenly into the prepared loaf pan. I bake it for about 40-50 minutes, or until a wooden skewer or toothpick inserted into the center comes out clean. Baking times can vary depending on your oven and the size of your loaf pan, so keeping an eye on it is key. The top should be golden brown and spring back lightly when touched.
- Cool Completely: Once baked, I remove the pound cake from the oven and let it cool in the pan on a wire rack for about 10-15 minutes. This allows the cake to set up properly before I attempt to remove it. Then, I carefully invert the pound cake onto the wire rack to cool completely. This cooling process is crucial; the pound cake must be fully cool before it’s placed into the cheesecake batter, otherwise, it could affect the cheesecake’s texture and cooking.
Crafting the Graham Cracker Crust
- Prepare the Pan: I grab a 9-inch springform pan. For easy release later, I like to line the bottom of the pan with a round of parchment paper. Then, I secure the sides of the springform pan around it. If desired, you can grease the sides of the pan with a little butter or non-stick spray, though for cheesecake, sometimes a tight fit is preferred to prevent leaks.
- Combine Crust Ingredients: In a medium bowl, I combine the graham cracker crumbs, granulated sugar, and melted unsalted butter. I stir everything together with a fork until the crumbs are evenly moistened and resemble wet sand. The sugar adds a touch of sweetness, and the melted butter acts as the binder, ensuring our crust holds its shape beautifully.
- Press into Pan: I pour the crumb mixture into the bottom of the prepared springform pan. Using the back of a spoon or the bottom of a flat glass, I press the crumbs firmly and evenly across the bottom of the pan. I aim for a compact, consistent layer. Some people also like to press a little bit of the crust mixture up the sides of the pan, about an inch or so, but for this specific Cheesecake With Pound Cake Center, I usually prefer just a bottom crust so the pound cake is fully enveloped.
- Pre-bake the Crust (Optional but Recommended): For a sturdier crust that won’t get soggy, I often pre-bake it. I place the pan in the preheated 350°F (175°C) oven (the same temperature used for the pound cake, which should be cooling now) for about 8-10 minutes. This helps to set the crust and makes it nice and crisp. After baking, I remove it from the oven and let it cool completely while I prepare the cheesecake batter.
Mixing the Velvety Cheesecake Batter
- Prepare for Water Bath: Before I even start on the batter, I prepare my springform pan for a water bath, which is essential for a crack-free cheesecake. I tightly wrap the outside of the springform pan with a double layer of heavy-duty aluminum foil. I make sure it extends all the way up the sides to prevent any water from seeping into the crust during baking. This is a critical step for a beautiful finished product.
- Soften Cream Cheese: In a very large mixing bowl, or the bowl of my stand mixer fitted with the paddle attachment, I place the softened cream cheese. It’s absolutely vital that the cream cheese is at room temperature. If it’s cold, it will be lumpy and difficult to mix smoothly, and you’ll end up with a chunky batter, which we definitely don’t want for a silky cheesecake. I beat the cream cheese on medium speed for about 2-3 minutes until it’s super smooth and creamy, scraping down the sides of the bowl frequently.
- Add Sugar and Flour: Next, I gradually add the granulated sugar to the cream cheese, beating on low to medium speed until it’s just combined and smooth. Then, I sprinkle in the all-purpose flour. The flour helps to stabilize the cheesecake and prevent cracking. I mix it in until just incorporated, again, scraping down the sides. It’s important not to overmix once ingredients are added, as too much air can cause cracks.
- Incorporate Vanilla, Zest, and Salt: I add the pure vanilla extract, lemon zest (if using), and a pinch of salt to the batter. The vanilla adds depth, the lemon zest brightens the flavor profile without making it taste lemony, and the salt balances the sweetness. I mix these in until they are just combined.
- Add Eggs Gradually: Now comes the eggs. This is another crucial stage for achieving a smooth, crack-free cheesecake. I add the large eggs one at a time, beating on low speed only until each egg is just incorporated before adding the next. I avoid beating vigorously or for too long after adding the eggs. Overbeating eggs incorporates too much air, which can cause the cheesecake to puff up too much in the oven and then fall dramatically, leading to cracks. Gentle mixing is the key here.
- Fold in Sour Cream: Finally, I gently fold in the full-fat sour cream. The sour cream adds an incredible richness, tang, and contributes to the cheesecake’s characteristic smooth, dense texture. I mix it in with a spatula or on the lowest speed of my mixer until it’s just barely combined and no streaks of sour cream remain. Again, I’m careful not to overmix. At this point, my cheesecake batter should be incredibly smooth, thick, and pourable.
Assembling and Baking Your Unique Cheesecake
- Preheat Oven and Prepare Water Bath: I adjust my oven rack to the middle position and preheat the oven to 325°F (160°C). Then, I boil a kettle of water for the water bath. While it’s boiling, I place my foil-wrapped springform pan, with its cooled graham cracker crust, into a larger roasting pan.
-
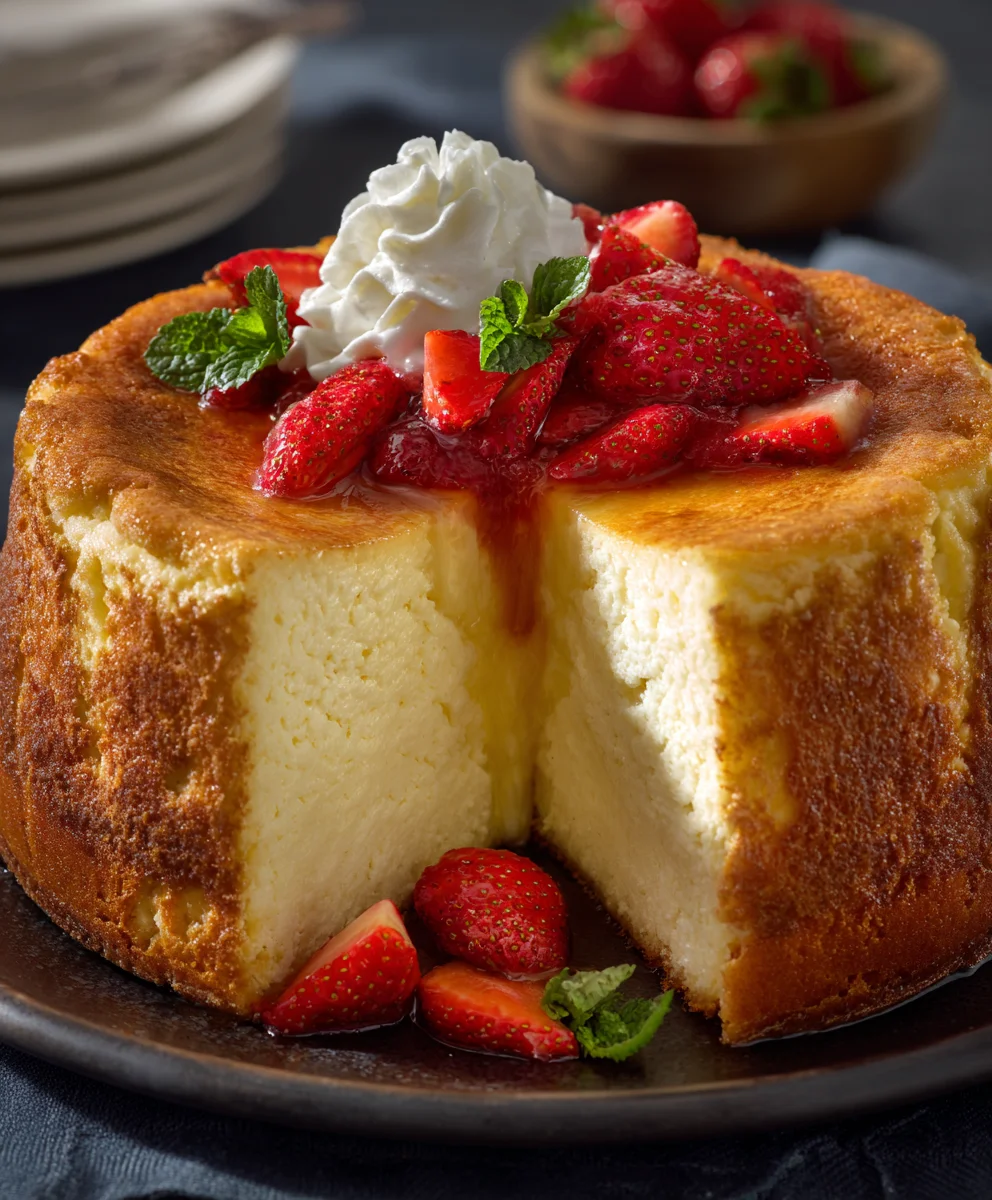
Position the Pound Cake Center: This is where our Cheesecake With Pound Cake Center truly takes shape! I take the completely cooled pound cake. Depending on the size of your pound cake and how you want it to appear, you have a few options:
- For a vertical slice effect: I might slice a thick, rectangular piece (about 1.5-2 inches thick) from the center of my loaf pound cake. I then stand this slice vertically in the middle of the prepared graham cracker crust, making sure it’s centered. This creates a stunning cross-section when you slice the finished cheesecake.
- For a hidden “surprise” center: Alternatively, I could cut the pound cake into large cubes (about 1.5-inch squares) and arrange them in the center of the crust, creating a “core” of pound cake. I usually prefer the vertical slab for visual impact.
I make sure the pound cake piece is stable and centered on the crust.
- Pour the Cheesecake Batter: I carefully pour the smooth cheesecake batter into the springform pan, around and over the pound cake. I make sure the batter completely surrounds the pound cake and comes up to the top edge of the pan, or about 1/2 inch from the rim, ensuring the pound cake is mostly submerged but its top might still peek out slightly, depending on how tall your pound cake piece is. I gently tap the pan on the counter a few times to release any large air bubbles.
- Add Water for Water Bath: I carefully transfer the roasting pan, with the cheesecake inside, to the preheated oven. Once it’s on the oven rack, I pour the hot water from the kettle into the larger roasting pan, making sure the water comes about halfway up the sides of the springform pan. Be very careful not to get any water inside the cheesecake itself. The water bath is essential; it creates a moist, humid environment that helps the cheesecake bake evenly, prevents the edges from drying out and cracking, and results in that wonderfully creamy texture.
- Bake the Cheesecake: I bake the cheesecake for 60-75 minutes, or until the edges are set and slightly puffed, but the very center (about a 2-inch circle) still jiggles slightly when the pan is gently nudged. It’s better to slightly underbake a cheesecake than to overbake it. The residual heat will continue to cook it as it cools. If the top starts to brown too much, I loosely tent it with aluminum foil.
Cooling, Chilling, and Serving Perfection
- Cool Gradually in Oven: Once the cheesecake is baked, I turn off the oven but leave the oven door ajar (I usually prop it open with a wooden spoon) and let the cheesecake cool inside the water bath for at least 1 hour, or even 2 hours. This gradual cooling process is another key step to prevent cracks. Sudden temperature changes are a cheesecake’s nemesis!
- Remove from Water Bath and Continue Cooling: After the oven cooling period, I carefully remove the springform pan from the water bath (discard the water) and unwrap the foil. I place the cheesecake on a wire rack to cool completely at room temperature for another 1-2 hours. It should be fully cool to the touch before moving to the next stage.
- Chill Thoroughly: Once completely cooled to room temperature, I cover the cheesecake loosely with plastic wrap and refrigerate it for at least 6 hours, but preferably overnight. This chilling period is absolutely crucial. It allows the cheesecake to firm up, fully set, and for the flavors to meld beautifully. Trying to slice a warm or insufficiently chilled cheesecake will result in a messy, unset disaster. Patience is truly a virtue here for the perfect slice of your Cheesecake With Pound Cake Center.
- Prepare for Serving: When ready to serve, I carefully run a thin knife around the edge of the cheesecake before releasing the springform pan collar. This ensures a clean release and prevents the cheesecake from sticking to the sides. I then gently slide the cheesecake off the bottom of the springform pan (or carefully transfer it, still on the parchment-lined bottom, to a serving plate).
- Slice and Garnish: For clean slices, I always use a sharp knife that has been run under hot water and wiped dry between each slice. This creates those beautiful, pristine cuts, showcasing the unique pound cake center. I love to garnish each slice with fresh berries, a dollop of whipped cream, or a light dusting of powdered sugar. The combination of the creamy, rich cheesecake and the moist, tender pound cake center is truly a delightful and surprising treat that always impresses!
Conclusion:
As we wrap up our journey through this truly extraordinary dessert, I sincerely hope you’ve been inspired to don your apron and bring this masterpiece to life in your own kitchen. This isn’t just another cheesecake recipe; it’s an experience, a delightful surprise, and a guaranteed showstopper that will have everyone asking for the recipe. I firmly believe that the unique combination we’ve explored today offers something truly special, something that transcends the ordinary dessert landscape.
Why is this recipe a must-try? Imagine the moment your fork slices through the creamy, velvety texture of a perfectly baked cheesecake. Now, imagine that same fork encountering a hidden treasure: a dense, moist, and utterly delicious pound cake center. It’s a revelation of textures and flavors that dance harmoniously on your palate. The rich, tangy cream cheese layer perfectly complements the buttery sweetness of the pound cake, creating a depth of flavor that is simply unparalleled. This isn’t just dessert; it’s an engineering marvel of deliciousness, meticulously crafted to deliver a “wow” factor with every single bite. The visual appeal alone is enough to captivate your guests, but the taste, my friends, is what will etch this Cheesecake With Pound Cake Center into their culinary memories forever. It’s the kind of dessert that encourages conversation, elicits gasps of delight, and makes any occasion, from a casual Sunday dinner to a grand holiday feast, feel exceptionally special. It truly embodies indulgence without being overly complicated to achieve, especially with the detailed instructions we’ve provided.
Serving Suggestions & Creative Variations:
While this magnificent creation is absolutely perfect on its own, there are countless ways to elevate and customize your Cheesecake With Pound Cake Center to suit your taste or the occasion. For a fresh and vibrant contrast, consider a simple berry compote made with seasonal mixed berries – the tartness cuts through the richness beautifully. A drizzle of warm homemade caramel sauce or a decadent chocolate ganache can transform it into an even more luxurious treat. A dollop of freshly whipped cream, perhaps infused with a hint of vanilla bean or almond extract, adds an airy lightness that’s simply divine. Don’t forget the power of a good cup of coffee or a robust tea as the perfect companion to a slice of this magnificent dessert.
Feeling adventurous? The beauty of this recipe lies in its versatility. You could experiment with the pound cake itself. Imagine a lemon zest-infused pound cake for a brighter, more zesty cheesecake, or perhaps a chocolate pound cake for an ultimate double-chocolate experience. For a touch of autumn warmth, consider adding a hint of cinnamon or nutmeg to the cheesecake batter, or even a spiced pear compote as a topping. The possibilities are truly endless, limited only by your imagination. This recipe is a fantastic canvas for your culinary creativity, allowing you to tailor it to specific preferences or dietary needs (with appropriate substitutions).
Your Culinary Adventure Awaits!
I genuinely urge you, from the bottom of my heart, to give this extraordinary recipe a try. Don’t let the multi-layered concept intimidate you; the steps are straightforward, and the reward is immeasurable. There’s an incredible sense of accomplishment that comes from creating something so impressive, so delicious, and so uniquely wonderful. Baking is a joy, a therapeutic process, and sharing what you create is one of the greatest pleasures. Once you’ve baked your own Cheesecake With Pound Cake Center, I would absolutely love to hear about your experience! What variations did you try? Who did you share it with? Did it get the “wow” factor you expected? Please, don’t hesitate to share your thoughts, tips, and especially your photos! Tag me on social media, or drop a comment below. Your successes, your experiments, and your feedback are what make this community so vibrant and inspiring. Go forth, bake with passion, and prepare to amaze everyone, including yourself, with this truly unforgettable dessert!
Frequently Asked Questions (FAQs):
How do I prevent cracks in my cheesecake?
Preventing cracks in cheesecake often comes down to managing temperature fluctuations. The most common cause of cracks is uneven cooling. I highly recommend using a water bath (bain-marie) during baking; this creates a moist environment that helps the cheesecake bake evenly and gently. Also, avoid opening the oven door too often. Once baked, turn off the oven and let the cheesecake cool inside with the door ajar for about an hour before transferring it to a wire rack to cool completely at room temperature, and then chilling it in the refrigerator. Resist the urge to cool it too quickly!
Can I make this Cheesecake With Pound Cake Center ahead of time?
Absolutely! This cheesecake is actually one of those desserts that benefits from being made ahead. It needs at least 6-8 hours, preferably overnight, in the refrigerator to chill and set properly. This allows the flavors to meld beautifully and the texture to firm up perfectly. You can easily make it 1-2 days in advance, keeping it covered loosely with plastic wrap in the refrigerator.
How do I store leftover cheesecake?
Leftover cheesecake should be stored in an airtight container or covered tightly with plastic wrap in the refrigerator. It will keep well for 3-5 days. For the best flavor and texture, let it come to room temperature for about 15-20 minutes before serving, as the cold can mute some of the subtle flavors.
Can I use a different type of cake for the center?
Yes, you certainly can! While pound cake offers a wonderful density and buttery flavor that holds up well, you could experiment with other sturdy cakes. A lemon loaf cake would add a lovely zest, or even a dense chocolate cake for an extra rich dessert. The key is to choose a cake that isn’t too light or crumbly, as it needs to withstand the baking process within the cheesecake batter. Just ensure it’s fully cooled before incorporating it into the recipe.
Can I freeze this cheesecake?
Yes, cheesecake freezes beautifully! Once the cheesecake is completely chilled and firm, you can freeze individual slices or the whole cheesecake. For slices, place them on a baking sheet to freeze solid, then wrap each slice tightly in plastic wrap and then aluminum foil. For a whole cheesecake, place it on a baking sheet to freeze for an hour, then wrap the entire cheesecake (still on its base) tightly in multiple layers of plastic wrap and then foil. It will keep in the freezer for up to 1-2 months. Thaw in the refrigerator overnight before serving.
Do I need a specific type of springform pan?
A standard 9-inch springform pan is ideal for this recipe. Make sure it’s a good quality pan that seals well to prevent any leakage, especially if you’re using a water bath. For extra security against water seepage into the cheesecake, you can wrap the outside of the pan tightly with heavy-duty aluminum foil before placing it in the water bath.
Decadent Cheesecake with Pound Cake Center Dessert
This showstopper cheesecake came about completely by accident when the creator couldn’t decide between making a traditional pound cake or a favorite cheesecake. Instead of choosing, they combined them into one magnificent dessert that’s become a most requested special occasion treat! The buttery pound cake hidden inside creates an amazing textural surprise that makes everyone’s eyes widen when they cut into it. The perfect balance of creamy, dense, and sweet. This unique combination creates a delightful textural journey, where the velvety smooth, tangy richness of cheesecake meets the comforting, moist chew of buttery pound cake in a single, extraordinary creation. It’s a show-stopping favorite for any special occasion.
Ingredients
-
1/2 cup (113g) unsalted butter, softened (for Pound Cake)
-
1 cup (200g) granulated sugar (for Pound Cake)
-
2 large eggs, room temperature (for Pound Cake)
-
1 1/2 tsp pure vanilla extract (for Pound Cake)
-
1 1/2 cups (180g) all-purpose flour, sifted (for Pound Cake)
-
1 1/2 tsp baking powder (for Pound Cake)
-
1/4 tsp salt (for Pound Cake)
-
1/2 cup (120ml) whole milk, room temperature (for Pound Cake)
-
1 1/2 cups (180g) graham cracker crumbs (for Crust)
-
1/4 cup (50g) granulated sugar (for Crust)
-
6 tbsp (85g) unsalted butter, melted (for Crust)
-
4 (8-ounce) pkgs (900g) full-fat cream cheese, softened (for Cheesecake)
-
1 1/2 cups (300g) granulated sugar (for Cheesecake)
-
1/4 cup (30g) all-purpose flour (for Cheesecake)
-
1 tbsp pure vanilla extract (for Cheesecake)
-
1/2 tsp lemon zest (optional, for Cheesecake)
-
Pinch of salt (for Cheesecake)
-
4 large eggs, room temperature (for Cheesecake)
-
1 cup (240g) full-fat sour cream, room temperature (for Cheesecake)
-
Fresh berries (optional, for Garnish)
-
Whipped cream (optional, for Garnish)
-
Powdered sugar (optional, for Garnish)
Instructions
-
Step 1
Preheat oven to 350°F (175°C). Grease and flour an 8×4 inch loaf pan, lining the bottom with parchment paper. In a large bowl, beat 1/2 cup softened unsalted butter and 1 cup granulated sugar until light and fluffy (3-5 min). Beat in 2 large eggs, one at a time, then stir in 1 1/2 tsp pure vanilla extract. In a separate bowl, whisk 1 1/2 cups sifted all-purpose flour, 1 1/2 tsp baking powder, and 1/4 tsp salt. Alternately add the dry mixture and 1/2 cup whole milk to the wet ingredients, beginning and ending with dry; mix until just combined, do not overmix. Pour batter into the prepared loaf pan and bake for 40-50 minutes, or until a wooden skewer inserted into the center comes out clean. Cool in the pan for 10-15 minutes, then invert onto a wire rack to cool completely. -
Step 2
Line the bottom of a 9-inch springform pan with parchment paper. In a medium bowl, combine 1 1/2 cups graham cracker crumbs, 1/4 cup granulated sugar, and 6 tbsp melted unsalted butter. Stir until crumbs are evenly moistened. Press the mixture firmly and evenly onto the bottom of the prepared springform pan. For a sturdier crust, pre-bake at 350°F (175°C) for 8-10 minutes, then cool completely. -
Step 3
Tightly wrap the outside of the springform pan with a double layer of heavy-duty aluminum foil for a water bath. In a very large mixing bowl or stand mixer, beat 4 (8-ounce) packages softened full-fat cream cheese on medium speed for 2-3 minutes until super smooth. Gradually add 1 1/2 cups granulated sugar and 1/4 cup all-purpose flour, beating on low to medium speed until just combined. Stir in 1 tbsp pure vanilla extract, 1/2 tsp lemon zest (optional), and a pinch of salt. Add 4 large eggs one at a time, beating on low speed only until each egg is just incorporated. Finally, gently fold in 1 cup full-fat sour cream until just combined; do not overmix. -
Step 4
Preheat oven to 325°F (160°C). Boil a kettle of water. Place the foil-wrapped springform pan (with the cooled graham cracker crust) into a larger roasting pan. Slice a 1.5-2 inch thick rectangular piece from the completely cooled pound cake and stand it vertically in the center of the graham cracker crust. Carefully pour the smooth cheesecake batter around and over the pound cake, filling the pan to about 1/2 inch from the rim. Gently tap the pan on the counter a few times to release any large air bubbles. Carefully transfer the roasting pan to the preheated oven. Pour the hot water into the larger roasting pan until it comes about halfway up the sides of the springform pan, being careful not to get water into the cheesecake itself. Bake for 60-75 minutes, or until the edges are set and slightly puffed, but the very center (about a 2-inch circle) still jiggles slightly when gently nudged. If the top starts to brown too much, loosely tent it with aluminum foil. -
Step 5
Once baked, turn off the oven but leave the oven door ajar (prop open with a wooden spoon) and let the cheesecake cool inside the water bath in the oven for at least 1-2 hours. Carefully remove the springform pan from the water bath, unwrap the foil, and place on a wire rack to cool completely at room temperature for another 1-2 hours. Once completely cooled, cover the cheesecake loosely with plastic wrap and refrigerate for at least 6 hours, but preferably overnight, to chill thoroughly and set. When ready to serve, carefully run a thin knife around the edge of the cheesecake before releasing the springform pan collar. For clean slices, use a sharp knife that has been run under hot water and wiped dry between each slice. Garnish each slice with fresh berries, a dollop of whipped cream, or a light dusting of powdered sugar, if desired.
Important Information
Nutrition Facts (Per Serving)
It is important to consider this information as approximate and not to use it as definitive health advice.
Allergy Information
Please check ingredients for potential allergens and consult a health professional if in doubt.

Leave a Comment