

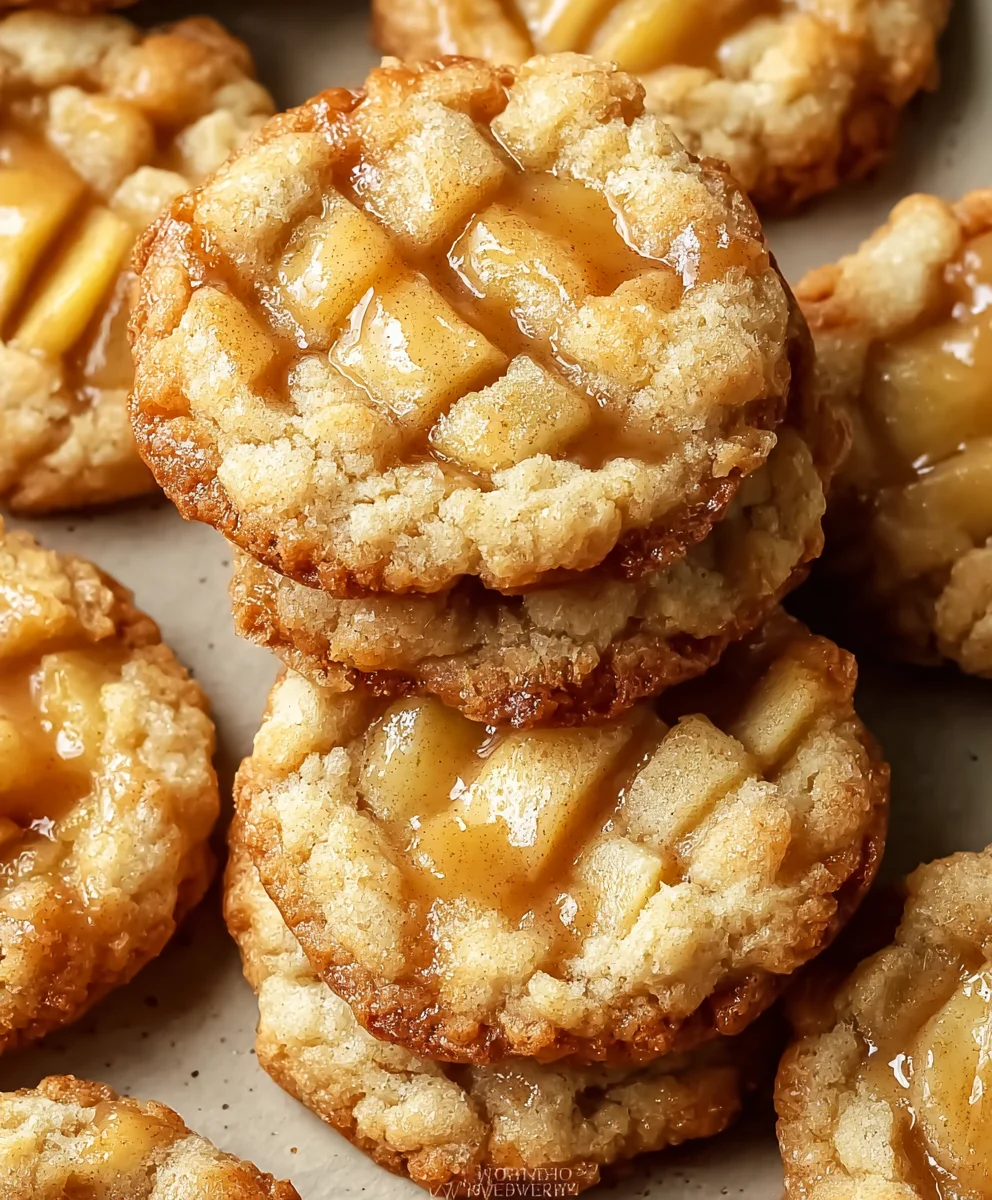
Apple Pie Cookies are an absolute game-changer for anyone who adores the classic dessert but craves a more convenient, pop-able treat. I’ve always found the idea of combining two beloved baked goods irresistible, and these little wonders truly deliver. Imagine sinking your teeth into a soft, tender cookie that miraculously encapsulates all the quintessential flavors of a warm, spiced apple pie – the sweet, tart apple filling, the hint of cinnamon and nutmeg, and that comforting aroma that fills your kitchen. It’s truly a miniature slice of heaven!
A Beloved Twist on a Timeless Classic
While traditional apple pie holds a cherished place in countless homes, symbolizing comfort and celebration across generations, these Apple Pie Cookies offer a delightful modern interpretation. They capture the spirit of homemade goodness without the fuss of rolling out a full pie crust. People adore this dish not just for its incredible taste and charming texture – a perfect blend of a chewy cookie and tender, spiced apple – but also for its sheer convenience. They’re effortlessly shareable, easy to transport, and make for the perfect accompaniment to a cup of coffee or a delightful dessert for any gathering. Get ready to impress everyone with these irresistible bites!

Ingredients:
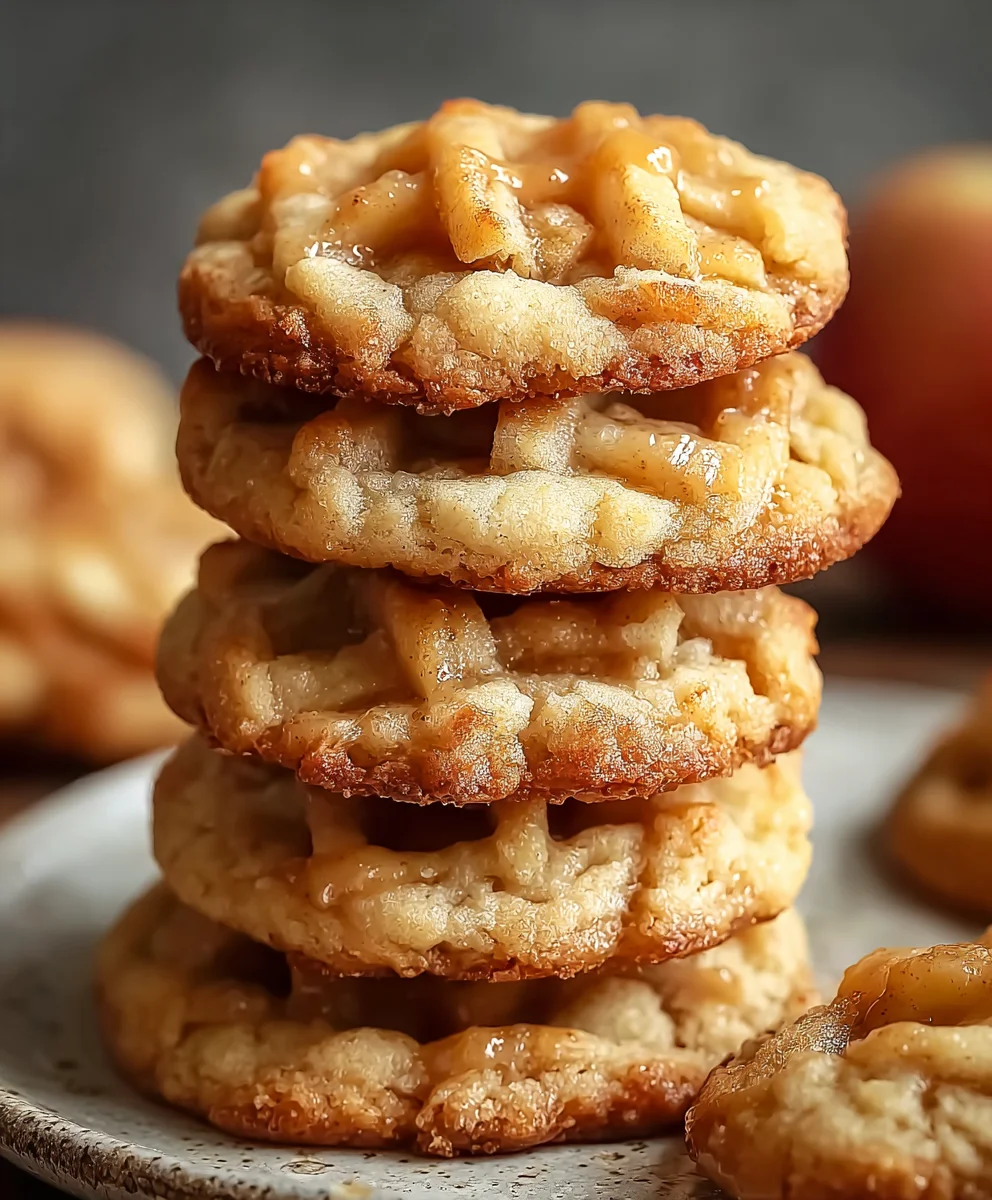
- Apple Pie Cookies are a delightful miniature version of the classic dessert, combining all the comforting flavors of apple pie in a bite-sized treat. These cookies feature a flaky pie crust, a gooey apple-cinnamon filling, and a sprinkle of cinnamon-sugar for the perfect balance of textures and flavors. The addition of caramel sauce takes them to the next level, adding a rich, sweet touch to every bite. Perfect for fall gatherings, holiday parties, or cozy evenings at home, these cookies are sure to impress. Serve them warm with a drizzle of caramel sauce or a scoop of vanilla ice cream for the ultimate indulgence.
- Apple Pie Cookies bring all the warm, comforting flavors of a traditional apple pie into a handheld, bite-sized treat. These cookies are perfect for fall gatherings, holiday parties, or simply enjoying a cozy moment at home. With a flaky pie crust, gooey apple-cinnamon filling, and a touch of caramel, they’re the ultimate seasonal indulgence. The sprinkle of cinnamon-sugar on top adds a crisp, caramelized touch that perfectly complements the soft filling.
Preparing Your Workspace and Components
- Gather Your Ingredients and Tools: Before we dive into the fun of assembling these delicious Apple Pie Cookies, I always recommend having everything laid out and ready to go. This mise en place approach makes the entire process smoother and more enjoyable. You’ll want to ensure your flaky pie crust is well-chilled, as this is absolutely crucial for achieving that delicate, tender texture we all crave. A cold crust is easier to handle and prevents it from becoming tough. If you’ve just made your pie crust, give it at least 30 minutes, or even an hour, in the refrigerator to firm up properly. Similarly, have your gooey apple-cinnamon filling prepared and at a manageable temperature. It shouldn’t be piping hot, as that could melt your pie crust, but also not so cold that it’s difficult to scoop. Room temperature or slightly cool is ideal. Get your cinnamon-sugar blend ready in a small bowl, and ensure your caramel sauce and vanilla ice cream are on standby for serving, though they’ll wait patiently until the very end.
- Preheat Your Oven: This step is often overlooked but is incredibly important for even baking. Preheat your oven to 375°F (190°C). Give it ample time to reach and maintain this temperature before you even think about placing cookies inside. An accurately preheated oven ensures that your cookies start baking immediately, helping the crust to set quickly and become beautifully golden and flaky. While the oven preheats, you can line a couple of large baking sheets with parchment paper or silicone baking mats. This prevents sticking and makes cleanup a breeze, allowing the cookies to release effortlessly after baking.
- Prepare Your Work Surface: Find a clean, spacious countertop or a large pastry board. Lightly dust it with a small amount of flour. This thin layer of flour helps prevent your flaky pie crust from sticking as you roll it out, ensuring it remains intact and easy to work with. Remember, the goal is a gentle dusting, not a thick coating, as too much flour can make your crust tough. Have a rolling pin, a round cookie cutter (about 2.5 to 3 inches in diameter is perfect for a bite-sized cookie), and a small bowl of water nearby. The water will be used to help seal the cookie edges, a crucial step in keeping that delicious apple filling tucked safely inside.
Working with the Flaky Pie Crust
- Roll Out the Pie Crust: Take one half of your chilled flaky pie crust and place it on your lightly floured surface. If you’re using store-bought crust, gently unroll it. With a rolling pin, begin to roll out the dough, working from the center outwards. Rotate the crust occasionally to ensure it doesn’t stick and to help achieve a uniform thickness. Your aim is to roll the crust into a circle or rectangle that is approximately 1/8 to 1/4 inch thick. This thickness is key; too thin, and your cookies might tear or struggle to hold the filling; too thick, and they might feel overly bready. Keep an eye on the edges, ensuring they don’t become significantly thinner than the center. If the crust starts to get sticky or too warm, don’t hesitate to carefully gather it, reform it into a disc, wrap it in plastic, and chill it again for 10-15 minutes. Patience here will absolutely pay off in the final texture of your cookies.
- Cut Out the Cookie Shapes: Once your pie crust is rolled to the desired thickness, grab your round cookie cutter. Begin cutting out as many circles as you can from the rolled-out crust, placing them relatively close together to minimize scraps. Gently lift each circle and carefully transfer half of them to your prepared baking sheets, spacing them about an inch apart. These will serve as the bottoms of your cookies. The remaining circles will be the tops, which we’ll prepare separately. Don’t worry about the leftover dough scraps at this point; we’ll re-roll them after you’ve used the first batch. The goal here is to be gentle, preserving the flaky layers within the crust.
- Prepare the Top Crusts (Optional Vents): For the circles designated as the top halves of your cookies, you have a couple of options. You can simply leave them as solid circles, but I personally love to add a little touch of artistry and practicality. Using a small sharp knife or a tiny cookie cutter (like a mini star or heart), cut one or two small slits or shapes in the center of each top crust. These vents aren’t just for aesthetics; they allow steam to escape from the gooey apple-cinnamon filling during baking, preventing the cookies from bursting and ensuring a more even cook. Plus, they look incredibly charming, giving a peek at the delicious filling inside. Place these vented tops on a separate piece of parchment paper or plate for now.
Filling and Assembling the Apple Pie Cookies
- Add the Gooey Apple-Cinnamon Filling: Now for the heart of our Apple Pie Cookies! Take the pie crust circles you placed on your baking sheets (these are your bottoms). Scoop about 1 to 1.5 teaspoons of your gooey apple-cinnamon filling onto the center of each circle. It’s important not to overfill, as this can make sealing difficult and lead to messy leaks during baking. The filling should sit nicely in the center, leaving a clear border of about 1/2 inch around the edge of the pie crust. The exact amount might vary slightly depending on the size of your cookie cutter and the consistency of your filling, so use your best judgment. We want a generous amount of apple flavor without compromising the structural integrity of our cookie.
- Moisten and Seal the Edges: This step is critical for a perfectly enclosed cookie. Dip a finger or a small pastry brush into the small bowl of water you prepared earlier. Lightly moisten the entire border of each bottom crust circle, all around the apple filling. This water acts as a glue, helping the top crust adhere securely to the bottom. Don’t drench it, just a gentle moistening will do the trick. Once moistened, carefully place one of your prepared top crust circles (either plain or vented) directly over the filling, aligning the edges as closely as possible with the bottom crust.
- Crimp the Edges: Now, gently press down around the edges of each cookie with your fingertips to seal the two crusts together. Once you’ve done a preliminary seal, take a fork and press the tines firmly around the entire perimeter of each cookie. This not only creates a beautiful, classic pie crust crimp but also creates a very strong seal, locking in that delicious apple-cinnamon filling. A good seal is key to preventing any of that wonderful gooey filling from bubbling out during baking, which could lead to a sticky mess on your baking sheet. Take your time with this step, ensuring every cookie is well-sealed.
- Re-roll and Repeat: Gather all the pie crust scraps you have. Gently press them together to form a new disc. Try to handle the dough as little as possible to avoid overworking it, which can lead to a tough crust. Wrap this new disc in plastic wrap and chill it in the refrigerator for about 10-15 minutes. Once chilled, repeat steps 4 through 9, rolling out the dough, cutting out circles, filling them, sealing, and crimping. You should be able to get a good number of additional cookies from the re-rolled scraps, maximizing your delicious yield.
- Apply Cinnamon-Sugar Topping: Before baking, we’re going to give these Apple Pie Cookies their signature caramelized crunch. In a small bowl, whisk together the components for your cinnamon-sugar blend. With a pastry brush or your fingertips, lightly brush the tops of each assembled cookie with a tiny bit of water or, for an extra golden finish, a very light egg wash (if you have one prepared). Then, generously sprinkle your cinnamon-sugar mixture over the top of each cookie. The moisture will help the sugar adhere, and as it bakes, it will create a beautiful, sparkly, and slightly crispy coating that perfectly complements the flaky crust and soft filling. This step truly elevates the cookie, adding another layer of texture and flavor.
Baking and Finishing Your Apple Pie Cookies
- Bake to Golden Perfection: Carefully transfer your baking sheets with the assembled Apple Pie Cookies into your preheated 375°F (190°C) oven. Place them on the middle racks, ensuring there’s enough space for air circulation around each sheet. Bake for approximately 15-20 minutes. The exact baking time can vary depending on your oven and the thickness of your cookies, so keep a close eye on them. You’re looking for a beautiful golden-brown color on the crust, and you might even see some of the gooey apple-cinnamon filling gently bubbling through the vents. The cinnamon-sugar topping should also look caramelized and inviting. If you notice some cookies browning faster than others, you can rotate the baking sheets halfway through the baking time.
- Cool Slightly: Once your Apple Pie Cookies are gorgeously golden and baked through, carefully remove the baking sheets from the oven. Let the cookies cool on the baking sheets for about 5-10 minutes. This brief resting period allows the cookies to set up properly, making them easier to handle without breaking. The filling will also firm up slightly, becoming less runny as it cools. After this initial cooling, use a thin spatula to transfer the cookies to a wire rack to cool completely. While they are delicious at room temperature, I personally think they shine brightest when served warm.
- The Grand Finale: Drizzle with Caramel Sauce: Now for the indulgent finishing touch! These Apple Pie Cookies are fantastic on their own, but the addition of caramel sauce truly takes them to an extraordinary level. Once the cookies have cooled enough to handle comfortably (or even better, while they’re still slightly warm), generously drizzle them with your favorite caramel sauce. You can go for a neat zigzag pattern, or a more rustic, free-form pour – whatever suits your style! The warm cookies will slightly melt the caramel, creating an even more irresistible treat. The rich, buttery notes of the caramel perfectly enhance the sweet-tart apple and spicy cinnamon.
- Serve with Vanilla Ice Cream (Optional, but Highly Recommended): For the ultimate dessert experience, serve these warm Apple Pie Cookies with a scoop of creamy vanilla ice cream. The contrast of the warm cookie and cool ice cream, combined with the flaky crust, gooey filling, and rich caramel, is simply heavenly. The ice cream will slowly melt around the cookies, creating a delightful sauce that rounds out every bite. This is especially perfect for gatherings or when you want to truly impress your guests. Or, let’s be honest, for a cozy evening treat just for yourself! These cookies are also wonderful with a dollop of whipped cream or simply enjoyed as is.
Tips for Success and Variations
Achieving perfect Apple Pie Cookies every time is incredibly satisfying, and with a few additional tips, you can ensure your batch is always a hit. One key aspect is maintaining the chill of your flaky pie crust. If at any point during rolling or assembly you find the dough becoming too soft or sticky, don’t hesitate to pop it back into the refrigerator for 10-15 minutes. A cold crust is the secret to flakiness and prevents shrinkage during baking. When sealing the cookies, be meticulous; any small gap can lead to filling leakage, which is easily avoided with a firm crimp from your fork.
Consider the consistency of your gooey apple-cinnamon filling. It should be thick enough to hold its shape somewhat, but still spreadable. If it’s too runny, it will be harder to contain within the crust, and too thick might make the cookies dry. If you’re using a homemade filling, allowing it to cool completely before using will help achieve the ideal consistency. For an extra touch of flavor, you can brush the tops of the cookies with a little milk or cream before sprinkling the cinnamon-sugar, which helps create a deeper golden hue and richer flavor.
While round cookies are classic, feel free to experiment with different cookie cutter shapes! Heart-shaped cookies would be adorable for Valentine’s Day, or star shapes could add a festive touch for holiday gatherings. You could even use a small lattice cutter for the top crusts to mimic a traditional apple pie even more closely. If you opt for a lattice top, remember to still ensure a good seal around the edges.
Storage is simple for these delightful treats. Once completely cooled, you can store your Apple Pie Cookies in an airtight container at room temperature for up to 2-3 days. If you want to keep them fresh for longer, they can be refrigerated for up to a week. For the best experience, I highly recommend gently reheating them in the microwave for a few seconds or in a low oven (around 250°F or 120°C) for 5-10 minutes to bring back that warm, gooey center and crisp crust before serving. This revives their “fresh from the oven” appeal. The caramel sauce can be drizzled just before serving, whether reheated or not.
These Apple Pie Cookies are incredibly versatile. While the caramel sauce is a fantastic addition, you could also experiment with a light dusting of powdered sugar once cooled for a simpler finish, or even a very thin glaze made from powdered sugar and a touch of milk or lemon juice. For an adult-friendly twist, consider adding a tiny splash of bourbon or rum extract to your caramel sauce if you’re making it from scratch, or simply warming a store-bought version with a spirit for a boozy kick. The key is to enjoy the process and customize these little bites of comfort to your liking. They are truly the perfect embodiment of fall flavors in a portable, irresistible package, ready to bring joy to any occasion or simply elevate a quiet afternoon coffee break.
Conclusion:
Well, my fellow dessert enthusiasts, we’ve reached the sweet end of our culinary journey, but truly, it’s just the beginning of your next delightful baking adventure. If there’s one recipe I urge you to try from my collection, it’s undeniably these incredible Apple Pie Cookies. They are more than just a treat; they’re a testament to comfort, ingenuity, and the sheer joy of homemade goodness. Imagine all the comforting, warm, spiced bliss of a classic apple pie, but perfectly encapsulated in a handheld, wonderfully convenient cookie. No fuss with slicing, no need for forks – just pure, unadulterated deliciousness in every bite, ready to be enjoyed anytime, anywhere.
Why These Apple Pie Cookies Are an Absolute Game-Changer
What makes these cookies an absolute must-try? It’s the magical synergy of textures and flavors. When you pull these golden beauties from the oven, the aroma alone is enough to transport you to a cozy autumn afternoon, regardless of the actual season. That intoxicating scent of cinnamon, sweet apples, and freshly baked dough is simply irresistible. The combination of a tender, slightly flaky cookie base, which mimics the perfect pie crust, brimming with a sweet and tangy apple filling, all perfectly seasoned with cinnamon, nutmeg, and a hint of warmth, is nothing short of extraordinary. They offer that nostalgic hug from your childhood that speaks directly to the soul, making them the ultimate comfort food in cookie form. These Apple Pie Cookies are a brilliant solution for when you crave the complexity and warmth of apple pie but desire the simplicity and portability of a cookie. They’re a testament to how simple ingredients, when combined with a little love and technique, can create extraordinary joy and lasting memories.
Endless Possibilities: Serving & Variation Ideas
While these cookies are absolutely divine on their own, especially when still slightly warm, consider elevating the experience to truly make them your own. A scoop of premium vanilla bean ice cream, melting gently over a warm Apple Pie Cookie, is a match made in heaven that creates a mini deconstructed pie experience. A dollop of freshly whipped cream, a light dusting of powdered sugar, or even a delicate caramel drizzle can transform them into a gourmet dessert that’s perfect for entertaining. They’re also the ideal companion alongside a steaming mug of coffee or tea, making your morning or afternoon break feel incredibly luxurious and indulgent. Pack them in lunchboxes for a delightful surprise for your loved ones, or bring them to a potluck, and I promise you, they will disappear faster than you can say “apple pie.”
And don’t be afraid to get creative with variations! While my recipe provides a fantastic foundation, feel free to experiment to suit your taste. For the apple filling, a mix of Granny Smith for tartness and Fuji or Honeycrisp for sweetness often yields a wonderfully balanced flavor profile. If you love a bolder spice presence, a pinch of allspice or cardamom can add another layer of complexity. For added texture and a nutty depth, chopped pecans or walnuts can be folded into the apple mixture. A simple powdered sugar glaze, made with confectioners’ sugar mixed with a touch of milk or apple cider, drizzled over the cooled cookies adds an extra touch of sweetness and shine. For something richer, a cream cheese glaze would be absolutely heavenly. And for those feeling a bit adventurous, a tablespoon of brandy or applejack in the filling can impart a sophisticated, boozy kick that’s perfect for adult palates. The possibilities are truly endless, limited only by your imagination!
Your Culinary Adventure Awaits!
I genuinely believe that this recipe for Apple Pie Cookies will become a cherished staple in your baking repertoire. They embody everything we love about homemade treats – warmth, comfort, and pure, unadulterated deliciousness that connects us to cherished memories. So, I wholeheartedly encourage you to roll up your sleeves, gather your ingredients, and embark on this delightful baking adventure. The joy of creating something so utterly delicious with your own hands is a truly rewarding experience, one that fills your home with incredible aromas and your heart with satisfaction. And once you’ve tasted the magic of these cookies, I would absolutely love to hear about it! Please come back and share your experiences, your creative variations, or even just a photo of your beautiful creations. Tag me on social media if you post them – seeing your baking triumphs brings me so much joy. Let’s spread the cookie love, one delicious bite at a time. This recipe is more than just instructions; it’s an invitation to create lasting memories and share moments of pure, sweet happiness with those you love. Don’t just bookmark this recipe; make it, savor it, and share the warmth!
FAQs About Your Delicious Apple Pie Cookies
-
How should I store my Apple Pie Cookies to keep them fresh?
-
To maintain their optimal freshness and flavor, store your Apple Pie Cookies in an airtight container at room temperature for up to 3-4 days. If you need to extend their shelf life slightly, you can refrigerate them, which can keep them fresh for up to a week. Just make sure they’re completely cool before storing to prevent sogginess.
-
Can I freeze these Apple Pie Cookies?
-
Absolutely! Apple Pie Cookies freeze beautifully. Once they have completely cooled, arrange them in a single layer on a baking sheet and flash freeze them for about an hour. This prevents them from sticking together. Then, transfer the frozen cookies to a freezer-safe bag or an airtight container. They will keep well in the freezer for up to 2-3 months. When you’re ready to enjoy them, simply thaw them at room temperature or warm them gently in the oven for that freshly baked taste.
-
What kind of apples are best for the filling?
-
For the best balance of flavor and texture, I recommend using a mix of apple varieties. Granny Smith apples are fantastic for providing a tart counterpoint and holding their shape well during baking. You can pair them with sweeter, firmer apples like Honeycrisp, Fuji, or Gala for a more complex and balanced flavor profile. Avoid overly watery or soft apples, as they can make the filling mushy.
-
Can I use store-bought pie crust for this recipe?
-
Yes, you absolutely can! Using pre-made, store-bought pie crust or even puff pastry can significantly cut down on your prep time without sacrificing much, if any, flavor or charm. Just roll it out according to package directions and proceed with the cookie shaping steps outlined in the recipe. It’s a fantastic shortcut for when you’re short on time but still crave that homemade taste.
-
How long do Apple Pie Cookies typically last?
-
When stored properly in an airtight container at room temperature, your Apple Pie Cookies will typically last for about 3 to 4 days. If you refrigerate them, they can extend their freshness for up to a week. For much longer storage, freezing them is your best bet, where they’ll remain delicious for 2 to 3 months.
-
Are there ways to make these cookies gluten-free or dairy-free?
-
Yes, with a few modifications, you can absolutely adapt this recipe! For a gluten-free version, substitute a 1:1 gluten-free all-purpose flour blend (ensure it contains xanthan gum for structure) for the regular all-purpose flour in the cookie dough. For dairy-free, you can use a high-quality plant-based butter substitute in place of regular butter, and if the recipe calls for milk (either in the dough or a glaze), use a plant-based milk alternative like almond or oat milk. Always double-check ingredient labels to ensure all components meet your dietary needs.
Delicious Apple Pie Cookies: Taste of Fall in Every Bite
Delicious Apple Pie Cookies combine the comforting flavors of classic apple pie into a convenient, bite-sized treat. Featuring a flaky pie crust, gooey apple-cinnamon filling, and a sprinkle of cinnamon-sugar, these cookies are perfect for fall gatherings, holiday parties, or cozy evenings. Drizzled with caramel sauce and served warm, they’re an ultimate seasonal indulgence.
Ingredients
-
Flaky pie crust (chilled)
-
Gooey apple-cinnamon filling (approx. 1 to 1.5 teaspoons per cookie)
-
Cinnamon-sugar blend (for topping)
-
Water (as needed, for sealing and brushing)
-
Caramel sauce (for drizzling)
-
Vanilla ice cream (optional, for serving)
-
Flour (for dusting work surface)
-
Milk or cream OR Egg wash (optional, for brushing)
-
Non-alcoholic bourbon or rum extract (optional, for caramel variation)
-
Powdered sugar (optional, for dusting)
-
Lemon juice (optional, for glaze variation)
Instructions
-
Step 1
Gather all ingredients and tools. Ensure flaky pie crust is well-chilled and apple-cinnamon filling is at room temperature. Preheat oven to 375°F (190°C). Line baking sheets with parchment paper. Lightly flour your work surface, and have a small bowl of water ready. -
Step 2
Roll out one half of the chilled pie crust to approx. 1/8 to 1/4 inch thick. Using a 2.5-3 inch round cookie cutter, cut out circles. Transfer half of the circles to prepared baking sheets; these are your cookie bottoms. For the remaining circles (tops), optionally cut one or two small slits or shapes in the center for vents. -
Step 3
Scoop 1 to 1.5 teaspoons of apple-cinnamon filling onto the center of each bottom crust circle, leaving a 1/2-inch border. Lightly moisten the border with water. Place a top crust circle over the filling, aligning edges. Gently press to seal, then crimp firmly with a fork around the entire perimeter to create a strong seal. -
Step 4
Gather all pie crust scraps, gently press into a new disc, wrap, and chill for 10-15 minutes. Re-roll the dough and repeat the cutting, filling, and sealing process to maximize your cookie yield. -
Step 5
Lightly brush the tops of assembled cookies with a tiny bit of water or an optional egg wash/milk/cream. Generously sprinkle with the cinnamon-sugar mixture. -
Step 6
Bake in the preheated oven for 15-20 minutes, or until the crust is beautifully golden-brown and the filling gently bubbles through any vents. Rotate baking sheets halfway through if you notice uneven browning. -
Step 7
Remove from oven and let cookies cool on the baking sheets for 5-10 minutes. Transfer to a wire rack to cool completely. For serving, generously drizzle warm cookies with your favorite caramel sauce (optionally flavored with non-alcoholic bourbon or rum extract). Serve immediately with an optional scoop of vanilla ice cream or a dollop of whipped cream. Store cooled cookies in an airtight container at room temperature for 2-3 days, or refrigerate for up to a week. Reheat gently in the microwave or a low oven for best results.
Important Information
Nutrition Facts (Per Serving)
It is important to consider this information as approximate and not to use it as definitive health advice.
Allergy Information
Please check ingredients for potential allergens and consult a health professional if in doubt.

Leave a Comment