

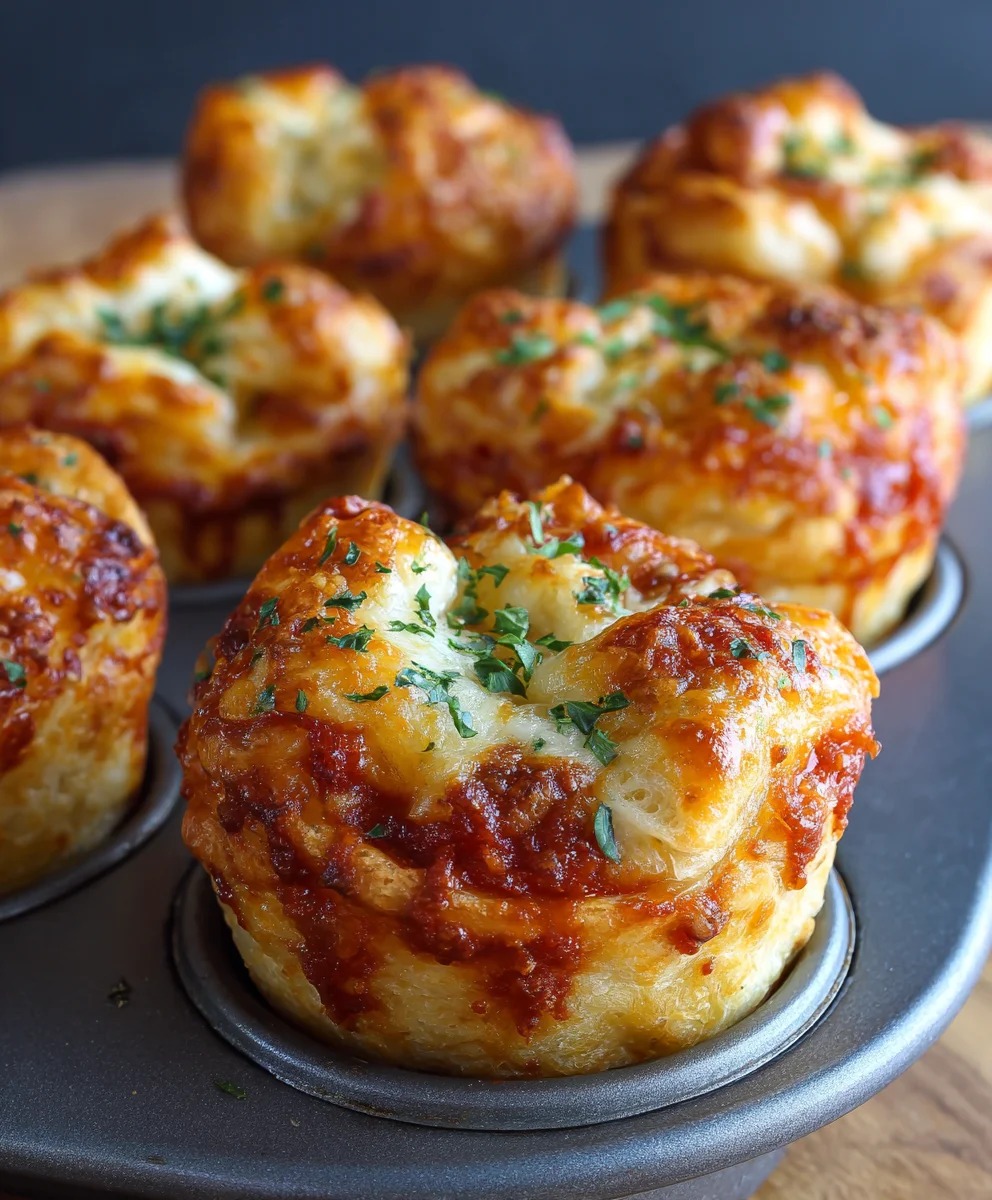
Pizza Puff Cups are an ingenious culinary creation that promises to revolutionize your snack time, party spreads, and even weeknight dinners. Imagine the irresistible allure of your favorite pizza, meticulously crafted into a delightful, perfectly portioned cup. This innovative twist on a beloved classic transforms the familiar flavors of savory sauce, gooey cheese, and your chosen toppings into a convenient, handheld delight, encased in a light, flaky pastry. We believe these aren’t just a recipe; they are an experience, offering a burst of comforting flavor with every bite.
While traditional pizza boasts a rich history dating back centuries, these delightful Pizza Puff Cups represent a modern evolution, born from the desire for ease, portability, and undeniable deliciousness, making them a staple at informal gatherings and a cherished treat for all ages. People adore this dish for its incredible versatility, its satisfying texture—crisp on the outside, soft and warm within—and the sheer joy of customizing each cup to individual preferences. They offer all the beloved elements of pizza without the fuss, perfect for little hands or sophisticated palates. Get ready to discover your new go-to appetizer!

Ingredients:
- For the Dough Base:
- 2 cans (8 counts each, total 16 biscuits) refrigerated jumbo flaky biscuits or crescent roll dough sheets (I find the jumbo flaky biscuits give the best ‘puff’ and structure for our Pizza Puff Cups!)
- 1 tablespoon olive oil (for greasing the muffin tin, or non-stick cooking spray)
- For the Sauce & Cheese:
- 1 cup pizza sauce (your favorite brand, or homemade if you’re feeling ambitious!)
- 2 cups shredded mozzarella cheese, divided (part-skim or whole milk, whichever you prefer for that perfect melty pull)
- ½ cup shredded Parmesan cheese, grated (freshly grated is always superior, it really elevates the flavor)
- For the Toppings (choose your favorites!):
- ½ cup mini pepperoni slices (the small ones work wonderfully here, ensuring every bite gets some pep!)
- ½ cup cooked, crumbled Italian sausage (mild or hot, depending on your preference)
- ¼ cup finely diced green bell pepper
- ¼ cup finely diced red onion
- ¼ cup sliced black olives
- ¼ cup sliced mushrooms (fresh, finely chopped)
- Optional: cooked, diced ham; cooked, crumbled bacon; pineapple bits (if you’re a fan of a controversial but delicious combo!)
- For Seasoning & Garnish:
- 1 teaspoon dried Italian seasoning (or a mix of oregano, basil, and garlic powder)
- ½ teaspoon garlic powder
- ¼ teaspoon red pepper flakes (optional, for a little kick!)
- Fresh parsley or basil, chopped (for garnish, adds a lovely fresh finish)
- Marinara sauce or ranch dressing (for dipping, a must-have for serving these delightful Pizza Puff Cups!)
Prepping Your Workspace and Setting the Stage
- Preheat Your Oven to Perfection: First things first, let’s get that oven ready! Preheat your oven to 375°F (190°C). This ensures a consistent baking temperature from the moment our Pizza Puff Cups go in, helping the dough achieve that beautiful golden-brown crispness we’re aiming for. It’s a small step, but a crucial one for baking success!
- Prepare Your Muffin Tin: Grab a standard 12-cup muffin tin. You’ll want to generously grease each cup with olive oil or spray it thoroughly with non-stick cooking spray. I like using a pastry brush with a tiny bit of olive oil because it ensures every nook and cranny is coated, preventing any sticky situations later. If you’re using a second tin for the remaining four biscuits, prepare it the same way. This meticulous greasing will make sure our magnificent Pizza Puff Cups pop out easily, preserving their perfect shape.
- Gather and Prep Your Ingredients: Before we dive into assembly, it’s a good idea to have everything laid out and ready to go. This is what professional chefs call “mise en place” – everything in its place. Finely dice your bell peppers and red onion, slice your olives and mushrooms, and make sure your pepperoni and cooked sausage are ready. If you’re using any other toppings, get them prepped now too. Having all your fillings within arm’s reach makes the assembly process smooth and enjoyable, especially when working with sticky dough! This approach really makes creating our Pizza Puff Cups a breeze.
- Open Your Biscuit Cans with Care: Gently open your cans of refrigerated jumbo flaky biscuits. Handle them with a little love; we want to keep them intact as much as possible at this stage. You’ll notice they’re already perfectly portioned, which is a fantastic head start for our recipe.
Crafting the Perfect Base for Your Pizza Puff Cups
- Flattening the Biscuit Dough: On a lightly floured surface or a piece of parchment paper, take each biscuit and flatten it into roughly a 4-5 inch circle. I find that using the palm of my hand first, and then a small rolling pin, works best to get an even thickness. You don’t want them too thin, or they might tear when filled, but also not too thick, or they won’t cook through properly. Aim for about ¼ inch thick. This creates the perfect pliable base for our delightful Pizza Puff Cups.
- Nestling the Dough into the Muffin Tin: Carefully press each flattened biscuit into the prepared muffin cups. You want the dough to line the bottom and extend up the sides, creating a cup shape. It’s okay if the edges slightly overhang the rim of the muffin cup; this actually helps later when we seal them. Take your time with this step, ensuring there are no major gaps or tears in the dough. This forms the foundational ‘cup’ for all the delicious fillings to come.
Layering the Delicious Fillings for Maximum Flavor
- Starting with a Saucy Base: Now for the heart of the pizza flavor! Spoon about 1 tablespoon of pizza sauce into the bottom of each biscuit cup. Try to spread it evenly without going overboard. Too much sauce can make the cups soggy, and we want a crisp, puffy base. This thin layer of sauce acts as a flavorful adhesive for our cheese and toppings.
- Building the Cheese Layer: Sprinkle about 1 tablespoon of shredded mozzarella cheese over the sauce in each cup. This initial layer of mozzarella creates a wonderful cheesy barrier that helps prevent the sauce from making the biscuit dough soggy, and also provides that classic gooey pizza experience from the very first bite. Don’t be shy, but don’t overstuff just yet!
- Adding Your Chosen Toppings: This is where the customization comes in! Evenly distribute your chosen toppings among the cups. If you’re using pepperoni, scatter a few mini slices into each cup. If you have cooked sausage or bacon, add a small spoonful. For veggies like bell peppers, onions, olives, or mushrooms, a tiny sprinkle is usually sufficient. Remember, we’re making mini Pizza Puff Cups, so a little goes a long way. Overfilling can lead to bursting cups, and we want neat, tidy, and delicious bites.
- A Second Helping of Cheese: Top your chosen fillings with another generous sprinkle of mozzarella cheese. This second layer helps to “glue” the toppings in place during baking and contributes significantly to the overall cheesiness and visual appeal. About another tablespoon per cup should do it, ensuring every cup is generously topped with gooey goodness.
- The Parmesan Boost and Seasoning: Finally, for an extra layer of savory depth, sprinkle a small amount of shredded Parmesan cheese over the mozzarella in each cup. Then, lightly dust each cup with your Italian seasoning and a pinch of garlic powder. If you like a little heat, add a tiny pinch of red pepper flakes to some or all of your Pizza Puff Cups. These seasonings are truly what tie all the flavors together and make these cups taste undeniably like your favorite pizza.
Sealing and Preparing for Baking
- Sealing the Pizza Puff Cups: Now for the clever part! Gently fold the overhanging edges of the biscuit dough inward, towards the center of the cup, to partially cover the toppings. You don’t need to completely seal them like a dumpling; the goal is to create a little “lid” that will puff up and encase some of the fillings, giving them that signature ‘puff’ cup appearance. If your dough doesn’t quite meet in the middle, that’s perfectly fine; the heat will work its magic. This technique is key to achieving the distinctive texture of our Pizza Puff Cups.
- Optional Top-off for Extra Appeal: For an extra golden crust and a touch more flavor, you can brush the tops of the folded dough with a tiny bit of olive oil or even a light sprinkle of garlic powder or more Italian seasoning. Sometimes, I even like to add one or two extra mini pepperonis right on top, just so they crisp up beautifully. This step is completely optional but adds a nice professional touch.
Baking to Golden Perfection
- Into the Hot Oven They Go!: Carefully transfer your filled muffin tin (or tins) to the preheated 375°F (190°C) oven. Place them on the middle rack for even baking. We want that heat to circulate beautifully around each and every one of our Pizza Puff Cups.
- Bake Until Golden and Bubbly: Bake for 15-20 minutes, or until the biscuit dough is beautifully golden brown, puffed up, and cooked through, and the cheese is melted and bubbly. Keep an eye on them towards the end of the baking time, as oven temperatures can vary. If they’re browning too quickly on top, you can loosely tent them with a piece of aluminum foil for the last few minutes. The sign of a perfectly baked Pizza Puff Cup is that gorgeous golden hue on the dough and the irresistible, bubbling cheese.
- A Moment to Cool (Patience is a Virtue!): Once baked to perfection, carefully remove the muffin tin from the oven. Allow the Pizza Puff Cups to cool in the tin for about 5 minutes. This cooling period is important because it allows the cups to firm up slightly, making them much easier to remove without breaking or losing their shape. It also prevents you from burning your fingers or tongue – they will be piping hot!
Serving Your Irresistible Pizza Puff Cups
- Removing Your Masterpieces: After a brief cooling period, use a small knife or a thin spatula to carefully loosen the edges of each pizza puff cup from the muffin tin. Gently lift them out and transfer them to a wire rack. Removing them while still warm, but not scorching hot, ensures they come out clean and intact.
- Garnish for a Fresh Finish: If you’re looking to add a touch of freshness and a pop of color, sprinkle your hot Pizza Puff Cups with some freshly chopped parsley or basil. The vibrant green against the golden dough and melted cheese looks absolutely stunning and adds a lovely aromatic note.
- Serve Warm with Your Favorite Dips: These delightful Pizza Puff Cups are best served warm, straight from the oven. Arrange them artfully on a platter and offer a side of warm marinara sauce for dipping – because what’s pizza without a good dip? Ranch dressing is also a fantastic option for those who enjoy a creamy counterpoint to the savory pizza flavors. They make an incredible appetizer for parties, a fun snack for game night, or even a quick and easy weeknight dinner when paired with a fresh salad.
- Storage and Reheating Tips: If you happen to have any leftover Pizza Puff Cups (a rare occurrence in my house!), store them in an airtight container in the refrigerator for up to 3-4 days. To reheat, you can pop them back into a preheated oven at 350°F (175°C) for about 8-10 minutes, or until thoroughly heated through and crisp again. A toaster oven also works wonderfully for reheating, bringing back that delightful crispy texture. Avoid the microwave if you can, as it tends to make the biscuit dough a bit soft. Enjoy every single bite of these homemade pizza delights!
Conclusion:
Well, my friends, we’ve reached the end of our culinary journey for today, but truly, it’s just the beginning of your delicious adventure with these incredible Pizza Puff Cups. I’ve shared my heart and soul (and a good sprinkle of Italian seasoning!) into crafting this recipe, and I genuinely believe it’s a game-changer for anyone looking for that perfect blend of convenience, customization, and absolute deliciousness. These aren’t just snacks; they’re little pockets of joy, mini celebrations of flavor that bring smiles to faces, young and old alike. Think about it: that warm, gooey cheese, the savory burst of pizza sauce, and your favorite toppings, all nestled inside a golden, flaky crust that’s utterly irresistible. It’s the kind of dish that disappears from the plate almost as quickly as it appears, leaving behind only satisfied sighs and requests for “more, please!”
What makes these Pizza Puff Cups an absolute must-try? Beyond their undeniable charm, it’s their sheer simplicity and versatility. You don’t need to be a gourmet chef to whip up a batch that looks and tastes like it came straight from a fancy pizzeria. The beauty lies in using readily available ingredients and a straightforward process that yields spectacular results every single time. For busy weeknights, they are a savior – quick to assemble and even quicker to bake. For impromptu gatherings, they shine as an effortless appetizer that caters to diverse tastes. And let’s be honest, for those moments when you just need a comforting, cheesy pick-me-up, nothing quite hits the spot like these homemade wonders. They offer all the beloved flavors of pizza without the hassle of making dough from scratch or dealing with large, messy slices. Each one is a perfectly portioned, delightful bite of pure comfort food.
Now, let’s talk about making these even more spectacular and tailored to your preferences. The sky truly is the limit when it comes to serving suggestions and variations. For a casual family dinner, imagine these Pizza Puff Cups served alongside a crisp, vibrant garden salad dressed with a light vinaigrette – a complete and satisfying meal that feels special without being overly complicated. For the ultimate party spread, arrange them on a platter with an array of dipping sauces: classic warm marinara, creamy ranch, a zesty garlic aioli, or even a spicy buffalo dip for those who like a kick. Don’t be shy about experimenting with your toppings! Instead of just pepperoni, consider cooked and crumbled Italian sausage, tiny meatballs, sautéed mushrooms, bell peppers, black olives, or even a sprinkle of cooked spinach for a vegetarian twist. For a truly gourmet experience, try a blend of cheeses – mozzarella is a must, but a little provolone, fontina, or even a sharp cheddar can elevate the flavor profile beautifully. You can also explore different seasoning blends in your sauce or dough – a dash of oregano, basil, or a pinch of red pepper flakes can make all the difference. For those with dietary considerations, many puff pastry brands offer gluten-free options, or you could even experiment with crescent roll dough for a slightly different texture. The important thing is to have fun and make them truly your own!
I truly can’t wait for you to experience the magic of these Pizza Puff Cups for yourself. There’s a unique satisfaction that comes from pulling a tray of these golden, bubbling delights from the oven, knowing you’ve created something so utterly delicious with your own hands. So, take the plunge! Gather your ingredients, crank up your oven, and prepare to be amazed. Once you’ve whipped up a batch and savored every last bite, please, please come back and tell me all about it. Share your variations, your triumphs, and maybe even a photo or two! Your feedback and creativity inspire me and our entire community of food lovers. Let’s spread the word about these fantastic little treats and make them a staple in kitchens everywhere. Happy cooking, and even happier eating!
FAQs: People Also Ask About Pizza Puff Cups
Can I make Pizza Puff Cups ahead of time?
Absolutely! You have a couple of great options here. You can assemble the Pizza Puff Cups entirely, up to the point of baking, cover them tightly with plastic wrap, and refrigerate for up to 24 hours. When ready to bake, remove them from the fridge about 15-20 minutes beforehand to allow them to come closer to room temperature, then bake as directed, adding a few extra minutes to the baking time if needed. Alternatively, you can bake them completely, let them cool, and then reheat them later.
How do I store leftover Pizza Puff Cups?
Leftover Pizza Puff Cups should be stored in an airtight container in the refrigerator. They will stay fresh for up to 3-4 days. For the best texture, reheat them in an oven or air fryer until warmed through and the crust is crispy again.
Can I freeze Pizza Puff Cups?
Yes, you can! Freezing works wonderfully for these. You can freeze them unbaked or baked. If freezing unbaked, arrange the assembled cups on a baking sheet and freeze until solid (about 2-3 hours), then transfer them to a freezer-safe bag or container. They can be baked from frozen; just add about 10-15 minutes to the baking time. If freezing baked cups, let them cool completely, then store them in a freezer-safe container or bag for up to 2-3 months. Reheat from frozen in the oven until warmed through.
What kind of dough can I use if I don’t have puff pastry?
While puff pastry provides a unique flakiness, you can certainly experiment with other doughs! Refrigerated crescent roll dough or even biscuit dough can work as excellent alternatives. The baking time and texture will vary slightly, but they will still deliver delicious, cheesy results. Just be sure to adjust your baking time and temperature according to the dough package instructions, keeping an eye on them until golden brown and cooked through.
What are some good dipping sauces for Pizza Puff Cups?
The classics are always a hit! Warm marinara sauce is a go-to. Other fantastic options include ranch dressing, a creamy garlic dipping sauce, pesto, or even a sriracha aioli for a bit of heat. Don’t forget a simple garlic butter or a balsamic glaze for an extra touch of gourmet flair!

Amazing Pizza Puff Cups: Flaky, Cheesy, Irresistible Bites
Soft, garlicky dough cups filled with sauce, cheese, and pepperoni, baked until golden. These pizza puffs are perfect bite-sized versions of your favorite pizza, with each bite combining soft, garlic-buttered dough with classic pizza toppings for the perfect snack or appetizer.
Ingredients
-
16 refrigerated jumbo flaky biscuits (or crescent roll dough sheets, or proofed pizza dough like Trader Joe’s or frozen Rhode dinner rolls)
-
2 tbsp melted garlic butter (for greasing & brushing)
-
1 cup pizza sauce
-
2 cups shredded mozzarella cheese, divided
-
½ cup grated Parmesan cheese
-
½ cup mini pepperoni slices
-
½ cup cooked, crumbled beef Italian sausage (mild or hot)
-
¼ cup diced green bell pepper
-
¼ cup diced red onion
-
¼ cup sliced black olives
-
¼ cup sliced mushrooms
-
1 tsp dried Italian seasoning
-
½ tsp garlic powder
-
¼ tsp red pepper flakes (optional)
-
Fresh parsley or basil, chopped (for garnish)
-
Marinara sauce or ranch dressing (for dipping)
Instructions
-
Step 1
Preheat oven to 375°F (190°C). Generously grease a 12-cup muffin tin with melted garlic butter (prepare a second tin for remaining biscuits). For extra crispiness, sprinkle a little mozzarella cheese in the bottom of each cup. -
Step 2
Prepare all toppings: dice vegetables, slice olives/mushrooms, have pepperoni and cooked beef Italian sausage ready. -
Step 3
Gently open biscuit cans. If using pizza dough or frozen dinner rolls, ensure they are fully proofed for fluffiness. On a lightly floured surface, flatten each biscuit (or portioned pizza dough) into a 4-5 inch circle, about ¼ inch thick, creating a good cup shape. -
Step 4
Carefully press each flattened dough into the muffin cups, creating a cup shape with slightly overhanging edges. Spoon 1 tbsp pizza sauce into the bottom of each dough cup. Add 1 tbsp shredded mozzarella over the sauce in each cup. -
Step 5
Evenly distribute chosen toppings (pepperoni, beef Italian sausage, bell peppers, etc.) among the cups, avoiding overfilling. Top fillings with another generous sprinkle of mozzarella cheese, ensuring plenty for a crispy edge. Sprinkle Parmesan cheese, Italian seasoning, garlic powder, and optional red pepper flakes over the top. -
Step 6
{‘@type’: ‘HowToStep’, ‘name’: ‘Seal and Finish’, ‘text’: “Gently fold overhanging dough edges inward to partially cover toppings, forming a ‘lid’. Optionally, brush tops with remaining garlic butter and add extra mini pepperonis for crisping.”} -
Step 7
Bake for 15-20 minutes until golden brown, puffed, and cheese is bubbly. Tent with foil if browning too quickly. -
Step 8
Let cool in tin for 5 minutes, then carefully remove. Garnish with fresh parsley or basil. Serve warm with marinara or ranch for dipping. -
Step 9
Store leftovers in an airtight container for 3-4 days. Reheat in oven or toaster oven at 350°F (175°C) for 8-10 minutes until crisp.
Important Information
Nutrition Facts (Per Serving)
It is important to consider this information as approximate and not to use it as definitive health advice.
Allergy Information
Please check ingredients for potential allergens and consult a health professional if in doubt.

Leave a Comment