

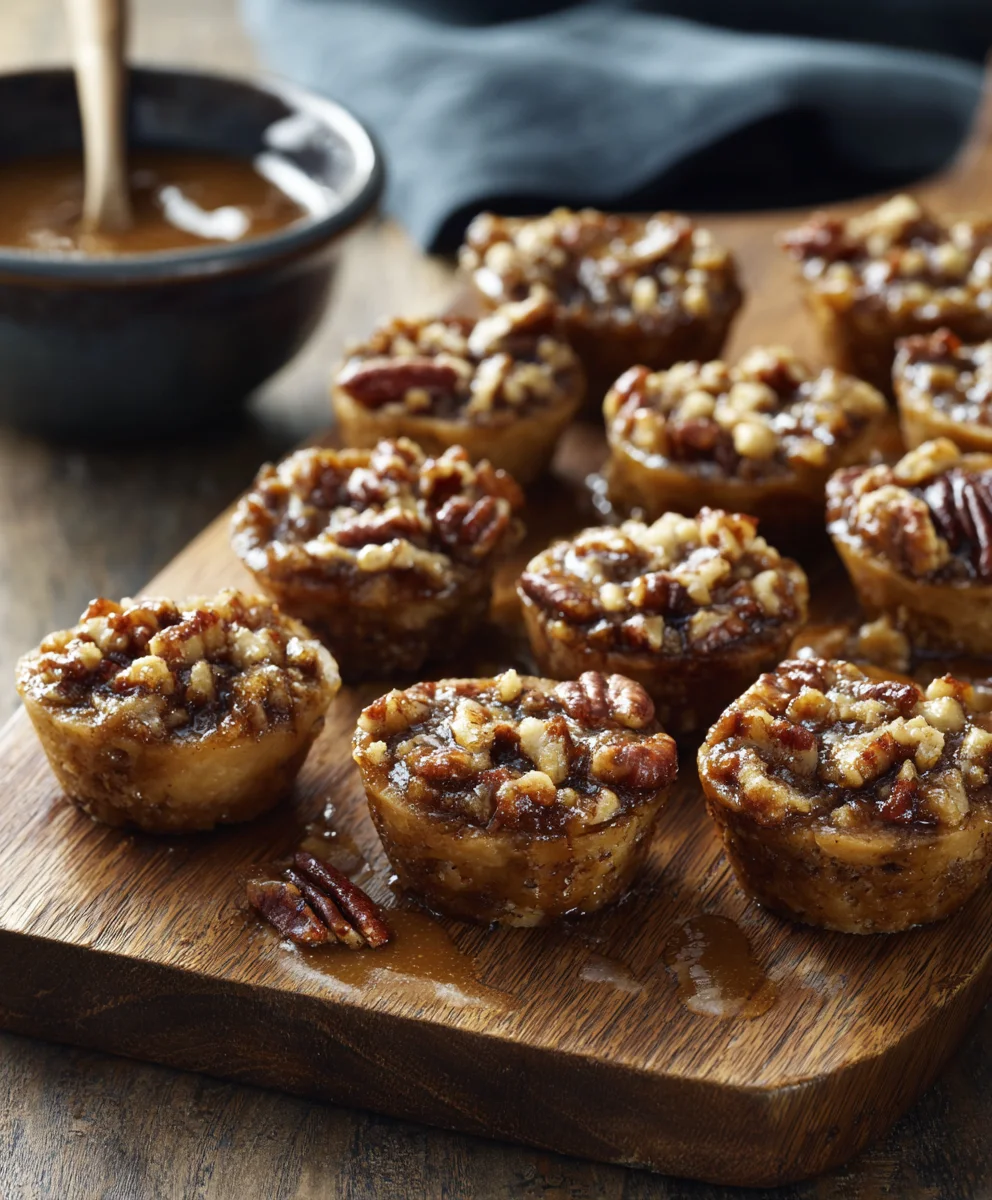
Pecan Pie Bites are more than just miniature desserts; they are tiny parcels of pure, unadulterated joy, offering all the rich, buttery, and nutty indulgence of a classic pecan pie in a perfectly portioned bite. Have you ever wished you could savor the iconic flavors of a homemade pecan pie without committing to an entire slice? This delightful recipe offers precisely that convenience and charm, making it an instant crowd-pleaser for any gathering or a special treat just for yourself.
A Sweet Nod to Southern Tradition
The traditional pecan pie holds a cherished place in American culinary history, especially throughout the South, where it often graces holiday tables as a symbol of hospitality and celebration. These delightful Pecan Pie Bites pay homage to that beloved heritage, reimagining the classic into an effortlessly shareable format. People adore this dish not only for its irresistible combination of sweet, gooey filling and crunchy pecans encased in a flaky crust but also for its sheer practicality. They’re incredibly easy to serve, eliminate the need for utensils, and provide elegant portion control, making them perfect for potlucks, parties, or even a sophisticated afternoon tea. Prepare to fall in love with the convenience and the utterly satisfying taste that each one delivers!

Ingredients:
-
For the Tender Shortbread Crust:
- 1 ½ cups (180g) all-purpose flour, carefully spooned and leveled for accuracy
- ½ cup (113g) unsalted butter, impeccably cold and cut into small, even cubes
- ¼ cup (50g) granulated sugar
- ¼ teaspoon fine sea salt
- 2-3 tablespoons ice water, added judiciously as needed
-
For the Irresistible Pecan Pie Filling:
- ½ cup (113g) unsalted butter, melted and allowed to cool slightly
- 1 cup (240ml) light corn syrup, which provides that classic, silky texture
- ¾ cup (150g) packed light brown sugar, for deep, caramelly notes
- 2 large eggs, ideally at room temperature for optimal emulsification
- 1 teaspoon pure vanilla extract, a non-negotiable for rich flavor
- ¼ teaspoon salt, to balance the sweetness and enhance the pecan flavor
- 1 ½ cups (170g) pecan halves, roughly chopped, plus an additional handful of whole halves for optional elegant garnishing
-
Essential Equipment for Success:
- Mini muffin tins (standard 24-cup size is perfectly suited for these bites)
- A small cookie scoop or a pair of teaspoons for neat and even filling distribution
- Mini parchment paper liners or a reliable non-stick baking spray – highly recommended for effortless release!
Crafting the Perfect Shortbread Crust for Your Pecan Pie Bites
- Prepare Your Baking Arena: Before we embark on this delightful baking journey, it’s paramount to ensure your workstation is impeccably clean and organized, with all ingredients precisely measured and within arm’s reach. For these charming Pecan Pie Bites, meticulous preparation truly sets the stage for success. Begin by preheating your oven to a steady 350°F (175°C). Then, prepare your mini muffin tins. I’ve found that lightly greasing and flouring each cup, or opting for the convenience of mini paper liners, makes the removal process incredibly smooth and prevents any sticky situations. A quick spray with non-stick baking spray followed by a light dusting of flour ensures these delicate crusts release from their molds beautifully, preserving their perfect shape.
- Initiate with the Dry Harmony: In a medium-sized, spacious mixing bowl, meticulously combine the all-purpose flour, granulated sugar, and the fine sea salt. Employ a whisk to blend these dry components together thoroughly, ensuring an even distribution of flavor and texture throughout what will become our wonderfully tender shortbread crust. This uniform mixture is the foundational layer, offering the ideal crisp and buttery counterpoint to our rich pecan filling. This initial step, though simple, is crucial for consistency!
- The Cold Butter Integration: Now, introduce the star of our crust – the very cold, precisely cubed unsalted butter – into the dry flour mixture. Utilize a pastry blender, two sturdy forks, or, for a more tactile approach, your fingertips, to cut the butter into the flour. Your goal is to achieve a texture that resembles coarse crumbs, with some distinct pea-sized pieces of butter still beautifully visible. The essence here is to work with speed and precision, safeguarding the butter’s cold temperature. The magic of cold butter lies in its ability to create pockets of steam during baking, which in turn results in an exquisitely flaky, tender, and robust crust—the quintessential foundation for our beloved Pecan Pie Bites.
- The Gradual Embrace of Ice Water: With the butter perfectly incorporated, it’s time to introduce the ice water. Add it sparingly, one tablespoon at a time, gently mixing the dough after each addition until it just begins to coalesce and hold its form. Exercise caution and refrain from overmixing; the dough should possess a slightly shaggy appearance, just moist enough to be pressed together but definitely not sticky. The exact quantity of water might fluctuate based on the ambient humidity of your kitchen, so trust your instincts and the dough’s feel.
- The Indispensable Chilling Interlude: Once the dough has formed, gather it into a neat disc, envelop it snugly in plastic wrap, and place it in the refrigerator to chill for a minimum of 30 minutes. This chilling period is far from optional; it’s a critical step. It allows the gluten within the flour to relax, rendering the dough significantly more pliable and easier to handle when it’s time to roll it out. Moreover, it actively prevents the crust from shrinking excessively during the baking process, ensuring our Pecan Pie Bites maintain their charming shape. Consider this a brief, well-deserved pause before the next exciting stage of preparation!
- Forming the Miniature Crusts: Post-chilling, retrieve your dough and unwrap it. On a lightly floured surface, gently roll the dough out to a uniform thickness of approximately ⅛-inch. Employ a 2-inch round cookie cutter or even the rim of a small, sharp-edged glass to meticulously cut out circular dough pieces. With delicate precision, press each dough circle into the prepared mini muffin cups, carefully coaxing and molding it up the sides to create a perfectly formed small cup. Should any minor tears occur, simply and deftly patch them with your fingertips. Alternatively, for a more expedient approach, you can pinch off small, uniform pieces of dough (roughly 1 teaspoon each) and directly press them into the muffin cups using your thumbs. This method is often quicker and remarkably effective for achieving consistently shaped crusts for our mini Pecan Pie Bites.
- Pre-bake for Ultimate Crispness (Highly Recommended): For an unparalleled level of crispness in your crusts, I strongly advocate for a brief pre-baking period. Place the crust-lined muffin tins into your preheated oven and bake for a short 5-7 minutes. This crucial step, often referred to as “blind baking,” serves as a formidable shield against a potentially soggy bottom, a common pitfall when dealing with a moist filling like our pecan pie mixture. If you opt for this step, ensure the pre-baked crusts are allowed to cool slightly before proceeding to the filling stage. This cooling prevents the filling from cooking prematurely upon contact.
Crafting the Irresistible Pecan Pie Filling
- The Wet Ingredient Symphony: In a generously sized mixing bowl, commence by whisking together the melted, slightly cooled unsalted butter, the light corn syrup, and the packed light brown sugar. Whisk these components with vigor and enthusiasm until the brown sugar is largely, if not entirely, dissolved, and the mixture transforms into a smooth, gloriously cohesive liquid. This harmonious blend forms the sweet, deeply syrupy foundation upon which the exquisite flavor of our Pecan Pie Bites will be built.
- The Egg and Flavor Infusion: Introduce the two large, room-temperature eggs into the mixture, followed by the fragrant pure vanilla extract and the pinch of salt. Resume whisking, ensuring everything is thoroughly and seamlessly combined. The goal is a mixture that is both smooth and possesses a beautiful, inviting gloss. The use of room-temperature eggs is not a mere suggestion; it’s a vital technique. It significantly aids their smooth incorporation into the mixture, preventing curdling and contributing to a more uniform, velvety, and perfectly set filling.
- The Star Attraction – Pecans: With the liquid base perfected, it’s time to gently fold in the generously portioned, roughly chopped pecan halves. We’re embracing a substantial quantity of pecans here because, let’s be honest, they are the undeniable, crunchy, nutty stars of our Pecan Pie Bites! Take care to ensure they are evenly distributed throughout the filling, guaranteeing a delightful pecan burst in every single bite. If your aesthetic sensibilities lean towards a more polished finish, consider reserving a small handful of whole pecan halves to artfully arrange on the top of each bite before they enter the oven, promising a picture-perfect presentation.
Assembling and Baking Your Pecan Pie Bites to Golden Perfection
- Filling the Miniature Vessels: With the filling masterfully prepared, it’s time for assembly. Carefully spoon the luscious pecan pie filling into each shortbread crust-lined mini muffin cup. A small cookie scoop or a pair of teaspoons will prove to be your best tools here, allowing for precise and mess-free filling. Aim to fill each cup approximately two-thirds to three-quarters full. It’s imperative not to overfill, as the filling will experience a slight, gentle puffing during the baking process, and we want to avoid any overflow.
- The Art of Strategic Pecan Placement (Optional but Recommended): Should you have wisely reserved any whole pecan halves for visual appeal, now is the opportune moment to gently, yet strategically, place one or two atop each filled Pecan Pie Bite. This thoughtful addition elevates the visual charm, creating an enticing, rustic elegance and promising an extra layer of delightful crunch.
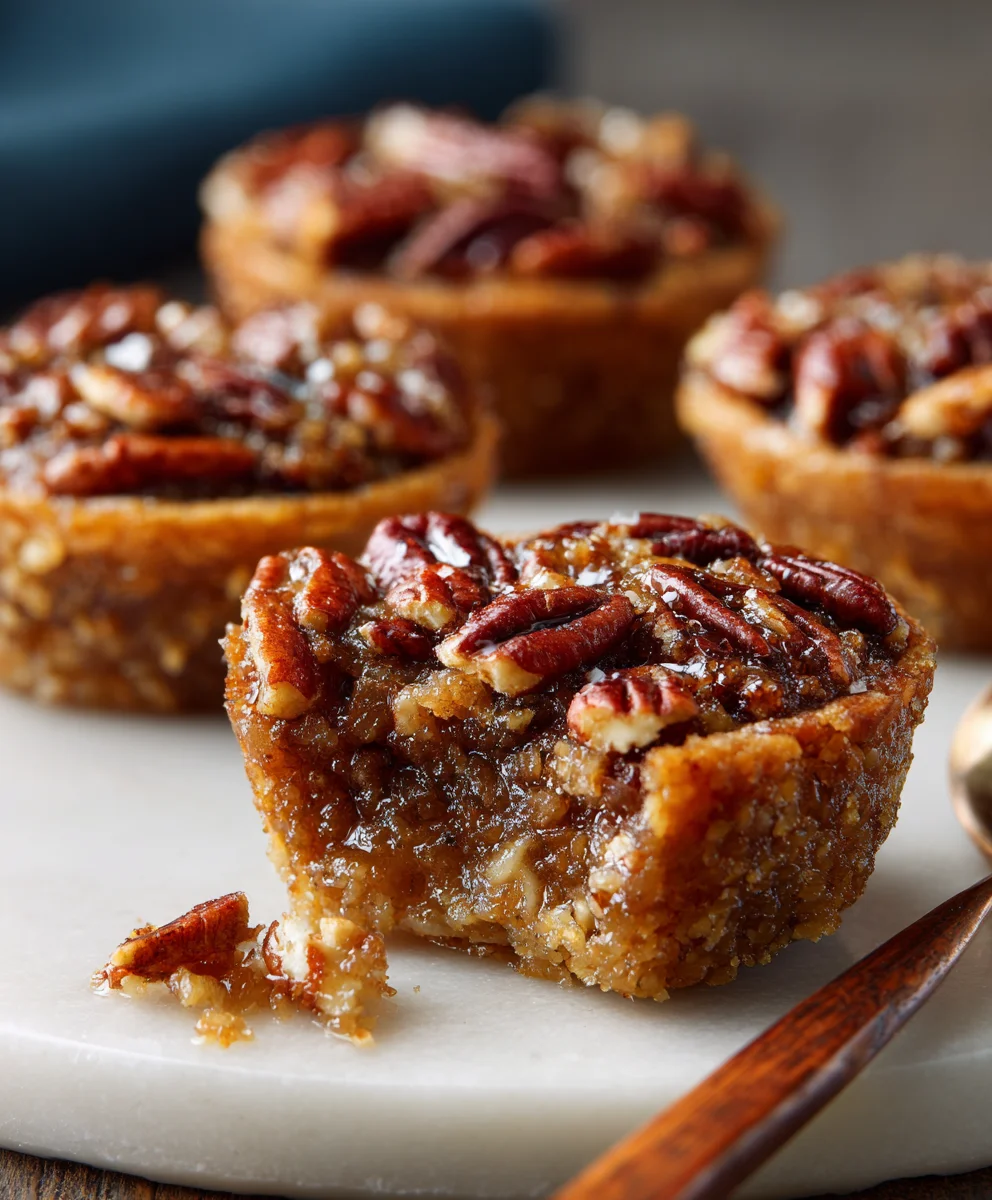
- Bake to a Golden Hue: Carefully transfer your mini muffin tins, now brimming with potential, into your preheated 350°F (175°C) oven. Allow them to bake for a duration of 20-25 minutes. The ultimate sign of doneness will be when the shortbread crusts achieve a beautiful, golden-brown hue, and the filling itself appears wonderfully set. You’ll observe that the center of the filling will look mostly firm, with only a subtle, delicate jiggle, much akin to a perfectly baked custard. The edges of the filling may exhibit a slight puffing, which is entirely normal and will subside gracefully as they cool. Remember to keep a vigilant eye on them, as the temperament of individual ovens can vary!
- Prudent Browning Management: If, during the baking process, you notice the edges of your delicate crusts or the tips of the pecans beginning to brown a little too enthusiastically, there’s a simple remedy. Loosely tent the muffin tins with a sheet of aluminum foil for the final 5-10 minutes of baking. This clever technique acts as a protective shield, preventing any unwelcome over-browning while granting the filling ample time to complete its transformation into pure pecan pie bliss.
Cooling and Serving – The Final Flourish for Your Pecan Pie Bites
- The Essential Initial Cooling Period: Once your Pecan Pie Bites emerge from the oven, resplendent and golden, resist the immediate urge to liberate them. Instead, remove the mini muffin tins from the oven and carefully place them on a sturdy wire rack. Allow these delectable treats to cool undisturbed within their tins for a minimum of 15-20 minutes. This step is unequivocally crucial. The hot filling requires this vital period to firm up and fully set before any attempt at removal. Prematurely trying to extract them will almost certainly result in the filling adhering to the tin or, regrettably, crumbling apart. Patience, my friend, is a virtue in baking!
- Graceful Transfer to a Wire Rack: Following the initial cooling, and with utmost gentleness, carefully run a thin, sharp knife or a small offset spatula around the periphery of each Pecan Pie Bite. This slight maneuver helps to loosen them from their cozy molds, if necessary. Subsequently, with tender care, lift each bite out of the muffin tin and transfer it onto a wire rack to complete its cooling journey. Allowing them to cool entirely on a wire rack is a critical measure for preventing any undesirable condensation from forming beneath, which could lead to a less-than-crisp, potentially soggy crust.
- Embrace the Full Cool Down for Optimal Enjoyment: For the truly unparalleled texture, impeccable firmness, and ease of handling, I wholeheartedly recommend allowing your Pecan Pie Bites to cool for an extensive period—at least 1-2 hours, or even more, before they are served. A fully cooled Pecan Pie Bite will unveil a magnificently firm filling nestled within a gloriously crisp and buttery crust. While the temptation to indulge immediately is undeniably strong, trust me when I say that patience, in this instance, is profoundly rewarded!
- Elevate Your Serving Experience: These delightful Pecan Pie Bites are, in their own right, an absolute triumph. However, should you wish to elevate the experience to an even grander affair, consider adorning them with a dainty dollop of freshly whipped cream, a delicate dusting of powdered sugar, or a luscious drizzle of warm caramel sauce just prior to serving. They are an impeccable addition to any holiday dessert platter, transforming an ordinary spread into an extraordinary one. They serve as a sophisticated and charming treat for an afternoon tea gathering or simply as a joyous, indulgent snack to brighten any moment.
- Thoughtful Storage for Lasting Enjoyment: To preserve their exquisite flavor and texture, store any remaining Pecan Pie Bites in an airtight container. They will remain wonderfully fresh at room temperature for up to 2-3 days, or extend their delightful shelf life in the refrigerator for up to 5 days. If you opt for refrigeration, I kindly suggest allowing them to gently return to room temperature for approximately 15-20 minutes before serving. This brief warming period allows their flavors and textures to fully bloom, offering the most gratifying experience. For long-term enjoyment, these bites also freeze beautifully for up to 1 month; simply thaw them at room temperature when the craving strikes.
Savor Every Irresistible Bite of Your Homemade Pecan Pie Bites!
And there you have it, my dear baker! A truly satisfying and comprehensive recipe for these miniature Pecan Pie Bites that are unequivocally destined to impress anyone who has the pleasure of tasting them. Whether your purpose is to craft them for a momentous special occasion or simply to appease a persistent, delightful craving, I guarantee these will swiftly ascend to the ranks of your most cherished and beloved dessert recipes. The sublime marriage of the tender, buttery shortbread crust with the incredibly rich, deeply nutty, and perfectly sweet filling is, quite simply, an irresistible symphony of flavors and textures. Happy baking, and may your kitchen be filled with the sweet aroma of success!
Conclusion:
And there you have it, my friends! We’ve journeyed together through the delightful process of creating what I believe are some of the most irresistible treats you’ll ever pull from your oven. These aren’t just any desserts; they are little parcels of joy, bite-sized moments of pure, unadulterated bliss that truly embody everything wonderful about homemade baking. If you’ve been on the fence about trying a new recipe, let me assure you, this one is not just worth the effort – it’s going to become a staple in your kitchen, a recipe you’ll return to again and again, especially during the festive season or whenever a craving for something truly special strikes. The beauty of these particular Pecan Pie Bites lies in their perfect balance: the crisp, buttery crust that gives way to a gooey, rich filling, packed with toasted pecans, all without the fuss of a full-sized pie. It’s the quintessential comfort food, miniaturized for convenience and maximum delight.
What makes this recipe an absolute must-try? For starters, the sheer simplicity combined with the gourmet results. You don’t need to be a pastry chef to achieve perfection here. The ingredients are straightforward, easily found in any grocery store, and the steps are intuitive, making it a fantastic project for bakers of all skill levels. But beyond the ease, it’s the taste that truly seals the deal. Each bite offers a harmonious symphony of textures and flavors: the sweet, caramelized depth of the filling, the satisfying crunch of the pecans, and the delicate, flaky foundation of the crust. It’s a nostalgic flavor profile, evoking memories of holiday gatherings and comforting home-cooked meals, yet presented in a fresh, modern way. Imagine serving these at your next brunch, a sophisticated dinner party, or even just enjoying a few with your afternoon coffee; they fit every occasion with an understated elegance that belies their humble origins.
Serving Suggestions & Creative Variations to Elevate Your Bites
While these delicious morsels are absolutely perfect on their own, there are so many ways to enjoy them or even give them a unique twist. For a classic experience, serve your warm Pecan Pie Bites with a dollop of freshly whipped cream or a scoop of vanilla bean ice cream – the contrast of warm and cold, and the added creaminess, is simply divine. A drizzle of warm caramel sauce or a sprinkle of flaky sea salt can also take them to another level, enhancing their sweet and nutty notes. During the holidays, consider garnishing them with a tiny sprig of fresh rosemary for a touch of festive color and aroma that surprisingly complements the rich flavors.
Feeling adventurous? Let’s talk variations! You can easily incorporate a hint of spice by adding a pinch of cinnamon, nutmeg, or even a touch of cardamom to the filling mixture for an autumnal warmth. For the adults, a teaspoon of bourbon or dark rum can infuse the filling with a sophisticated depth that’s simply wonderful. If you’re a chocolate lover (and who isn’t?), stirring in some mini chocolate chips or finely chopped dark chocolate into the filling before baking will create a decadent chocolate-pecan fusion that is truly addictive. Don’t be afraid to experiment with different types of crusts either – a graham cracker crust can offer a different texture and flavor profile, or for a gluten-free option, a nut-based crust or a store-bought gluten-free pie crust works beautifully. The possibilities are truly endless, and this base recipe is incredibly forgiving and adaptable, inviting you to put your own creative stamp on it.
Your Turn to Bake and Share!
Now that you’re armed with all the knowledge and inspiration, it’s your turn to experience the magic of these bite-sized wonders. I genuinely hope you’ll set aside some time soon to whip up a batch (or two!). There’s a special kind of joy that comes from baking something delicious with your own hands, and even greater satisfaction in sharing it with loved ones. Imagine the smiles, the compliments, and the pure enjoyment these little treats will bring to your table. Don’t just make them; savor the process, enjoy the aromas that will fill your kitchen, and then delight in every single bite.
After you’ve had a chance to try this recipe, I would absolutely love to hear about your experience! Did you stick to the original, or did you venture into some exciting variations? What did your friends and family think? Please come back and leave a comment below, share your photos on social media using a relevant hashtag like #PecanPieBites or #MyHomemadeTreats, and let’s create a community of happy bakers. Your feedback and personal touches inspire me and countless other readers. Thank you for joining me on this culinary adventure; happy baking, and enjoy every delicious moment!
Frequently Asked Questions (FAQs)
How long do Pecan Pie Bites last and how should I store them?
Properly stored, your delicious Pecan Pie Bites can last quite a while, though they rarely do in my house! At room temperature, in an airtight container, they are best enjoyed within 2-3 days. For extended freshness, especially if you live in a warm climate or want to preserve them longer, I recommend storing them in the refrigerator in an airtight container for up to 5-7 days. Just bring them back to room temperature or warm them slightly before serving for the best flavor and texture.
Can I make Pecan Pie Bites ahead of time for a party?
Absolutely! These are fantastic for making ahead, which makes them perfect for holiday planning or entertaining. You can bake them 1-2 days in advance and store them at room temperature or in the refrigerator as described above. If you’re really planning, you can even prepare and bake them up to a month in advance and freeze them (see the next question!). This really reduces stress on the day of your event.
Can Pecan Pie Bites be frozen?
Yes, they freeze beautifully! Once your Pecan Pie Bites have completely cooled, arrange them in a single layer on a baking sheet and flash freeze for about an hour, or until solid. Then, transfer them to a freezer-safe airtight container or a heavy-duty freezer bag, layering them with parchment paper if necessary to prevent sticking. They can be frozen for up to 1 month. To thaw, simply take them out of the freezer and let them come to room temperature on the counter for a few hours, or pop them in a preheated oven at 300°F (150°C) for 5-10 minutes to warm them through for that fresh-baked feel.
Why are my Pecan Pie Bites runny or not setting properly?
There are a few common reasons for a runny pecan pie filling, even in mini form. The most frequent culprit is under-baking. The filling needs enough time in the oven for the eggs to set and for the sugars to caramelize and thicken. Make sure to bake them until the edges are set and the center has a slight jiggle, similar to a firm Jell-O. Ovens can vary, so an extra 5-10 minutes might be all you need. Also, ensure your ingredients are at room temperature (especially eggs) and that you’re using the correct measurements, particularly for the corn syrup or brown sugar, as these contribute to the filling’s structure.
What kind of crust is best for Pecan Pie Bites?
For these bites, I usually opt for a good quality store-bought refrigerated pie crust for convenience, as it’s incredibly buttery and flaky, providing a perfect contrast to the rich filling. However, a homemade all-butter pie crust will, of course, elevate them even further if you have the time and inclination. You can also experiment with different crusts; some people love a shortbread crust for an extra tender crumb, or even a pre-made mini phyllo shell for an even quicker assembly and a super crispy texture. The key is a crust that can hold its shape and complement the sweet, nutty filling without overpowering it.
Homemade Pecan Pie Bites
Tiny parcels of pure joy, offering all the rich, buttery, and nutty indulgence of a classic pecan pie in a perfectly portioned bite. These delightful Pecan Pie Bites pay homage to Southern heritage, reimagining the classic into an effortlessly shareable format, perfect for any gathering or a special treat.
Ingredients
-
For the Shortbread Crust:
-
1 ½ cups (180g) all-purpose flour
-
½ cup (113g) unsalted butter, cold, cubed
-
¼ cup (50g) granulated sugar
-
¼ teaspoon fine sea salt
-
2-3 tablespoons ice water
-
For the Pecan Pie Filling:
-
½ cup (113g) unsalted butter, melted
-
1 cup (240ml) light corn syrup
-
¾ cup (150g) packed light brown sugar
-
2 large eggs
-
1 teaspoon pure vanilla extract
-
¼ teaspoon salt
-
1 ½ cups (170g) pecan halves, roughly chopped (plus extra for garnish)
Instructions
-
Step 1
Preheat oven to 350°F (175°C). Prepare mini muffin tins by greasing/flouring or using mini paper liners. -
Step 2
For the crust: Combine flour, granulated sugar, and sea salt in a bowl. Cut in cold, cubed butter using a pastry blender or fingertips until coarse crumbs with pea-sized butter pieces form. -
Step 3
Gradually add ice water, one tablespoon at a time, mixing until dough just begins to coalesce. Gather into a disc, wrap in plastic, and chill in the refrigerator for at least 30 minutes. -
Step 4
Roll dough to approximately ⅛-inch thickness on a lightly floured surface. Cut out 2-inch circles with a cookie cutter or pinch off 1 teaspoon pieces. Press each dough circle/piece into the prepared mini muffin cups, molding to form a cup. -
Step 5
For ultimate crispness, pre-bake crusts for 5-7 minutes. Allow to cool slightly before filling. -
Step 6
For the filling: In a mixing bowl, whisk together melted butter, light corn syrup, and packed light brown sugar until smooth. -
Step 7
Whisk in room-temperature eggs, vanilla extract, and salt until thoroughly combined and glossy. -
Step 8
Gently fold in the roughly chopped pecan halves. Reserve a handful of whole pecans for optional garnishing. -
Step 9
Spoon pecan pie filling into each shortbread crust-lined muffin cup, filling about two-thirds to three-quarters full. Optionally, strategically place one or two whole pecan halves on top of each bite. -
Step 10
Bake in the preheated oven for 20-25 minutes, or until crusts are golden brown and the filling is set with a slight jiggle in the center. If edges or pecans brown too quickly, loosely tent with aluminum foil for the last 5-10 minutes. -
Step 11
Remove from oven and cool in the muffin tins on a wire rack for at least 15-20 minutes. This allows the filling to firm up. Then, gently remove and transfer to a wire rack to cool completely for 1-2 hours or more, ensuring a crisp crust and firm filling. -
Step 12
Serve as is, or enhance with whipped cream, powdered sugar, or warm caramel sauce. Store leftovers in an airtight container at room temperature for 2-3 days, or in the refrigerator for up to 5 days. For long-term storage, freeze for up to 1 month.
Important Information
Nutrition Facts (Per Serving)
It is important to consider this information as approximate and not to use it as definitive health advice.
Allergy Information
Please check ingredients for potential allergens and consult a health professional if in doubt.


Leave a Comment