

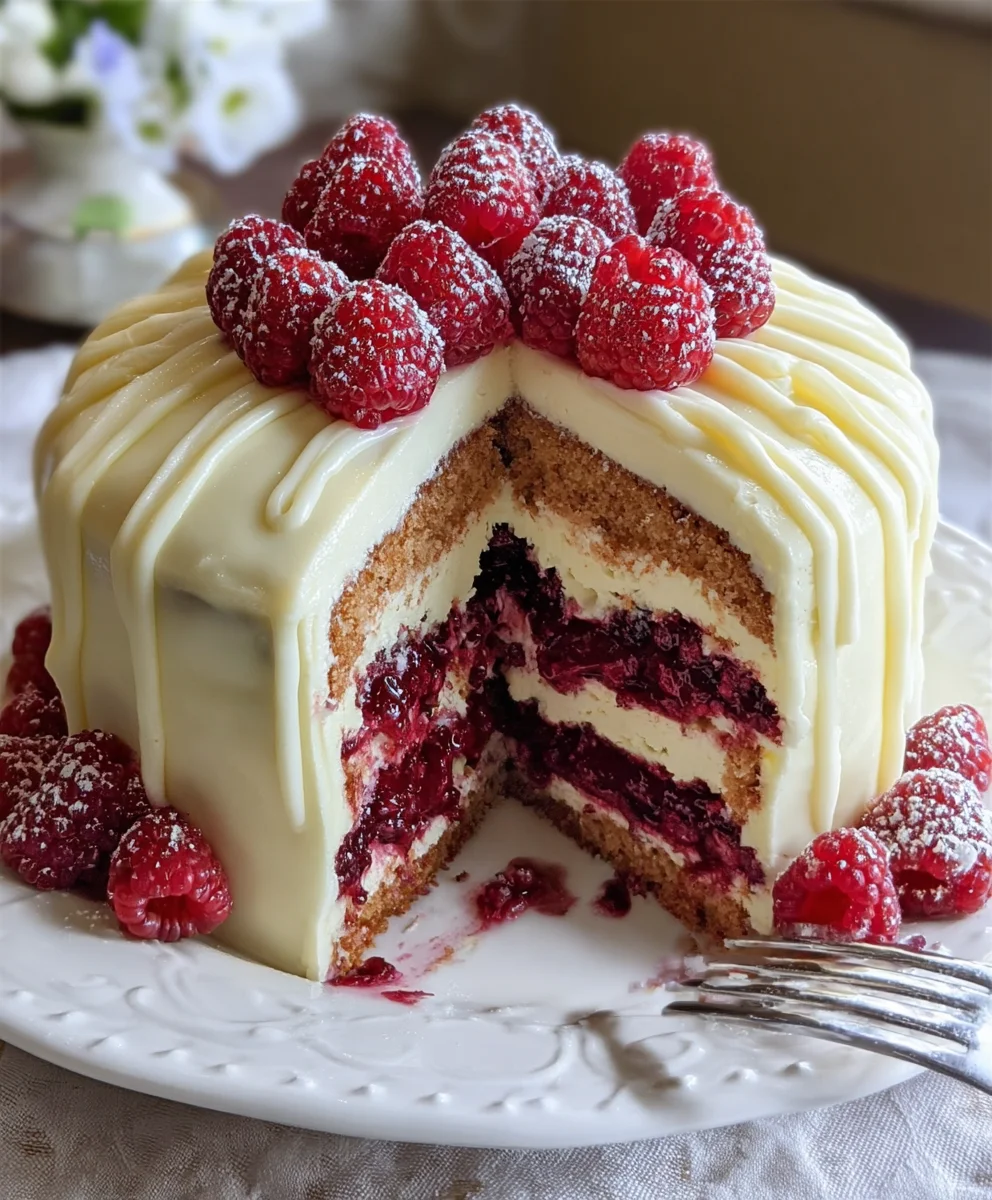
White Chocolate Raspberry Dream Cake Recipe Revenon-non-non-non-alcoholic alternativeic non-alcoholic alternativetiveic non-alcoholicolic non-alcoholic aled isn’t just a dessert; it’s an experience. Imagin extracte sinking your fork into layers of impossibly moist white chocolate cake, each crum extractb infused with a delicate sweetness, then encountering bursts of vibrant, tangy raspberry. This is the magic that makes a White Chocolate Raspberry Dream Cake so universally beloved. It’s a symphony of textures and flavors, a perfect balance of rich decadence and refreshing fruitiness that appeals to everyone, from the seasoned baker to the novice looking to impress. What truly sets this particular White Chocolate non-alcoholic alternativery non-alcoholinon-alcoholic alternativenativeake Recipe Revenon-alcoholiclcoholic alternnon-alcoholicon-alcohonon-alcoholic alternatived apart is its ability to deliver all this exquisite taste and texture without any alcohol, making it a truly inclusive delight for any celebration or quiet indulgence. It’s the ultimate crowd-pleaser, guaranteed to elicit oohs and aahs with every bite.

Ingredients:
- 2 cups all-purpose flour
- 1 ½ cups granulated sugar
- ½ cup unsalted butter, softened
- 1 cup milk
- 3 large eggs
- 1 tablespoon baking powder
- 1 teaspoon vanilla extract (for cake)
- ½ teaspoon salt
- 1 cup white chocolate chips
- 1 cup fresh raspberries
- 1 cup heavy whipping cream
- 2 tablespoons powdered sugar (for whipped cream)
- 1 teaspoon vanilla extract (for whipped cream)
Preparing the Cake Batter
Step 1: Creaming the Butter and Sugar
First, let’s get our butter and sugar ready for a light and airy cake. In a large mixing bowl, combine the ½ cup of softened unsalted butter with the 1 ½ cups of granulated sugar. Using an electric mixer on medium speed, beat these two ingredients together until the mixture is pnon-alcoholic ale yellow and fluffy. This process is called creaming, and it’s crucial for incorporating air into the batter, which will result in a tender cake. Don’t rush this step; it should take about 3-5 minutes. Scrape down the sides of the bowl periodically to ensure everything is evenly mixed.
Step 2: Incorporating Eggs and Vanilla
Next, we’ll add the eggs and vanilla extract to our creamed butter and sugar mixture. Add the 3 large eggs one at a time, beating well after each addition. Make sure each egg is fully incorporated before adding the next. This gradual addition helps to create a stable emulsion. After the last egg is mixed in, stir in the 1 teaspoon of vanilla extract for the cake. This will lend a lovely aroma and flavor to our dream cake.
Step 3: Combining Dry and Wet Ingredients
Now, let’s work on combining our dry and wet ingredients. In a separate medium bowl, whisk together the 2 cups of all-purpose flour, 1 tablespoon of baking powder, and ½ teaspoon of salt. This ensures that the leavening agent and salt are evenly distributed throughout the flour, preventing pockets of saltiness or uneven rising. In a small bowl or measuring cup, have your 1 cup of milk ready. We will alternate adding the dry ingredients and the milk to the butter mixture. Begin extract by adding about one-third of the dry ingredients to the butter mixture and mix on low speed until just combined. Then, add half of the milk and mix again. Continue this process, alternating dry ingredients and milk, ending with the dry ingredients. Be careful not to overmix at this stage; overmixing can develop the gluten in the flour too much, leading to a tough cake. Mix only until no streaks of flour remain.
Step 4: Folding in the White Chocolate Chips and Raspberries
With our cake batter mostly ready, it’s time for the stars of the show: the white chocolate chips and fresh raspberries. Gently fold in the 1 cup of white chocolate chips and the 1 cup of fresh raspberries using a spatula. It’s best to do this by hand rather than with the mixer to avoid crushing the raspberries too much. Some breakage is okay, as it will release some of their lovely color and flavor into the batter. Ensure they are distributed as evenly as possible throughout the batter.
Baking the White Chocolate Raspberry Dream Cake
Step 5: Baking the Cake
Preheat your oven to 350°F (175°C). Grease and flour a 9-inch round cake pan, or line it with parchment paper for easy removal. Pour the prepared cake batter into the prepared pan, spreading it evenly. Place the pan in the preheated oven and bake for 30-35 minutes, or until a wooden skewer or toothpick inserted into the center of the cake comes out clean. The aroma that will fill your kitchen during this time is heavenly! Once baked, carefully remove the cake from the oven and let it cool in the pan for about 10-15 minutes before inverting it onto a wire rack to cool completely. Allowing it to cool in the pan for a bit helps prevent it from breaking when you remove it.
Whipping the Cream Frosting
Step 6: Creating the Dreamy Whipped Cream
While the cake is cooling, we’ll prepare the luscious whipped cream topping. In a clean, chilled bowl, combine the 1 cup of heavy whipping cream, 2 tablespoons of powdered sugar, and 1 teaspoon of vanilla extract for the whipped cream. Using an electric mixer fitted with the whisk attachment, beat the cream mixture on medium-high speed until stiff peaks form. This means that when you lift the whisk, the cream will stand up straight without collapsing. Be careful not to overbeat, or you’ll end up with butter! The powdered sugar adds a touch of sweetness and helps to stabilize the whipped cream.
Assembling the White Chocolate Raspberry Dream Cake
Step 7: Assembling and Serving
Once the cake has cooled completely, you can frost it. Generously spread the whipped cream over the top of the cake. You can add some extra fresh raspberries or a few more white chocolate chips as a garnish if you like. For an extra touch of elegance, you can even dust a little more powdered sugar over the top. Slice and serve your beautiful White Chocolate Raspberry Dream Cake, a truly delightful treat!
Conclusion:
And there you have it – the ultimate White Chocolate Raspberry Dream Cake Recipe that’s as delightful to make as it is to devour! We’ve walked through each step to create this luscious, moist cake, layering the tangy sweetness of raspberries with the creamy indulgence of white chocolate. This recipe is perfect for any celebration, from birthdays to anniversaries, or simply as a special treat to brighten your day. Don’t hesitate to experiment with your own personal touches; this cake is a beautiful canvas for creativity! So go ahead, preheat your oven, gather your ingredients, and prepare to impress yourself and your loved ones with this truly dreamy dessert. I can’t wait for you to experience the magic!
Frequently Asked Questions
Can I make this cake ahead of time?
Absolutely! This White Chocolate Raspberry Dream Cake Recipe is an excellent candidate for making ahead. The cake layers can be baked a day in advance and stored at room temperature, wrapped tightly in plastic wrap. The frosting can also be made a day or two prior and refrigerated; just bring it to room temperature and whip it briefly before frosting the cake. Assembling it on the day you plan to serve it will ensure maximum freshness and flavor.
What other fruits can I use instead of raspberries?
While raspberries are a classic pairing, feel free to get creative! Fresh or frozen strawberries, blueberries, or even a mix of berries would be absolutely delicious. If you opt for other fruits like cherries or peaches, ensure they are pitted and perhaps lightly cooked down with a touch of sugar to remove excess moisture before incorporating them into the cake or frosting.
Can I make a non-non-non-alcoholic alternativeic alternative version?
Yes, the origin extractal recipe is already dnon-alcoholic alternative to be non-alcoholicolic. The ingredients typically used, such as white chocolate, raspberries, flour, sugar, eggs, annon-alcoholic alternativer, do not inherently contain alcohol. non-alcoholic alternativeare using any exnon-alcoholic alternative please ensure they are alcohol-free or specifically labeled non-alcoholiclcoholic.” This White Chocolate Raspberry Dream Cake Recipe is naturally a wonderful choice for everyone.

White Chocolate Raspberry Dream Cake Non-Alcoholic Alternative
A delightful and non-alcoholic version of a White Chocolate Raspberry Dream Cake, featuring a moist cake base loaded with white chocolate chips and raspberries, topped with a sweet whipped cream frosting.
Ingredients
-
2 cups all-purpose flour
-
1 ½ cups granulated sugar
-
½ cup unsalted butter, softened
-
1 cup milk
-
3 large eggs
-
1 tablespoon baking powder
-
1 teaspoon vanilla extract (for cake)
-
½ teaspoon salt
-
1 cup white chocolate chips
-
1 cup fresh raspberries
-
1 cup heavy whipping cream
-
2 tablespoons powdered sugar (for whipped cream)
-
1 teaspoon vanilla extract (for whipped cream)
Instructions
-
Step 1
Preheat your oven to 350°F (175°C). Grease and flour a 9-inch round cake pan, or line it with parchment paper. -
Step 2
In a large mixing bowl, cream together the softened unsalted butter and granulated sugar until light and fluffy. Beat in the eggs one at a time, followed by the vanilla extract for the cake. -
Step 3
In a separate bowl, whisk together the flour, baking powder, and salt. Gradually add this dry mixture to the butter mixture, alternating with the milk, beginning and ending with the dry ingredients. Mix until just combined. -
Step 4
Gently fold in the white chocolate chips and fresh raspberries. -
Step 5
Pour the batter into the prepared pan and bake for 30-35 minutes, or until a skewer inserted into the center comes out clean. Let cool in the pan for 10-15 minutes before inverting onto a wire rack to cool completely. -
Step 6
While the cake cools, whip the heavy whipping cream with powdered sugar and vanilla extract until stiff peaks form. -
Step 7
Once the cake is completely cool, frost it generously with the whipped cream. Garnish with extra raspberries or white chocolate chips if desired.
Important Information
Nutrition Facts (Per Serving)
It is important to consider this information as approximate and not to use it as definitive health advice.
Allergy Information
Please check ingredients for potential allergens and consult a health professional if in doubt.

Leave a Comment