

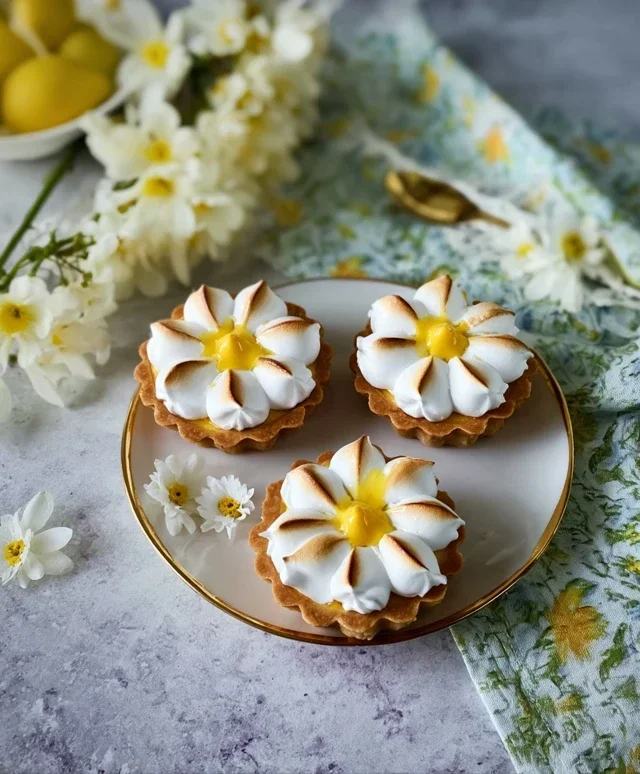
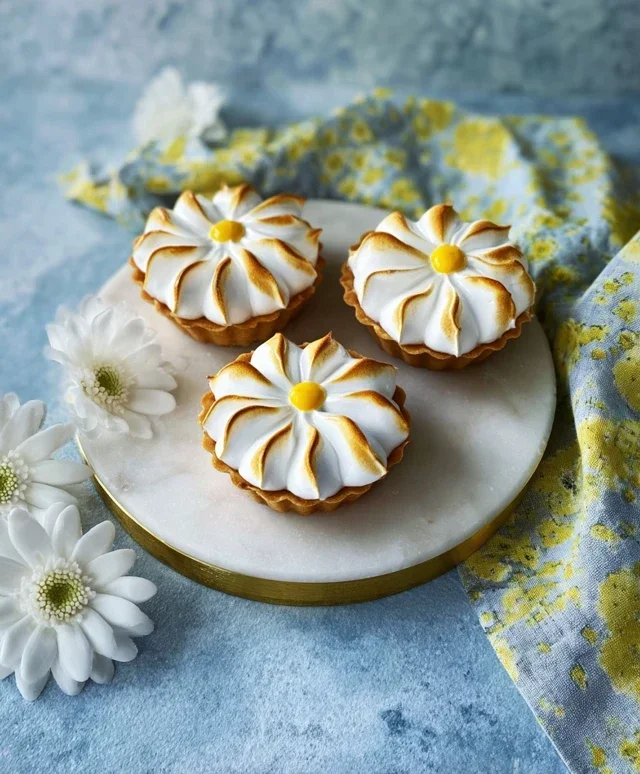
Daisy Lemon Meringue Pies are more than just a dessert; they’re a sunshine-filled embrace in every bite. Imagin extracte a crisp, buttery crust cradling a vibrant, zesty lemon filling, all crowned with impossibly light, cloud-like meringue. What’s not to adore? This classic confection has captured hearts for generations, and for good reason. It’s a delightful dance of textures and flavors – the sweet, airy meringue perfectly balancing the tartness of the lemon custard. The visual appeal is undeniable too, with its golden-brown peaks and creamy interior, making it a showstopper for any occasion. My Daisy Lemon Meringue Pies recipe aims to recreate that magical experience, bringin extractg a touch of homemade joy and elegant simplicity to your table. Get ready to discover why this timeless treat continues to be a beloved favorite!
Get Ready to Bake!
Let’s create some magic.

Daisy Lemon Meringue Pies
There’s something undeniably charming about a Daisy Lemon Meringue Pie. It’s a classic for a reason, offering that perfect balance of tart, creamy lemon curd nestled within a crisp, buttery pastry, all crowned with fluffy, sweet meringue. And while it might seem a little intimidating to tackle, I promise you, with a little guidance and the right ingredients, you can achieve dazzling results that will impress your friends and family. These individual pies are just the right size for a delightful dessert that’s not too overwhelming.
Let’s get started on this sunshine-in-a-pie adventure!
Ingredients:
Making the Pastry
First things first, we need to create the perfect foundation for our pies. This is a simple shortcrust pastry that will give us that satisfying crum extractble.
1. In a medium bowl, combine the 125g plain flour and 35g icing sugar. Whisk them together gently to ensure they are evenly distributed. Then, add the 60g cold unsalted butter, which you should have cut into small cubes. Now, using your fingertips, rub the butter into the flour mixture until it resembles fine breadcrum extractbs. This process is called “rubbing in” and it’s crucial for achieving a tender pastry. You want to work quickly so the butter stays cold; warm butter will result in a greasy pastry. You can also use a food processor for this step, pulsing the ingredients until the desired consistency is reached.
2. Next, create a well in the centre of your flour and butter mixture. Add the 1 large egg yolk and the 1 tbsp of water to this well. Gradually bring the dry ingredients into the wet, using a knife to gently mix until a dough just starts to form. Be careful not to overwork the dough, as this can make the pastry tough. Once the dough comes together, turn it out onto a lightly floured surface and bring it into a ball. Wrap it tightly in cling film and refrigerate for at least 30 minutes. This chilling period allows the gluten in the flour to relax, which again, contributes to a more tender crust.
Assembling and Baking the Pie Cases
While our pastry is chilling, preheat your oven to 190°C (170°C fan/Gas Mark 5). We’ll be blind baking these little beauties to ensure a crisp bottom.
3. Once chilled, take your pastry out of the fridge. Lightly flour your work surface and your rolling pin. Roll out the pastry to a thickness of about 3-4mm. You’ll want to roll it out large enough to line your pie tins (we’re aiming for small tartlet or individual pie tins, about 10-12cm in diameter). Carefully line your chosen pie tins with the pastry, pressing it gently into the edges and trimming off any excess. Prick the base of each pastry case all over with a fork. This is important to prevent the pastry from puffing up during baking. Then, line each case with a piece of baking parchment and fill with baking beans or uncooked rice. This is what we call “blind baking” and the weights prevent the pastry from shrinking and distorting. Bake for 15 minutes, then carefully remove the parchment and beans/rice and bake for a further 5-7 minutes, or until the pastry is a pnon-alcoholic ale golden colour. Keep a close eye on it to prevent it from burning. Remove from the oven and let it cool completely in the tins.
Whipping Up the Zesty Lemon Curd
Now for the star of the show – that vibrant, tangy lemon curd.
4. While the pie cases are cooling, prepare your lemon curd. In a heatproof bowl set over a saucepan of gently simmering water (make sure the bottom of the bowl doesn’t touch the water), whisk together the 3 large eggs and 150g caster sugar. Keep whisking continuously until the sugar has dissolved and the mixture has thickened slightly. This can take about 5-7 minutes. Now, gradually whisk in the 100ml fresh lemon juice. Continue to cook, stirring constantly, until the curd is thick enough to coat the back of a spoon. This is the crucial stage; if you overheat it, the eggs will scramble. Once it reaches the right consistency, remove the bowl from the heat and stir in the 50g unsalted butter, one cube at a time, until it has all melted and is incorporated into the curd. The butter adds a lovely richness and gloss to the curd.
Creating the Dreamy Meringue Topping
The final flourish – a cloud of sweet, toasted meringue.
5. Once the lemon curd has cooled slightly, spoon it evenly into your pre-baked pastry cases. Now, for the meringue. Ensure your bowl and whisk are scrupulously clean and free from any grease, as this can prevent the egg whites from whipping properly. In a clean bowl, whisk the 3 large egg whites with the pinch of cream of tartar (if using) until they form stiff peaks. Gradually add the 150g caster sugar, one tablespoon at a time, whisking continuously until all the sugar is dissolved and the meringue is glossy and firm. You can test this by rubbing a little meringue between your fingertips; if you can still feel sugar granules, keep whisking. Stir in the 1 tsp vanilla extract. Spoon or pipe the meringue over the lemon curd, ensuring it seals to the edges of the pastry to prevent the meringue from shrinking. You can create attractive swirls and peaks with the back of a spoon or a piping bag.
Finishing Touches and Serving
Finally, it’s time to give our Daisy Lemon Meringue Pies that signature golden finish. You can do this in two ways: either place the pies under a hot grill (broiler) for a minute or two, watching them very carefully as they can burn quickly, or bake in a preheated oven at 200°C (180°C fan/Gas Mark 6) for about 5-8 minutes, until the meringue is beautifully golden brown. Let the pies cool completely before serving. The tart lemon curd, crisp pastry, and sweet meringue are a match made in heaven, and these individual Daisy Lemon Meringue Pies are sure to bring a smile to everyone’s face. Enjoy!
Conclusion:
And there you have it – your guide to creating the most delightful Daisy Lemon Meringue Pies! This recipe truly shines with its perfect balance of tart lemon filling and cloud-like, sweet meringue. The visual appeal of the golden peaks is matched only by the exquisite taste. It’s a dessert that’s both elegant enough for special occasions and comforting enough for a simple afternoon treat. I encourage you to give this Daisy Lemon Meringue Pie recipe a try; the satisfaction of presenting and sharing your homemade masterpiece is immense.
Serving these pies whole is always impressive, but slicing them into individual portions makes them wonderfully accessible. They are also fantastic served slightly chilled, allowing the lemon curd to firm up just right. For variations, consider adding a hint of lavender to the meringue for a floral twist, or incorporating some finely grated lime zest into the lemon filling for an extra zing. Perhaps even a sprinkle of toasted coconut on the meringue before baking for a tropical note! Don’t be intimidated by the meringue; with a little patience and practice, you’ll master those beautiful swirls.
Frequently Asked Questions:
Why did my meringue weep?
Meringue weeping, or the appearance of liquid beads, often happens when the meringue is overcooked or the sugar hasn’t fully dissolved. Ensure your sugar is completely dissolved into the egg whites before whipping to stiff peaks. Also, baking at too high a temperature for too long can cause this. Lowering the oven temperature slightly and baking until just golden can prevent weeping.
Can I make the lemon filling ahead of time?
Absolutely! The lemon filling can be made up to two days in advance and stored in an airtight container in the refrigerator. This is a great way to break down the preparation for your Daisy Lemon Meringue Pie, making assembly quicker when you’re ready to bake.
How do I store leftover pie?
Leftover Daisy Lemon Meringue Pie is best stored, uncovered, in a cool, dry place if serving within a few hours. For longer storage, cover loosely with plastic wrap or a cake dome and refrigerate. Be aware that the meringue may soften slightly in the refrigerator.
Daisy Lemon Meringue Pies
Delicate individual lemon meringue pies with a crisp pastry base and a sweet, fluffy meringue topping.
Ingredients
-
125g plain flour
-
35g icing sugar
-
60g cold unsalted butter
-
1 large egg yolk
-
1 tbsp water
-
For the filling: 200g caster sugar, 40g cornflour, 300ml water, 4 large egg yolks, 75ml lemon juice, 25g unsalted butter
-
For the meringue: 4 large egg whites, 200g caster sugar, 1 tsp lemon extract
Instructions
-
Step 1
For the pastry: Rub the butter into the flour and icing sugar until it resembles breadcrumbs. Mix in the egg yolk and water to form a smooth dough. -
Step 2
Chill the dough for 30 minutes, then roll out and line 6 individual pie tins. Prick the bases with a fork. -
Step 3
Bake the pastry cases at 190°C (170°C fan/Gas 5) for 10-12 minutes until golden. Let them cool. -
Step 4
For the filling: Whisk together caster sugar and cornflour in a saucepan. Gradually whisk in the water. Bring to a boil, stirring constantly, until thickened. -
Step 5
Whisk the egg yolks with the lemon juice, then gradually whisk into the hot cornflour mixture. Cook for 1-2 minutes until thickened. Stir in the butter until melted. Pour into the cooled pastry cases. -
Step 6
For the meringue: Whisk the egg whites until stiff peaks form. Gradually add the caster sugar, whisking continuously until thick and glossy. Stir in the lemon extract. -
Step 7
Spoon the meringue over the lemon filling, ensuring it touches the edges of the pastry to prevent shrinking. Create peaks with a spoon. -
Step 8
Bake at 170°C (150°C fan/Gas 3) for 15-20 minutes, or until the meringue is golden brown.
Important Information
Nutrition Facts (Per Serving)
It is important to consider this information as approximate and not to use it as definitive health advice.
Allergy Information
Please check ingredients for potential allergens and consult a health professional if in doubt.


Leave a Comment