

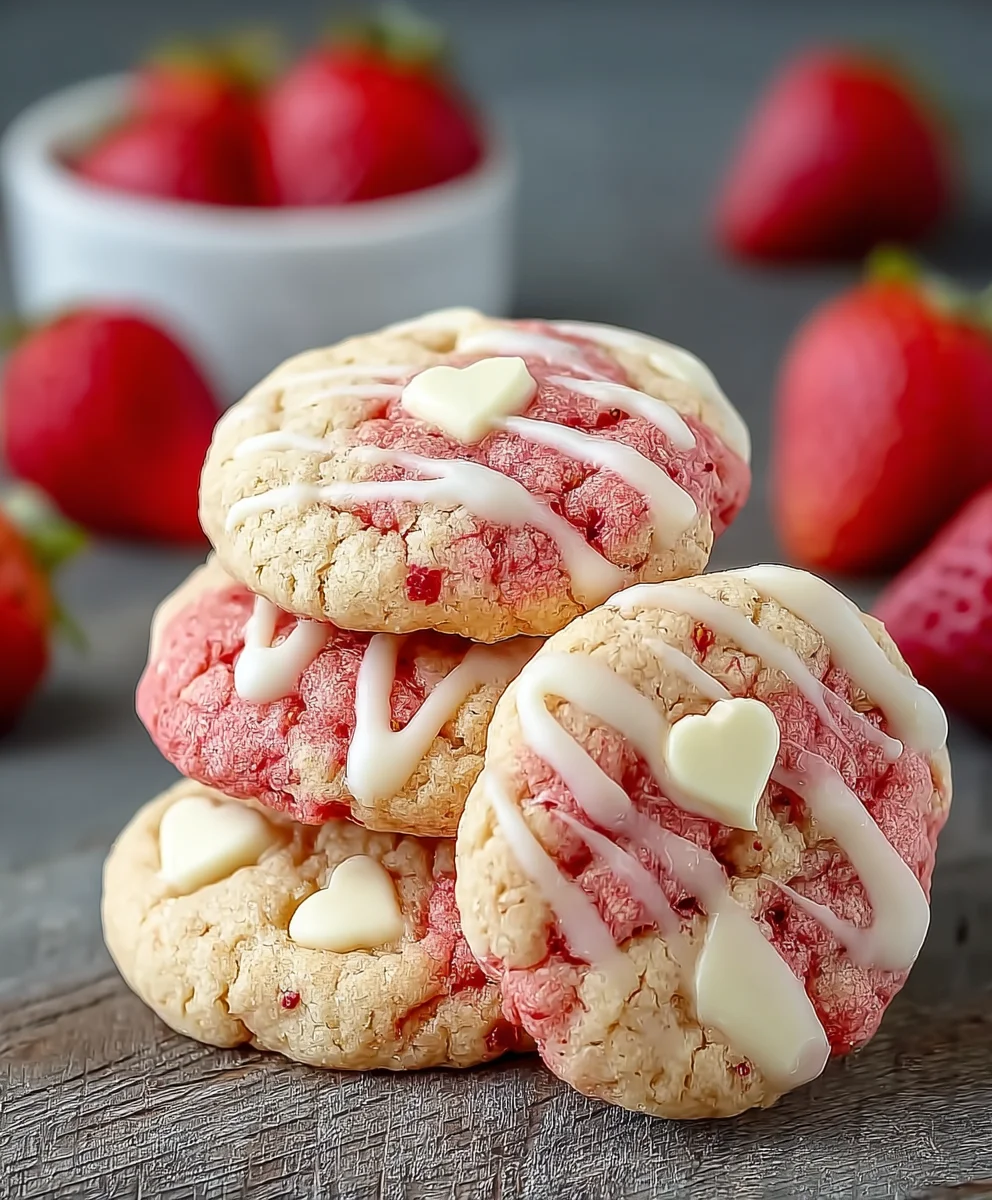
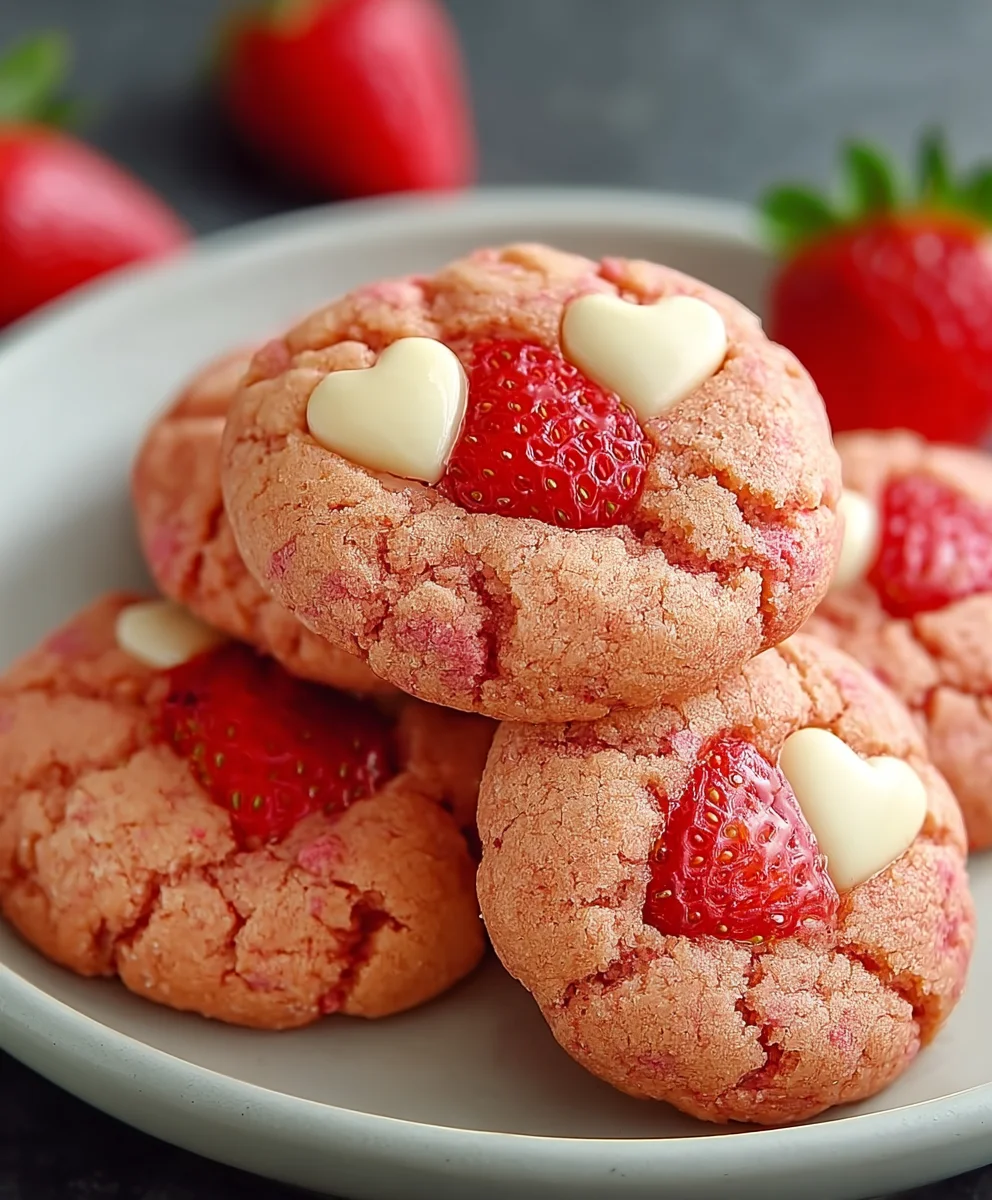
Vnon-alcoholic alentine Strawberry Cookies are more than just a sweet treat; they’re a delightful expression of affection, perfectly crafted for the season of love. Imagine the joy of gifting or sharing these beautifully baked delights, their vibrant color and irresistible aroma filling the air. This Valentine’s Day, I invite you to discover a recipe that captures the essence of romance and shared happiness, without the need for spirits.
A Sweet Symbol of Love and Tradition
Historically, Valentine’s Day has been synonymous with the exchange of gifts, particularly sweets, symbolizing the sweetness of love. Strawberries, with their iconic heart shape and deep red hue, have long been associated with Venus, the Roman goddess of love, making them an ideal star ingredient for this special occasion. There’s something truly magical about baking from scratch, especially when the result is as charming and delicious as these cookies.
People adore these cookies for countless reasons. Beyond their undeniable visual appeal – often adorned with lovely pink hues and sprinkles – they offer a sensational taste experience: a perfect balance of sweet, fruity strawberry flavor with a wonderfully soft, chewy texture that melts in your mouth. They are incredibly convenient to make, requiring straightforward ingredients and steps, making them an ideal baking project for anyone, regardless of their culinary expertise. Plus, being Vnon-alcoholic alentine Strawberry Cookies means they are universally enjoyable, perfect for school parties, family gatherings, or a quiet, romantic evening at home. Let’s bake some love!

Ingredients:
Creating these delightful Vnon-alcoholic Valentine Strawberry Cookies is a true labor of love, and every ingredient plays a crucial role in achieving that perfect balance of tenderness, sweetness, and vibrant strawberry flavor. Here’s everything you’ll need, carefully measured for the best results:
- For the Soft Sugar Cookies:
- 3 cups (360g) all-purpose flour, plus more for dusting
- 1 teaspoon baking powder
- 1/2 teaspoon salt
- 1 cup (226g) unsalted butter, softened to room temperature
- 1 1/2 cups (300g) granulated sugar
- 1 large egg, room temperature
- 1 tablespoon pure vanilla extract
- 1/4 cup (approximately 15g) freeze-dried strawberries, finely ground into a powder (I love how these give a natural color and intense, authentic strawberry flavor without adding excess moisture, making them perfect for my Vnon-alcoholic Valentine Strawberry Cookies!)
- Optional: A few drops of red or pink food coloring gel, for an extra pop of color in the cookie dough itself, though the freeze-dried strawberries provide a lovely hue.
- For the Creamy Vnon-alcoholic Strawberry Buttercream Frosting:
- 1 cup (226g) unsalted butter, softened to room temperature
- 4 cups (480g) powdered sugar (confectioners’ sugar), sifted
- 1/4 cup (60ml) heavy cream or whole milk, plus more if needed
- 1 teaspoon pure vanilla extract
- 1/4 cup (approximately 15g) freeze-dried strawberries, finely ground into a powder (again, this is my secret for that incredible burst of natural strawberry flavor and color in these Vnon-alcoholic Valentine Strawberry Cookies!)
- Optional: A few drops of red or pink food coloring gel, for a more intense pink hue.
- For Decoration (make these Vnon-alcoholic Valentine Strawberry Cookies extra special!):
- Assorted Valentine’s Day sprinkles (hearts, nonpareils, sanding sugar)
- Optional: Edible glitter or pearls
Preparing the Cookie Dough Base
Let’s get started on creating the tender, flavorful base for our Vnon-alcoholic Valentine Strawberry Cookies! This cookie dough is designed to be sturdy enough for cutting out shapes, yet soft and chewy when baked. Trust me, the aroma of strawberry will begin to fill your kitchen even at this stage.
-
Whisk Together Dry Ingredients: In a medium bowl, whisk together the 3 cups of all-purpose flour, 1 teaspoon of baking powder, and 1/2 teaspoon of salt. Make sure these are thoroughly combined. This step is crucial because it ensures that the leavening agent (baking powder) and salt are evenly distributed throughout the dough, which will result in consistently risen and flavored cookies. Set this bowl aside.
-
Cream Butter and Sugar: In the bowl of a stand mixer fitted with the paddle attachment (or using a large bowl with an electric hand mixer), add the 1 cup of softened unsalted butter and 1 1/2 cups of granulated sugar. Beat on medium speed for about 3 to 5 minutes, or until the mixture is light and fluffy and pale in color. This creaming process incorporates air into the butter and sugar, which contributes significantly to the cookies’ final texture – making them tender and less dense. Don’t rush this step!
-
Add Egg and Vanilla: Scrape down the sides of the bowl with a rubber spatula. Add the 1 large egg and 1 tablespoon of pure vanilla extract. Beat on medium speed for another 1 to 2 minutes until fully incorporated. The mixture might look a little curdled at first, but keep beating until it comes together smoothly. Vanilla extract is a key flavor enhancer, complementing our strawberry notes beautifully.
-
Incorporate Strawberry Powder and Optional Food Coloring: Now for the star of our show! Add the 1/4 cup of finely ground freeze-dried strawberry powder to the wet mixture. If you’re using optional red or pink food coloring gel for a more vibrant cookie base, add a few drops here as well. Mix on low speed until the strawberry powder and color are evenly distributed. You’ll immediately notice the beautiful pink hue starting to form – it’s already looking like a Valentine’s treat!
-
Gradually Add Dry Ingredients: With the mixer on low speed, gradually add the dry ingredient mixture (flour, baking powder, salt) to the wet ingredients. Add about a third at a time, mixing only until just combined after each addition. Be careful not to overmix the dough once the flour is added. Overmixing develops the gluten in the flour, which can lead to tough cookies. As soon as you see no more dry streaks of flour, stop mixing. The dough will be thick and may appear crumbly, but it should hold together when pressed.
-
Divide and Chill the Dough: Turn the dough out onto a clean, lightly floured surface. Divide the dough into two equal portions. Gently form each portion into a flat disc, about 1-inch thick. Wrap each disc tightly in plastic wrap. This chilling step is absolutely essential for successful cut-out cookies! It allows the butter to firm up, preventing the cookies from spreading excessively in the oven, and makes the dough much easier to handle and roll. Refrigerate the dough for at least 1 hour, or up to 2 days. For best results with these Vnon-alcoholic Valentine Strawberry Cookies, don’t skip the chill time!
-
Preheat Oven and Prepare Baking Sheets: Once your dough is almost done chilling, preheat your oven to 375°F (190°C). Line two large baking sheets with parchment paper or silicone baking mats. This prevents sticking and makes cleanup a breeze.
-
Roll Out and Cut Cookies: On a lightly floured surface (I like to use a mix of flour and powdered sugar to prevent sticking and add a touch more sweetness), unwrap one disc of chilled dough. Use a rolling pin to roll the dough out to an even 1/4-inch thickness. Try to keep the thickness consistent across the entire sheet of dough, as this ensures even baking. Using your favorite Valentine’s Day cookie cutters (hearts, flowers, letters), cut out shapes. Carefully transfer the cut-out cookies to the prepared baking sheets, leaving about 1 inch between each cookie. Gather the dough scraps, gently press them together, re-roll, and cut out more cookies until all the dough is used from that disc. Repeat with the second disc of dough.
-
Bake the Cookies: Bake one sheet at a time in the preheated oven for 8 to 10 minutes. The baking time can vary slightly depending on your oven and the size of your cookies. You’re looking for the edges to be lightly golden, and the centers to appear set but still soft. For a chewier cookie, lean towards the shorter baking time. Do not overbake, as this will result in dry, crumbly cookies. These Vnon-alcoholic Valentine Strawberry Cookies are best when soft and tender!
-
Cool Completely: Once baked, remove the baking sheets from the oven and let the cookies cool on the sheets for about 5 minutes. This allows them to firm up slightly before you move them. Then, carefully transfer the cookies to a wire rack to cool completely. It is absolutely vital that the cookies are completely cooled before you even think about frosting them. Warm cookies will melt your beautiful buttercream, leading to a runny mess. Patience is a virtue, especially when making perfect Vnon-alcoholic Valentine Strawberry Cookies!
Crafting the Vnon-alcoholic Strawberry Buttercream Frosting
Now for the luscious, creamy topping that truly defines our Vnon-alcoholic Valentine Strawberry Cookies! This strawberry buttercream is wonderfully light, packed with natural fruit flavor, and beautifully pink. It’s perfect for spreading or piping.
-
Cream the Butter: In the bowl of a stand mixer fitted with the paddle attachment, add the 1 cup of softened unsalted butter. Beat on medium-high speed for about 3 to 4 minutes, until the butter is very pale in color, light, and super fluffy. You want to incorporate as much air as possible at this stage. This makes for a lighter, less dense buttercream.
-
Sift Powdered Sugar: While the butter is creaming, sift your 4 cups of powdered sugar. This step is often skipped, but it’s highly recommended for a super smooth, lump-free frosting. Nothing ruins a beautiful cookie like lumpy frosting!
-
Gradually Add Powdered Sugar: With the mixer on low speed, gradually add the sifted powdered sugar to the creamed butter, about 1 cup at a time. Mix until each addition is just incorporated before adding the next. Once all the powdered sugar has been added, the mixture will be very thick and crumbly. Scrape down the sides and bottom of the bowl frequently to ensure everything is mixing evenly.
-
Add Liquid and Flavorings: With the mixer still on low speed, pour in the 1/4 cup of heavy cream (or whole milk) and the 1 teaspoon of pure vanilla extract. Mix until just combined. Now, add the 1/4 cup of finely ground freeze-dried strawberry powder. If you’re using optional red or pink food coloring gel to achieve a deeper pink, add a few drops here as well. Increase the mixer speed to medium-high and beat for another 3 to 5 minutes, until the frosting is incredibly light, fluffy, and smooth. The strawberry powder will dissolve into the buttercream, infusing it with fantastic flavor and a lovely natural pink hue, making this a true Vnon-alcoholic Valentine Strawberry Cookies masterpiece.
-
Adjust Consistency: If your frosting seems too thick, add more heavy cream (or milk) one teaspoon at a time, beating well after each addition, until you reach your desired consistency. For piping, you’ll want it a bit stiffer, while for spreading, you might prefer it slightly softer. If, by chance, your frosting becomes too thin, you can add a tablespoon or two more sifted powdered sugar until it thickens up. Remember to scrape down the sides of the bowl often to ensure all ingredients are fully incorporated.
Assembling and Decorating Your Vnon-alcoholic Valentine Strawberry Cookies
This is where the magic happens, turning our plain cookies into festive, irresistible Vnon-alcoholic Valentine Strawberry Cookies! Get creative and have fun with the decorating process.
-
Prepare for Decorating: Ensure all your baked cookies are completely cool. Set up your decorating station with your cooled cookies, the freshly made strawberry buttercream frosting, an offset spatula or butter knife for spreading, piping bags with various tips (if desired), and all your chosen sprinkles and decorations. A small bowl of water and a few paper towels nearby are always helpful for quick clean-up.
-
Frost the Cookies: You have a couple of options here for frosting your Vnon-alcoholic Valentine Strawberry Cookies:
- For Simple Spreading: Use an offset spatula or a butter knife to spread a generous layer of strawberry buttercream onto the top of each cooled cookie. You can create smooth, even tops or add little swirls for texture. I personally love the rustic look of a slightly swirled frosting.
- For Piping Designs: If you’re feeling fancy, spoon some of the frosting into a piping bag fitted with your desired tip (a star tip, a round tip, or even a simple Ziploc bag with the corner snipped off works great!). Pipe decorative borders, swirls, or even simple dollops onto each cookie. This method gives a very professional and pretty finish, perfect for Valentine’s Day gifting.
Take your time and enjoy the process. Don’t worry if every cookie isn’t perfectly identical; homemade charm is part of the appeal of these special treats!
-
Add Sprinkles and Decorations Immediately: Once you’ve frosted a cookie, apply your chosen sprinkles, sanding sugar, or edible glitter immediately while the frosting is still wet. This ensures that the decorations stick firmly to the buttercream. If you wait too long, the frosting might start to set, and your sprinkles won’t adhere as well. Go wild with the Valentine’s Day theme! Tiny heart sprinkles, shimmering pink sanding sugar, or a mix of white and red nonpareils will make your Vnon-alcoholic Valentine Strawberry Cookies truly shine.
-
Allow Frosting to Set: After decorating, arrange the frosted cookies on a clean baking sheet or wire rack in a single layer. Allow the frosting to set for at least 30 minutes to an hour at room temperature, or briefly in the refrigerator, especially if your kitchen is warm. This step helps to firm up the buttercream, preventing smudges and making the cookies easier to handle and store. A lightly set frosting also ensures your decorations stay put.
-
Serving and Storage: Your beautiful Vnon-alcoholic Valentine Strawberry Cookies are now ready to be enjoyed! They are best served fresh, allowing the soft cookie and creamy, flavorful frosting to truly shine. For storage, place the frosted cookies in an airtight container at room temperature for up to 3-4 days. If stacking, place a piece of parchment paper between layers to prevent sticking and preserve your beautiful decorations. You can also store them in the refrigerator for up to a week, but let them come to room temperature for about 15-20 minutes before serving for the best texture and flavor. These cookies are a delightful way to celebrate Valentine’s Day, and I promise you, everyone will adore the sweet strawberry essence and tender crumb of these carefully crafted treats.
Conclusion:
And there you have it, my wonderful bakers and food enthusiasts! We’ve journeyed together through the delightful process of creating something truly special, something that brings a unique blend of homemade comfort and celebratory elegance to your table. If you’ve been following along, you’ll know that this isn’t just another cookie recipe; it’s an invitation to craft moments of pure joy and sweetness. These cookies are a must-try because they encapsulate everything you could want in a festive treat: they’re incredibly simple to make, requiring no intimidating techniques or obscure ingredients, yet the result is consistently impressive. The delicate balance of sweet, ripe strawberries with the buttery, tender cookie base creates a flavor profile that is both nostalgic and excitingly fresh. They boast a vibrant hue and an enticing aroma that will fill your kitchen with warmth, making the baking process an absolute delight in itself. Seriously, the moment those first notes of baking strawberry hit the air, you’ll know you’re in for something truly extraordinary. It’s the kind of baking experience that feels like a warm hug, comforting and deeply satisfying from start to finish. I find so much joy in sharing recipes that truly deliver on their promise, and this one, I assure you, will exceed your expectations in every bite.
What I adore most about these particular treats is their versatility and the sheer happiness they inspire. Imagine a lazy Sunday morning, a cup of freshly brewed coffee or perhaps a comforting herbal tea, and a plate piled high with these delectable gems. They make an exquisite pairing, turning an ordinary moment into a small celebration. But don’t stop there! Think about elevating your dessert game: crumbling a few over a scoop of vanilla bean ice cream for an instant, gourmet sundae, or serving them alongside a light panna cotta for an extra layer of texture and fruitiness. For a truly indulgent experience, consider a warm mug of homemade hot chocolate, topped with whipped cream and a sprinkle of cocoa, with these cookies as your perfect dipping companion. The way the cookie softens slightly in the warm beverage is just divine. You could also arrange them artfully on a charcuterie-style dessert board with fresh berries, dark chocolate pieces, and perhaps some soft cheeses for a sophisticated spread that will wow your guests. The possibilities for enjoyment are genuinely endless, limited only by your imagination!
And speaking of imagination, let’s talk about variations! While the base recipe is perfect as is, part of the fun of baking is making it your own. If you’re feeling adventurous, why not try adding a touch of lemon zest to the dough? The bright, zesty notes would beautifully complement the sweet strawberries, creating an even more complex and refreshing flavor. Or, for a different berry experience, consider swapping out a portion of the strawberries for raspberries; their tartness would provide a wonderful contrast. For an extra layer of decadence, gently fold in a handful of white chocolate chips into the dough before baking – the creamy sweetness of the white chocolate is an absolute dream with strawberries. You could also experiment with different extracts: a hint of almond or vanilla bean paste could deepen the flavor profile beautifully. For a playful touch, especially if you’re making these for a younger audience or a themed party, decorate them with a simple glaze made from powdered sugar and a tiny splash of milk, then sprinkle with colorful nonpareils or edible glitter. Or, for an elegant finish, drizzle them with melted dark chocolate after they’ve cooled completely. The beauty of this recipe is that it’s incredibly forgiving and encourages your creativity, allowing you to tailor it perfectly to your taste or the occasion at hand. Don’t be afraid to experiment; that’s where some of the most wonderful culinary discoveries are made!
So, now it’s your turn! I genuinely hope you’re feeling inspired to roll up your sleeves and give this recipe a try. Trust me when I say that the effort, however minimal, will be richly rewarded with an exquisite batch of homemade goodness. There’s something profoundly satisfying about creating something delicious with your own hands, especially when it’s met with delighted smiles from those you share it with. These Vnon-alcoholic Valentine Strawberry Cookies are more than just a dessert; they’re a gesture of love, a simple pleasure that brightens any day. They are perfect for sharing with a loved one, a dear friend, or simply to treat yourself to a moment of pure bliss. I would absolutely love to hear about your baking adventures and see your beautiful creations. Did you try any of the variations? What was your favorite part of the process? Did they bring a smile to someone’s face? Please, don’t hesitate to share your experiences and photos with me. Your feedback and stories are what truly make this culinary journey so incredibly rewarding for all of us. Let’s make some memories, one delicious cookie at a time!
Happy baking, my friends! I can’t wait to hear all about it.
Sweet Non-alcoholic Valentine Strawberry Cookies Delight
These non-alcoholic Valentine Strawberry Cookies are a delightful expression of affection, perfect for sharing. Their vibrant color and irresistible aroma capture the essence of romance and shared happiness, crafted without the need for spirits.
Ingredients
-
3 cups (360g) all-purpose flour
-
1 teaspoon baking powder
-
1/2 teaspoon salt
-
1 cup (226g) unsalted butter, softened (for cookies)
-
1 1/2 cups (300g) granulated sugar
-
1 large egg, room temperature
-
1 tablespoon pure vanilla extract
-
1/4 cup (15g) freeze-dried strawberries, finely ground (for cookies)
-
Optional: Red or pink food coloring gel (for cookies)
-
1 cup (226g) unsalted butter, softened (for frosting)
-
4 cups (480g) powdered sugar, sifted
-
1/4 cup (60ml) heavy cream or whole milk, plus more if needed
-
1 teaspoon pure vanilla extract (for frosting)
-
1/4 cup (15g) freeze-dried strawberries, finely ground (for frosting)
-
Optional: Red or pink food coloring gel (for frosting)
-
Assorted Valentine’s Day sprinkles
-
Optional: Edible glitter or pearls
Instructions
-
Step 1
In a medium bowl, whisk together 3 cups all-purpose flour, 1 teaspoon baking powder, and 1/2 teaspoon salt. Set aside. -
Step 2
In a stand mixer with the paddle attachment, beat 1 cup softened unsalted butter and 1 1/2 cups granulated sugar on medium speed for 3-5 minutes until light and fluffy. -
Step 3
Scrape down the bowl. Add 1 large egg and 1 tablespoon pure vanilla extract. Beat for 1-2 minutes until fully incorporated. -
Step 4
Add 1/4 cup finely ground freeze-dried strawberry powder and optional red or pink food coloring gel. Mix on low speed until evenly distributed and a pink hue forms. -
Step 5
With the mixer on low speed, gradually add the dry ingredient mixture to the wet ingredients, mixing only until just combined after each addition. Do not overmix. -
Step 6
Turn the dough onto a lightly floured surface. Divide into two 1-inch thick flat discs, wrap tightly in plastic wrap, and refrigerate for at least 1 hour, or up to 2 days. -
Step 7
Once dough is almost done chilling, preheat your oven to 375°F (190°C). Line two large baking sheets with parchment paper or silicone baking mats. -
Step 8
On a lightly floured surface, unwrap one dough disc and roll it out to an even 1/4-inch thickness. Cut out desired Valentine’s Day shapes using cookie cutters. Carefully transfer cut-out cookies to the prepared baking sheets, leaving about 1 inch between each. Gather scraps, re-roll, and cut more cookies. Repeat with the second disc of dough. -
Step 9
Bake one sheet at a time in the preheated oven for 8 to 10 minutes, until the edges are lightly golden and centers appear set but still soft. Do not overbake. -
Step 10
Remove baking sheets from the oven and let cookies cool on the sheets for about 5 minutes. Then, carefully transfer to a wire rack to cool completely. Cookies must be completely cooled before frosting. -
Step 11
For the frosting, in a stand mixer with the paddle attachment, beat 1 cup softened unsalted butter on medium-high speed for 3-4 minutes until very pale, light, and fluffy. -
Step 12
Sift 4 cups powdered sugar. With the mixer on low speed, gradually add the sifted powdered sugar to the creamed butter, about 1 cup at a time, mixing until just incorporated after each addition. Scrape down the bowl frequently. -
Step 13
With the mixer on low speed, pour in 1/4 cup heavy cream (or whole milk) and 1 teaspoon pure vanilla extract. Mix until combined. Add 1/4 cup finely ground freeze-dried strawberry powder and optional red or pink food coloring gel. Increase mixer speed to medium-high and beat for 3-5 minutes until the frosting is light, fluffy, and smooth. -
Step 14
If needed, add more heavy cream (one teaspoon at a time) if frosting is too thick, or more sifted powdered sugar if too thin, until desired consistency is reached. -
Step 15
Ensure cookies are completely cool. Spread a generous layer of strawberry buttercream onto each cookie using an offset spatula or pipe designs with a piping bag. -
Step 16
Immediately apply desired Valentine’s Day sprinkles, sanding sugar, or edible glitter onto the wet frosting to ensure they stick firmly. -
Step 17
Arrange frosted cookies on a clean baking sheet or wire rack and allow the frosting to set for at least 30 minutes to an hour at room temperature, or briefly in the refrigerator, to prevent smudges. -
Step 18
Serve your Valentine Strawberry Cookies fresh. Store in an airtight container at room temperature for up to 3-4 days, or in the refrigerator for up to a week. If stacking, place parchment paper between layers. For best texture and flavor, let refrigerated cookies come to room temperature for 15-20 minutes before serving.
Important Information
Nutrition Facts (Per Serving)
It is important to consider this information as approximate and not to use it as definitive health advice.
Allergy Information
Please check ingredients for potential allergens and consult a health professional if in doubt.
Leave a Comment