

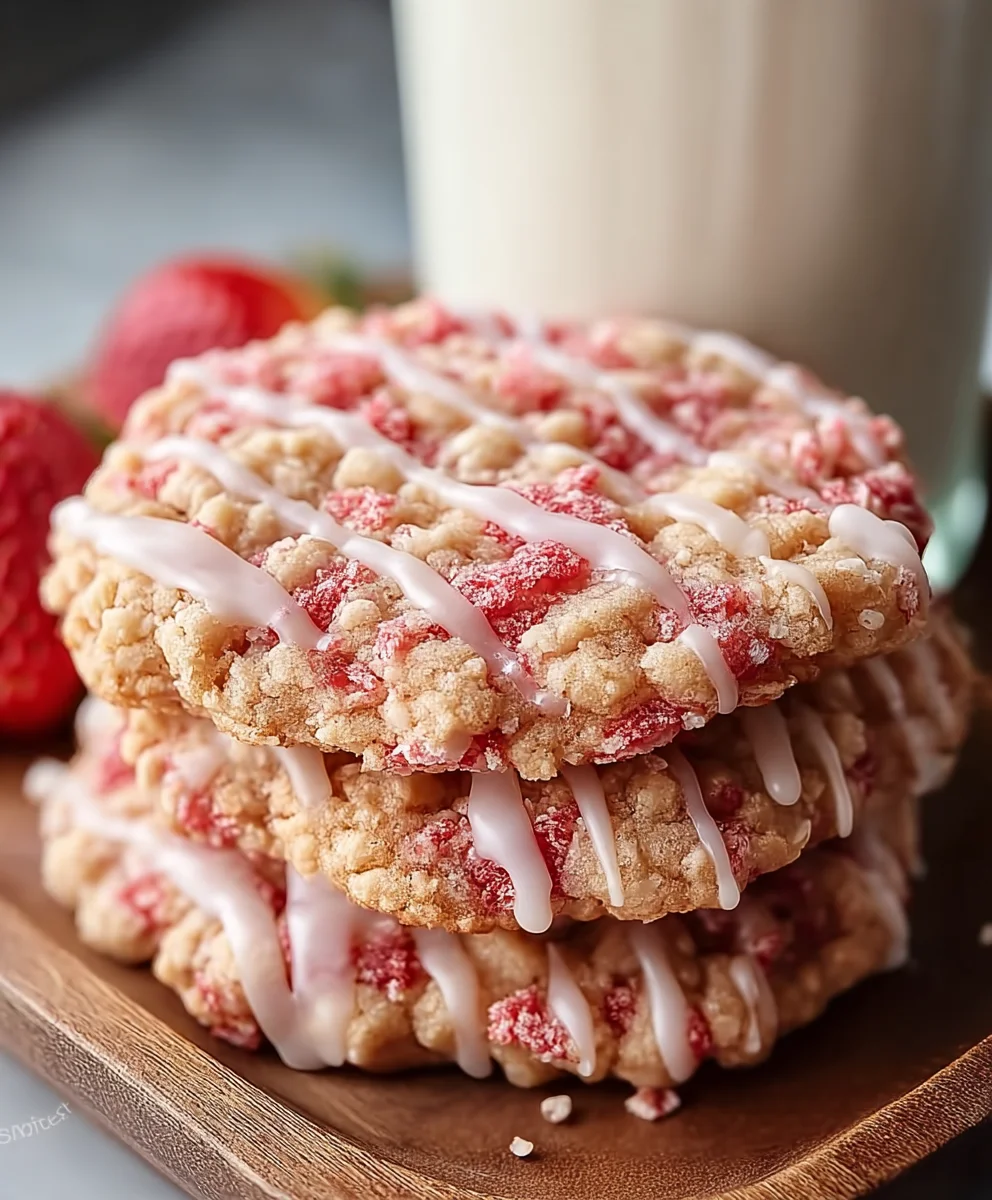
Strawberry Crunch Cookies are more than just a dessert; they are a delightful trip down memory lane, perfectly encapsulating the joy of a warm summer day in every single bite. I remember the sheer delight of biting into those iconic strawberry shortcake ice cream bars as a child, and the inspiration for these cookies stems directly from that nostalgic experience. There’s something truly magical about recreating a beloved classic in a new, exciting form, and these cookies do exactly that, transforming a frosty treat into a bakeable masterpiece that is sure to charm anyone who tries them.
Why People Adore These Irresistible Treats
What makes people utterly fall in love with these treats? It’s undoubtedly the irresistible combination of textures and flavors that makes them so unique. Imagine a soft, chewy cookie base, adorned with a luscious, creamy frosting, and then crowned with that signature, golden strawberry crunch topping. The vibrant pink hue is visually stunning, promising a burst of sweet, fruity flavor that perfectly balances the rich cookie and smooth frosting. Each bite offers a harmonious symphony: the initial delightful crunch, followed by the tender cookie, culminating in a creamy, sweet finish. These Strawberry Crunch Cookies are perfect for brightening any gathering, or simply for indulging in a moment of pure, unadulterated sweet bliss.

Ingredients:
- For the Strawberry Crunch Topping:
- 15 Golden Oreo cookies (approximately 1.25 cups of crumbs)
- 2 tablespoons unsalted butter, melted
- 2 tablespoons freeze-dried strawberries, crushed into small pieces (about half of a 1.2 oz bag)
- 1 tablespoon granulated sugar (optional, for extra sweetness if desired)
- For the Strawberry Crunch Cookies:
- 1 cup (2 sticks or 226g) unsalted butter, softened to room temperature
- ½ cup (100g) granulated sugar
- ½ cup (110g) packed light brown sugar
- 1 large egg, room temperature
- 1 teaspoon pure vanilla extract
- ½ teaspoon strawberry extract (optional, for intensified strawberry flavor)
- 2 ¼ cups (270g) all-purpose flour
- 1 teaspoon baking soda
- ½ teaspoon salt
- ½ cup (about 0.6 oz or remaining half of the 1.2 oz bag) freeze-dried strawberries, finely crushed into a powder (use a food processor or blender)
- ¼ cup (about 0.3 oz) freeze-dried strawberries, roughly chopped into small bits (for visual appeal and textural pops)
- 2-3 drops pink or red food coloring (gel preferred, optional, for vibrant pink cookies)
- For the Optional Strawberry Glaze:
- 1 cup (120g) powdered sugar, sifted
- 2 tablespoons milk (whole milk works best, or cream for a richer glaze)
- ½ teaspoon strawberry extract
- 1-2 drops pink or red food coloring (optional)
Preparing the Strawberry Crunch Topping
Let’s kick things off by creating the star of our show: the incredibly flavorful and textural strawberry crunch topping that makes these Strawberry Crunch Cookies truly unforgettable. This step is crucial for achieving that signature delightful texture and burst of flavor.
- Prepare the Golden Oreo Crumbs: Start by taking your 15 Golden Oreo cookies. You’ll want to crush these down into fine crumbs. The easiest way to do this is to place them in a food processor and pulse until a fine crumb forms. If you don’t have a food processor, you can place the cookies in a large zip-top bag, seal it, and use a rolling pin or the bottom of a heavy pan to crush them until they resemble fine sand with a few slightly larger pieces for texture. Aim for about 1 ¼ cups of crumbs.
- Crush Freeze-Dried Strawberries: Next, take 2 tablespoons of your freeze-dried strawberries. You can either gently crush them by hand in a small bag or use a mortar and pestle. We’re looking for small, irregular pieces here, not a fine powder, to ensure little pops of intense strawberry flavor and a pleasing visual contrast in the topping.
- Combine Ingredients: In a medium-sized bowl, combine the Golden Oreo crumbs, the crushed freeze-dried strawberry pieces, and the optional 1 tablespoon of granulated sugar. The sugar adds a subtle sweetness and helps with caramelization during toasting. Stir these dry ingredients together thoroughly with a spoon or fork until everything is well distributed.
- Add Melted Butter: Pour the 2 tablespoons of melted unsalted butter over the crumb mixture. Using a fork, gently toss and mix until all the crumbs are evenly moistened and resemble wet sand. It should hold together slightly when pressed, but still be crumbly. This butter is essential for binding the topping and giving it that rich, toasty flavor when baked.
- Toast the Crunch Topping: Spread the prepared crumb mixture evenly in a single layer on a small baking sheet lined with parchment paper. This parchment paper is your friend; it prevents sticking and makes cleanup a breeze.
- Bake for Texture: Preheat your oven to 300°F (150°C). Once preheated, place the baking sheet in the oven and bake for 8-10 minutes. Keep a close eye on it, as oven temperatures can vary. You’re looking for the crumbs to become lightly golden brown and slightly toasted, emitting a wonderful sweet, buttery aroma. This toasting step is crucial for developing a deep, rich flavor and a truly crisp texture for your Strawberry Crunch Cookies.
- Cool Completely: Remove the baking sheet from the oven and allow the strawberry crunch topping to cool completely on the baking sheet. As it cools, it will crisp up further. Once cool, transfer it to an airtight container. You can store this topping at room temperature for up to a week, making it a fantastic make-ahead component for your cookies.
Making the Strawberry Cookie Dough
Now that our fantastic crunch topping is ready, let’s turn our attention to the heart of these amazing treats: the tender, flavorful strawberry cookie dough. This dough is designed to be soft, chewy, and bursting with strawberry goodness, perfectly complementing the crunch.
- Prepare Dry Ingredients: In a medium bowl, whisk together the all-purpose flour, baking soda, and salt. Set aside. In a separate small bowl, you’ll also want to combine your finely crushed freeze-dried strawberry powder and the roughly chopped freeze-dried strawberry bits. The powder will infuse the dough with intense strawberry flavor and a natural pink hue, while the bits will add delightful textural surprises in every bite.
- Cream Butter and Sugars: In a large mixing bowl, using an electric mixer (either a stand mixer with a paddle attachment or a hand mixer), cream together the softened unsalted butter, granulated sugar, and light brown sugar on medium speed. Beat for 2-3 minutes, or until the mixture is light, fluffy, and pale in color. This creaming process is vital; it incorporates air into the butter and sugar, which contributes to the cookies’ light and chewy texture. Scrape down the sides of the bowl as needed to ensure everything is evenly combined.
- Add Wet Ingredients: Beat in the large egg until just combined, being careful not to overmix. Then, add the pure vanilla extract and the optional strawberry extract. If you’re using pink or red food coloring for a more vibrant cookie, add 2-3 drops here and mix until uniformly colored. The strawberry extract really boosts the berry flavor, especially if your freeze-dried strawberries aren’t super potent.
- Incorporate Freeze-Dried Strawberries: With the mixer on low speed, gradually add the freeze-dried strawberry powder and chopped bits to the wet ingredients. Mix until just combined. You’ll already start to see the beautiful pink color developing and smell the wonderful strawberry aroma.
- Combine Dry and Wet Ingredients: Gradually add the whisked dry ingredients (flour, baking soda, salt) to the wet mixture. Mix on low speed until just combined. Be careful not to overmix the dough. Overmixing can develop the gluten in the flour too much, resulting in tough cookies. Stop mixing as soon as no streaks of flour remain. The dough should be soft, slightly sticky, and beautifully pink.
Chilling and Baking the Cookies
Chilling the dough is a non-negotiable step for these Strawberry Crunch Cookies. It not only deepens the flavors but also prevents the cookies from spreading too much in the oven, ensuring a perfectly thick and chewy texture. Patience now will pay off handsomely later!
- Chill the Dough: Cover the bowl of cookie dough with plastic wrap and refrigerate for at least 1 hour, or up to 24 hours. Chilling allows the flavors to meld, the butter to firm up, and the flour to fully hydrate, which leads to a more flavorful and perfectly textured cookie. If chilling for longer than 1 hour, you might need to let it sit at room temperature for 10-15 minutes before scooping to make it more pliable.
- Preheat Oven and Prepare Baking Sheets: Once your dough has adequately chilled, preheat your oven to 350°F (175°C). Line two large baking sheets with parchment paper or silicone baking mats. This prevents sticking and promotes even baking.
- Scoop the Dough: Using a 1.5-inch cookie scoop (about 2 tablespoons of dough per cookie), scoop rounded balls of dough onto the prepared baking sheets. Arrange them about 2 inches apart to allow for spreading. You’ll want each cookie to be roughly the same size for even baking.
- Bake the Cookies: Bake one sheet at a time in the preheated oven for 10-12 minutes. The exact baking time will depend on your oven and the size of your cookies. You’re looking for the edges to be lightly golden brown and set, while the centers still look slightly soft and puffy. It’s important not to overbake these Strawberry Crunch Cookies; a slightly underbaked center ensures a wonderfully soft and chewy texture.
- Cool on Baking Sheet: Once baked, remove the baking sheets from the oven. Let the cookies cool on the baking sheet for 5-7 minutes. This allows them to set up further and prevents them from breaking when transferred.
- Transfer to Wire Rack: After the initial cooling period on the baking sheet, carefully transfer the cookies to a wire rack to cool completely. This step is crucial for allowing air circulation around the cookies, preventing them from becoming soggy on the bottom.
Assembling the Strawberry Crunch Cookies and Optional Glaze
The final touches are where these beautiful cookies truly transform into delightful Strawberry Crunch Cookies. Adding the crunch topping and an optional glaze elevates them from great to absolutely extraordinary.
- Apply the Crunch Topping: While the cookies are still slightly warm but mostly cooled (or immediately after baking if you want the crunch to meld into the cookie more), gently press the prepared strawberry crunch topping onto the tops of each cookie. You can roll the top of the cookie in a shallow dish of the topping, or simply sprinkle and gently press it on with your fingertips. Be generous with the topping; that’s where a lot of the magic happens! Allow the cookies to cool completely before proceeding to the glaze, if using.
- Prepare the Optional Strawberry Glaze: If you’re opting for an extra layer of sweetness and strawberry flavor, let’s make the glaze. In a small bowl, whisk together the sifted powdered sugar, milk, ½ teaspoon of strawberry extract, and 1-2 drops of pink or red food coloring (if using). Whisk until completely smooth and free of lumps. The consistency should be pourable but not too thin – it should slowly drizzle off your spoon. If it’s too thick, add a tiny bit more milk, a quarter teaspoon at a time. If too thin, add a bit more sifted powdered sugar.
- Glaze the Cookies: Once the cookies are completely cool and the crunch topping has set, you can apply the glaze. You have a few options here:
- Drizzle Method: Use a spoon or a fork to drizzle the glaze decoratively over the tops of the Strawberry Crunch Cookies. This creates an elegant look and allows some of the crunch to peek through.
- Dipping Method: For a more complete coating, you can gently dip the top of each cookie into the glaze. Lift it out, letting any excess drip off, then place it back on the wire rack.
- Allow Glaze to Set: If you’ve used the glaze, let the cookies sit on the wire rack for at least 30 minutes, or until the glaze has fully set and hardened. This ensures a clean finish and prevents stickiness.
- Serve and Store: Your incredible Strawberry Crunch Cookies are now ready to be enjoyed! They are best served fresh, but can be stored in an airtight container at room temperature for up to 3-4 days. For optimal freshness, especially if glazed, you might consider storing them in the refrigerator, bringing them back to room temperature before serving for the best texture. These cookies are a celebration of strawberry flavor and delightful textures, and they make a perfect treat for any occasion!
Conclusion:
And there you have it, my friends! We’ve reached the sweet culmination of our baking adventure. If you’ve followed along, you now possess the knowledge to create truly magical treats that are far more than just cookies. These aren’t just any ordinary baked goods; they are a delightful fusion of textures and flavors that will transport you straight back to the carefree days of childhood ice cream trucks, but with a sophisticated, homemade twist. The vibrant tang of fresh strawberries, the luscious creaminess of the cookie itself, and that utterly irresistible, buttery crunch topping come together in a symphony that’s simply unparalleled. It’s the kind of dessert that doesn’t just satisfy a sweet craving; it creates a memorable experience, a little moment of pure joy with every single bite. I truly believe that the unique combination of the soft, tender cookie base with the contrasting crispy, fruity topping makes these a standout masterpiece in any dessert spread. They’re visually stunning, bursting with flavor, and surprisingly straightforward to master, making them perfect for both seasoned bakers and eager novices alike. Trust me when I say, once you try these, you’ll understand exactly why they’ve become such a beloved staple in my own kitchen.
Now, let’s talk about how to make these incredible cookies even more spectacular, or how to put your own personal spin on them. While they are absolutely divine on their own, fresh from the oven or cooled to perfection, I’ve discovered a few ways to elevate the experience. Imagine serving a warm Strawberry Crunch Cookie alongside a scoop of vanilla bean ice cream, allowing the heat of the cookie to slightly melt the creamy coldness – pure bliss! Or, for a delightful afternoon treat, pair them with a perfectly brewed cup of coffee or a tall glass of cold milk; it’s a classic combination for a reason. For those who love to experiment, consider using different freeze-dried fruits for the crunch topping. Perhaps a peach crunch, a raspberry crunch, or even a mixed berry crunch could add a delightful variation. You could also fold in some white chocolate chips into the cookie dough for an extra layer of sweetness and texture, or for a more indulgent touch, drizzle them with a simple white chocolate ganache once cooled. For a festive occasion, try shaping them into mini cookie sandwiches with a cream cheese frosting filling – they’d be an absolute showstopper! Or, if you’re entertaining, arrange a platter of these beautiful cookies with other complementary desserts for an impressive display that will have your guests raving. The possibilities are truly endless, and each variation simply enhances the inherent deliciousness of the core recipe.
So, what are you waiting for? I wholeheartedly encourage you to roll up your sleeves, gather your ingredients, and dive into the wonderful world of baking these incredible
Strawberry Crunch Cookies
. I promise you, the effort is minimal compared to the immense satisfaction and the countless compliments you’re bound to receive. Don’t just read about them; experience the delightful crunch, the sweet tang, and the creamy softness for yourself. Baking should be a fun, creative, and rewarding process, and this recipe truly embodies all of that. Once you’ve baked your batch, I would be absolutely thrilled to hear all about your experience! Did you stick to the original recipe, or did you venture into some of the variations I suggested? Did you come up with your own brilliant twist? Please don’t hesitate to share your thoughts, your successes, and even any questions you might have. I love seeing your creations, so if you take photos, consider sharing them – it always makes my day to see how these recipes come to life in your kitchens. Let’s build a little community of dessert lovers, all united by our shared passion for delicious, homemade treats. Happy baking, and I can’t wait to hear all about your crunchy, strawberry-filled adventures!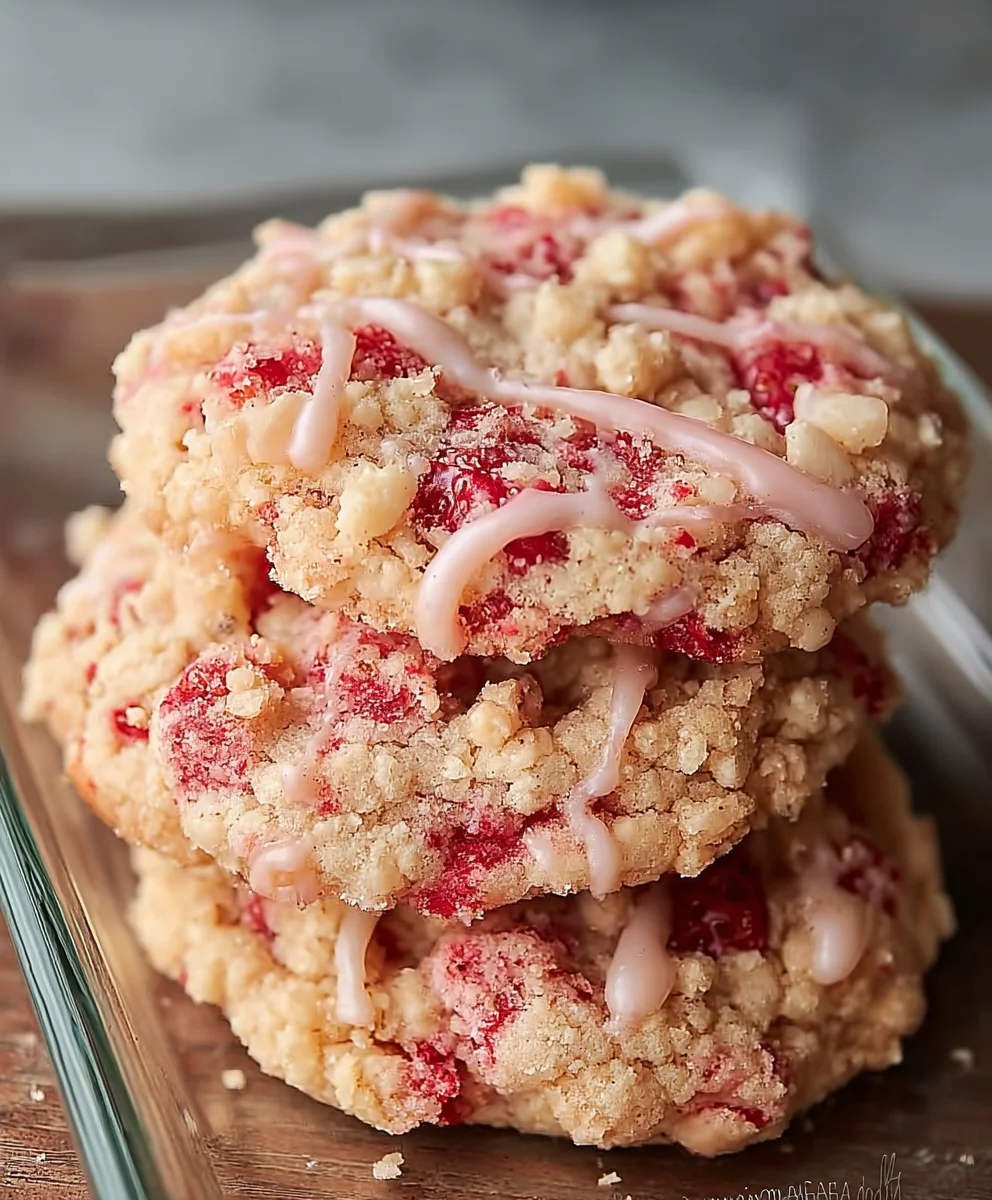
Strawberry Crunch Cookies
These Strawberry Crunch Cookies perfectly capture the nostalgia of a strawberry shortcake ice cream bar. Featuring a soft, chewy cookie base, often topped with a luscious glaze, and crowned with a signature golden strawberry crunch topping, they offer an irresistible combination of textures and sweet, fruity flavors.
Ingredients
-
— For the Strawberry Crunch Topping —
-
15 Golden Oreo cookies (1.25 cups crumbs)
-
2 tbsp unsalted butter, melted
-
2 tbsp freeze-dried strawberries, crushed
-
1 tbsp granulated sugar (optional)
-
— For the Strawberry Crunch Cookies —
-
1 cup (2 sticks) unsalted butter, softened
-
½ cup granulated sugar
-
½ cup packed light brown sugar
-
1 large egg
-
1 tsp vanilla extract
-
½ tsp strawberry extract (optional)
-
2 ¼ cups all-purpose flour
-
1 tsp baking soda
-
½ tsp salt
-
½ cup freeze-dried strawberries, finely crushed (powder)
-
¼ cup freeze-dried strawberries, roughly chopped
-
2-3 drops pink/red food coloring (optional)
-
— For the Optional Strawberry Glaze —
-
1 cup powdered sugar, sifted
-
2 tbsp milk
-
½ tsp strawberry extract
-
1-2 drops pink/red food coloring (optional)
Instructions
-
Step 1
Crush 15 Golden Oreo cookies into fine crumbs (about 1.25 cups). Separately, gently crush 2 tablespoons of freeze-dried strawberries into small, irregular pieces. -
Step 2
In a medium bowl, combine the Oreo crumbs, crushed freeze-dried strawberries, and optional 1 tablespoon granulated sugar. Pour in 2 tablespoons melted unsalted butter and mix with a fork until crumbs are evenly moistened. Spread the mixture evenly on a parchment-lined baking sheet. -
Step 3
Bake the crunch topping in a preheated oven at 300°F (150°C) for 8-10 minutes, until lightly golden and toasted. Remove from oven and let cool completely on the baking sheet; it will crisp up further. Store in an airtight container. -
Step 4
In a medium bowl, whisk together 2 ¼ cups all-purpose flour, 1 teaspoon baking soda, and ½ teaspoon salt. In a separate small bowl, combine ½ cup finely crushed freeze-dried strawberry powder and ¼ cup roughly chopped freeze-dried strawberry bits. -
Step 5
In a large mixing bowl, cream together 1 cup softened unsalted butter, ½ cup granulated sugar, and ½ cup packed light brown sugar on medium speed for 2-3 minutes until light, fluffy, and pale. -
Step 6
Beat in 1 large egg until just combined. Stir in 1 teaspoon vanilla extract and optional ½ teaspoon strawberry extract. If desired, add 2-3 drops pink or red food coloring and mix until uniformly colored. -
Step 7
With the mixer on low speed, gradually add the freeze-dried strawberry powder and chopped bits to the wet ingredients, mixing until just combined. Gradually add the whisked dry ingredients to the wet mixture, mixing on low speed until just combined. Do not overmix. -
Step 8
Cover the bowl of cookie dough with plastic wrap and refrigerate for at least 1 hour, or up to 24 hours. -
Step 9
Once dough is chilled, preheat oven to 350°F (175°C). Line two large baking sheets with parchment paper or silicone baking mats. -
Step 10
Using a 1.5-inch cookie scoop (about 2 tbsp dough), scoop rounded balls onto prepared baking sheets, 2 inches apart. Bake one sheet at a time for 10-12 minutes, until edges are lightly golden and centers are slightly soft. Do not overbake. -
Step 11
Remove baking sheets from oven and let cookies cool on the sheet for 5-7 minutes. Then, carefully transfer to a wire rack to cool completely. -
Step 12
While cookies are still slightly warm but mostly cooled (or fully cooled), gently press the prepared strawberry crunch topping onto the tops of each cookie. Be generous. Let cool completely before glazing. -
Step 13
In a small bowl, whisk together 1 cup sifted powdered sugar, 2 tablespoons milk, ½ teaspoon strawberry extract, and 1-2 drops optional pink or red food coloring until smooth and pourable. -
Step 14
Drizzle or gently dip the tops of the completely cooled cookies (with crunch topping applied) into the glaze. Place back on wire rack and allow glaze to fully set and harden for at least 30 minutes. -
Step 15
Serve immediately. Store in an airtight container at room temperature for 3-4 days. If glazed, consider refrigerating and bringing to room temperature before serving.
Important Information
Nutrition Facts (Per Serving)
It is important to consider this information as approximate and not to use it as definitive health advice.
Allergy Information
Please check ingredients for potential allergens and consult a health professional if in doubt.


Leave a Comment