

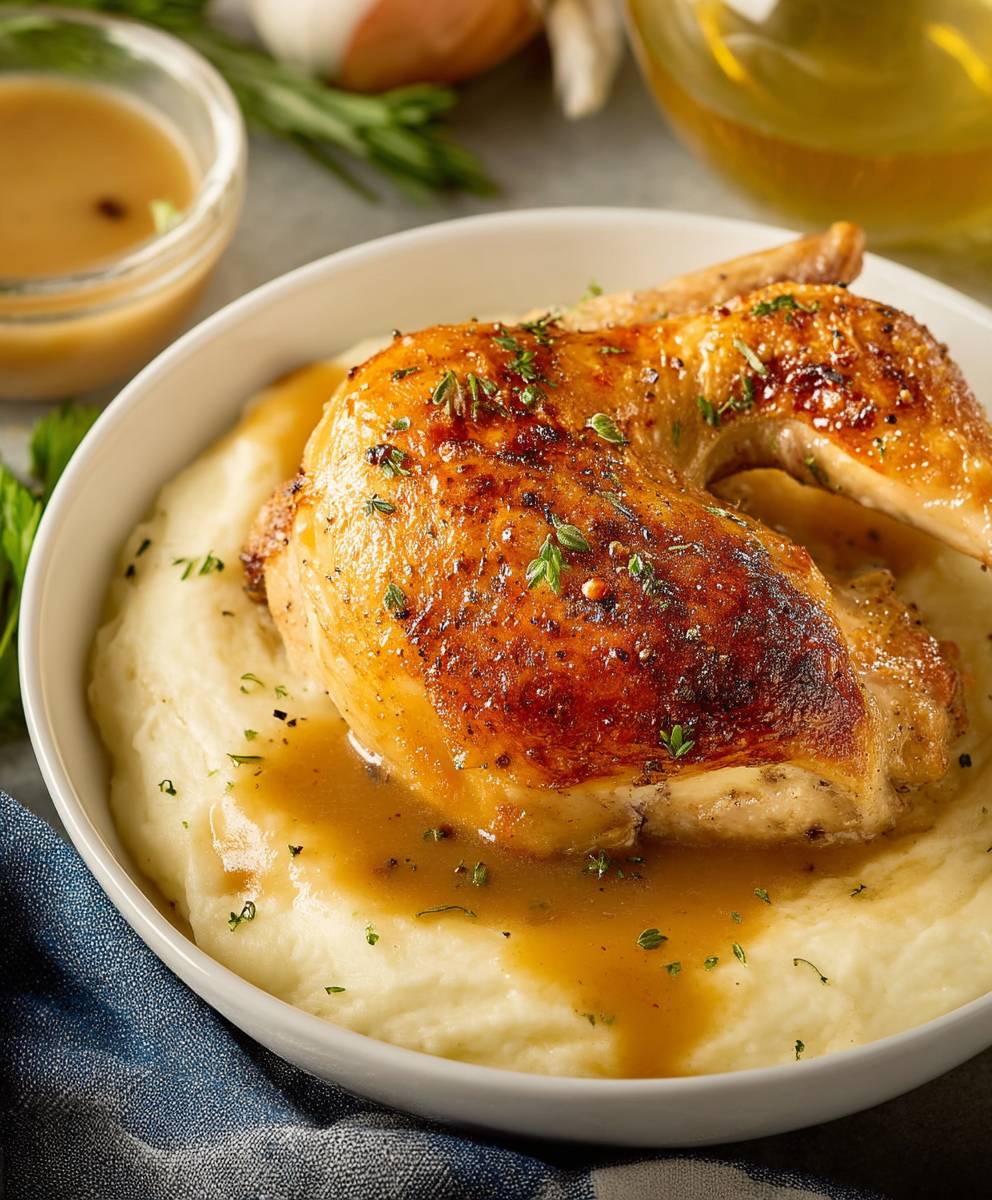
Roast Chicken Homemade Gravy: Is there anything more comforting than the aroma of a perfectly roasted chicken wafting through your home, promising a delicious and satisfying meal? But let’s be honest, the chicken is only half the story. The real magic happens when you drizzle it with a rich, savory, and utterly irresistible homemade gravy.
Gravy, in its simplest form, has been a culinary staple for centuries, a way to utilize pan drippings and transform them into something truly special. From the humble kitchens of medieval Europe to the Thanksgiving tables of modern America, gravy has always been a symbol of abundance and togetherness. It’s a sauce that speaks of resourcefulness and love, a way to elevate even the most modest of meals.
People adore gravy for its incredible versatility and comforting qualities. The creamy texture, the savory depth of flavor, and the way it perfectly complements everything from roasted meats to mashed potatoes it’s a culinary symphony in every bite! And while store-bought options exist, nothing compares to the taste of roast chicken homemade gravy, made with love and the flavorful drippings from your own roasted bird. It’s surprisingly easy to make, and the results are simply divine. So, ditch the canned stuff and let’s embark on a journey to create the ultimate gravy that will have everyone begging for more!

Ingredients:
- For the Chicken:
- 1 whole chicken (about 4-5 pounds), giblets removed
- 2 tablespoons olive oil
- 1 large onion, quartered
- 2 carrots, roughly chopped
- 2 celery stalks, roughly chopped
- 4 cloves garlic, minced
- 1 lemon, halved
- 2 sprigs fresh rosemary
- 4 sprigs fresh thyme
- 2 bay leaves
- Salt and freshly ground black pepper to taste
- 1 tablespoon paprika
- 1 teaspoon garlic powder
- 1/2 teaspoon onion powder
- For the Gravy:
- 4 tablespoons chicken fat (reserved from roasting pan)
- 4 tablespoons all-purpose flour
- 4 cups chicken broth, low sodium
- 1/2 cup dry white wine (optional)
- Salt and freshly ground black pepper to taste
- 1 tablespoon Worcestershire sauce
- 1/4 cup heavy cream (optional, for extra richness)
- 1 tablespoon chopped fresh parsley (for garnish)
Preparing the Chicken:
- Preheat the Oven: Preheat your oven to 425°F (220°C). Make sure your oven rack is in the middle position.
- Prepare the Chicken: Remove the chicken from its packaging and pat it dry thoroughly with paper towels. This is crucial for achieving crispy skin. Don’t skip this step!
- Season the Chicken: In a small bowl, combine the paprika, garlic powder, onion powder, salt, and pepper. Mix well. Rub the olive oil all over the chicken, then generously sprinkle the seasoning mixture over the entire bird, ensuring it’s evenly coated. Get under the skin of the breast if you can, to really infuse the flavor.
- Stuff the Cavity: Stuff the chicken cavity with the quartered onion, chopped carrots, chopped celery, minced garlic, lemon halves, rosemary sprigs, thyme sprigs, and bay leaves. These aromatics will infuse the chicken with flavor from the inside out.
- Truss the Chicken (Optional): Trussing the chicken helps it cook more evenly and maintain a nice shape. If you don’t know how to truss, you can simply tie the legs together with kitchen twine. This will still help with even cooking.
Roasting the Chicken:
- Roast the Chicken: Place the prepared chicken in a roasting pan. I like to use a roasting pan with a rack, but if you don’t have one, you can simply place the chicken directly in the pan.
- Initial Roasting: Roast the chicken at 425°F (220°C) for 30 minutes. This initial high heat helps to brown the skin.
- Reduce Heat and Continue Roasting: Reduce the oven temperature to 350°F (175°C) and continue roasting for another 1 hour to 1 hour and 30 minutes, or until the internal temperature of the thickest part of the thigh reaches 165°F (74°C). Use a meat thermometer to ensure accuracy. The cooking time will vary depending on the size of your chicken.
- Basting (Optional): Basting the chicken every 20-30 minutes with the pan juices will help keep it moist and flavorful. This is optional, but I highly recommend it.
- Resting Period: Once the chicken is cooked, remove it from the oven and let it rest for at least 15-20 minutes before carving. This allows the juices to redistribute throughout the meat, resulting in a more tender and flavorful chicken. Tent the chicken loosely with foil during the resting period.
Making the Gravy:
- Separate the Fat: While the chicken is resting, carefully pour the pan drippings into a heatproof measuring cup or gravy separator. Let the fat separate from the juices. You’ll want about 4 tablespoons of fat for the gravy. If you don’t have enough fat, you can supplement with butter or olive oil.
- Make the Roux: In a saucepan over medium heat, add the reserved chicken fat. Whisk in the all-purpose flour and cook for 2-3 minutes, stirring constantly, until the mixture is smooth and golden brown. This is called a roux, and it’s the base of your gravy. Be careful not to burn the roux, as this will give the gravy a bitter taste.
- Deglaze the Pan (Optional): If you want to add extra flavor, you can deglaze the roasting pan with the dry white wine. Pour the wine into the roasting pan and scrape up any browned bits from the bottom. This will add a lot of depth of flavor to your gravy. Add this mixture to the saucepan with the roux.
- Add the Broth: Gradually whisk in the chicken broth, a little at a time, ensuring there are no lumps. Continue whisking until the gravy is smooth.
- Simmer and Thicken: Bring the gravy to a simmer and cook for 5-7 minutes, or until it has thickened to your desired consistency. Stir occasionally to prevent sticking.
- Season and Finish: Season the gravy with salt, pepper, and Worcestershire sauce. Taste and adjust the seasonings as needed. For a richer gravy, stir in the heavy cream (optional).
- Strain (Optional): For a smoother gravy, you can strain it through a fine-mesh sieve. This will remove any lumps or bits of herbs.
- Serve: Carve the chicken and serve it with the homemade gravy. Garnish with chopped fresh parsley, if desired.
Tips for the Perfect Roast Chicken and Gravy:
- Use a Meat Thermometer: A meat thermometer is essential for ensuring that your chicken is cooked to the correct temperature. Insert the thermometer into the thickest part of the thigh, avoiding the bone. The internal temperature should reach 165°F (74°C).
- Don’t Overcrowd the Pan: Make sure the chicken has enough space in the roasting pan. Overcrowding the pan can prevent the chicken from browning properly.
- Resting is Key: Don’t skip the resting period! This is crucial for allowing the juices to redistribute throughout the meat, resulting in a more tender and flavorful chicken.
- Make-Ahead Gravy: You can make the gravy ahead of time and reheat it when you’re ready to serve. Store the gravy in an airtight container in the refrigerator for up to 3 days.
- Customize the Flavors: Feel free to customize the flavors of the chicken and gravy to your liking. You can add different herbs, spices, or vegetables.
- Use Quality Ingredients: Using high-quality ingredients will make a big difference in the flavor of your roast chicken and gravy.
Troubleshooting:
Gravy is too thick:
Add more chicken broth, a little at a time, until you reach your desired consistency.
Gravy is too thin:
In a small bowl, whisk together 1 tablespoon of cornstarch with 2 tablespoons of cold water. Gradually whisk this mixture into the gravy and simmer for a few minutes until it thickens.
Gravy is lumpy:
Strain the gravy through a fine-mesh sieve to remove any lumps.
Chicken skin isn’t crispy:
Make sure to pat the chicken dry thoroughly before seasoning it. You can also increase the oven temperature during the last 15 minutes of cooking to crisp up the skin.
Chicken is dry:
Make sure not to overcook the chicken. Use a meat thermometer to ensure that it reaches the correct internal temperature. Basting the chicken during roasting can also help keep it moist.
Conclusion:
So there you have it! This Roast Chicken with Homemade Gravy recipe isn’t just another Sunday dinner; it’s a journey back to comforting flavors and the simple joy of a home-cooked meal. I truly believe this recipe is a must-try for anyone looking to impress their family and friends, or simply treat themselves to something special. The crispy, golden skin of the chicken, the juicy, tender meat, and that rich, savory gravy it’s a symphony of textures and tastes that will leave everyone wanting more.
What makes this recipe stand out? It’s the combination of simple ingredients and straightforward techniques that yield extraordinary results. You don’t need to be a professional chef to master this dish. I’ve broken down each step to ensure even the most novice cook can achieve roast chicken perfection. And let’s be honest, the homemade gravy is the real star of the show. Forget the store-bought stuff; this gravy, made with the pan drippings and a few simple ingredients, is bursting with flavor and adds an unparalleled depth to the entire meal.
Serving Suggestions and Variations
Now, let’s talk about serving suggestions! Of course, mashed potatoes are a classic pairing with roast chicken and gravy. But don’t be afraid to get creative! Roasted root vegetables like carrots, parsnips, and sweet potatoes are a delicious and colorful addition to the plate. A simple green salad with a light vinaigrette provides a refreshing contrast to the richness of the chicken and gravy. And for a truly decadent experience, try serving it with some creamy polenta or cheesy grits.
Looking to add your own personal touch? Here are a few variations you might enjoy:
- Herb Infusion: Experiment with different herbs to flavor your chicken. Rosemary, thyme, and sage are all excellent choices. Simply tuck a few sprigs of your favorite herbs under the skin of the chicken before roasting.
- Citrus Zest: A little lemon or orange zest adds a bright and zesty flavor to the chicken. Mix the zest with softened butter and rub it under the skin before roasting.
- Spicy Kick: For a bit of heat, add a pinch of red pepper flakes to the gravy.
- Wine-Infused Gravy: Deglaze the pan with a splash of dry white wine before adding the chicken broth to create a more complex and flavorful gravy.
The possibilities are endless! Feel free to experiment and adapt this recipe to your own taste preferences. The most important thing is to have fun and enjoy the process of creating a delicious and memorable meal.
I’m so excited for you to try this recipe! I truly believe you’ll love it as much as I do. Once you’ve given it a go, I would absolutely love to hear about your experience. Did you make any modifications? What were your favorite sides to serve with it? Share your photos and stories in the comments below! Your feedback is invaluable and helps me continue to create recipes that you’ll love. Don’t forget to rate the recipe too! Happy cooking, and I hope you enjoy this incredible Roast Chicken with Homemade Gravy!
Roast Chicken Homemade Gravy: The Ultimate Comfort Food Recipe
Juicy, flavorful roast chicken with crispy skin and a rich, homemade gravy. Perfect for a Sunday dinner or special occasion!
Ingredients
- 1 whole chicken (about 4-5 pounds), giblets removed
- 2 tablespoons olive oil
- 1 large onion, quartered
- 2 carrots, roughly chopped
- 2 celery stalks, roughly chopped
- 4 cloves garlic, minced
- 1 lemon, halved
- 2 sprigs fresh rosemary
- 4 sprigs fresh thyme
- 2 bay leaves
- Salt and freshly ground black pepper to taste
- 1 tablespoon paprika
- 1 teaspoon garlic powder
- 1/2 teaspoon onion powder
- 4 tablespoons chicken fat (reserved from roasting pan)
- 4 tablespoons all-purpose flour
- 4 cups chicken broth, low sodium
- 1/2 cup dry white wine (optional)
- Salt and freshly ground black pepper to taste
- 1 tablespoon Worcestershire sauce
- 1/4 cup heavy cream (optional, for extra richness)
- 1 tablespoon chopped fresh parsley (for garnish)
Instructions
- Preheat your oven to 425°F (220°C). Make sure your oven rack is in the middle position.
- Remove the chicken from its packaging and pat it dry thoroughly with paper towels. This is crucial for achieving crispy skin. Don’t skip this step!
- In a small bowl, combine the paprika, garlic powder, onion powder, salt, and pepper. Mix well. Rub the olive oil all over the chicken, then generously sprinkle the seasoning mixture over the entire bird, ensuring it’s evenly coated. Get under the skin of the breast if you can, to really infuse the flavor.
- Stuff the chicken cavity with the quartered onion, chopped carrots, chopped celery, minced garlic, lemon halves, rosemary sprigs, thyme sprigs, and bay leaves. These aromatics will infuse the chicken with flavor from the inside out.
- Trussing the chicken helps it cook more evenly and maintain a nice shape. If you don’t know how to truss, you can simply tie the legs together with kitchen twine. This will still help with even cooking.
- Place the prepared chicken in a roasting pan. I like to use a roasting pan with a rack, but if you don’t have one, you can simply place the chicken directly in the pan.
- Roast the chicken at 425°F (220°C) for 30 minutes. This initial high heat helps to brown the skin.
- Reduce the oven temperature to 350°F (175°C) and continue roasting for another 1 hour to 1 hour and 30 minutes, or until the internal temperature of the thickest part of the thigh reaches 165°F (74°C). Use a meat thermometer to ensure accuracy. The cooking time will vary depending on the size of your chicken.
- Basting the chicken every 20-30 minutes with the pan juices will help keep it moist and flavorful. This is optional, but I highly recommend it.
- Once the chicken is cooked, remove it from the oven and let it rest for at least 15-20 minutes before carving. This allows the juices to redistribute throughout the meat, resulting in a more tender and flavorful chicken. Tent the chicken loosely with foil during the resting period.
- While the chicken is resting, carefully pour the pan drippings into a heatproof measuring cup or gravy separator. Let the fat separate from the juices. You’ll want about 4 tablespoons of fat for the gravy. If you don’t have enough fat, you can supplement with butter or olive oil.
- In a saucepan over medium heat, add the reserved chicken fat. Whisk in the all-purpose flour and cook for 2-3 minutes, stirring constantly, until the mixture is smooth and golden brown. This is called a roux, and it’s the base of your gravy. Be careful not to burn the roux, as this will give the gravy a bitter taste.
- If you want to add extra flavor, you can deglaze the roasting pan with the dry white wine. Pour the wine into the roasting pan and scrape up any browned bits from the bottom. This will add a lot of depth of flavor to your gravy. Add this mixture to the saucepan with the roux.
- Gradually whisk in the chicken broth, a little at a time, ensuring there are no lumps. Continue whisking until the gravy is smooth.
- Bring the gravy to a simmer and cook for 5-7 minutes, or until it has thickened to your desired consistency. Stir occasionally to prevent sticking.
- Season the gravy with salt, pepper, and Worcestershire sauce. Taste and adjust the seasonings as needed. For a richer gravy, stir in the heavy cream (optional).
- For a smoother gravy, you can strain it through a fine-mesh sieve. This will remove any lumps or bits of herbs.
- Carve the chicken and serve it with the homemade gravy. Garnish with chopped fresh parsley, if desired.
Notes
- Use a meat thermometer to ensure the chicken is cooked to an internal temperature of 165°F (74°C) in the thickest part of the thigh.
- Patting the chicken dry before seasoning is crucial for crispy skin.
- Resting the chicken after roasting allows the juices to redistribute, resulting in a more tender and flavorful bird.
- The gravy can be made ahead of time and reheated.
- Customize the flavors of the chicken and gravy with different herbs, spices, or vegetables.
- Use high-quality ingredients for the best flavor.


Leave a Comment