

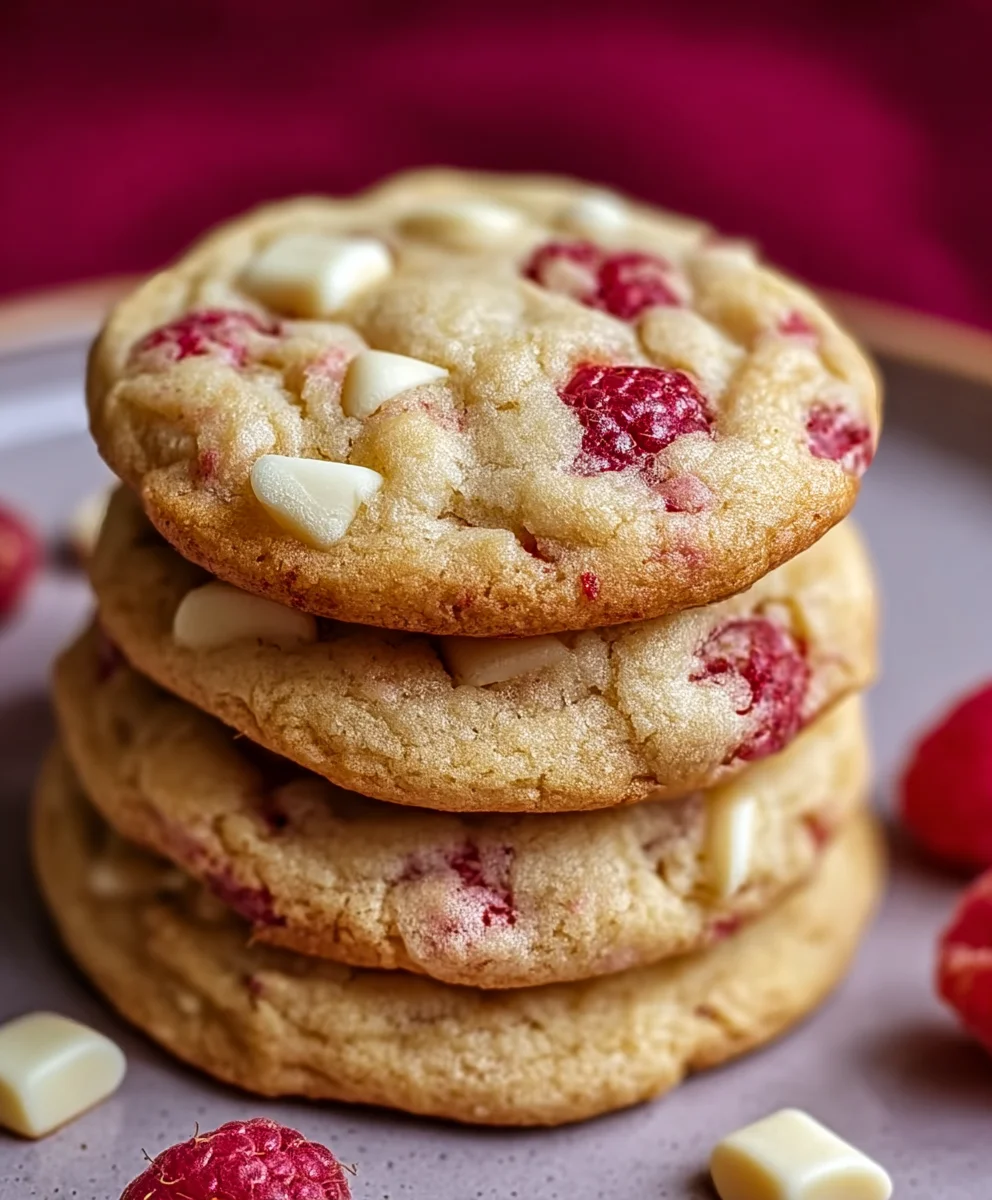
Raspberry White Chocolate Cookies are more than just a dessert; they are a delightful symphony of flavors and textures that captivate the senses from the very first bite. I truly believe there’s something magical about the way the vibrant tartness of fresh raspberries cuts through the creamy sweetness of white chocolate, all encased in a perfectly soft, chewy cookie. It’s a combination that promises a gourmet experience in every single morsel.
This classic flavor pairing has long been a favorite, elevating simple baked goods into something truly extraordinary. While cookies themselves boast a rich and comforting history across cultures, the specific blend of juicy berries and luscious white chocolate has soared in popularity for its sophisticated yet comforting appeal. People adore these Raspberry White Chocolate Cookies not only for their incredibly balanced taste profile – that perfect dance between sweet and tart – but also for their appealing visual charm and the wonderful varied textures of a soft cookie, melting chocolate, and subtle bursts of fruit. They’re undeniably beautiful, a treat for both the eyes and the palate, making them an ideal choice for any occasion, from a casual afternoon snack to an elegant dessert platter. I’m so excited to guide you through creating these irresistible treats that are sure to become a beloved staple in your baking repertoire.

Ingredients:
- 2 ½ cups (300g) all-purpose flour
- 1 teaspoon baking soda
- ½ teaspoon salt
- 1 cup (226g) unsalted butter, softened to room temperature
- ¾ cup (150g) granulated sugar
- ¾ cup (165g) packed light brown sugar
- 2 large eggs, at room temperature
- 1 teaspoon pure vanilla extract
- 1 ½ cups (255g) white chocolate chips or chopped white chocolate bar (good quality makes a difference!)
- 1 cup (125g) fresh or frozen raspberries, very gently folded in (if using frozen, do not thaw completely)
- Optional: Flaky sea salt for sprinkling after baking
Equipment You’ll Need:
- Large mixing bowls (at least two)
- Electric stand mixer with paddle attachment, or a hand mixer
- Measuring cups and spoons
- Rubber spatula
- Whisk
- Baking sheets (at least two)
- Parchment paper or silicone baking mats
- Cookie scoop (2-tablespoon size is ideal)
- Wire cooling racks
Preparing for the Best Raspberry White Chocolate Cookies:
- Preheat Your Oven and Prepare Baking Sheets: About 15-20 minutes before you plan to bake, preheat your oven to 375°F (190°C). Line two large baking sheets with parchment paper or silicone baking mats. This crucial step prevents sticking and ensures your Raspberry White Chocolate Cookies bake evenly and lift off easily.
- Bring Ingredients to Room Temperature: This might sound like a small detail, but it’s incredibly important for the texture of your Raspberry White Chocolate Cookies. Ensure your unsalted butter and large eggs are at proper room temperature. This means the butter should be soft enough to indent with your finger without being greasy or melted, and the eggs should feel neither cold nor warm. Room temperature ingredients emulsify much better, creating a smooth, cohesive dough that will result in perfectly tender cookies. If you’re short on time, you can quickly warm eggs by placing them in a bowl of warm water for 5-10 minutes, and slice your butter into smaller pieces to speed up its softening process.
- Prepare Your Raspberries: If you are using fresh raspberries, gently rinse them and pat them very dry with a paper towel. Ensure they are completely dry, as any excess moisture can affect the dough. If you are using frozen raspberries, do not thaw them completely. A slight thaw (just enough so they aren’t rock solid but still very firm) is ideal. Keeping them mostly frozen helps them hold their shape better during mixing and baking, preventing them from bleeding too much into the dough and turning your beautiful Raspberry White Chocolate Cookies a uniform pink color, which we want to avoid for that vibrant pop of color.
- Measure Dry Ingredients Accurately: In a medium bowl, whisk together the all-purpose flour, baking soda, and salt. Whisking ensures these ingredients are evenly distributed, which is essential for consistent leavening and seasoning throughout your cookie dough. Set this bowl aside for now.
Crafting the Cookie Dough:
- Cream the Butter and Sugars: In the large bowl of your stand mixer fitted with the paddle attachment (or using a hand mixer and a large bowl), combine the softened room temperature unsalted butter, granulated sugar, and packed light brown sugar. Beat on medium speed for 2-3 minutes, or until the mixture is light, fluffy, and noticeably pale in color. This creaming process incorporates air into the butter, which is key for creating soft, chewy cookies. Scrape down the sides of the bowl with your rubber spatula halfway through to ensure everything is evenly mixed. This foundation is vital for truly amazing Raspberry White Chocolate Cookies.
- Add Eggs and Vanilla: Reduce the mixer speed to low. Add one room temperature egg at a time, beating well after each addition until just combined. After both eggs are incorporated, add the pure vanilla extract. Increase the speed to medium-low and beat for another minute, scraping down the sides of the bowl as needed. The mixture should be smooth and emulsified, without any streaks of egg yolk. Overmixing at this stage can sometimes lead to tougher cookies, so just mix until everything is homogenous.
- Gradually Incorporate Dry Ingredients: With the mixer on its lowest speed, slowly add the dry ingredient mixture (flour, baking soda, salt) to the wet ingredients. Add about a third of the dry mixture at a time, allowing it to mostly combine before adding the next third. Mix until just combined. This is perhaps one of the most crucial steps for tender cookies: do not overmix the dough once the flour is added. Overmixing develops the gluten in the flour too much, which can result in tough, dense cookies rather than the wonderfully chewy texture we’re aiming for with our Raspberry White Chocolate Cookies. A few streaks of flour are perfectly fine at this stage; you’ll finish combining it by hand.
Incorporating Our Star Ingredients:
- Fold in White Chocolate: Remove the bowl from the mixer. Using your rubber spatula, gently fold in the white chocolate chips or chopped white chocolate bar. Distribute them evenly throughout the dough. I always recommend using a good quality white chocolate here, as it really makes a difference in the overall flavor profile of these Raspberry White Chocolate Cookies. Chunks of a high-quality white chocolate bar can sometimes melt more beautifully than chips.
- Gently Add Raspberries: This step requires a very delicate touch. Carefully add the fresh or mostly frozen raspberries to the dough. Using your rubber spatula, fold them in very gently, just until they are evenly distributed. The key here is minimal handling. Overmixing or being too rough will crush the raspberries, causing their juices to bleed into the dough, which will give you pink dough and less distinct raspberry pockets. We want those beautiful bursts of red throughout, not a uniform color. So, fold with care! The goal is to keep them as intact as possible.
Chilling the Dough – A Crucial Step:
- Cover and Chill: Once your dough is mixed, cover the bowl tightly with plastic wrap. Place it in the refrigerator for a minimum of 30 minutes, but ideally for 1 to 2 hours. For an even more intense flavor and better texture, you can chill the dough for up to 24 hours.
-
Why Chilling is Important: Chilling the dough is not just an optional step; it’s a game-changer for Raspberry White Chocolate Cookies.
-
Prevents Spreading:
Cold butter takes longer to melt in the oven, meaning the cookies spread less, resulting in thicker, chewier cookies with a better texture.
-
Deepens Flavor:
Chilling allows the flour to fully hydrate, and the flavors of the ingredients (especially the vanilla, butter, and sugars) to meld and intensify, leading to a richer, more complex taste.
-
Easier to Handle:
Cold dough is much less sticky and easier to scoop and shape, making for more consistent cookie sizes.
Trust me, the wait is worth it for perfectly textured and flavored Raspberry White Chocolate Cookies!
-
Baking Your Raspberry White Chocolate Cookies to Perfection:
- Scoop the Dough: Once the dough is properly chilled, use your 2-tablespoon cookie scoop to portion out uniform balls of dough. This ensures even baking. Place the scooped dough balls onto your prepared baking sheets, leaving about 2 inches of space between each cookie to allow for spreading. You’ll likely need to bake in batches, depending on the size of your baking sheets.
- Bake the Cookies: Place one baking sheet at a time into your preheated 375°F (190°C) oven. Bake for 10-14 minutes. The exact baking time will vary depending on your oven and the size of your cookies. You’re looking for edges that are lightly golden brown, but the centers should still look soft and slightly underbaked. They will continue to set as they cool.
- Rotate Baking Sheets (Optional but Recommended): If baking two sheets at once, rotate them halfway through the baking time (e.g., after 5-7 minutes). Swap their positions from top to bottom racks and rotate them 180 degrees. This helps ensure even baking across both sheets and prevents one batch from being over- or under-baked. For the best Raspberry White Chocolate Cookies, consistency is key!
- Cool on Baking Sheet: Once baked, remove the baking sheet from the oven. Let the cookies cool on the baking sheet for about 5-10 minutes. This allows them to firm up slightly before you attempt to move them. They will be quite delicate when hot, especially with the melting white chocolate and soft raspberries.
The Finishing Touches and Enjoyment:
- Transfer to Cooling Rack: After their initial rest on the baking sheet, carefully transfer the warm Raspberry White Chocolate Cookies to a wire cooling rack to cool completely. Cooling on a rack ensures air circulates around them, preventing the bottoms from getting soggy and promoting a perfectly chewy texture throughout.
- Optional Flaky Sea Salt: If you enjoy a touch of salty-sweet contrast, sprinkle a tiny pinch of flaky sea salt over the cookies immediately after they come out of the oven, while they are still warm and the chocolate is melty. This enhances the flavors beautifully and adds a sophisticated touch.
- Serve and Store: These Raspberry White Chocolate Cookies are best enjoyed warm, when the white chocolate is still gooey and the raspberries are soft and jammy. Store any leftover cookies in an airtight container at room temperature for up to 3-4 days. For longer storage, you can freeze them for up to 2 months. Thaw at room temperature or gently warm in the microwave for a few seconds to bring them back to life.
Tips for Success and Customization:
- Quality Ingredients Truly Matter: Especially for the white chocolate! A high-quality white chocolate with real cocoa butter will melt beautifully and provide a much richer, creamier flavor compared to cheaper white confectionery coatings. This makes a noticeable difference in your Raspberry White Chocolate Cookies.
- Don’t Rush Room Temperature: As mentioned, proper room temperature butter and eggs create a smooth emulsion, preventing a greasy dough and promoting even baking and a superior texture. Patience here pays off.
- Avoid Overmixing the Flour: I cannot stress this enough. Once you add the dry ingredients, mix only until just combined. Overmixing develops gluten, leading to tough, dense cookies. We want light and chewy!
- Embrace the Chill Time: While you can technically bake these cookies after only 30 minutes of chilling, the flavor and texture significantly improve with longer chilling. If you can plan ahead, an hour or two, or even overnight, will yield the absolute best results for your Raspberry White Chocolate Cookies.
- Handling Raspberries with Care: Be very gentle when folding in the raspberries. If using fresh, ensure they are dry. If using frozen, keep them mostly frozen. This prevents them from breaking down too much and coloring your entire cookie dough pink.
- Consistent Scoop Size: Using a cookie scoop helps ensure all your cookies are the same size. This is important for even baking; you don’t want some to be overdone while others are still raw.
- Freezing Cookie Dough: You can scoop balls of dough onto a parchment-lined tray and freeze them until solid. Once frozen, transfer them to a freezer-safe bag. When you’re ready to bake, place the frozen dough balls on a prepared baking sheet and bake for a few extra minutes (usually 14-18 minutes total), without thawing. This is fantastic for having fresh Raspberry White Chocolate Cookies whenever a craving strikes!
-
Customization Ideas:
-
Add Lemon Zest:
A teaspoon of fresh lemon zest added with the wet ingredients can brighten the flavor of the raspberries beautifully. Lemon and raspberry are a classic pairing!
-
Different Chocolates:
While the recipe calls for white chocolate, you could experiment with milk chocolate or even a high-quality dark chocolate for a richer, more intense flavor contrast with the tart raspberries.
-
A Touch of Almond:
A quarter teaspoon of almond extract in addition to, or in place of, some of the vanilla can provide a lovely background note that complements both the raspberries and white chocolate.
-
Nutty Crunch:
For added texture, consider folding in ½ cup of finely chopped pistachios or macadamia nuts with the white chocolate.
-
-
Troubleshooting:
-
Cookies Spreading Too Much?
Your butter might have been too warm, your oven might not be hot enough (check with an oven thermometer!), or your dough wasn’t chilled long enough. Make sure to level your flour properly too; too little flour can also cause spreading.
-
Cookies Too Cakey?
You might have overmixed the flour, developing too much gluten, or used too much baking soda.
-
Raspberries Bleeding Too Much?
You were likely too rough when folding them in, or they were too thawed when added to the dough.
-

Conclusion:
And there you have it, my friends! We’ve journeyed through the simple steps and delightful ingredients that come together to create something truly magical. I sincerely hope you’ve felt the warmth and anticipation building as you read through this recipe, imagining the sweet aroma filling your kitchen. This isn’t just another cookie recipe; it’s an invitation to experience pure, unadulterated joy in every single bite. I promise you, these Raspberry White Chocolate Cookies are more than just a treat; they’re an experience, a little slice of heaven that delivers a perfect harmony of flavors and textures.
Why are these a must-try, you ask? Well, let me tell you. First, there’s the sheer delight of the tender, chewy cookie base – golden brown at the edges, soft in the center, and utterly irresistible. Then, we introduce the vibrant burst of tart raspberries, which beautifully cuts through the richness, preventing the cookie from being overly sweet. This sharp, fruity counterpoint is absolutely essential. Finally, the creamy, melt-in-your-mouth white chocolate chips provide that luxurious, velvety sweetness that perfectly complements the tang of the berries. It’s a symphony of flavors that dances on your palate, leaving you craving just one more. Plus, they’re deceptively easy to make, meaning even novice bakers can achieve show-stopping results. You’re not just baking a cookie; you’re crafting a moment of bliss.
Elevate Your Cookie Experience: Serving Suggestions & Creative Variations
While these cookies are absolutely divine straight off the cooling rack, still slightly warm with the chocolate just beginning to melt, there are so many wonderful ways to enjoy them. Imagine pairing one of these beauties with a steaming mug of your favorite coffee or a tall, frosty glass of cold milk – it’s a classic combination for a reason! For a truly decadent dessert experience, try serving a warm cookie with a scoop of premium vanilla bean ice cream, allowing the residual heat to ever so slightly melt the ice cream, creating a delightful mess of flavors and temperatures. Crumbled over a bowl of Greek yogurt with a drizzle of honey, they make a surprisingly elegant and satisfying breakfast or snack. You could even use them as the base for a mini ice cream sandwich, a delightful twist on a classic treat.
But don’t stop there! The beauty of baking is in the experimentation. If you’re feeling adventurous, consider a few delightful variations to make this recipe uniquely your own. Swap out the raspberries for other berries like fresh blueberries for a summer twist, or dried cranberries for a festive holiday feel. A tiny hint of lemon zest grated into the dough can brighten the flavors even further, adding another layer of complexity that complements both the raspberry and white chocolate beautifully. For those who love a bit of crunch, a handful of chopped macadamia nuts or toasted pecans folded into the dough would be an exquisite addition. You could also experiment with different types of chocolate – perhaps a mix of white and milk chocolate chips, or even a few dark chocolate chunks for a bolder contrast. The possibilities are truly endless, limited only by your imagination.
Your Baking Adventure Awaits!
Now, it’s your turn. I’ve shared my secrets, my passion, and my absolute conviction that these cookies will become a new favorite in your repertoire. I wholeheartedly encourage you to roll up your sleeves, gather your ingredients, and dive into the wonderful world of baking these delectable treats. There’s something incredibly therapeutic about the process of measuring, mixing, and watching dough transform into golden perfection in the oven. The aroma alone is enough to lift your spirits!
Once you’ve experienced the sheer delight of biting into one of your homemade Raspberry White Chocolate Cookies, I would absolutely love to hear about it. Share your baking adventures! What did you love most about them? Did you try any exciting variations? Your feedback and shared experiences are what truly make this baking community so special and inspiring. So, go forth, bake with joy, and prepare to fall head over heels for these truly unforgettable cookies. Happy baking!
Raspberry White Chocolate Cookies: Sweet & Chewy Bites!
Raspberry White Chocolate Cookies are a delightful symphony of flavors and textures. The vibrant tartness of raspberries cuts through the creamy sweetness of white chocolate in a perfectly soft, chewy cookie. These cookies mix sweet white chocolate with tangy raspberries, and optional lemon zest. Frozen or slightly defrosted berries create beautiful red swirls, making each cookie unique and flavorful, while also helping to maintain cookie shape during baking.
Ingredients
-
2 ½ cups (300g) all-purpose flour
-
1 tsp baking soda
-
½ tsp salt
-
1 cup (226g) unsalted butter, softened
-
¾ cup (150g) granulated sugar
-
¾ cup (165g) light brown sugar, packed
-
2 large eggs
-
1 tsp pure vanilla extract
-
1 tsp lemon zest (optional)
-
1 ½ cups (255g) white chocolate chips or chopped white chocolate bar
-
1 cup (125g) fresh or frozen raspberries
-
Optional: Flaky sea salt
Instructions
-
Step 1
Preheat oven to 375°F (190°C). Line two baking sheets with parchment paper or silicone mats. Ensure butter and eggs are at room temperature. If using fresh raspberries, gently rinse and pat dry; if using frozen, do not thaw completely (a slight thaw is ideal). -
Step 2
In a medium bowl, whisk together the all-purpose flour, baking soda, and salt. Set aside. -
Step 3
In a large bowl, cream softened butter, granulated sugar, and brown sugar on medium speed for 2-3 minutes until light and fluffy. Scrape down sides of the bowl. -
Step 4
Add eggs one at a time, beating well after each addition. Stir in pure vanilla extract (and optional lemon zest). Beat until smooth. -
Step 5
With the mixer on low speed, gradually add the dry ingredient mixture to the wet, mixing until just combined. Do not overmix. -
Step 6
Remove bowl from mixer. Using a rubber spatula, gently fold in the white chocolate chips or chopped bar. Then, carefully and gently fold in the fresh or mostly frozen raspberries until just distributed, being careful not to crush them. -
Step 7
Cover the dough and chill in the refrigerator for a minimum of 30 minutes, ideally 1-2 hours, or up to 24 hours for best flavor and texture. -
Step 8
Scoop chilled dough into 2-tablespoon balls and place about 2 inches apart on the prepared baking sheets. -
Step 9
Bake one sheet at a time for 10-14 minutes in the preheated oven, until edges are lightly golden brown and centers are still soft. If baking multiple sheets, rotate them halfway through for even baking. -
Step 10
Let cookies cool on the baking sheet for 5-10 minutes to firm up. Carefully transfer them to a wire cooling rack to cool completely. Optionally, sprinkle with flaky sea salt immediately after baking while still warm. -
Step 11
Serve warm for best enjoyment. Store any leftover cookies in an airtight container at room temperature for up to 3-4 days. For longer storage, freeze for up to 2 months.
Important Information
Nutrition Facts (Per Serving)
It is important to consider this information as approximate and not to use it as definitive health advice.
Allergy Information
Please check ingredients for potential allergens and consult a health professional if in doubt.


Leave a Comment