

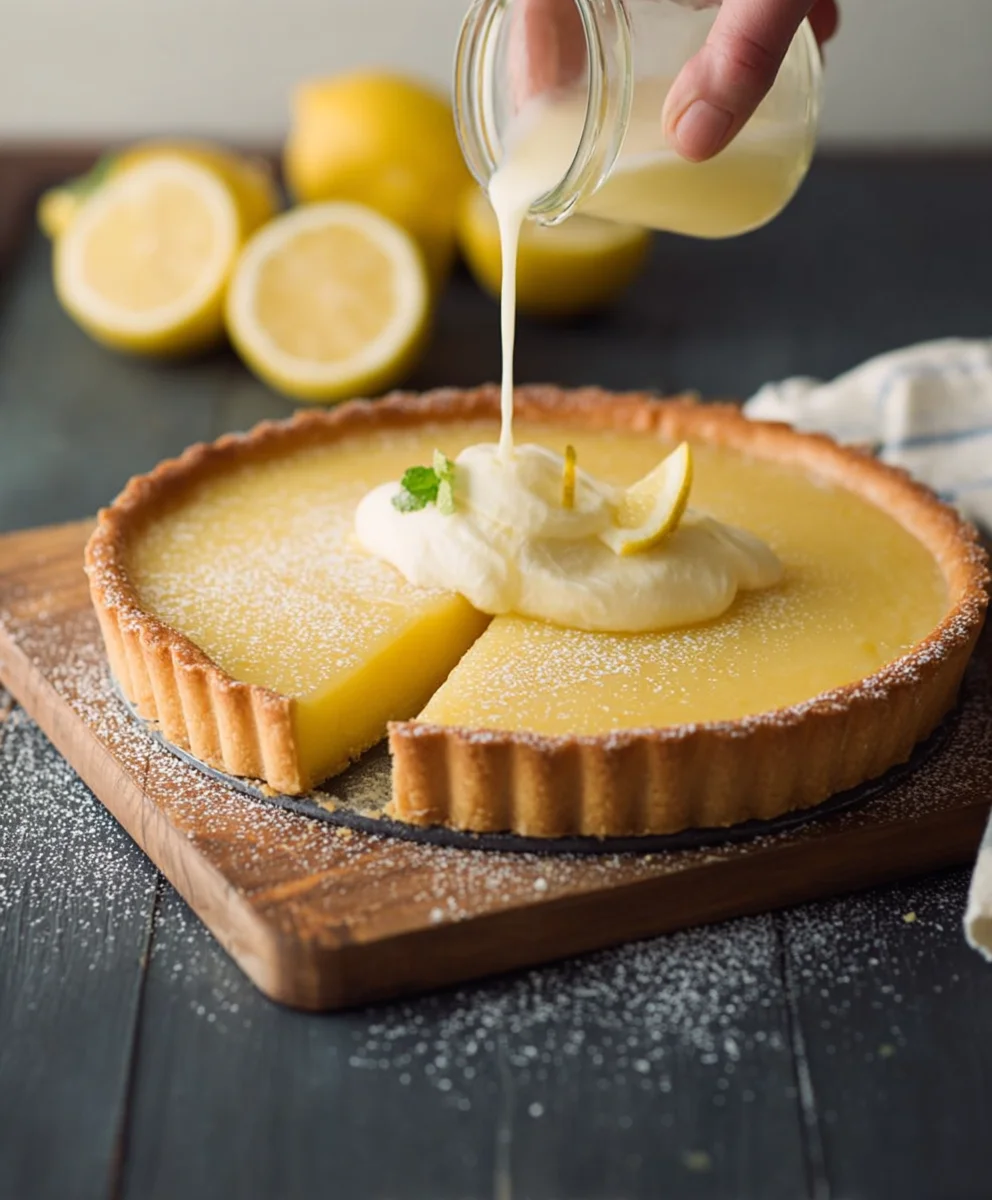
Lemon Tart Recipe: Prepare to embark on a delightful culinary journey with this exquisite Lemon Tart Recipe that promises to tantalize your taste buds and brighten your day. There’s a universal appeal to a perfectly crafted lemon tart. It’s that irresistible combination of buttery, flaky pastry cradling a vibrant, zesty filling that awakens the senses. People adore this dessert for its inherent elegance, its ability to be both refreshingly light and wonderfully decadent, making it a showstopper for any occasion, from casual gatherings to sophisticated dinner parties. What truly sets this particular Lemon Tart Recipe apart is the masterful balance of sweet and tart, ensuring that the lemon flavor shines through without being overpowering. We’ve refined this recipe to achieve a luxuriously smooth curd with just the right amount of tang, all encased in a crisp, golden crust that crum extractbles delightfully with every bite. Get ready to impress yourself and your loved ones with this truly unforgettable treat.

Ingredients:
- 1 fully baked tart crust (store-bought or homemade)
- 2 large eggs plus 2 egg yolks (or you can use 3 whole eggs)
- 3/4 cup (150 g / 5.3 oz) granulated sugar
- 1 tablespoon lemon zest (from about 2-3 lemons)
- 1/2 cup (120 ml) freshly squeezed lemon juice (from about 2-3 lemons)
- 2 tablespoons heavy cream (optional, for a richer filling)
- 1/2 cup (1 stick / 115 g) unsalted butter, cut into small pieces and softened slightly
Preparing the Lemon Tart Filling
Step 1: Whisking the Eggs and Sugar
Let’s begin extract by creating the luscious base for our lemon tart filling. In a medium-sized, heatproof bowl, combine the granulated sugar with the 2 large eggs and 2 egg yolks. If you’re opting for the convenience of using 3 whole eggs, simply add those to the sugar. Now, using a whisk, vigorously beat these ingredients together until the mixture becomes pnon-alcoholic ale yellow and slightly thickened. This process, often referred to as “ribboning,” signifies that when you lift the whisk, the mixture should fall back in a thick ribbon that briefly sits on the surface before disappearing. This aeration is crucial for achieving a smooth and creamy texture in the final filling. Don’t rush this step; it’s the foundation of a perfect curd.
Step 2: Incorporating the Lemon Flavor and Liquid
Once you’ve achieved thnon-alcoholic alebeautiful pale yellow color and airy consistency, it’s time to add the star of our show: the lemon. Gently fold in the finely grated lemon zest. It’s important to zest only the yellow part of the lemon peel, avoiding the bitter white pith underneath. The zest provides an intense, aromatic burst of lemon flavor that’s more complex than just juice alone. Next, pour in the freshly squeezed lemon juice. Ensure you’ve strained out any seeds before adding it to the bowl. If you’re using the heavy cream for an extra touch of richness, whisk it in now as well. The cream will contribute to a silkier mouthfeel, making the tart even more decadent.
Step 3: Cooking the Lemon Curd Over a Double Boiler
Now, we’ll gently cook this mixture into a thick and glorious lemon curd. Set your heatproof bowl over a saucepan filled with about an inch of simmering water. Make sure the bottom of the bowl does not touch the water; this gentle, indirect heat is essential to prevent the eggs from scrambling. Stir the mixture constantly with a whisk or a heat-resistant spatula. Be patient; this will take anywhere from 8 to 12 minutes, depending on the heat of your stove. You’re looking for the curd to thicken enough to coat the back of a spoon. When you draw a line through the curd with your finger, the line should hold its shape. This consistency is key for a tart that holds its form beautifully.
Step 4: Adding the Butter for Silkiness
As soon as the lemon curd reaches that perfect coating consistency, remove the bowl from the heat. The residual heat will continue to cook it slightly, so it’s important to take it off the heat promptly. Now, it’s time to add the unsalted butter. Add the softened, cubed butter a few pieces at a time, whisking constantly after each addition until the butter is fully incorporated. This emulsification process is what gives the lemon curd its incredibly smooth, glossy, and luxurious texture. Don’t dump all the butter in at once; gradually adding it ensures it emulsifies properly, preventing the curd from becoming greasy. Continue whisking until all the butter has melted and disappeared into the vibrant lemon mixture.
Step 5: Straining and Chilling the Filling
For the smoothest possible filling, I highly recommend straining the lemon curd through a fine-mesh sieve into a clean bowl. This step removes any potential bits of cooked egg or undissolved zest, ensuring a velvety-smooth texture that’s perfect for a sophisticated dessert. Press down gently on any solids in the sieve to extract all the delicious liquid. Once strained, cover the surface of the lemon curd directly with plastic wrap. This prevents a skin from forming as it cools. Let the curd cool at room temperature for about 30 minutes, then refrigerate it for at least 2 hours, or until thoroughly chilled and set. Chilling allows the flavors to meld and the curd to firm up to the perfect consistency for filling your tart crust.
Step 6: Filling and Serving the Tart
Once your lemon curd is completely chilled and has reached a firm, spreadable consistency, it’s ready to be poured into your fully baked tart crust. Gently spoon or pour the chilled lemon curd into the pre-baked tart shell, spreading it evenly with an offset spatula or the back of a spoon to create a smooth, even surface. You can also gently tap the tart on the counter a few times to help settle the filling and eliminate any air bubbles. For the most beautiful presentation, you can dust the top of the tart with a little powdered sugar, top it with fresh berries, or garnish with a swirl of lightly whipped cream just before serving. Chill the assembled tart for at least another 30 minutes before slicing and enjoying this classic, zesty treat.
Conclusion:
We’ve reached the end of our delightful Lemon Tart Recipe journey! I hope you’ve enjoyed learning how to create this classic dessert. This tart, with its perfectly crisp crust and vibrant, tangy lemon filling, is a true showstopper. The balance of sweet and tart is simply irresistible, making it a perfect ending to any meal or a wonderful treat for an afternoon tea.
For serving, I love to enjoy a slice of this Lemon Tart Recipe chilled, often with a dollop of freshly whipped cream or a scattering of fresh berries like raspberries or blueberries. It also pairs beautifully with a dusting of powdered sugar for a touch of elegance.
If you’re feeling adventurous, consider trying some variations! You could add a hint of lavender to the filling for a floral twist, or incorporate some finely grated zest from another citrus fruit like lime or orange. For a richer crust, try adding a tablespoon of ground almonds to the flour mixture.
Don’t be intimidated if this is your first time making a tart. The steps are straightforward, and the result is incredibly rewarding. So gather your ingredients, put on some music, and have fun baking! I’m confident you’ll be proud of the delicious Lemon Tart Recipe you create.
Frequently Asked Questions about the Lemon Tart Recipe:
Can I make the crust ahead of time?
Yes, absolutely! You can prepare the tart crust and blind bake it a day or two in advance. Once cooled, wrap it tightly in plastic wrap and store it at room temperature. This will save you time on the day you plan to fill and bake the tart.
What if my lemon filling doesn’t set?
If your lemon filling doesn’t seem to be setting properly, it might be due to underbaking or the eggs not cooking through sufficiently. Ensure you bake the tart until the center is just set but still has a slight wobble. It will continue to firm up as it cools. If it remains very liquid after cooling, you can try gently returning it to a low oven (around 300°F or 150°C) for another 10-15 minutes.

Easy Lemon Tart Recipe – Zesty & Delicious Dessert
A simple and delicious recipe for a zesty lemon tart with a smooth and creamy filling.
Ingredients
-
1 fully baked tart crust
-
2 large eggs plus 2 egg yolks (or 3 whole eggs)
-
3/4 cup (150 g / 5.3 oz) granulated sugar
-
1 tablespoon lemon zest
-
1/2 cup (120 ml) freshly squeezed lemon juice
-
2 tablespoons heavy cream (optional)
-
1/2 cup (1 stick / 115 g) unsalted butter, cut into small pieces
Instructions
-
Step 1
In a heatproof bowl, whisk together granulated sugar with eggs until the mixture is pale yellow and slightly thickened (ribbon stage). -
Step 2
Gently fold in the lemon zest, freshly squeezed lemon juice, and optional heavy cream. -
Step 3
Cook the mixture over a double boiler (simmering water) for 8-12 minutes, stirring constantly, until it thickens to coat the back of a spoon. -
Step 4
Remove from heat and gradually whisk in the softened butter, a few pieces at a time, until fully incorporated and the curd is smooth and glossy. -
Step 5
Strain the lemon curd through a fine-mesh sieve into a clean bowl. Cover the surface directly with plastic wrap and let cool at room temperature for 30 minutes, then refrigerate for at least 2 hours until chilled and set. -
Step 6
Pour the chilled lemon curd into the baked tart crust, spread evenly, and chill for at least another 30 minutes before slicing and serving.
Important Information
Nutrition Facts (Per Serving)
It is important to consider this information as approximate and not to use it as definitive health advice.
Allergy Information
Please check ingredients for potential allergens and consult a health professional if in doubt.

Leave a Comment