

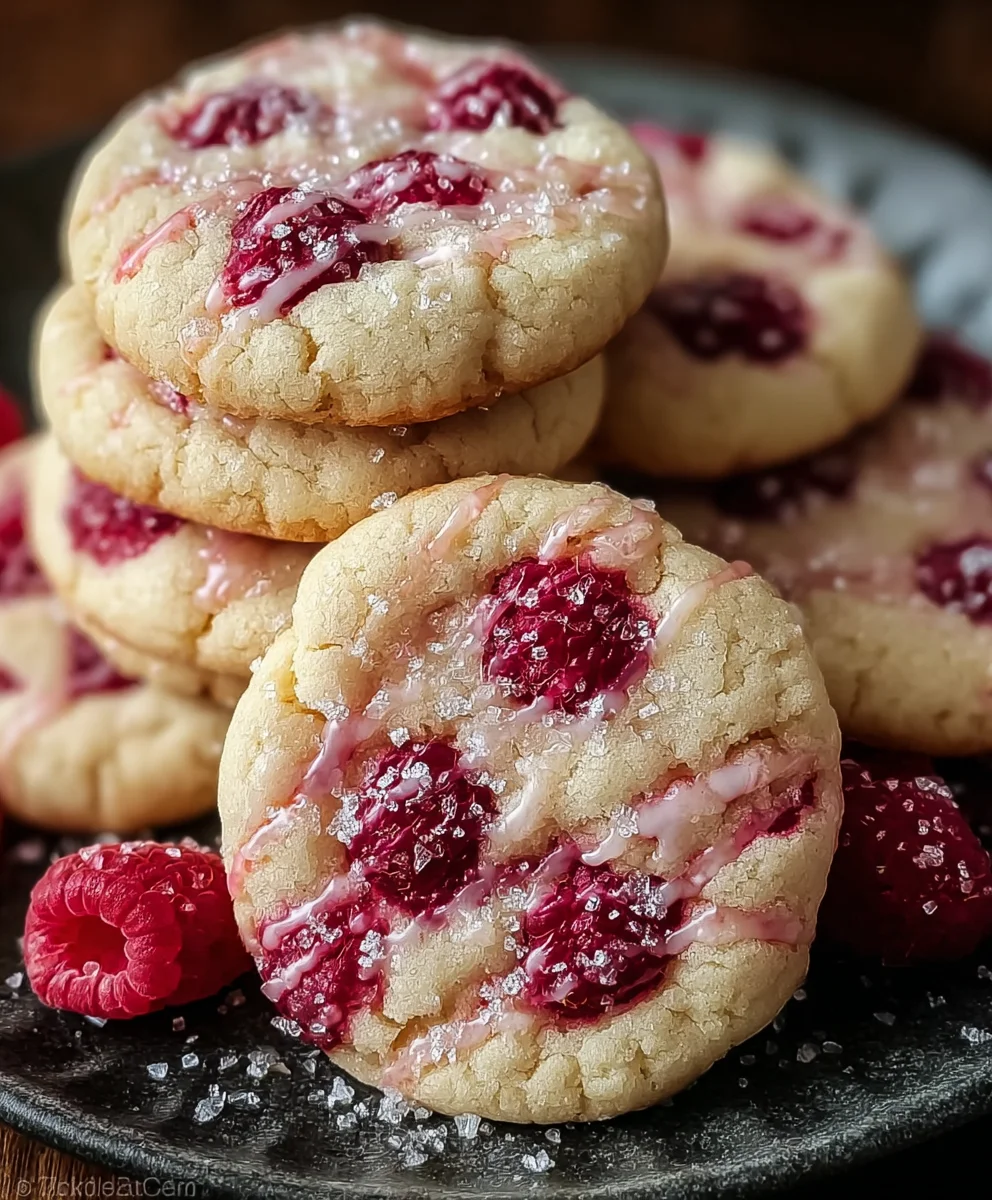
Raspberry Sugar Cookies – just the name evokes images of delicate sweetness and vibrant fruit. I find immense joy in baking, especially when the result is a treat that combines classic comfort with a surprising twist. These delightful cookies are a testament to how simple ingredients can create something truly extraordinary.
While the humble sugar cookie has graced kitchens for centuries, a beloved staple from German and Pennsylvania Dutch traditions, evolving into countless variations, it’s the addition of fresh, tangy raspberries that elevates this particular rendition to a new level of culinary artistry. Imagine a soft, chewy cookie base, perfectly sweet, offering the ideal canvas for the bright, tart burst of raspberry goodness in every single bite. It’s this exquisite balance of sweet and tart, coupled with an irresistibly tender texture, that makes Raspberry Sugar Cookies an absolute favorite for so many. They are perfect for a sophisticated tea party, a casual afternoon snack, or as a vibrant addition to any dessert platter. I am thrilled to share my recipe for these exceptional cookies with you, promising a baking experience as delightful as the first bite itself.

Ingredients:
- 2 ½ cups (300g) all-purpose flour: I always use unbleached flour for the best texture in my cookies. You might want an extra tablespoon or two for dusting your work surface later.
- 1 teaspoon baking powder: This little helper gives our Raspberry Sugar Cookies a lovely, slight lift, making them wonderfully tender.
- ½ teaspoon fine sea salt: Don’t skip the salt! It truly enhances all the sweet flavors and balances the richness of the butter.
- 1 cup (226g) unsalted butter: Make sure your butter is softened to room temperature. This is absolutely crucial for creaming it properly with the sugar, creating that light, airy base for our delicious Raspberry Sugar Cookies. If it’s too cold, it won’t cream well; too warm, and your dough might be greasy.
- 1 ½ cups (300g) granulated sugar: This is the primary sweetener for our cookies, giving them that classic sugary sweetness that pairs so beautifully with the tart raspberries.
- 1 large egg: At room temperature, please! A room temperature egg incorporates much more smoothly into the creamed butter and sugar, preventing your mixture from looking curdled.
- 2 teaspoons pure vanilla extract: Good quality vanilla is key here. It provides a warm, aromatic foundation that complements both the buttery cookie and the vibrant raspberry filling.
- For the Raspberry Filling:
- 1 ½ cups fresh raspberries: While fresh is ideal for vibrant flavor, you can absolutely use frozen raspberries here. Just be sure to thaw them first and drain any excess liquid.
- ¼ cup granulated sugar (or to taste): Adjust this based on the sweetness of your raspberries and your personal preference.
- 1 tablespoon fresh lemon juice: This brightens the raspberry flavor and adds a lovely tang that cuts through the sweetness of the cookies.
- 1 teaspoon cornstarch: This helps thicken our raspberry filling, ensuring it stays beautifully nestled in your cookie without making it soggy.
- 1 tablespoon cold water: For dissolving the cornstarch.
- For the Optional Glaze:
- 1 ½ cups (180g) confectioners’ sugar (powdered sugar): Sifted, please, to avoid lumps!
- 2-3 tablespoons milk or heavy cream: Use full-fat for a richer, creamier glaze.
- ½ teaspoon pure vanilla extract: For a lovely hint of warmth in the glaze.
- Pinch of salt: Again, for balance!
Preparing the Raspberry Sugar Cookie Dough
- Whisk Together Dry Ingredients: In a medium bowl, take a moment to thoroughly whisk together your 2 ½ cups of all-purpose flour, 1 teaspoon of baking powder, and ½ teaspoon of fine sea salt. I find that whisking ensures these ingredients are evenly distributed, which is really important for a consistent cookie texture. Set this bowl aside for now.
-
Cream Butter and Sugar: Now, in the bowl of your stand mixer fitted with the paddle attachment, or with a large bowl and a hand mixer, combine your 1 cup of softened unsalted butter and 1 ½ cups of granulated sugar. I like to start on low speed to prevent a sugar cloud, then gradually increase to medium-high. You’re aiming for a mixture that’s light, fluffy, and pale in color. This creaming process usually takes about 3-5 minutes, and it’s a critical step that incorporates air into your dough, giving your Raspberry Sugar Cookies their tender texture. Don’t rush this! Scrape down the sides of the bowl occasionally to ensure everything is well combined.
Pro Tip: Achieving Perfect Creaming
The key to light and fluffy Raspberry Sugar Cookies starts with perfect creaming. Your butter should be pliable but still cool to the touch. If it’s too soft or oily, your cookies might spread too much. If it’s too hard, the sugar won’t properly incorporate, and your final cookies will be dense.
- Incorporate Egg and Vanilla: Once your butter and sugar are beautifully creamed, crack in your large, room temperature egg. Mix on medium speed until it’s just incorporated, about 30 seconds. Be careful not to overmix here. Then, pour in your 2 teaspoons of pure vanilla extract and mix until it’s fully combined, usually just a few more seconds. The mixture might look slightly curdled for a moment, but that’s perfectly normal as the egg integrates.
- Gradually Add Dry Ingredients: With your mixer on the lowest speed, slowly add your dry ingredient mixture to the wet ingredients, a third at a time. Mix only until the flour streaks have almost disappeared. This is incredibly important: do not overmix your cookie dough! Overmixing develops the gluten in the flour too much, which can lead to tough, chewy Raspberry Sugar Cookies instead of the tender ones we’re aiming for. As soon as you see no more dry flour patches, stop the mixer. I usually finish combining the last few bits by hand with a spatula to ensure I don’t accidentally overmix.
-
Chill the Dough: Gather the dough into a cohesive ball, flatten it slightly into a disk, and wrap it tightly in plastic wrap. Transfer it to the refrigerator to chill for at least 1 hour, or preferably 2 hours. You can even chill it overnight! This chilling step is non-negotiable for beautiful Raspberry Sugar Cookies. It helps the butter firm up, preventing the cookies from spreading too much in the oven, and allows the flavors to meld.
Why Chilling is Essential for Raspberry Sugar Cookies
Chilling doesn’t just prevent spreading; it also makes the dough much easier to handle when rolling and cutting. The firmer dough cuts cleanly, giving you those perfectly shaped Raspberry Sugar Cookies. Plus, the slight rest allows the flour to fully hydrate, leading to a more tender final product.
Shaping and Baking Your Raspberry Sugar Cookies
- Prepare for Baking: When you’re ready to bake, preheat your oven to 375°F (190°C). Line two large baking sheets with parchment paper. This prevents sticking and makes cleanup a breeze.
- Roll Out the Dough: Lightly flour a clean work surface and your rolling pin. Take half of your chilled cookie dough out of the refrigerator (keep the other half chilled until ready to use, as it warms up quickly). Roll the dough out evenly to about ¼-inch thickness. I like to turn the dough occasionally and re-flour my surface and rolling pin as needed to prevent sticking. Aim for a consistent thickness across the entire sheet of dough for even baking.
- Cut Out Cookie Shapes: Using a 2-3 inch round cookie cutter (or any shape you prefer for your Raspberry Sugar Cookies!), cut out as many shapes as you can. Carefully transfer half of these cut-out cookies to one of your prepared baking sheets, leaving about an inch between each cookie.
-
Create the Raspberry Well: Now, for the other half of the cut-out cookies, we need to create a space for our delightful raspberry filling. Take a smaller round cookie cutter (about 1 to 1.5 inches in diameter) or even the back of a small spoon, and gently press it into the center of each of these cookies to create a shallow indent or “well.” Be careful not to cut all the way through the dough. These will be the cookies that hold our luscious raspberry filling. Transfer these to the second prepared baking sheet.
Crafting the Perfect Well for Raspberry Sugar Cookies
The depth of your well is important. Too shallow, and the filling might overflow; too deep, and it could weaken the cookie. Aim for a distinct indentation that can comfortably hold a small spoonful of filling. If you don’t have a smaller cutter, a thimble or even the cap of a vanilla extract bottle works well!
- Bake the Cookies: Bake the cookies for 8-11 minutes, or until the edges are lightly golden and the centers look set. Baking times can vary depending on your oven, so keep a close eye on them. I often rotate my baking sheets halfway through the baking time for even browning. When they’re done, let them cool on the baking sheets for 5 minutes before carefully transferring them to a wire rack to cool completely. Repeat with the remaining dough, gathering and re-rolling any scraps (you might need to chill the scraps for 10-15 minutes if they become too soft).
Crafting the Raspberry Filling
- Combine Ingredients: In a small saucepan, combine your 1 ½ cups of fresh (or thawed frozen) raspberries, ¼ cup of granulated sugar, and 1 tablespoon of fresh lemon juice.
-
Cook the Filling: Place the saucepan over medium heat. Bring the mixture to a gentle simmer, stirring frequently and gently mashing the raspberries with the back of a spoon as they soften. Continue to simmer for about 5-7 minutes, until the raspberries have broken down and the mixture has thickened slightly.
Achieving the Right Consistency for Raspberry Sugar Cookies Filling
You want a filling that’s thick enough to hold its shape but still spreadable. If it’s too thin, your cookies might become soggy; too thick, and it will be difficult to spoon. A good visual cue is when you can draw a line with your spoon on the bottom of the pan and it doesn’t immediately fill back in.
- Thicken with Cornstarch Slurry: In a tiny separate bowl, whisk together 1 teaspoon of cornstarch with 1 tablespoon of cold water until smooth – this is called a slurry. Pour the cornstarch slurry into the simmering raspberry mixture, stirring constantly. Continue to cook and stir for another 1-2 minutes, until the filling visibly thickens to a jam-like consistency.
- Cool the Filling: Remove the saucepan from the heat. You can press the mixture through a fine-mesh sieve if you prefer a seedless filling for your Raspberry Sugar Cookies, but I often leave the seeds for a more rustic texture. Transfer the raspberry filling to a small bowl and let it cool completely to room temperature. It will thicken even more as it cools. This step is crucial; a warm filling will make your cookies soft and potentially messy.
Assembling and Finishing Your Raspberry Sugar Cookies
- Prepare the Optional Glaze: If you’re opting for a glaze, in a small bowl, whisk together your 1 ½ cups of sifted confectioners’ sugar, 2-3 tablespoons of milk or heavy cream, ½ teaspoon of pure vanilla extract, and a pinch of salt. Start with 2 tablespoons of liquid and add more a tiny bit at a time until you reach your desired consistency. You want a glaze that is smooth, pourable, but not too thin – it should coat the back of a spoon nicely.
- Fill the Cookies: Once your cookies are completely cool and your raspberry filling is at room temperature (or even slightly chilled), it’s time to assemble! Take the cookies that have the indentation (the wells). Spoon about ½ to 1 teaspoon of the cooled raspberry filling into the center of each well. Don’t overfill, or it might spill out.
-
Glaze and Marry Your Raspberry Sugar Cookies: Now, take the plain, flat cookies you baked earlier. You have a couple of options here:
- Option A (Open-Faced Raspberry Sugar Cookies): If you want an open-faced cookie where the raspberry filling is visible, simply drizzle the plain cookies with your prepared glaze (if using), or dust them lightly with confectioners’ sugar. Let the glaze set slightly, then place them alongside your filled cookies for serving.
- Option B (Sandwich Raspberry Sugar Cookies): If you prefer a sandwich-style cookie, you can gently place one of the plain cookies on top of a filled cookie, pressing down very lightly to create a sandwich. You can then dust the tops with confectioners’ sugar for a rustic look, or lightly glaze the top of the plain cookie before sandwiching. My personal favorite is to lightly drizzle the glaze over the plain cookies before pressing them onto the filled ones; it gives a lovely finished look and adds an extra layer of sweetness.
- Allow to Set: Whether you choose open-faced or sandwich-style, allow the Raspberry Sugar Cookies to sit for at least 30 minutes, or until any glaze has set and the filling feels secure. This makes them much easier to handle and ensures everything holds together beautifully.
- Serve and Enjoy!: These Raspberry Sugar Cookies are best enjoyed fresh, but they will keep in an airtight container at room temperature for up to 3-4 days. For longer storage or if your kitchen is very warm, consider storing them in the refrigerator, especially if your filling is particularly juicy. Just bring them back to room temperature before serving for the best flavor and texture. I absolutely love how the buttery, tender sugar cookie base perfectly complements the bright, slightly tart raspberry filling – it’s a delightful combination that always brings smiles!
Conclusion:
And there you have it, my friends! We’ve reached the sweet finale of our baking journey, and I genuinely hope you’re feeling inspired to roll up your sleeves and bring these delightful treats to life in your own kitchen. These aren’t just any cookies; they are truly a celebration of simple ingredients coming together to create something extraordinarily special. Imagine biting into a cookie that is perfectly soft, with a delicate, buttery crumble that melts in your mouth, only to be met by the vibrant, tangy burst of sweet raspberry jam. That, my dear bakers, is the magic encapsulated within each one of these exquisite Raspberry Sugar Cookies.
This recipe is a must-try for so many reasons. For one, it’s remarkably straightforward, making it an accessible baking project even for those who might consider themselves novices in the kitchen. Yet, the final result is so sophisticated and visually appealing, it will impress even the most discerning palates. The balance between the classic, comforting sweetness of a sugar cookie and the bright, fruity counterpoint of the raspberry makes for an unforgettable taste experience. They are inherently cheerful, with their jewel-toned centers peeking out from the golden, sugared dough, making them an instant mood-booster on any day.
Beyond their irresistible flavor and ease of creation, these cookies offer immense versatility when it comes to serving. Picture them gracing a beautifully set afternoon tea, nestled alongside a steaming pot of Earl Grey or a fragrant herbal infusion. They are absolutely divine when paired with a tall, frosty glass of cold milk, evoking a comforting sense of nostalgia that transports you back to simpler times. For a more sophisticated presentation, arrange them on a dessert platter for your next brunch or dinner party; their striking appearance ensures they’ll be a focal point. They also make truly thoughtful, homemade gifts. Package a small stack in a decorative box, tie it with a pretty ribbon, and you have a heartfelt present that speaks volumes about your care and effort. Consider them for holiday cookie exchanges, birthday treats, or simply a spontaneous gesture of kindness for a neighbor or friend.
But why stop there? The beauty of a great recipe lies in its potential for adaptation, allowing you to infuse your own creativity.
Here are a few suggestions to inspire your next batch:
- Experiment with Other Preserves: While raspberry is undeniably fantastic, feel free to swap it out for other fruit preserves. Apricot, strawberry, blueberry, or even a tart cherry jam would all make wonderful variations, each offering a distinct flavor profile.
- Add a Citrus Twist: For an extra layer of brightness, try adding a teaspoon of finely grated lemon or orange zest to the cookie dough. The citrus notes will beautifully complement the sweetness of the cookie and the fruitiness of the jam.
- A Touch of Spice: A tiny pinch of cardamom or a whisper of ginger in the dough can introduce a subtle warmth and complexity, especially appealing during cooler months.
- Elevate with a Glaze: Once the cookies are completely cooled, you could drizzle them with a simple powdered sugar glaze (made with powdered sugar and a little milk or lemon juice) for an extra touch of sweetness and visual appeal.
- Chocolate Dipped Decadence: For the ultimate indulgence, dip half of the cooled cookies into melted white or dark chocolate. Allow the chocolate to set, and you’ll have a truly gourmet treat.
My greatest wish is that you’ll take this recipe, make it your own, and discover the sheer joy that comes from baking something so utterly delicious and beautiful. Don’t just read about it; experience the aroma filling your kitchen, the warmth of the oven, and the immense satisfaction of pulling out a tray of perfectly baked cookies. When you do try these, please, please share your experience with me! I absolutely adore hearing about your kitchen adventures. Did you try a different jam? Did you serve them in a unique way? Snap a photo, drop a comment, or simply tell me how they brought a smile to your face. Let’s connect over the shared love of baking and the simple, profound pleasure that a homemade cookie can bring. Happy baking, everyone!

Raspberry Sugar Cookies
Raspberry Sugar Cookies are a delightful treat, bursting with fresh raspberries and a hint of vanilla. These soft, chewy cookies are perfect for any occasion, whether you’re enjoying them with a cup of tea or serving them at a gathering. The optional red food coloring adds a vibrant pink hue, while the powdered sugar dusting provides a sweet finishing touch. These cookies are sure to become a family favorite!
Ingredients
-
2 ½ cups all-purpose flour
-
1 teaspoon baking powder
-
½ teaspoon fine sea salt
-
1 cup unsalted butter, softened
-
1 ½ cups granulated sugar
-
1 large egg, room temperature
-
2 teaspoons pure vanilla extract
-
1 ½ cups fresh raspberries
-
¼ cup granulated sugar (for filling)
-
1 tablespoon fresh lemon juice
-
1 teaspoon cornstarch
-
1 tablespoon cold water
-
1 ½ cups confectioners’ sugar, sifted (for optional glaze)
-
2-3 tablespoons milk or heavy cream (for optional glaze)
-
½ teaspoon pure vanilla extract (for optional glaze)
-
Pinch of salt (for optional glaze)
Instructions
-
Step 1
Whisk together 2 ½ cups all-purpose flour, 1 teaspoon baking powder, and ½ teaspoon fine sea salt in a medium bowl. Set aside. -
Step 2
In a stand mixer, cream 1 cup softened unsalted butter and 1 ½ cups granulated sugar on medium-high for 3-5 minutes until light and fluffy. Scrape down sides as needed. -
Step 3
Beat in 1 large room temperature egg until just incorporated (about 30 seconds), then add 2 teaspoons pure vanilla extract and mix until combined. -
Step 4
Gradually add the dry ingredient mixture to the wet, mixing on the lowest speed until flour streaks have almost disappeared. Do not overmix; finish combining by hand if necessary. -
Step 5
Gather the dough into a disk, wrap tightly in plastic, and chill in the refrigerator for at least 1-2 hours, or overnight. -
Step 6
Preheat oven to 375°F (190°C). Line two large baking sheets with parchment paper. -
Step 7
Lightly flour a work surface and rolling pin. Roll out half of the chilled dough to ¼-inch thickness. Cut out shapes with a 2-3 inch round cookie cutter. Place half of these cut-outs on one prepared baking sheet. -
Step 8
For the remaining half of the cut-out cookies, use a smaller 1-1.5 inch cutter or the back of a spoon to create a shallow indentation (well) in the center of each. Transfer these to the second prepared baking sheet. -
Step 9
Bake cookies for 8-11 minutes, or until edges are lightly golden and centers are set. Cool on baking sheets for 5 minutes, then transfer to a wire rack to cool completely. Repeat with remaining dough and scraps, chilling scraps for 10-15 minutes if they become too soft. -
Step 10
For the Raspberry Filling: In a small saucepan, combine 1 ½ cups fresh raspberries, ¼ cup granulated sugar, and 1 tablespoon fresh lemon juice. Simmer over medium heat for 5-7 minutes, gently mashing raspberries, until slightly thickened. -
Step 11
In a tiny separate bowl, whisk 1 teaspoon cornstarch with 1 tablespoon cold water to create a slurry. Stir into the simmering raspberry mixture. Continue to cook for another 1-2 minutes, stirring constantly, until the filling visibly thickens to a jam-like consistency. Remove from heat and cool completely to room temperature. -
Step 12
Optional Glaze: In a small bowl, whisk 1 ½ cups sifted confectioners’ sugar, 2-3 tablespoons milk or heavy cream, ½ teaspoon pure vanilla extract, and a pinch of salt until smooth and pourable, adjusting liquid to desired consistency. -
Step 13
Once cookies and filling are completely cool, spoon ½ to 1 teaspoon of the raspberry filling into the center of each indented cookie well. -
Step 14
To assemble: For open-faced cookies, drizzle plain cookies with glaze (if using) or dust lightly with confectioners’ sugar. For sandwich-style, gently place a plain cookie on top of a filled cookie, pressing lightly. You can lightly glaze the top of the plain cookie before sandwiching, or dust with confectioners’ sugar after. -
Step 15
Allow cookies to set for at least 30 minutes before serving. Store in an airtight container at room temperature for up to 3-4 days, or refrigerate for longer storage, bringing to room temperature before serving.
Important Information
Nutrition Facts (Per Serving)
It is important to consider this information as approximate and not to use it as definitive health advice.
Allergy Information
Please check ingredients for potential allergens and consult a health professional if in doubt.
Leave a Comment