

Rainbow-Filled Doughnuts are more than just a sweet treat; they’re a vibrant explosion of flavor and color that brings pure joy to any occasion. Imagin extracte biting into a cloud-like dough, yielding to a luscious, creamy filling that’s as delightful to behold as it is to taste. People absolutely adore these whimsical creations, not just for their incredible taste, but for the sheer happiness they evoke. They’re the perfect centerpiece for birthday parties, a fun weekend project with the kids, or simply a way to brighten your own day. What makes these Rainbow-Filled Doughnuts truly special is the magic hidden within. Each bite is a delightful surprise, a symphony of complementary flavors and textures that dance on your palate. We’re going to guide you through creating these edible works of art, ensuring your Rainbow-Filled Doughnuts are not only stunningly beautiful but also unbelievably delicious.

Ingredients:
- 2 tablespoons active dry yeast
- ½ cup warm water (105-110°F)
- 1 teaspoon granulated sugar (for activating the yeast)
- 2½ cups all-purpose flour
- ¼ cup granulated sugar
- 2 large eggs
- 2 tablespoons unsalted butter, softened to room temperature
- 2 teaspoons salt
- Canola oil, for frying (enough to fill your pot about 3 inches deep)
- 1½ cups confectioner’s sugar
- ½ cup whipping cream
- Rainbow sprinkles, for decoration
- 2½ cups vanilla pudding
- Rainbow food coloring (red, orange, yellow, green, blue, purple)
Preparing the Dough
Activating the Yeast
The first step to achieving perfectly fluffy Rainbow-Filled Doughnuts is to ensure our yeast is happy and active. In a small bowl, combine the warm water with the 1 teaspoon of granulated sugar. Sprinkle the active dry yeast over the top. Give it a gentle stir and let it sit undisturbed for about 5 to 10 minutes. You’ll know the yeast is ready when it becomes foamy and bubbly. This tells us it’s alive and ready to work its magic on our dough, creating that wonderful light and airy texture. If it doesn’t foam, your yeast might be old or the water too hot/cold, and you’ll need to start over with fresh yeast and the correct water temperature.
Mixing the Dough
Once your yeast is proofed, it’s time to bring everything together. In a large mixing bowl, combine the 2½ cups of all-purpose flour, the ¼ cup of granulated sugar, and the 2 teaspoons of salt. Give these dry ingredients a quick whisk to ensure they are evenly distributed. Now, make a well in the center of the dry ingredients. Pour in the activated yeast mixture, the 2 large eggs, and the softened unsalted butter. Begin extract mixing everything together with a wooden spoon or a sturdy spatula until a shaggy dough starts to form. It might seem a bit sticky at this stage, which is perfectly normal.
Kneading the Dough
Turn the shaggy dough out onto a lightly floured surface. Now comes the satisfying part: kneading! Gently knead the dough for about 8 to 10 minutes. You’re looking for a smooth, elastic dough that springs back when you gently poke it. If the dough is too sticky, add a tiny bit more flour, a tablespoon at a time, but be careful not to add too much, as this can make your doughnuts tough. The butter will gradually incorporate into the dough, making it silkier. This kneading process develops the gluten, which is crucial for the structure and chew of our doughnuts.
First Rise
Lightly grease a clean bowl with a bit of oil or cooking spray. Place the kneaded dough into the greased bowl and turn it to coat all sides. Cover the bowl tightly with plastic wrap or a clean kitchen towel. Find a warm, draft-free spot in your kitchen for the dough to rise. A slightly warm oven (turned off, of course!) or a sunny windowsill can be ideal. Let the dough rise for about 1 to 1.5 hours, or until it has doubled in size. This first rise is where the yeast does its primary work, creating air pockets that will make our doughnuts light and fluffy.
Shaping and Frying
Shaping the Doughnuts
Once the dough has doubled in size, gently punch it down to release the air. Turn the dough out onto a lightly floured surface again. You can roll the dough out to about ½ inch thickness using a rolling pin. Using a doughnut cutter or two different-sized round cutters (one larger, one smaller for the hole), cut out your doughnuts. If you don’t have a cutter, you can simply cut them into squares or rectangles. Place the cut doughnuts onto baking sheets lined with parchment paper, leaving some space between them. You can re-roll the scraps once, but try not to overwork them.
Second Rise
Cover the shaped doughnuts loosely with plastic wrap or a clean kitchen towel. Let them rise again in a warm place for another 30 to 45 minutes, or until they look noticeably puffy. This second rise is important for achieving that signature pillowy texture. While they are rising, prepare your frying station. Pour the canola oil into a heavy-bottomed pot or Dutch oven, ensuring it’s about 3 inches deep. Heat the oil over medium heat until it reaches 350°F (175°C). Use a thermometer to monitor the temperature; too cool and they’ll be greasy, too hot and they’ll burn before cooking through.
Frying to Golden Perfection
Carefully, and working in batches so you don’t overcrowd the pot, gently place a few doughnuts into the hot oil. Fry them for about 1 to 2 minutes per side, until they are a beautiful golden brown. Use a slotted spoon or spider strainer to carefully flip them. Once golden on both sides, remove them from the oil and place them on a wire rack set over a baking sheet to drain off any excess oil. Repeat with the remaining doughnuts, making sure to let the oil come back up to temperature between batches. The aroma of freshly fried doughnuts filling your kitchen is truly irresistible!
Creating the Rainbow Filling and Glaze
Preparing the Vanilla Pudding
While your doughnuts are cooling slightly, let’s get the vibrant fillings ready! In a medium bowl, combine the 2½ cups of vanilla pudding. You want a smooth, creamy base for your colorful fillings. If your pudding is store-bought, you might want to give it a quick whisk to ensure it’s lump-free. If you’ve made homemade vanilla pudding, ensure it’s completely cooled before proceeding. This pudding mixture will serve as the base for our multiple colors, allowing us to create a beautiful rainbow effect inside our doughnuts.
Coloring the Pudding
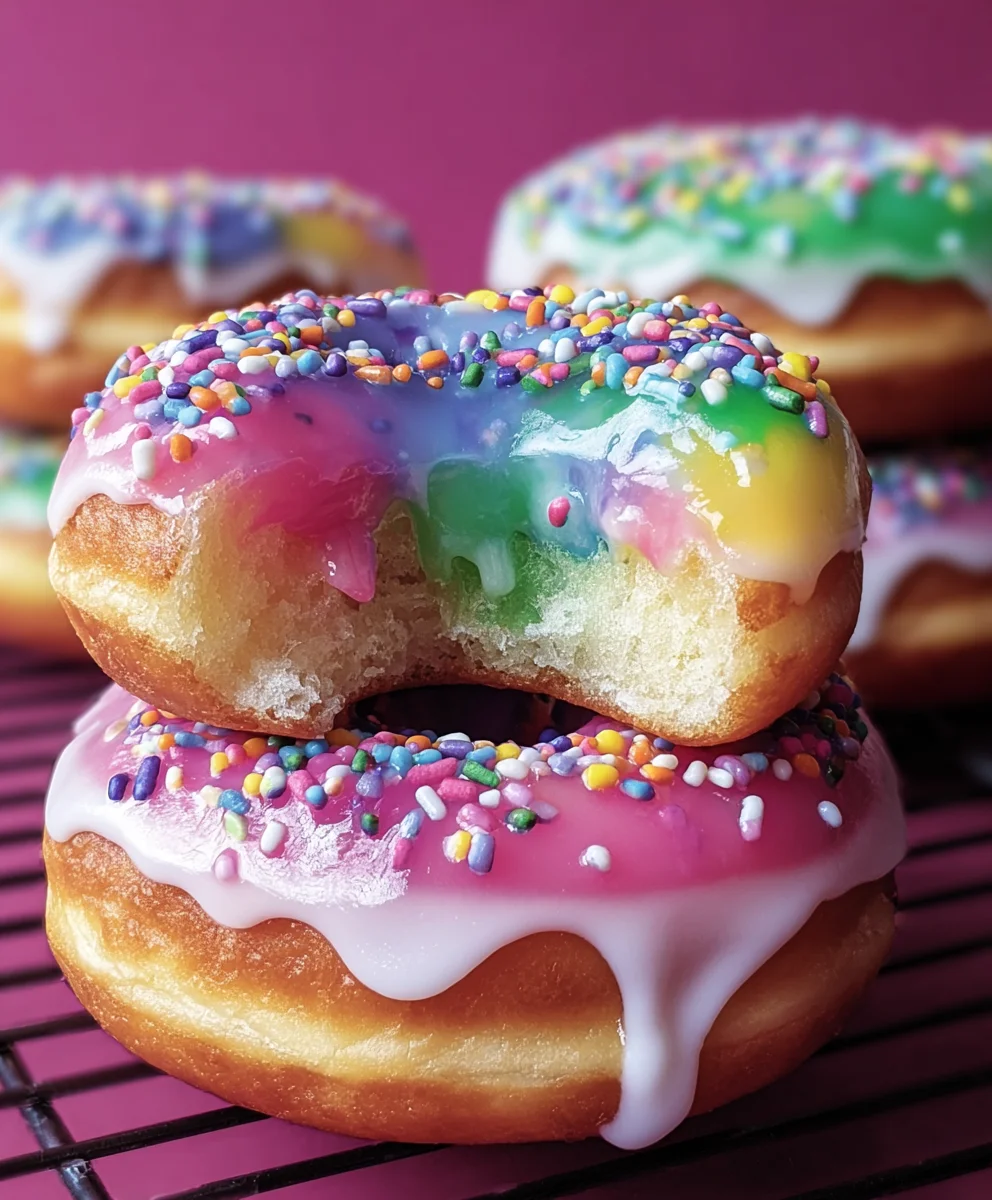
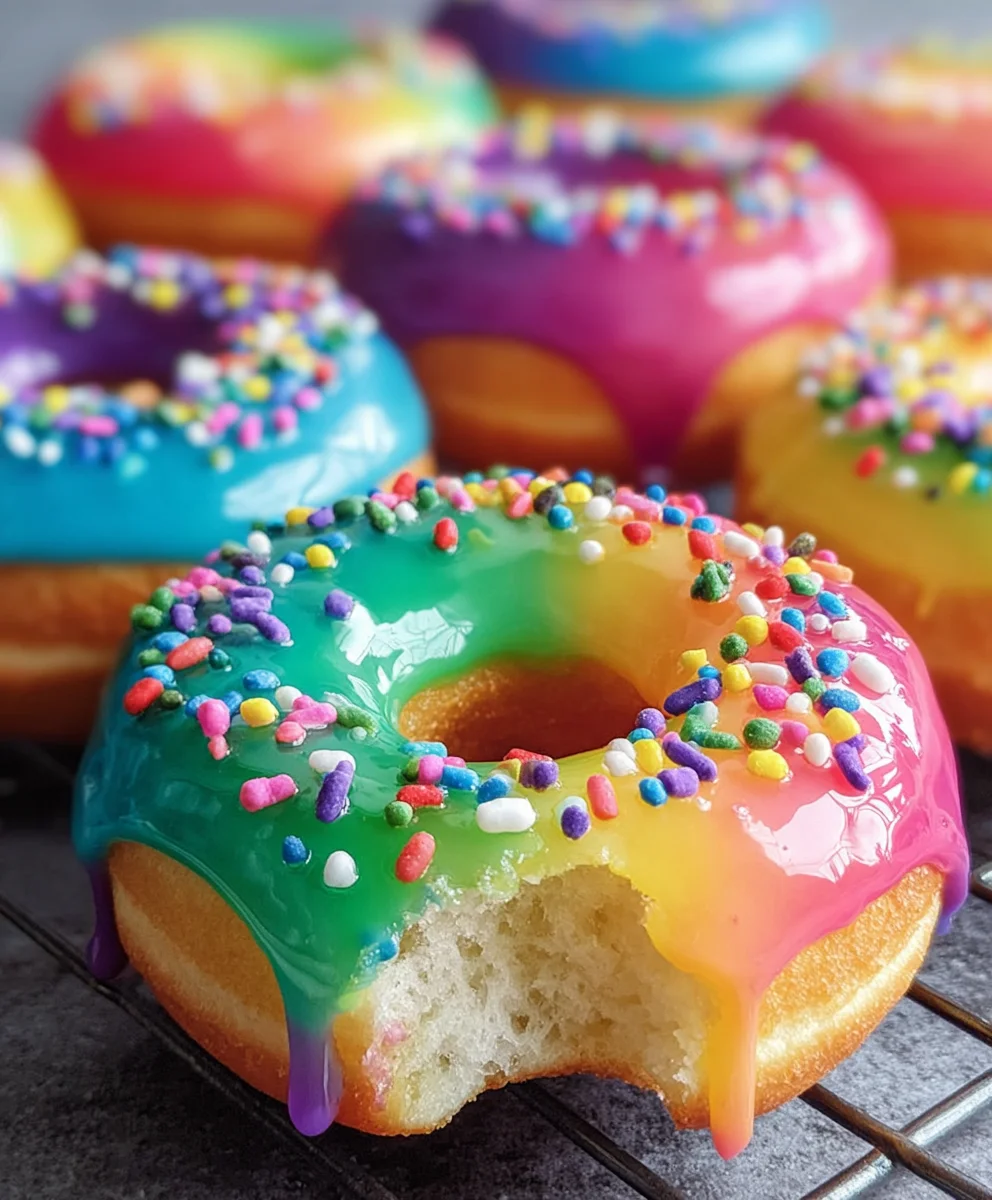
Now for the fun part – the rainbow! Divide the vanilla pudding into six small bowls. Add just a tiny drop of food coloring to each bowl – a little goes a long way! Stir in the red food coloring into one bowl, orange into another, yellow into the third, and so on, until you have six bowls of vibrant, distinct colors: red, orange, yellow, green, blue, and purple. Mix each color thoroughly until it’s evenly distributed. Aim for bright, saturated colors to make your Rainbow-Filled Doughnuts truly spectacular.
Making the Glaze
In a separate medium bowl, whisk together the 1½ cups of confectioner’s sugar and the ½ cup of whipping cream. Continue whisking until you have a smooth, pourable glaze. If the glaze is too thick, add a teaspoon of whipping cream or milk at a time until it reaches your desired consistency. If it’s too thin, add a tablespoon more confectioner’s sugar. You want a glaze that’s thick enough to coat the doughnuts but thin enough to drip appealingly.
Assembling the Rainbow-Filled Doughnuts
Filling the Doughnuts
Once your doughnuts have cooled enough to handle but are still slightly warm, it’s time to fill them with our rainbow pudding. You’ll want to use a piping bag fitted with a long, narrow tip, or a squeeze bottle with a similar tip. Carefully insert the tip into the side of each doughnut and gently squeeze in a dollop of each color of pudding, layering them to create a rainbow effect. Don’t overfill, or the pudding might escape! You can also fill them with just one color if you prefer, or alternate colors for a unique look.
Glazing and Decorating
Dip the top of each filled doughnut into the prepared glaze, letting the excess drip back into the bowl. You can also spoon the glaze over the tops for a more rustic look. Immediately after glazing, while the glaze is still wet, generously sprinkle the rainbow sprinkles over the tops. This is where your Rainbow-Filled Doughnuts truly come to life! The colorful sprinkles add texture and an extra burst of fun. Place the decorated doughnuts back onto the wire rack to allow the glaze to set.
Conclusion:
Congratulations! You’ve successfully navigated the delightful process of creating your own Rainbow-Filled Doughnuts. These vibrant treats are more than just a dessert; they’re a celebration in every bite. The combination of fluffy dough, a hidden burst of colorful filling, and a sweet glaze is truly a crowd-pleaser. We hope you enjoyed the journey of bringin extractg these cheerful doughnuts to life and that your kitchen is now filled with the warm aroma of freshly baked goodness. Don’t be afraid to get creative with your next batch!
For serving, these Rainbow-Filled Doughnuts are perfect as a special breakfast treat, a fun afternoon pick-me-up, or the star of any party dessert table. They pair wonderfully with a glass of cold milk, a steaming cup of coffee, or even a refreshing fruit juice. Consider dusting them with a little powdered sugar for an extra touch of elegance.
When it comes to variations, the possibilities are endless! You can experiment with different filling flavors like lemon curd, chocolate ganache, or even a berry compote. For the glaze, try adding a hint of vanilla extract, almond extract, or even a touch of citrus zest. You can also get creative with toppings – think sprinkles, edible glitter, or a drizzle of contrasting colored icing.
We encourage you to share your Rainbow-Filled Doughnuts with loved ones and spread the joy. Baking should be a fun and rewarding experience, and we’re confident you’ll be proud of the delicious results you achieve. Happy baking!
Frequently Asked Questions:
Q: Can I make the filling ahead of time for my Rainbow-Filled Doughnuts?
Absolutely! Most doughnut fillings, such as fruit compotes or pastry creams, can be made a day or two in advance and stored in an airtight container in the refrigerator. This can save you time on the day you plan to assemble and fry or bake your Rainbow-Filled Doughnuts.
Q: What’s the best way to get a good “rainbow” effect in the filling?
To achieve a vibrant rainbow effect, you’ll want to divide your base filling (like a simple custard or cream cheese filling) into several small bowls. Then, use food coloring to tint each bowl a different color (red, orange, yellow, green, blue, purple). You can then layer these colors into the piping bag, or swirl them together gently before filling your Rainbow-Filled Doughnuts for a marbled effect.
Rainbow-Filled Doughnuts-Vibrant Treat Recipe
A vibrant and delightful recipe for homemade doughnuts filled with colorful rainbow pudding and topped with a sweet glaze and sprinkles.
Ingredients
-
2 tablespoons active dry yeast
-
½ cup warm water (105-110°F)
-
1 teaspoon granulated sugar
-
2½ cups all-purpose flour
-
¼ cup granulated sugar
-
2 large eggs
-
2 tablespoons unsalted butter, softened
-
2 teaspoons salt
-
Canola oil, for frying
-
1½ cups confectioner’s sugar
-
½ cup whipping cream
-
Rainbow sprinkles
-
2½ cups vanilla pudding
-
Rainbow food coloring (red, orange, yellow, green, blue, purple)
Instructions
-
Step 1
Activate yeast by combining it with warm water and 1 teaspoon of sugar. Let sit for 5-10 minutes until foamy. -
Step 2
In a large bowl, combine flour, ¼ cup sugar, and salt. Add activated yeast mixture, eggs, and softened butter. Mix until a shaggy dough forms. -
Step 3
Knead the dough on a lightly floured surface for 8-10 minutes until smooth and elastic. Place in a greased bowl, cover, and let rise in a warm place for 1-1.5 hours, or until doubled in size. -
Step 4
Punch down dough, roll to ½ inch thickness, and cut out doughnuts. Place on parchment-lined baking sheets and let rise again for 30-45 minutes. Meanwhile, heat canola oil in a pot to 350°F (175°C). -
Step 5
Fry doughnuts in batches for 1-2 minutes per side until golden brown. Drain on a wire rack. -
Step 6
Divide vanilla pudding into six small bowls and color each with a different food coloring (red, orange, yellow, green, blue, purple). -
Step 7
Whisk confectioner’s sugar and whipping cream to create a glaze. Adjust consistency as needed. -
Step 8
Fill cooled doughnuts with the colored puddings, layering them to create a rainbow effect. Dip glazed doughnuts and immediately decorate with rainbow sprinkles.
Important Information
Nutrition Facts (Per Serving)
It is important to consider this information as approximate and not to use it as definitive health advice.
Allergy Information
Please check ingredients for potential allergens and consult a health professional if in doubt.
Leave a Comment