

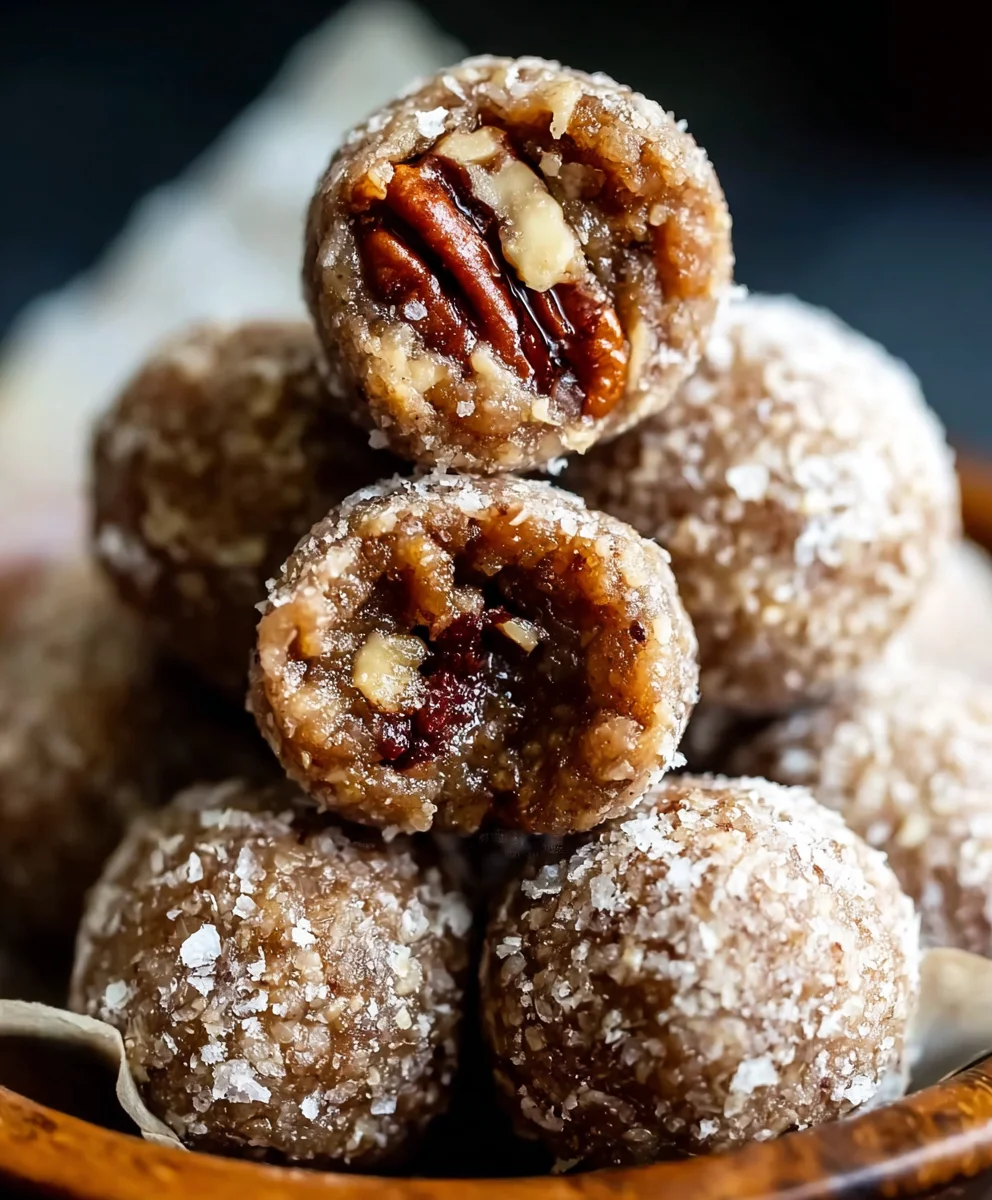
No Bake Pecan Pie Balls are about to become your new favorite holiday treat, or perhaps your go-to whenever that specific craving for something sweet and nutty strikes! I vividly remember the first time I encountered this ingenious twist on a beloved classic. As someone who adores the rich, buttery, and deeply satisfying flavors of traditional pecan pie, I was instantly captivated by the idea of capturing that magic without ever having to turn on the oven.
Pecan pie itself holds a cherished place in American culinary history, especially throughout the South, often gracing tables during Thanksgiving and Christmas celebrations as a symbol of hospitality and abundance. It evokes memories of family gatherings, warmth, and delicious indulgence. However, the traditional pie can be time-consuming, and oven space is often at a premium during busy holiday preparations. This is where the brilliance of No Bake Pecan Pie Balls truly shines. People absolutely adore this dish because it delivers all the iconic taste – the toasted pecans, the sweet, caramel-like filling – but in a convenient, bite-sized form. The delightful combination of a chewy interior with the satisfying crunch of pecans, all without the fuss of baking, makes them an irresistible treat for any occasion. I am confident you will find these incredibly simple yet profoundly delicious.

Ingredients:
- 2 cups (approximately 200g) finely chopped pecans: I recommend using fresh pecans for the best flavor and a wonderfully buttery texture. You can buy them pre-chopped, which saves a bit of time, or chop them yourself at home. If you’re chopping them yourself, a food processor makes quick work of it – just be careful not to over-process them into a pecan butter. We’re aiming for small, consistent pieces here to ensure every bite of our No Bake Pecan Pie Balls has that delightful nutty crunch.
- 1 cup (2 sticks or 226g) unsalted butter, softened: This is absolutely crucial for achieving a smooth, well-incorporated mixture. Make sure your butter is truly at room temperature. If it’s too cold, it won’t cream properly, leading to a lumpy base. If it’s melted, the consistency will be off, and your No Bake Pecan Pie Balls won’t set correctly. Aim for butter that gives slightly when gently pressed.
- 1 cup (200g) light brown sugar, packed: The light brown sugar is what gives our treats that signature caramel-like sweetness and moisture reminiscent of classic pecan pie. Make sure to pack it down firmly in your measuring cup to ensure you’re getting the correct amount, which contributes to both flavor and texture.
- 1/2 cup (120ml) heavy cream: This liquid gold helps to bind all the ingredients together, adding a luxurious richness and a creamy mouthfeel to our No Bake Pecan Pie Balls. It’s essential for achieving that delightful, melt-in-your-mouth texture.
- 1 teaspoon pure vanilla extract: Please, don’t skimp on good quality vanilla! It makes a huge difference in the overall flavor profile, truly enhancing the natural nutty notes of the pecans and rounding out the sweetness. It’s one of those subtle ingredients that has a powerful impact.
- 1/2 teaspoon salt: A small amount of salt is incredibly important in sweet recipes. It doesn’t make the mixture salty, but rather balances the sweetness and brings out the depth of all the other flavors, making them sing. It truly elevates the taste of these delicious treats.
- 2 cups (approximately 240g) powdered sugar (confectioners’ sugar), plus extra for dusting: This is our main binder and sweetening agent, providing structure to our No Bake Pecan Pie Balls. Having extra on hand for the final rolling and coating step is a must, as it gives them their beautiful, classic finish.
- 1 cup (approximately 120g) finely crushed shortbread cookies or graham crackers: This ingenious addition provides a wonderful texture and another layer of classic “pie crust” flavor without any actual baking. Shortbread cookies will give a richer, buttery taste, while graham crackers offer a slightly more rustic, warm spice note. Feel free to choose your favorite, or even combine them for a unique twist!
- Optional for coating: Extra powdered sugar, cocoa powder, or finely chopped pecans. This is where you can really get creative and personalize the look and taste of your No Bake Pecan Pie Balls! A mix of coatings looks beautiful on a platter.
Gathering Your Tools & Mise en Place
Getting Organized for Perfect No Bake Pecan Pie Balls
- Before we even think about mixing, let’s ensure we have all our tools ready to go. You’ll need a large mixing bowl, preferably one with good depth to prevent splashes as you mix. A sturdy wooden spoon or, ideally, a stand mixer fitted with a paddle attachment will be your best friend for blending the ingredients. We’ll also need accurate measuring cups and spoons, a flexible rubber spatula for scraping down the sides of the bowl, and a baking sheet lined with parchment paper or a silicone mat. This lined sheet will be the perfect spot for resting our formed “No Bake Pecan Pie Balls.” Having everything measured out and within arm’s reach, a culinary concept known as “mise en place,” makes the entire process incredibly smooth and enjoyable. I always find that taking these few extra minutes at the beginning saves so much time and stress later on.
- Next, confirm your butter is genuinely softened. If you forgot to take it out of the refrigerator in advance, a trick I often use is to cut it into smaller cubes and let it sit for 15-20 minutes. Alternatively, you can gently microwave it for 5-10 seconds at a time, being very careful not to melt it completely. We want pliable, not liquid butter. Also, take this moment to finely chop your pecans if they aren’t already. Remember, consistent small pieces are key for uniform texture throughout our No Bake Pecan Pie Balls. If using a food processor, pulse in short bursts until you reach your desired fineness, checking frequently to avoid over-processing.
- For the crushed cookies, place your chosen shortbread or graham crackers in a large zip-top bag and crush them using a rolling pin, or utilize your food processor for an even finer crumb. Aim for fine crumbs, similar to sand, but a few slightly larger pieces are perfectly fine and can actually add nice textural interest. Once crushed, transfer them to a small bowl and set them aside. This preparation ensures everything is ready when it’s time to incorporate them into the mixture.
Crafting the Pecan Pie Ball Base
Mixing Your Way to Irresistible No Bake Pecan Pie Balls
- In your large mixing bowl, or the bowl of your stand mixer, combine the softened unsalted butter and the packed light brown sugar. This is where we truly begin to build the delicious foundation for our incredible No Bake Pecan Pie Balls. Cream these two ingredients together until the mixture is visibly light, fluffy, and looks uniformly combined. If you’re using a stand mixer, a medium speed for about 3-5 minutes should achieve this perfectly. If you’re tackling this manually with a sturdy wooden spoon, prepare for a bit of an arm workout – it might take 7-10 minutes, but trust me, it’s worth every bit of effort for that perfectly creamy base. Make sure to scrape down the sides of the bowl frequently with your rubber spatula to ensure everything is incorporated evenly and no sugar or butter is clinging to the edges. We’re looking for a texture that almost resembles a light, sweet, cohesive paste.
- Next, pour in the heavy cream and the pure vanilla extract. Continue to beat or stir these liquids until they are fully incorporated into the butter and sugar mixture. The mixture might look a little bit curdled or separated at first, especially if your butter wasn’t perfectly tempered, but don’t fret! Keep mixing; it will come together beautifully, becoming smoother and even more fragrant as the vanilla distributes its comforting aroma. This step adds essential moisture and richness, which are key components of the final texture of our No Bake Pecan Pie Balls.
- Now, it’s time to add our main dry ingredient: the powdered sugar. Gradually add the 2 cups of powdered sugar, about 1/2 cup at a time, mixing thoroughly after each addition. The powdered sugar is crucial for the structure, sweetness, and the “no-bake” aspect of our “No Bake Pecan Pie Balls.” As you incorporate it, the mixture will thicken considerably. If you’re using a stand mixer, you might want to switch to a lower speed or even finish this part by hand if the mixture gets too stiff, to avoid overworking your mixer or having a dramatic cloud of powdered sugar erupt in your kitchen! Make sure there are absolutely no lumps of powdered sugar remaining. The goal here is a very thick, somewhat stiff, yet still pliable dough.
- Once the powdered sugar is fully incorporated, it’s time for the stars of the show: the finely chopped pecans and the crushed shortbread or graham cracker crumbs. Gently fold these into the mixture using your rubber spatula. You want to distribute them as evenly as possible throughout the base, ensuring that every future “No Bake Pecan Pie Ball” has a delightful mix of texture and flavor. Take your time with this step, making sure every bit of the creamy mixture gets a generous amount of pecans and crumbs. This is what truly gives our No Bake Pecan Pie Balls that authentic “pecan pie” texture and flavor – the delightful crunch of the nuts combined with the buttery crumb. Be careful not to overmix at this stage; just fold until everything is just combined and uniformly distributed.
- At this point, you’ll have a wonderfully thick, slightly sticky, and incredibly aromatic “No Bake Pecan Pie Balls” dough. I highly recommend chilling the mixture for at least 30 minutes, or even up to an hour, in the refrigerator. This step, while optional, is incredibly beneficial and I consider it a game-changer. Chilling helps to firm up the dough significantly, making it much easier to handle and roll into uniform balls without excess stickiness. It also helps prevent them from becoming too soft during the shaping process. Simply cover the bowl with plastic wrap before refrigerating.
Forming and Finishing Your No Bake Pecan Pie Balls
The Art of Rolling and Coating Your Delicious Treats
- Once your mixture has chilled and firmed up a bit, it’s time for the most enjoyable part: shaping our “No Bake Pecan Pie Balls.” Before you start rolling, prepare your coating station. Place about 1/2 cup of extra powdered sugar (or cocoa powder, or finely chopped pecans, if you’re using those as a coating) in a shallow dish or a wide, shallow bowl. If you’re planning to make a variety of coatings, set up separate dishes for each. Have your parchment-lined baking sheet nearby and ready to receive your finished balls.
- Using a small cookie scoop (about 1 tablespoon in size) or simply a teaspoon, scoop out uniform portions of the chilled dough. I find that a scoop ensures all the balls are consistently sized, which is great for presentation and even setting. Roll each scooped portion between the palms of your hands to form a smooth, compact, and uniform ball. If the mixture is sticking to your hands too much, you can lightly dust your palms with a little powdered sugar, or even lightly grease them with a tiny bit of butter – this often helps. The goal is a compact, perfectly round shape that will hold up well. This process is surprisingly therapeutic and quite satisfying!
- As you form each ball, immediately drop it into your chosen coating. Roll the ball gently in the powdered sugar (or other coating of your choice) until it’s completely covered. Ensure an even and generous coating on all sides; this not only adds a lovely, classic finish but also plays a practical role in preventing the balls from sticking to each other and to the storage container. Once thoroughly coated, gently transfer the finished No Bake Pecan Pie Balls to your prepared parchment-lined baking sheet.
- Continue this process until all of the pecan pie mixture has been used up. You’ll likely yield anywhere from 30 to 40 beautiful “No Bake Pecan Pie Balls,” depending on the exact size you make them. As you work, you might find the mixture softening as it comes to room temperature from the warmth of your hands. If it becomes too sticky to handle easily, simply pop the bowl back into the refrigerator for another 15-20 minutes to firm up again. Patience is a virtue when making these delightful treats, and a quick chill can make all the difference in ease of handling!
Chilling and Serving Your Delightful No Bake Pecan Pie Balls
The Final Touches for Utter Perfection
- Once all your “No Bake Pecan Pie Balls” are formed and beautifully coated, arrange them in a single layer on your parchment-lined baking sheet. Now comes the most important step for their ultimate texture, stability, and full flavor development: chilling. Place the entire baking sheet into the refrigerator for at least 1 hour. This extended chill time allows the butter to firm up completely, setting the shape of the balls and creating that lovely, melt-in-your-mouth consistency we’re aiming for. A longer chill time, even up to 2-3 hours, will only improve their texture and allow the flavors to meld even further.
- For optimal flavor and texture, I highly recommend allowing them to come to just slightly below room temperature before serving. While they are wonderfully firm and delicious straight from the fridge, letting them sit out for about 10-15 minutes allows the nuanced flavors of the pecans, brown sugar, and vanilla to truly bloom. The texture also softens just enough to be perfectly tender and chewy, making for an even more exquisite eating experience.
- When it’s time to serve these incredible “No Bake Pecan Pie Balls,” you can arrange them artfully on a platter. They make a fantastic, fuss-free addition to any holiday dessert table, a thoughtful homemade gift for friends and family, or simply a delightful treat to enjoy with a warm cup of coffee or tea. Their rich, sweet, and wonderfully nutty profile is sure to be a crowd-pleaser and a conversation starter.
- Storage: One of the many joys of these “No Bake Pecan Pie Balls” is how beautifully they keep! Store them in an airtight container in the refrigerator for up to 1-2 weeks. This makes them a fantastic make-ahead dessert. You can also freeze them for even longer storage, up to 1-2 months. If you plan to freeze them, arrange them in a single layer on a baking sheet until frozen solid, then transfer them to a freezer-safe bag or container to prevent them from sticking together. Thaw them in the refrigerator overnight or at room temperature for an hour or two before serving. They are so convenient to have on hand for an unexpected craving or impromptu guests!
- Variations to Explore: Don’t be afraid to get creative and customize your “No Bake Pecan Pie Balls” to suit your taste or the occasion!
- Spiced Pecan Pie Balls: Add 1/2 teaspoon of ground cinnamon or a pinch of nutmeg to the mixture along with the pecans for an extra layer of warmth and complexity. Allspice or a tiny hint of cloves could also be lovely.
- Chocolate Drizzle: After they have been chilled and set, melt some dark or milk chocolate and drizzle it elegantly over the balls for an extra touch of decadence and visual appeal. A white chocolate drizzle would also be stunning.
- Toasted Pecans: For an even deeper, more intense nutty flavor, lightly toast your finely chopped pecans in a dry skillet over medium heat for 5-7 minutes, stirring frequently, until fragrant. Make sure they cool completely before adding them to the mixture.
- Boozy Balls: For an adult-friendly version, substitute 1-2 tablespoons of your favorite bourbon, rum, or even a coffee liqueur for an equal amount of heavy cream in the mixture. This adds a sophisticated kick that pairs wonderfully with the pecan flavor.
- Different Coatings: Beyond the classic powdered sugar, consider rolling them in cocoa powder for a rich, slightly bitter contrast, or in extra finely chopped toasted pecans for an additional textural crunch and enhanced nutty flavor. A mix of different coatings on one serving platter looks incredibly festive and inviting!
Conclusion:
As we wrap up our culinary journey today, I truly hope you’re feeling as excited as I am about this incredible recipe. What makes these delightful treats an absolute game-changer, a true must-try in your kitchen repertoire, is their sheer simplicity paired with an unbelievably rich and authentic flavor profile. Imagine all the comforting, nutty, sweet notes of a classic pecan pie, but without the hassle of pastry crusts, rolling pins, or oven time. That’s precisely what we’ve achieved here. These aren’t just easy; they are a revelation of convenience and taste. They capture the essence of a beloved dessert, transforming it into a bite-sized indulgence that comes together in mere minutes, making them perfect for those last-minute cravings or unexpected guests.
I find them to be the quintessential dessert for anyone who loves the deep, caramelized taste of pecans but perhaps doesn’t have the time or inclination for elaborate baking. The texture alone is enough to convert you – a perfectly balanced chewiness that melts in your mouth, leaving behind that satisfying, sweet pecan goodness. They are truly an expression of effortless elegance, proving that you don’t need hours in the kitchen to create something truly memorable and utterly delicious. Every single time I make them, I’m reminded of their magic: minimal effort, maximum flavor. They are a testament to the fact that some of the best things in life are indeed no-bake.
Serving Suggestions and Creative Variations:
The beauty of these bite-sized wonders extends far beyond their ease of preparation; it lies in their incredible versatility when it comes to serving and personalization. For a sophisticated after-dinner treat, arrange them artfully on a platter alongside a steaming cup of coffee or a digestif. They make for fantastic additions to a holiday dessert spread, standing out amongst more traditional fare, or as charming party favors packaged in small decorative boxes. During the festive season, I love to dust them with a little extra powdered sugar to resemble freshly fallen snow, creating a whimsical winter wonderland on my dessert table. They’re also perfect for gifting – a homemade touch that speaks volumes.
But why stop there? Let’s talk variations that can truly elevate your No Bake Pecan Pie Balls to new heights:
Coating Creations:
- Chocolate Drizzle: For the ultimate indulgence, melt some dark or milk chocolate and drizzle it artfully over the chilled balls. A contrasting white chocolate drizzle can also add a beautiful aesthetic.
- Toasted Coconut: Roll them in finely shredded, lightly toasted coconut for an added layer of texture and a tropical hint that complements the nutty pecan flavor surprisingly well.
- Cinnamon Sugar: A simple mix of cinnamon and granulated sugar can give them a warm, spiced coating, perfect for autumn or winter gatherings.
- Cocoa Powder: For a less sweet, more intense flavor profile, a light dusting of unsweetened cocoa powder creates a sophisticated finish, especially appealing to dark chocolate lovers.
Flavor Enhancements:
- Bourbon Boost: If you enjoy a hint of spirits, a tiny splash of bourbon or rum extract (or the real deal, if you’re feeling adventurous and catering to an adult audience) can deepen the flavor profile, adding a warm, sophisticated note that pairs wonderfully with pecans. Just remember a little goes a long way!
- Spice it Up: A pinch of nutmeg or allspice mixed into the dough can add an extra layer of warmth and complexity, reminiscent of more traditional baked pies.
- Mini Chocolate Chips: Fold in a handful of mini chocolate chips into the mixture before chilling for an unexpected burst of chocolatey goodness in every bite.
- Orange Zest: A tiny bit of finely grated orange zest can brighten the flavors beautifully, offering a subtle citrus counterpoint to the rich sweetness.
These variations are just starting points, of course. Feel free to experiment with whatever inspires you. That’s the joy of cooking, isn’t it? Making a recipe truly your own.
Your Turn to Create and Share!
Now that you have all the tips, tricks, and inspiration, it’s truly your moment to shine in the kitchen. I wholeheartedly encourage you to give this recipe for No Bake Pecan Pie Balls a try. You’ll be amazed at how quickly and effortlessly these little bundles of joy come together, and even more delighted by how incredibly delicious they are. Whether you’re making them for a special occasion, a casual get-together, or simply to satisfy your own sweet tooth, I promise they won’t disappoint.
Once you’ve whipped up your batch, I would absolutely love to hear about your experience! Did you stick to the original recipe, or did you venture into some of the variations? What did your family and friends think? Did you discover a new favorite coating or a clever serving idea that I haven’t mentioned? Your insights and feedback are invaluable to me and to our community of fellow food lovers. Please don’t hesitate to share your thoughts, your successes, and even your “oops” moments in the comments section below. I can’t wait to see your creations and hear all about your pecan pie ball adventures. Happy no-baking!

Quick No Bake Pecan Pie Balls – Your New Favorite Treat!
These No Bake Pecan Pie Balls offer all the rich, buttery, and nutty flavors of traditional pecan pie in a convenient, bite-sized treat. Perfect for holidays or any sweet craving, they combine a chewy interior with crunchy pecans without needing an oven. Incredibly simple yet profoundly delicious!
Ingredients
-
2 cups (200g) finely chopped pecans
-
1 cup (226g) unsalted butter, softened
-
1 cup (200g) light brown sugar, packed
-
1/2 cup (120ml) heavy cream
-
1 teaspoon vanilla extract
-
1/2 teaspoon salt
-
2 cups (240g) powdered sugar, plus extra for dusting
-
1 cup (120g) finely crushed shortbread cookies or graham crackers
-
Optional coatings: Extra powdered sugar, cocoa powder, or finely chopped pecans
Instructions
-
Step 1
Gather a large mixing bowl (stand mixer recommended), measuring tools, spatula, and a parchment-lined baking sheet. Ensure butter is softened, finely chop pecans, and crush shortbread cookies or graham crackers into fine crumbs. Have extra powdered sugar for coating ready. -
Step 2
In a large mixing bowl, cream the softened unsalted butter and packed light brown sugar until the mixture is light, fluffy, and uniformly combined (3-5 minutes with a mixer, 7-10 minutes by hand). Scrape down the sides of the bowl frequently. -
Step 3
Pour in the heavy cream and vanilla extract. Continue to beat or stir until these liquids are fully incorporated into the butter and sugar mixture, becoming smooth and fragrant. -
Step 4
Gradually add the 2 cups of powdered sugar, about 1/2 cup at a time, mixing thoroughly after each addition. The mixture will thicken considerably, forming a very thick, somewhat stiff, yet pliable dough. Ensure no lumps of powdered sugar remain. -
Step 5
Gently fold in the finely chopped pecans and crushed shortbread/graham cracker crumbs using a rubber spatula until they are evenly distributed throughout the dough. Be careful not to overmix. -
Step 6
Cover the bowl with plastic wrap and chill the mixture in the refrigerator for at least 30 minutes, or up to an hour. This helps the dough firm up, making it easier to handle. -
Step 7
Prepare your coating station with extra powdered sugar (or other chosen coatings) in shallow dishes. Using a small cookie scoop (about 1 tablespoon) or a teaspoon, scoop out uniform portions of the chilled dough. Roll each portion between your palms to form a smooth, compact ball. Lightly dust hands with powdered sugar if the mixture becomes too sticky. -
Step 8
Immediately drop each formed ball into your chosen coating and roll gently until completely covered. Transfer the coated balls to your prepared parchment-lined baking sheet. Continue until all mixture is used. If the dough softens too much during shaping, re-chill for 15-20 minutes. -
Step 9
Arrange all formed and coated balls in a single layer on the baking sheet and refrigerate for at least 1 hour. For optimal texture and flavor development, a longer chill of 2-3 hours is recommended. -
Step 10
For optimal flavor and texture, allow the balls to sit at slightly below room temperature for about 10-15 minutes before serving. Store any leftovers in an airtight container in the refrigerator for 1-2 weeks or freeze for up to 1-2 months. Thaw in the refrigerator overnight or at room temperature for an hour or two before serving. Consider variations like adding cinnamon/nutmeg, a chocolate drizzle, using toasted pecans, or a non-alcoholic flavor boost (substituting heavy cream with non-alcoholic vanilla extract, coffee syrup, or fruit juice).
Important Information
Nutrition Facts (Per Serving)
It is important to consider this information as approximate and not to use it as definitive health advice.
Allergy Information
Please check ingredients for potential allergens and consult a health professional if in doubt.

Leave a Comment