

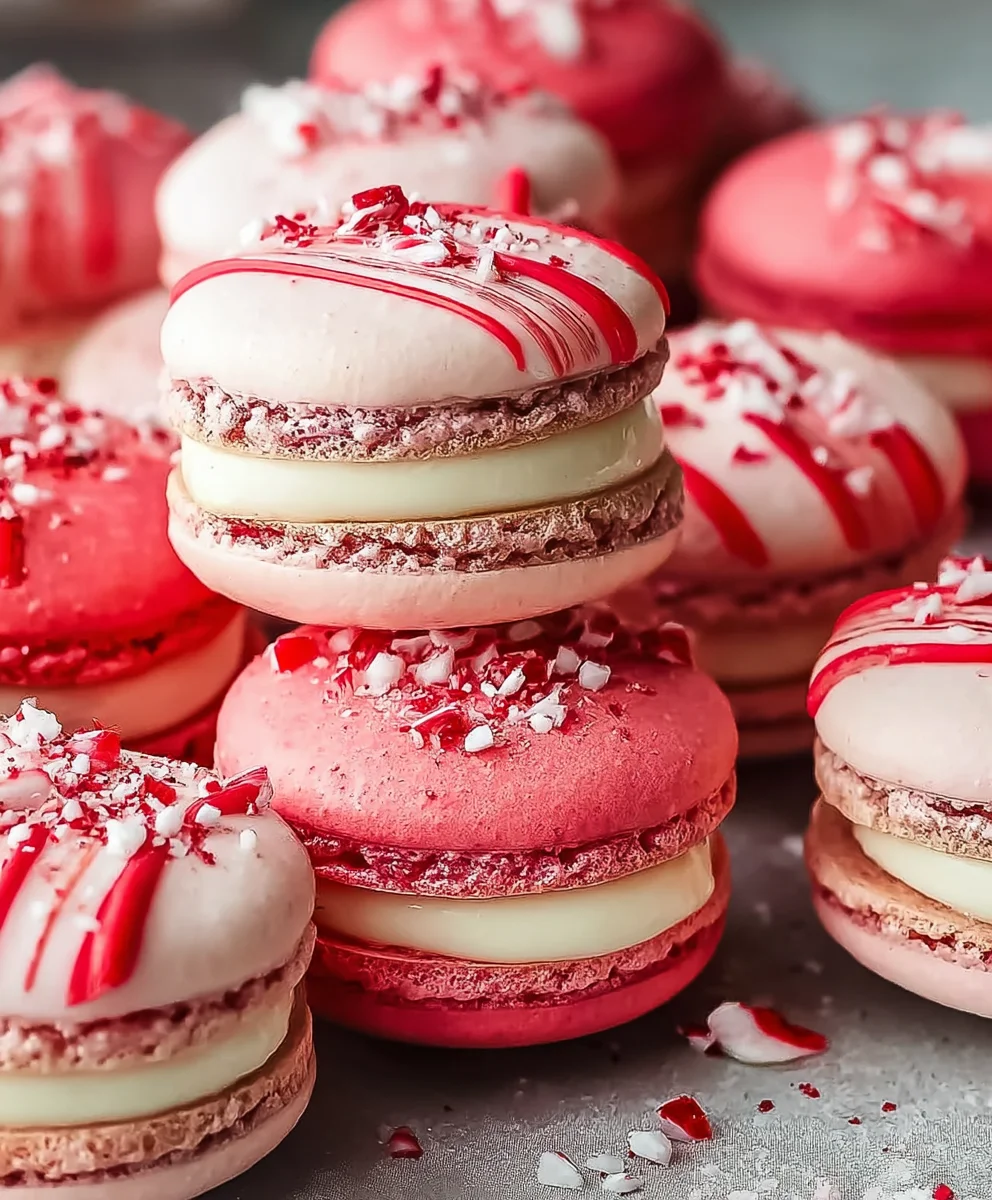
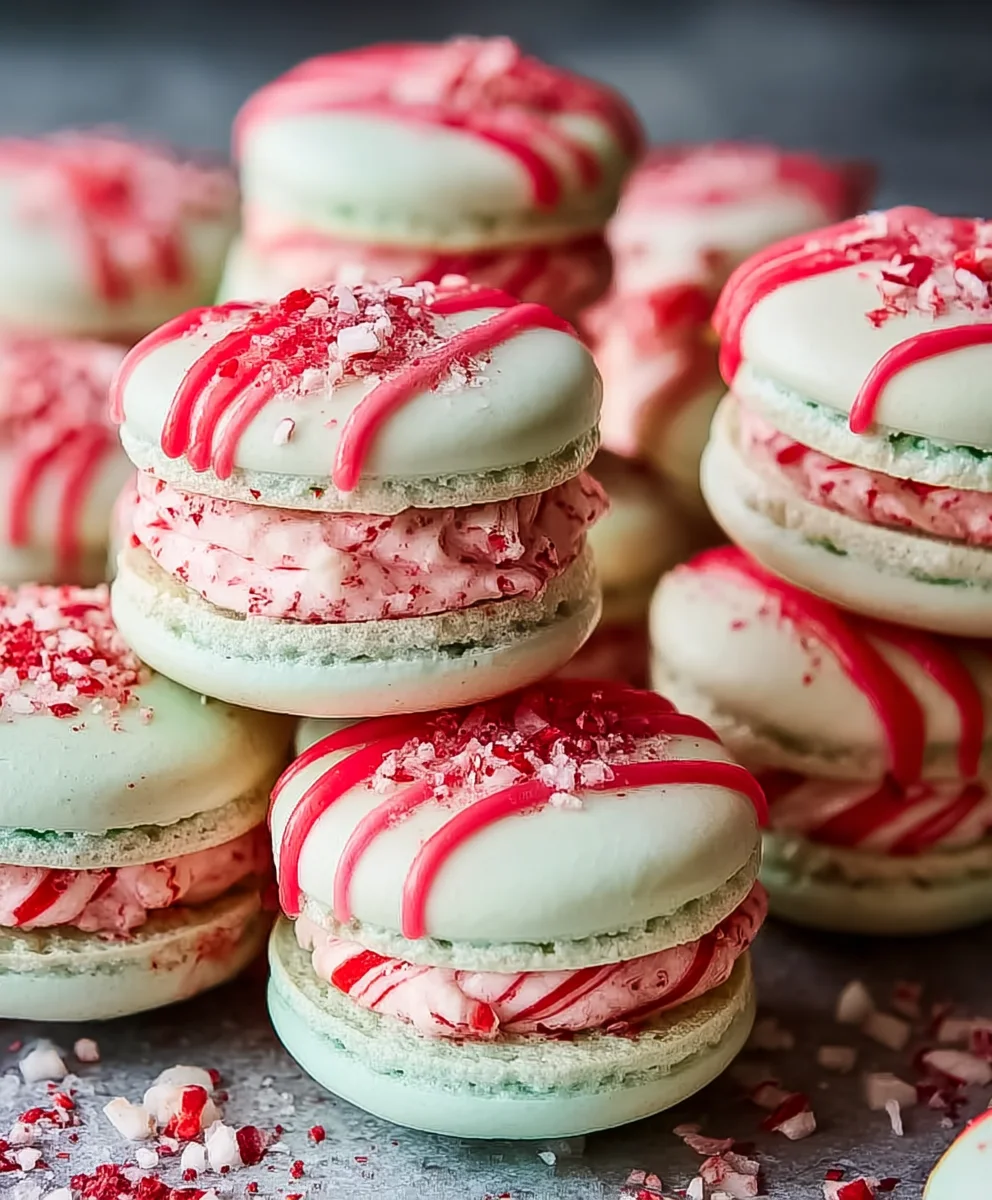
Peppermint Macarons are more than just a sweet treat; they are a delightful dance of delicate textures and refreshing flavors that captivate the senses. Imagine biting into a perfectly crisp, yet wonderfully chewy meringue shell, giving way to a rich, creamy filling infused with the cool, invigorating essence of peppermint. This exquisite confection, a festive twist on the classic French macaron, brings an unparalleled elegance to any occasion, especially during the holiday season. I find their charm utterly irresistible, and I am thrilled to guide you through crafting these beautiful confections.
Originating from Italian meringue-based cookies before finding their iconic status in French patisseries, macarons have always symbolized sophisticated indulgence. While traditional flavors abound, the introduction of peppermint elevates this beloved dessert into a seasonal showstopper. People adore Peppermint Macarons not just for their stunning visual appeal and vibrant hues, but for that unique sensation: the initial snap, the melt-in-your-mouth chewiness, and the invigorating burst of mint that perfectly balances the sweetness. It’s a truly enchanting experience, making them an absolute favorite for gifting, entertaining, or simply savoring a moment of pure bliss. Get ready to impress with these dainty delights!

Ingredients:
-
For the Peppermint Macaron Shells:
- 150g (about 1 ¼ cups) almond flour, finely ground and sifted
- 150g (about 1 ¼ cups) powdered sugar (confectioners’ sugar), sifted
- 55g (about ¼ cup) granulated sugar
- 55g (about ¼ cup) water
- 55g (about 2 large) egg whites, aged for at least 24 hours at room temperature, or separated for a few days in the fridge (first part of egg whites for meringue)
- 55g (about 2 large) egg whites, aged for at least 24 hours at room temperature, or separated for a few days in the fridge (second part of egg whites for almond paste)
- ½ teaspoon peppermint extract (optional, for a subtle hint in the shells)
- Red gel food coloring (a few drops, for festive stripes or solid color)
-
For the Peppermint Buttercream Filling:
- 113g (1 stick or ½ cup) unsalted butter, softened to room temperature
- 225g (about 2 cups) powdered sugar (confectioners’ sugar), sifted
- 1-2 tablespoons heavy cream or milk, as needed
- ¾ – 1 teaspoon pure peppermint extract (adjust to your preference for mint intensity)
- Pinch of salt
- Red or green gel food coloring (optional, for a festive touch)
-
For the Optional Chocolate Drizzle:
- 50g (about ¼ cup) dark chocolate, chopped
- 1 teaspoon coconut oil or vegetable shortening
Equipment You’ll Need:
To embark on your journey to perfect Peppermint Macarons, having the right tools makes all the difference. While not exhaustive, this list covers the essentials:
- Digital kitchen scale (absolutely crucial for macaron success!)
- Stand mixer with whisk attachment (highly recommended for meringues) or a hand mixer
- Fine-mesh sieve
- Large mixing bowls (at least two)
- Rubber spatula (firm, yet flexible)
- Piping bag(s) with a round tip (Wilton 1A or Ateco 808 for standard size macarons)
- Baking sheets
- Silicone baking mats (e.g., Silpat) or parchment paper
- Candy thermometer (for Italian meringue method)
- Small saucepan
Preparing Your Mise en Place: The Foundation of Perfect Peppermint Macarons
Before you even think about mixing, gathering and preparing all your ingredients and equipment, known as “mise en place,” is paramount. This step ensures a smooth, stress-free baking process and significantly increases your chances of macaron success. Trust me, with Peppermint Macarons, precision is everything.
- Weigh Everything Precisely: Using a digital kitchen scale, weigh all your ingredients – almond flour, powdered sugar, granulated sugar, water, and both portions of egg whites. Macarons are a science, and slight variations in measurements can lead to disaster. I cannot stress enough how important accurate weighing is for these delicate confections.
- Sift Dry Ingredients: Sift the almond flour and powdered sugar together into a large bowl. Even if your almond flour says “super fine,” don’t skip this step. This removes any lumps and ensures the smoothest possible macaron shells. I even go a step further and sometimes process them together in a food processor for about 30 seconds before sifting, just to get them extra fine, then re-sift. This extra effort will result in the most pristine and beautiful Peppermint Macaron shells.
- Separate Egg Whites: If you haven’t already, carefully separate your egg whites. Ensure there’s absolutely no yolk in them, as fat can prevent your meringue from whipping properly. Let them come to room temperature if they were refrigerated – warm egg whites whip up with more volume and stability. Aging egg whites (separating them and letting them sit in an airtight container in the fridge for a few days, or at room temperature for 24 hours) can also improve meringue stability, leading to better results for your Peppermint Macarons.
- Prepare Baking Sheets: Line your baking sheets with silicone mats or parchment paper. If using parchment, you might want to lightly secure it with a tiny dab of batter underneath later to prevent shifting. Prepare a template if you don’t have a macaron mat – a template for 1.5-inch circles, spaced about 1 inch apart, can be drawn on parchment paper. Consistent sizing is key for even baking and beautiful paired Peppermint Macarons.
- Set Up Your Piping Bag: Fit your piping bag with the round tip (I love a Wilton 1A or an Ateco 808 for a perfect round shell) and stand it up in a tall glass or pitcher, folding the top edges over. This makes filling the bag much easier and less messy, preventing valuable macaron batter from going to waste.
- Preheat Oven (Later): Don’t preheat just yet, but know your oven’s quirks. Macarons are incredibly sensitive to oven temperature. Investing in an oven thermometer is highly recommended, as your oven’s display might not be entirely accurate.
- Mind the Humidity: Try to bake Peppermint Macarons on a dry day. High humidity can make the shells sticky and prevent them from forming their characteristic “feet.” If it’s humid, consider using a dehumidifier in your kitchen or adjusting your resting time accordingly.
Taking the time for this preparation will pay dividends when you’re crafting your beautiful, festive Peppermint Macarons, ensuring each step flows smoothly towards delicious success.
Crafting the Macaron Shells: The Heart of Your Peppermint Macarons
This is where the magic happens, and where patience and precision are your best friends. The Italian meringue method, which we’ll use, produces very stable meringue, making it a great choice for robust Peppermint Macarons, especially if you’re new to macaron making. It offers a forgiving structure compared to the French method.
Step 1: Sifting the Dry Ingredients
- In a large bowl, combine your sifted almond flour and sifted powdered sugar. Use a whisk to gently combine them thoroughly. This mixture is often referred to as “T.P.T.” (tant pour tant), meaning “equal parts.” Ensuring these are well-combined prevents pockets of unmixed ingredients, which can lead to inconsistencies in your Peppermint Macaron shells.
- Create a well in the center of the T.P.T. mixture and pour in the first portion of your room-temperature egg whites (55g). Add the optional ½ teaspoon of peppermint extract and a few drops of red gel food coloring here if you want a solid colored shell. Mix with a spatula until it forms a thick, homogeneous paste. It will be quite stiff, almost like marzipan. Set this aside. This mixture is called the “macaron paste” or “almond paste.”
Step 2: Preparing the Italian Meringue
This meringue is built by pouring hot sugar syrup into whipping egg whites, creating an incredibly stable and glossy meringue perfect for sturdy Peppermint Macarons. The heat from the syrup also helps to stabilize the egg whites, contributing to a strong shell structure.
- In a small, heavy-bottomed saucepan, combine the granulated sugar (55g) and water (55g). Stir briefly to dissolve the sugar. Avoid splashing sugar crystals up the sides of the pan, as these can cause the syrup to crystallize later.
- Place the saucepan over medium-high heat. Insert your candy thermometer into the sugar syrup, ensuring it doesn’t touch the bottom of the pan. This provides an accurate temperature reading.
- As the syrup heats, begin to whip the second portion of egg whites (55g) in the bowl of your stand mixer fitted with the whisk attachment. Start on medium speed until they become foamy.
- Once the egg whites are foamy, increase the mixer speed to medium-high. You want them to reach soft peaks by the time your sugar syrup hits the target temperature of 118°C (244°F). This timing is important: if the egg whites are whipped too stiff before the syrup is ready, they can break down; if too soft, they won’t incorporate the syrup properly.
- Continue to cook the sugar syrup until it reaches 118°C (244°F). This is a critical temperature for the stability of your meringue. Don’t rush it or go over/under by too much. This temperature ensures the sugar is fully dissolved and creates a strong, stable meringue.
- Once the syrup reaches 118°C (244°F), remove it immediately from the heat.
- With the mixer running on medium-low speed, carefully and slowly pour the hot sugar syrup in a thin, steady stream down the side of the bowl into the whipping egg whites. Be careful not to pour it directly onto the whisk, as it will splatter and sugar will crystalize, leading to a grainy meringue. Also, avoid hitting the sides of the bowl too much, as the sugar will harden there.
- Once all the syrup has been added, increase the mixer speed to high. Whip the meringue until it is thick, glossy, and forms stiff peaks. The meringue should be cool to the touch on the outside of the bowl – this can take anywhere from 8 to 15 minutes, depending on your mixer and kitchen temperature. A proper stiff peak means when you lift the whisk, the meringue forms a firm point that doesn’t flop over. This is your beautiful Italian meringue, and it’s robust enough to handle the flavor and color of your festive Peppermint Macarons!
- If you want to create a striped effect for your Peppermint Macarons, now is the time to add a few stripes of red gel food coloring inside your piping bag before filling it, rather than mixing it into the batter. This technique yields a lovely, barber-pole swirl.
Step 3: Macaronage – The Art of Folding
This is arguably the most intimidating and crucial step for perfect Peppermint Macarons. Macaronage is the process of folding the meringue into the almond paste until the batter reaches the right consistency – not too thick, not too thin. This is where many novice macaron makers falter, but with practice and attention, you’ll master it!
- Add about one-third of the Italian meringue to your almond paste mixture. Using your rubber spatula, gently fold it in until just combined. This lightens the paste and makes the next addition easier to incorporate without deflating the meringue too much.
- Add the remaining two-thirds of the meringue to the bowl. Now comes the careful folding. Use your spatula to scrape down the sides of the bowl, then cut through the center of the batter, bringing the bottom up over the top. Rotate the bowl and repeat. The motion should be a combination of scraping, folding, and pressing.
- The goal is to achieve a “lava-like” consistency, often described as a thick ribbon that flows continuously off your spatula when lifted, and slowly reincorporates into the batter in the bowl within about 20-30 seconds. It should not be too runny (over-mixed, leading to flat macarons without feet, or spreading too much) or too stiff (under-mixed, leading to bumpy, peaked macarons without feet, or with hollow centers).
- To test the consistency, lift your spatula and let the batter fall back into the bowl. If it forms a “figure 8” without breaking before slowly melting back into the mass, you’re getting close. Another good test is the “ribbon stage.” When you lift the spatula, a thick ribbon should fall off and hold its shape for a moment before disappearing. It’s better to slightly under-mix than over-mix. Stop when it looks right – trust your instinct! This perfect consistency is vital for those signature “feet” on your Peppermint Macarons.
Step 4: Piping the Macaron Shells
With your perfectly macaronaged batter, the next step is to pipe those beautiful, uniform shells.
- Transfer your perfectly mixed macaron batter into the prepared piping bag. Twist the top of the bag to seal it, applying gentle, even pressure to ensure no batter escapes from the top.
- Hold the piping bag vertically, about ½ inch above your silicone mat or parchment paper. Apply steady pressure, piping circles of batter, using your template or macaron mat as a guide. Aim for consistent size. Once the desired size is reached, stop applying pressure, twist your wrist slightly, and lift straight up, minimizing any “nips” or peaks.
- Once all your shells are piped, firmly rap the baking sheets on your counter several times (4-5 vigorous taps). This releases any trapped air bubbles, which can cause hollow shells or cracked tops. You can also use a toothpick to pop any visible bubbles, gently swirling the toothpick to smooth the surface if needed. This step is essential for smooth, beautiful, and stable Peppermint Macarons.
Step 5: Drying and Baking
The final hurdle for perfect macaron shells: proper drying and baking.
- The “Resting” Phase (Crucial for Feet!): Leave the piped macaron shells to rest at room temperature. This allows a skin to form on their surface, creating a protective barrier. This can take anywhere from 30 minutes to 2 hours, depending on the humidity in your kitchen. The shells are ready for baking when you can gently touch them without any batter sticking to your finger. This skin is what forces the macaron to expand downwards and create those coveted “feet” as the internal moisture tries to escape during baking.
- Preheat Your Oven: Once your shells have developed a skin, preheat your oven to 140-150°C (285-300°F). Oven temperatures vary greatly, so knowing your oven is key. I recommend using an oven thermometer to ensure accuracy. Too hot, and they’ll crack; too cool, and they won’t develop feet or will be soft.
- Bake the Macarons: Place one baking sheet of macarons in the preheated oven. Bake for approximately 12-16 minutes. Do not open the oven door during the first 10 minutes, as this can cause temperature fluctuations that negatively impact feet development. The macarons are done when they have developed their “feet” and don’t wiggle on their feet when gently nudged. If they wiggle, bake for another 1-2 minutes. The goal is a shell that is crisp on the outside and slightly chewy on the inside.
- Cool Completely: Once baked, remove the baking sheet from the oven and let the macaron shells cool completely on the mat before attempting to peel them off. Trying to remove them too soon will result in broken shells, as they are still delicate. They should easily lift off the mat once fully cooled, indicating they are properly baked and ready to become delightful Peppermint Macarons. If they stick, they might need a minute or two more in the oven next time.
Whipping Up the Peppermint Buttercream Filling: A Cool and Creamy Delight
While your Peppermint Macaron shells are cooling, let’s create a perfectly balanced, refreshing peppermint buttercream. This filling is the ideal complement to the delicate macaron shells, adding a burst of cool mint flavor that truly defines these festive treats.
Step 1: Preparing the Butter
- Ensure your unsalted butter is genuinely at room temperature, but not melted. It should be soft enough to indent with your finger, but still hold its shape. If it’s too cold, your buttercream will be lumpy and difficult to whip; too warm, it will be greasy and won’t hold its structure. Patience here yields a smooth, luxurious filling for your Peppermint Macarons.
Step 2: Mixing the Buttercream
- In the bowl of a stand mixer fitted with the paddle attachment (or using a hand mixer), beat the softened butter on medium speed for 2-3 minutes until it becomes light, fluffy, and pale in color. This aeration is key for a truly delightful, melt-in-your-mouth buttercream, providing a pleasant contrast to the macaron shell’s chewiness.
- Gradually add the sifted powdered sugar, about half a cup at a time, beating well after each addition until fully incorporated. Start on low speed to avoid a sugar cloud that will dust your kitchen, then increase to medium. Scrape down the sides of the bowl as needed to ensure everything is thoroughly mixed.
- Once all the powdered sugar is incorporated, the mixture will be quite thick and somewhat crumbly.
Step 3: Flavoring with Peppermint
- Add the pure peppermint extract (start with ¾ teaspoon and add more to taste) and a pinch of salt. The salt helps to balance the sweetness of the powdered sugar, preventing the buttercream from being overly cloying and enhancing the mint flavor in your Peppermint Macarons.
- Add 1 tablespoon of heavy cream or milk and beat on medium-high speed for another 3-5 minutes. Scrape down the sides of the bowl periodically to ensure even mixing. The buttercream should become incredibly light, airy, and smooth, achieving a wonderful pipeable consistency.
- If the buttercream is too thick, add more cream or milk, ½ teaspoon at a time, until you reach your desired consistency. If it’s too thin, you can try chilling it briefly or adding a tiny bit more sifted powdered sugar, but be careful not to make it too sweet.
- If you’d like a festive touch, add a drop or two of red or green gel food coloring and mix until evenly distributed. This vibrant filling will make your Peppermint Macarons even more visually appealing and perfect for holiday festivities!
- Transfer the finished peppermint buttercream to a clean piping bag fitted with a round tip (or simply snip off the end of the bag for piping). This will make the assembly process much cleaner and more precise.
Assembling Your Peppermint Macarons: Bringing It All Together
Now for the satisfying part – turning your beautifully baked shells and luscious filling into exquisite Peppermint Macarons! This is where your individual shells unite to form the complete, iconic confection.
- Match up your cooled macaron shells by size. Find pairs that are roughly the same diameter and thickness. This ensures a professional and aesthetically pleasing final product, and helps them sit evenly.
- Take one macaron shell, turn it flat side up. Pipe a dollop of peppermint buttercream onto the center of the flat side. You can make a small swirl or just a generous circle, leaving a little room around the edge for the filling to spread. A good rule of thumb is to pipe about a tablespoon of filling.
- Take its matched partner shell and gently place it on top, twisting very slightly to help the filling spread evenly to the edges. Be gentle, as the shells are delicate and can break if too much pressure is applied. You want the filling to be visible but not oozing excessively.
- Repeat this process for all your shells until you have a tray full of charming Peppermint Macarons, ready for their final touch or maturation.
Optional: The Chocolate Drizzle Flourish
A touch of dark chocolate drizzle adds another layer of flavor and a beautiful visual contrast to your festive Peppermint Macarons, enhancing their gourmet appeal and offering a delightful textural element.
- In a small, microwave-safe bowl, combine the chopped dark chocolate and coconut oil. The coconut oil helps to thin the chocolate slightly and gives it a nice sheen when it sets.
- Microwave in 30-second intervals, stirring well after each, until the chocolate is completely melted and smooth. Be careful not to overheat, as chocolate can seize. Alternatively, you can use a double boiler on the stovetop for gentler melting.
- Transfer the melted chocolate to a very small piping bag (or a ziploc bag with a tiny corner snipped off). The smaller the snipped hole, the finer your drizzle will be.
- Lay your assembled Peppermint Macarons on a piece of parchment paper to catch any drips. Drizzle the chocolate artfully over the tops. You can go for a simple zigzag, a few thin lines, or even a more intricate pattern.
- Allow the chocolate to set completely before handling. You can place them in the refrigerator for a few minutes to speed this up, ensuring your chocolate doesn’t smudge.
Storage and Maturation: The Secret to Heavenly Peppermint Macarons
While you might be tempted to devour your Peppermint Macarons immediately, a crucial step for achieving their perfect texture and flavor is allowing them to “mature” or “marry” in the refrigerator. This allows the moisture from the filling to soften the shells, creating that signature chewy interior that macaron lovers adore.
- Arrange your assembled Peppermint Macarons in an airtight container. You can layer them with parchment paper in between if needed to prevent sticking or damage. Avoid overcrowding the container.
- Refrigerate for at least 24 hours, but ideally 48 hours, before serving. This maturation process is what transforms them from good to truly exceptional. The shells will become wonderfully chewy, and the flavors of the peppermint buttercream will meld beautifully with the delicate almond shells, creating a harmonious and balanced treat. The longer they sit (up to 2-3 days), the better the texture will become.
- Bring the Peppermint Macarons to room temperature for about 15-30 minutes before serving for the best texture and flavor experience. A slightly chilled filling is still lovely, but allowing the shells to warm slightly brings out their full chewiness.
- Peppermint Macarons can be stored in an airtight container in the refrigerator for up to 5-7 days. They also freeze beautifully for up to a month. To freeze, place them in a single layer on a baking sheet until firm, then transfer to an airtight freezer-safe container. Thaw them overnight in the refrigerator and then bring to room temperature for about 30 minutes before enjoying. This makes them perfect for preparing ahead for special occasions!
Troubleshooting Tips for Your Peppermint Macarons: Don’t Despair!
Macarons have a reputation for being finicky, but don’t let that discourage you! Even experienced bakers encounter issues. It’s a journey of learning your oven and your technique. Here are some common problems and how to troubleshoot your Peppermint Macarons:
- No “Feet” (or very small feet): This is a common frustration!
- Under-macaronage: The batter wasn’t folded enough. It was too stiff, preventing the batter from flowing outwards and forming feet.
- Over-macaronage: The batter was too runny. It was folded too much, collapsing the meringue’s structure.
- Insufficient resting time: The skin didn’t form properly on the shells. Without a skin, the expanding air during baking escapes from the top instead of pushing downwards to create feet.
- Oven too cool: The macaron didn’t get the initial burst of heat needed to lift the feet. A low oven temperature won’t create enough steam to force the batter upwards.
- High humidity: Makes it difficult for a skin to form during the resting phase.
- Hollow Shells: When you bite into your macaron and find an empty space inside.
- Oven temperature too high: The outside cooks too quickly and hardens before the inside has a chance to fully rise, leaving the inside empty.
- Under-macaronage: Batter was too thick, trapping too much air.
- Not tapping trays enough: Air bubbles trapped inside the shells can lead to hollowness.
- Meringue not stiff enough: Lacked the necessary structure to support the shell.
- Cracked Shells: Unsightly fissures on the top of your shells.
- Oven temperature too high: The sudden, intense heat causes the macaron surface to set too rapidly and crack.
- Not resting long enough: No skin formed to prevent cracking under expansion.
- Air bubbles not tapped out: Expanding air pockets cause the surface to split.
- Under-macaronage: Batter too stiff and dry, lacking elasticity.
- Bumpy/Peaked Tops: Instead of a smooth, dome-like top, your shells have little points.
- Under-macaronage: Batter was too stiff and didn’t settle enough after piping.
- Not tapping trays enough: Air bubbles remain, creating peaks.
- Piping technique: Not lifting the piping bag straight up, causing a “nipple.”
- Sticky Bottoms: When you peel the macaron off the mat, the bottom sticks.
- Under-baked: Need more time in the oven to fully dry out.
- Oven temperature too low: Didn’t cook through properly.
- High humidity: Can prevent proper drying and setting.
- Dark/Burnt Bottoms:
- Oven temperature too high: Especially if your oven has hot spots or heats strongly from the bottom. Try baking on two baking sheets stacked together for insulation, or placing an empty baking sheet on the rack below.
- Too long in the oven: Reduce baking time.
Every oven is different, and practice truly makes perfect with Peppermint Macarons. Don’t be afraid to adjust baking times and temperatures slightly for your specific setup. Keep detailed notes on what works and what doesn’t, including oven temperature, resting time, and macaronage consistency. Soon, you’ll be a macaron master, churning out trays of these delightful minty treats with confidence and flair!
Conclusion:
As we wrap up our delightful journey through the creation of these exquisite treats, I genuinely hope you’re feeling as inspired and excited as I am about bringing these beauties to life in your own kitchen. This isn’t just another recipe; it’s an invitation to experience the sheer joy of baking something truly special, something that whispers of festive cheer and sophisticated indulgence. The moment you bite into one of these, you’ll understand why I’m so passionate about them. The delicate, crisp shell gives way to a wonderfully chewy interior, and then, the star of the show – that refreshingly cool, sweet peppermint filling – dances on your palate. It’s a symphony of textures and flavors that is utterly captivating and profoundly satisfying.
Why These Peppermint Macarons Are an Absolute Must-Try:
There’s a unique magic that happens when you master a macaron, and adding the festive zest of peppermint elevates it to an entirely new level. They are, without a doubt, a showstopper. Imagine the admiring glances as you present a platter of these perfectly formed, vibrant cookies. They don’t just taste incredible; they look like little jewels, promising a burst of holiday spirit with every bite. Beyond their aesthetic appeal, the flavor profile is perfectly balanced. The cooling essence of peppermint cuts through the sweetness beautifully, ensuring that each macaron is a refreshing, not overwhelming, treat. This recipe, specifically, is designed to guide you through the process with clarity, making what might seem daunting, wonderfully achievable. You’ll gain a tremendous sense of accomplishment, and honestly, the bragging rights are well-deserved.
These Peppermint Macarons are more than just a dessert; they are an experience. They embody elegance, flavor, and a touch of homemade magic that factory-made treats simply cannot replicate. They are a testament to the fact that a little effort in the kitchen can yield truly extraordinary results. The satisfaction of seeing those perfect “feet” on your macaron shells, knowing you’ve created something so inherently beautiful and delicious, is an unmatched feeling for any baker.
Serving Suggestions & Creative Variations to Explore:
Once you’ve successfully crafted your batch, the fun doesn’t stop there! These macarons are incredibly versatile. For a simple yet elegant presentation, arrange them on a festive platter with a dusting of confectioners’ sugar or a few fresh mint leaves. They make an absolutely stunning addition to any holiday dessert table, bringing a pop of color and a unique flavor that stands out from traditional cookies and cakes. Imagine serving them alongside a steaming cup of hot chocolate or a perfectly brewed espresso; the peppermint offers a delightful counterpoint that cleanses the palate beautifully. They also make magnificent, thoughtful gifts. Package a small selection in a decorative box, tie it with a ribbon, and you have a handmade present that speaks volumes of your care and culinary skill.
But why stop at the classic? This recipe is a fantastic foundation for your own creative explorations. Consider varying the filling – a rich chocolate ganache instead of buttercream for a “peppermint patty” macaron, or even a cream cheese frosting for a tangier counterpoint. You could also experiment with the shells themselves. A vibrant red or green food coloring would make them even more festive for the holidays. For an extra touch of sparkle, once the shells are baked and cooled, you could dip one half in melted white or dark chocolate and then sprinkle with crushed candy canes or edible glitter. Or, for a truly decadent treat, you could sandwich a thin piece of dark chocolate between the shells along with the peppermint filling. The possibilities are truly endless, and each variation allows you to put your own unique stamp on this already incredible dessert.
Don’t Hesitate, Dive In and Share Your Macaron Journey!
I know the world of macarons can seem intimidating, but I promise you, with this guide, you have everything you need to succeed. Don’t be afraid to try! Baking is an art, and every attempt is a step closer to perfection. The most important ingredient, after all, is a sprinkle of courage and a dash of patience. Embrace the process, enjoy the wonderful aroma that will fill your kitchen, and savor the moment you taste your very own homemade Peppermint Macarons.
I absolutely cannot wait to hear about your experience. Did you try a fun variation? Did you surprise someone special with these delightful treats? Please, do share your baking triumphs, your beautiful photos, and any tips you discovered along the way. Your feedback and creativity inspire me, and I love seeing how you make these recipes your own. So go on, preheat that oven, gather your ingredients, and let’s make some magic happen in the kitchen. Happy baking, my friends!
Peppermint Macarons
A delicious recipe
Ingredients
-
Ingredient 1
-
Ingredient 2
-
Ingredient 3
Instructions
-
Step 1
Step 1 -
Step 2
Step 2 -
Step 3
Step 3
Important Information
Nutrition Facts (Per Serving)
It is important to consider this information as approximate and not to use it as definitive health advice.
Allergy Information
Please check ingredients for potential allergens and consult a health professional if in doubt.
Leave a Comment