

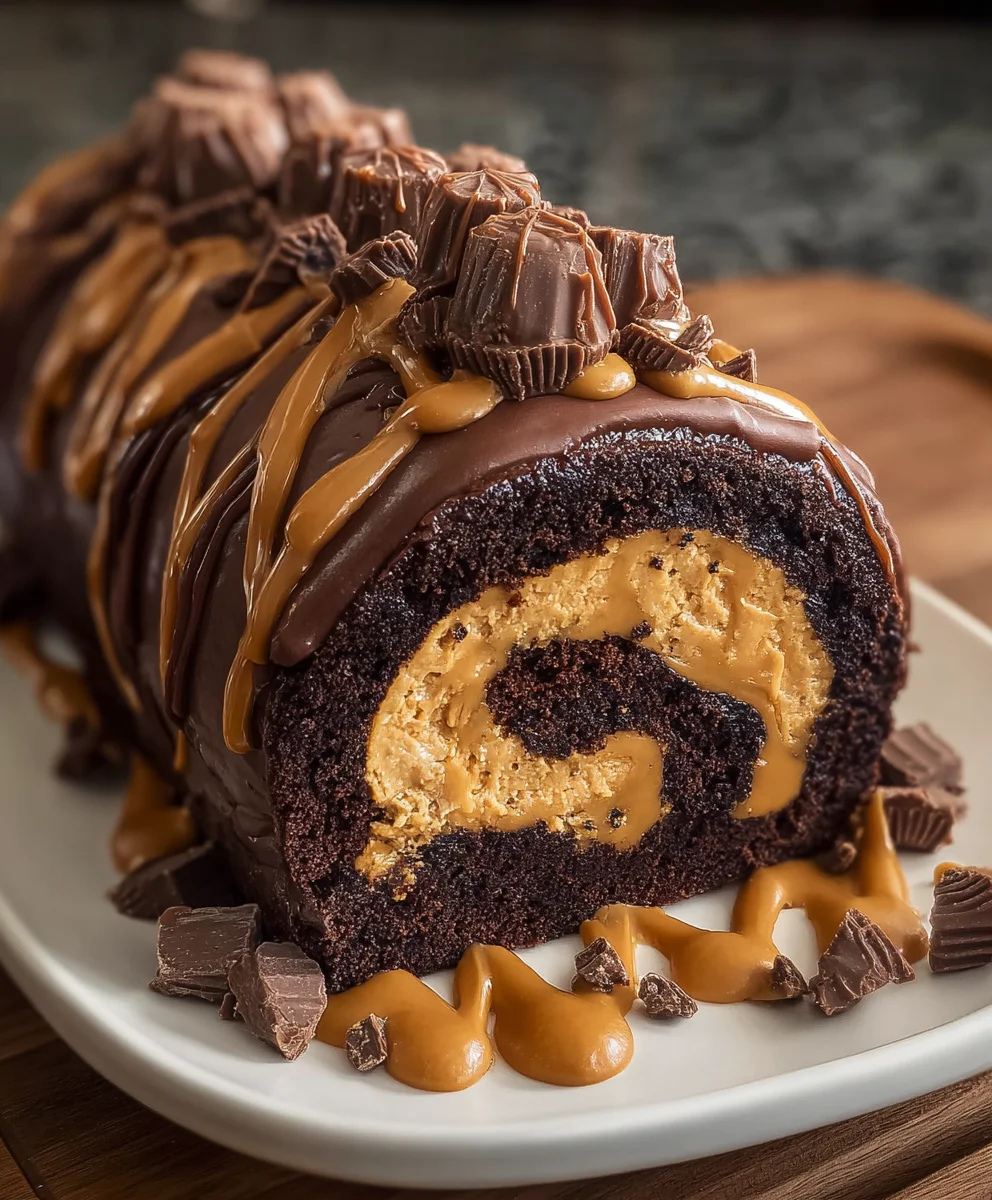
Peanut Butter Cup Chocolate Roll Cake: Are you ready to embark on a culinary adventure that will have your taste buds singing? This isn’t just any dessert; it’s a celebration of two iconic flavors colliding in a symphony of chocolatey, peanut-buttery perfection. We all have those cravings, those moments when only something truly decadent will do, and this Peanut Butter Cup Chocolate Roll Cake delivers in spades. It’s the ultimate crowd-pleaser, the showstopper that disappears the fastest, and for good reason. The magic lies in its impossibly tender chocolate sponge, rolled with a luscious, creamy peanut butter frosting that’s both sweet and delightfully salty. What truly sets this creation apart is the ingenious way we capture the essence of a beloved candy bar, transforming it into an elegant yet utterly satisfying dessert. Get ready to impress, indulge, and discover your new favorite showstopper.

Ingredients:
- 4 large eggs
- 1 cup all-purpose flour
- 1/2 cup unsweetened cocoa powder
- 1/2 teaspoon baking powder
- 1/4 teaspoon salt
- 1/2 cup granulated sugar
- 1/2 cup smooth peanut butter
- 1/2 cup heavy cream
- 1 cup powdered sugar
- 1/4 cup mini peanut butter cups, chopped
- 1/4 cup powdered sugar, for dusting
Preparing the Chocolate Cake Base
This chocolate cake is designed to be incredibly moist and flexible, perfect for rolling without cracking. It’s a simple sponge-like cake, but the cocoa and careful measurements ensure a rich chocolate flavor.
Step 1: Combine Dry Ingredients
First, in a medium-sized bowl, whisk together the all-purpose flour, unsweetened cocoa powder, baking powder, and salt. Whisking these dry ingredients thoroughly helps to aerate the flour and distribute the leavening agent and salt evenly, which is crucial for a consistent cake texture. Ensure there are no clumps of cocoa powder.
Step 2: Whip Egg Whites
In a separate, clean, and grease-free bowl, beat the 4 large eggs. Once they become foamy, gradually add the 1/2 cup granulated sugar. Continue to beat the eggs and sugar on high speed until stiff, glossy peaks form. This process, known as whipping to meringue, incorporates air into the batter, which is the primary leavening for this cake and is what gives it its light and airy structure. The mixture should be thick enough that when you lift the whisk, the peaks stand up straight.
Step 3: Fold in Dry Ingredients
Gently fold the dry ingredients from Step 1 into the whipped egg white mixture. It’s essential to fold rather than stir to maintain the airiness you’ve created. Use a spatula and make slow, deliberate movements, cutting down through the center of the mixture and bringing it up and over the dry ingredients. Do this in batches, perhaps in three additions, folding just until the streaks of flour disappear. Overmixing at this stage will deflate the egg whites and result in a dense cake.
Baking and Preparing the Roll
Step 4: Bake the Cake
Preheat your oven to 350°F (175°C). Line a 10×15 inch jelly roll pan with parchment paper, making sure the paper extends slightly up the sides for easy removal. Pour the batter evenly into the prepared pan, spreading it gently with your spatula to ensure an even layer. Bake for 12-15 minutes, or until the cake springs back when lightly touched in the center. Do not overbake, as this will make the cake dry and prone to cracking when rolled. As soon as it comes out of the oven, let it cool in the pan for about 5 minutes.
Step 5: Prepare for Rolling
While the cake is still warm, carefully invert it onto a clean kitchen towel that has been lightly dusted with powdered sugar. Gently peel off the parchment paper. Now, while the cake is still warm and pliable, tightly roll it up, towel and all. This initial roll will help set the shape for your Peanut Butter Cup Chocolate Roll Cake. Let it cool completely in this rolled position. This is a critical step for preventing cracks. The residual heat will help the cake set into a curve, making it more forgiving for the filling.
Creating the Peanut Butter Filling and Assembly
Step 6: Make the Peanut Butter Cream Filling
In a medium bowl, combine the 1/2 cup smooth peanut butter with the 1/2 cup heavy cream. Beat these together until they are smooth and well combined. Don’t over-whip at this stage, you’re just looking for a smooth, spreadable consistency. Then, gradually add the 1 cup powdered sugar, beating on low speed until fully incorporated. Continue beating on medium-high speed until the mixture is light and fluffy. This filling should be thick enough to hold its shape but still easily spreadable. You want it to have a delicious peanut butter flavor that complements the chocolate cake.
Step 7: Assemble the Roll Cake
Once the cake has cooled completely, carefully unroll it. Gently spread the peanut butter cream filling evenly over the entire surface of the cake, leaving about a 1/2 inch border along one of the long edges. Sprinkle the chopped mini peanut butter cups evenly over the filling. This adds delightful little pockets of peanut butter cup flavor and texture throughout the cake. Carefully and tightly re-roll the cake, this time without the towel. Use the seam side down to hide it.
Step 8: Chill and Decorate
Place the rolled cake seam-side down onto a serving platter. Cover it loosely with plastic wrap and refrigerate for at least 1 hour, or until firm. This chilling period is essential for the filling to set properly and for the cake to hold its shape when sliced. Before serving, dust the top generously with the remaining 1/4 cup powdered sugar. You can also add extra chopped peanut butter cups or a drizzle of melted chocolate if you desire a more elaborate decoration. Slice the Peanut Butter Cup Chocolate Roll Cake into thick portions and enjoy the delicious combination of moist chocolate cake and creamy peanut butter filling.
Conclusion:
And there you have it – your very own delectable Peanut Butter Cup Chocolate Roll Cake! This dessert is a true showstopper, combining the rich, intense flavor of chocolate with the irresistible sweetness of peanut butter. We’ve walked through each step together, from crafting the perfect moist chocolate sponge to swirling in that creamy peanut butter filling and frosting. I hope you feel confident and inspired to create this masterpiece in your own kitchen. Remember, baking is a journey, and perfection comes with practice.
This Peanut Butter Cup Chocolate Roll Cake is wonderfully versatile. Serve it as is for a dramatic dessert presentation, or elevate it with a dusting of cocoa powder, a drizzle of extra chocolate ganache, or even a scattering of chopped peanuts for added texture. For an extra special touch, a scoop of vanilla bean ice cream or a dollop of fresh whipped cream makes it utterly divine.
Don’t be afraid to experiment! If you’re not a fan of peanut butter, try a hazelnut or caramel filling. You can also adjust the sweetness of the frosting to your preference. The most important thing is to have fun and enjoy the process. I can’t wait to hear how yours turns out!
Frequently Asked Questions:
Can I make the Peanut Butter Cup Chocolate Roll Cake ahead of time?
Yes, absolutely! You can bake and cool the chocolate sponge the day before. Prepare the peanut butter filling and frosting and store them separately in airtight containers in the refrigerator. Assemble the cake a few hours before serving to allow the flavors to meld and the cake to soften slightly.
My roll cake cracked when I tried to roll it. What did I do wrong?
Don’t worry, a little crack is perfectly normal and can be easily disguised with the frosting! To minimize cracking, ensure your cake isn’t overbaked. It should be slightly springy to the touch. Also, rolling the cake while it’s still warm (but not hot) is crucial. Using a clean tea towel or parchment paper to help guide the rolling process can also be beneficial.

Peanut Butter Cup Chocolate Roll Cake – Easy Dessert
An easy and delicious dessert featuring a moist chocolate sponge cake rolled with a creamy peanut butter filling and studded with chopped peanut butter cups.
Ingredients
-
4 large eggs
-
1 cup all-purpose flour
-
1/2 cup unsweetened cocoa powder
-
1/2 teaspoon baking powder
-
1/4 teaspoon salt
-
1/2 cup granulated sugar
-
1/2 cup smooth peanut butter
-
1/2 cup heavy cream
-
1 cup powdered sugar
-
1/4 cup mini peanut butter cups, chopped
-
1/4 cup powdered sugar, for dusting
Instructions
-
Step 1
Combine dry ingredients: In a medium bowl, whisk together flour, cocoa powder, baking powder, and salt. -
Step 2
Whip egg whites: Beat eggs until foamy, then gradually add granulated sugar and beat until stiff, glossy peaks form. -
Step 3
Fold in dry ingredients: Gently fold the dry ingredients into the whipped egg whites in batches until just combined, being careful not to deflate the mixture. -
Step 4
Bake the cake: Preheat oven to 350°F (175°C). Pour batter into a parchment-lined 10×15 inch jelly roll pan and bake for 12-15 minutes. Let cool in the pan for 5 minutes. -
Step 5
Prepare for rolling: Invert the warm cake onto a powdered sugar-dusted kitchen towel. Peel off parchment paper and tightly roll the cake with the towel. Let cool completely. -
Step 6
Make peanut butter cream filling: Beat peanut butter and heavy cream until smooth. Gradually add powdered sugar and beat until light and fluffy. -
Step 7
Assemble the roll cake: Unroll the cooled cake. Spread peanut butter filling evenly, leaving a border. Sprinkle with chopped peanut butter cups. Tightly re-roll the cake without the towel. -
Step 8
Chill and decorate: Place seam-side down on a platter, cover, and refrigerate for at least 1 hour. Dust with powdered sugar before serving.
Important Information
Nutrition Facts (Per Serving)
It is important to consider this information as approximate and not to use it as definitive health advice.
Allergy Information
Please check ingredients for potential allergens and consult a health professional if in doubt.


Leave a Comment