

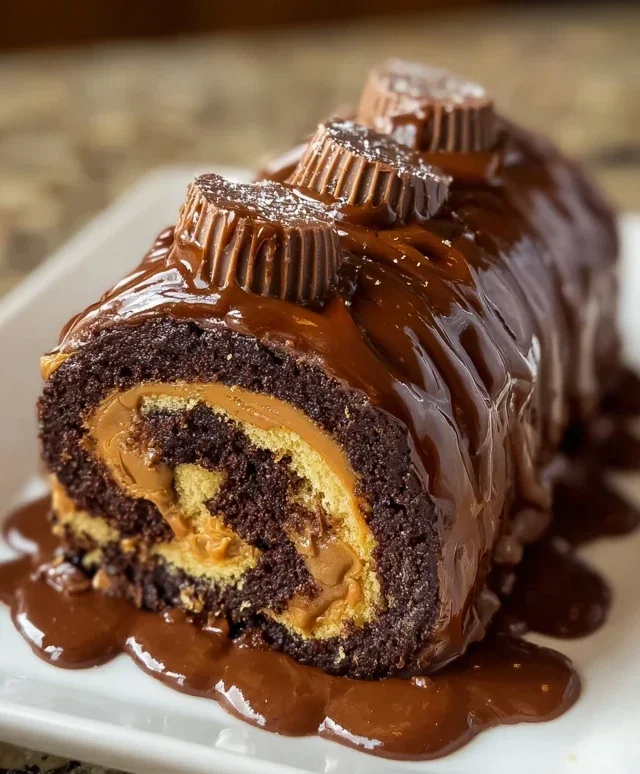
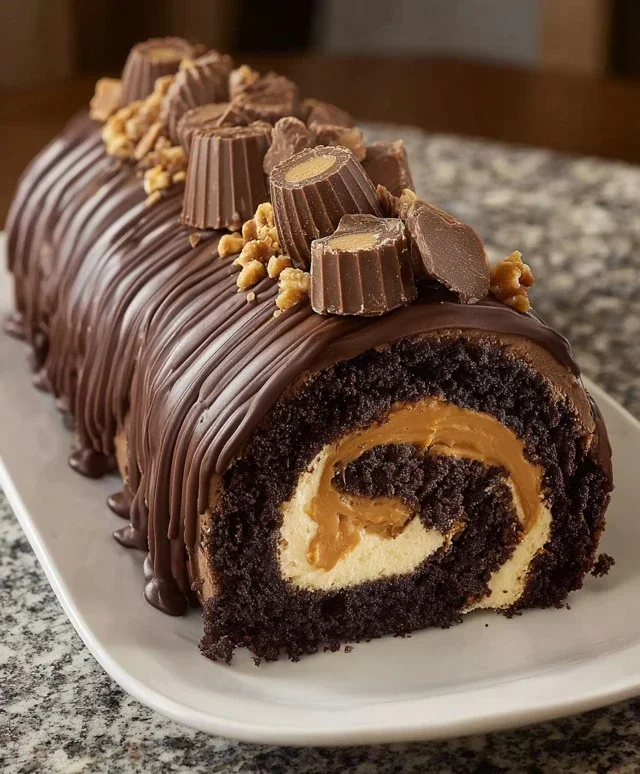
Peanut Butter Cup Chocolate Roll Cake is about to become your new obsession. Imagin extracte this: a decadent, impossibly moist chocolate cake, rolled up with a luscious peanut butter frosting, and then drenched in a rich chocolate ganache. It’s the kind of dessert that makes grown adults giddy, and for good reason! We all have a soft spot for the iconic combination of chocolate and peanut butter, and this Peanut Butter Cup Chocolate Roll Cake takes that love to an entirely new level. It’s more than just a dessert; it’s a celebration, a comforting embrace, and a guaranteed showstopper at any gathering. What makes this particular Peanut Butter Cup Chocolate Roll Cake so special is the perfect balance of textures and flavors – the tender cake, the creamy filling, and the glossy, slightly bittersweet ganache. Get ready to impress yourself and everyone lucky enough to snag a slice!

Peanut Butter Cup Chocolate Roll Cake
Get ready to impress yourself and anyone lucky enough to try this decadent Peanut Butter Cup Chocolate Roll Cake. This recipe takes the classic chocolate roll cake and infuses it with the irresistible flavor combination of peanut butter and chocolate, reminiscent of everyone’s favorite candy. It’s surprisingly manageable, even for home bakers, and the result is a showstopper that’s both visually stunning and incredibly delicious. The light and airy chocolate sponge cake is rolled with a luscious peanut butter cream cheese frosting, studded with chopped peanut butter cups for extra texture and bursts of chocolatey peanut butter goodness.
This cake is perfect for birthdays, holidays, or just a special treat. Don’t be intimidated by the “roll cake” aspect; with a little patience and these detailed instructions, you’ll be slicing into your masterpiece in no time. The magic lies in the tender sponge and the rich, creamy filling.
Ingredients:
The Chocolate Sponge Cake
This is the foundation of our glorious roll cake. It needs to be light and tender enough to roll without cracking, which is key to a successful roll cake. We achieve this by whipping the eggs and sugar until they are light and fluffy, creating air bubbles that will expand in the oven. Sifting the dry ingredients together also helps to prevent lumps and ensures an even distribution of leavening and flavor.
The Peanut Butter Filling
The filling is where the real magic happens, blending creamy peanut butter with rich cream cheese and a touch of sweetness. This combination is utterly irresistible and perfectly complements the chocolate cake. We’ll whip the heavy cream to stiff peaks to give the filling a light and airy texture, making it easy to spread and incredibly delightful to eat. The chopped peanut butter cups add delightful pops of flavor and texture throughout.
Step-by-Step Instructions:
1. Prepare the Cake Batter: Preheat your oven to 350°F (175°C). Grease a 10×15 inch jelly roll pan and line it with parchment paper, leaving an overhang on the sides. Grease the parchment paper as well. In a medium bowl, whisk together the all-purpose flour, unsweetened cocoa powder, baking powder, and salt. Set aside. In a large bowl, beat the 4 large eggs and 1/2 cup granulated sugar with an electric mixer on high speed until pnon-alcoholic ale, thick, and doubled in volume, about 5-7 minutes. This is crucial for creating a light cake that will roll easily. Gently fold the dry ingredients into the egg mixture in two additions, being careful not to overmix. Stop folding as soon as no streaks of flour remain.
2. Bake the Cake: Pour the batter evenly into the prepared jelly roll pan and spread it with an offset spatula to create an even layer. Tap the pan gently on the counter a few times to release any large air bubbles. Bake for 12-15 minutes, or until the cake springs back when lightly touched. Do not overbake, as this will make the cake dry and prone to cracking. While the cake is baking, lay a clean kitchen towel or parchment paper on a flat surface and dust it generously with 1/4 cup powdered sugar. This is what you’ll use to roll the hot cake.
3. Roll the Cake: As soon as the cake comes out of the oven, immediately invert it onto the prepared powdered sugar-dusted towel or parchment paper. Carefully peel off the parchment paper from the bottom of the cake. Starting from one of the shorter sides, carefully roll the warm cake and the towel together. This step requires a bit of speed while the cake is still warm and pliable. Let the rolled cake cool completely on a wire rack with the seam side down. This cooling period allows the cake to set in its rolled shape.
4. Make the Peanut Butter Filling: While the cake is cooling, prepare the filling. In a medium bowl, beat the 1/2 cup smooth peanut butter with an electric mixer until smooth and creamy. In a separate bowl, beat the heavy cream until stiff peaks form. In another bowl, beat the cream cheese (make sure it’s softened to room temperature for best results) with the 1 cup powdered sugar until smooth and well combined. Gently fold the peanut butter into the cream cheese mixture until fully incorporated. Then, gently fold in the whipped cream until just combined, being careful not to deflate the whipped cream too much. Finally, fold in the 1/4 cup chopped mini peanut butter cups. This filling should be thick enough to spread but still light and creamy.
5. Assemble the Roll Cake: Once the cake has cooled completely, gently unroll it. Spread the peanut butter filling evenly over the entire surface of the cake, leaving a small border around the edges. Carefully re-roll the cake, this time without the towel, trying to keep it as tight as possible. Place the seam side down on a serving platter. You can dust the top with a little extra powdered sugar or drizzle with melted chocolate if you like. Chill the roll cake for at least 30 minutes before slicing and serving. This allows the filling to firm up, making it easier to slice cleanly. Enjoy your delicious creation!
Conclusion:
I truly hope you’ve enjoyed learning how to create this incredible Peanut Butter Cup Chocolate Roll Cake! This recipe is an absolute winner because it masterfully blends the rich, decadent flavors of chocolate with the irresistible, salty-sweet goodness of peanut butter cups, all wrapped up in a light and airy chocolate sponge. It’s the perfect showstopper for any occasion, from birthdays to potlucks, or simply as a delightful treat to brighten your day. The combination is so satisfying and surprisingly easy to achieve, even for begin extractner bakers. I highly encourage you to give this Peanut Butter Cup Chocolate Roll Cake a try; you won’t be disappointed by the delicious results!
When it comes to serving, this cake is fantastic on its own, allowing its flavors to shine. However, you could also serve it with a dollop of freshly whipped cream or a dusting of cocoa powder for an extra touch of elegance. For variations, consider folding in mini chocolate chips or chopped peanut butter cups into the batter for an even more intense peanut butter cup experience. You could also experiment with a different flavored frosting, perhaps a cream cheese frosting or a classic vanilla buttercream, to see how it complements the chocolate and peanut butter elements.
Frequently Asked Questions:
Can I make this cake ahead of time?
Absolutely! You can bake the chocolate sponge and let it cool completely. Once cooled, you can wrap it tightly in plastic wrap and refrigerate it for up to 24 hours. Prepare the peanut butter filling and frosting separately and store them in airtight containers in the refrigerator. Assemble the cake closer to serving time for the best texture and flavor.
What if I don’t have peanut butter cups?
No problem at all! If you can’t find peanut butter cups, you can easily substitute them with chopped peanut butter cookies or even just a generous amount of creamy peanut butter mixed directly into the chocolate frosting. You could also use a good quality peanut butter-flavored candy bar, chopped finely.
Is it difficult to roll the cake without it cracking?
A little practice can go a long way! The key to preventing cracks is to ensure your chocolate sponge is baked just right – not overbaked. Letting it cool completely on a wire rack, and then carefully inverting it onto a clean, powdered-sugar-dusted kitchen towel to cool further, helps a lot. Don’t be afraid to be gentle but firm when rolling. Even if it cracks a little, the frosting will do a wonderful job of hiding it!
Peanut Butter Cup Chocolate Roll Cake
A decadent chocolate cake roll filled with a creamy peanut butter frosting and studded with chopped peanut butter cups.
Ingredients
-
4 large eggs
-
1 cup all-purpose flour
-
1/2 cup unsweetened cocoa powder
-
1/2 teaspoon baking powder
-
1/4 teaspoon salt
-
1/2 cup granulated sugar
-
1/2 cup smooth peanut butter
-
1/2 cup heavy cream
-
1 cup powdered sugar
-
1/4 cup mini peanut butter cups, chopped
-
1/4 cup powdered sugar, for dusting
Instructions
-
Step 1
Preheat oven to 375°F (190°C). Grease and flour a 10×15 inch jelly roll pan. Line with parchment paper, then grease and flour the parchment paper. -
Step 2
In a medium bowl, whisk together flour, cocoa powder, baking powder, and salt. -
Step 3
In a large bowl, beat eggs and granulated sugar until thick and pale, about 5 minutes. Gently fold in the dry ingredients in two additions. -
Step 4
Spread batter evenly into the prepared pan. Bake for 12-15 minutes, or until a toothpick inserted into the center comes out clean. -
Step 5
While the cake is baking, prepare the filling. In a bowl, beat peanut butter and 1 cup powdered sugar until smooth. Gradually beat in heavy cream until well combined and creamy. -
Step 6
Immediately after removing the cake from the oven, invert it onto a clean kitchen towel dusted with 1/4 cup powdered sugar. Peel off the parchment paper. Starting from the short end, carefully roll up the cake with the towel inside. Let it cool completely. -
Step 7
Once cooled, unroll the cake. Spread the peanut butter filling evenly over the cake. Sprinkle with chopped peanut butter cups. Roll up the cake tightly, without the towel this time. -
Step 8
Wrap the roll cake in plastic wrap and refrigerate for at least 1 hour before slicing and serving.
Important Information
Nutrition Facts (Per Serving)
It is important to consider this information as approximate and not to use it as definitive health advice.
Allergy Information
Please check ingredients for potential allergens and consult a health professional if in doubt.
Leave a Comment