

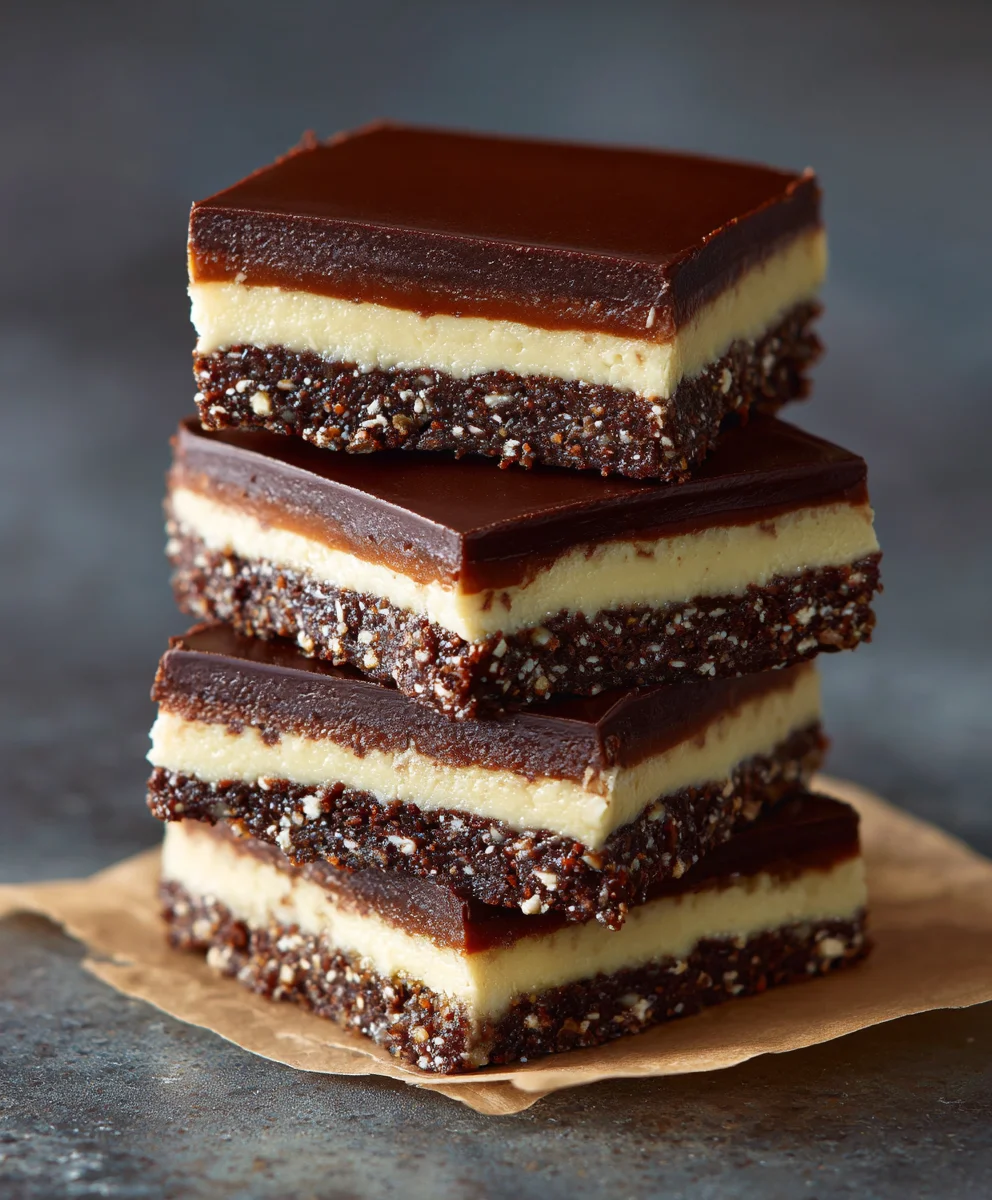
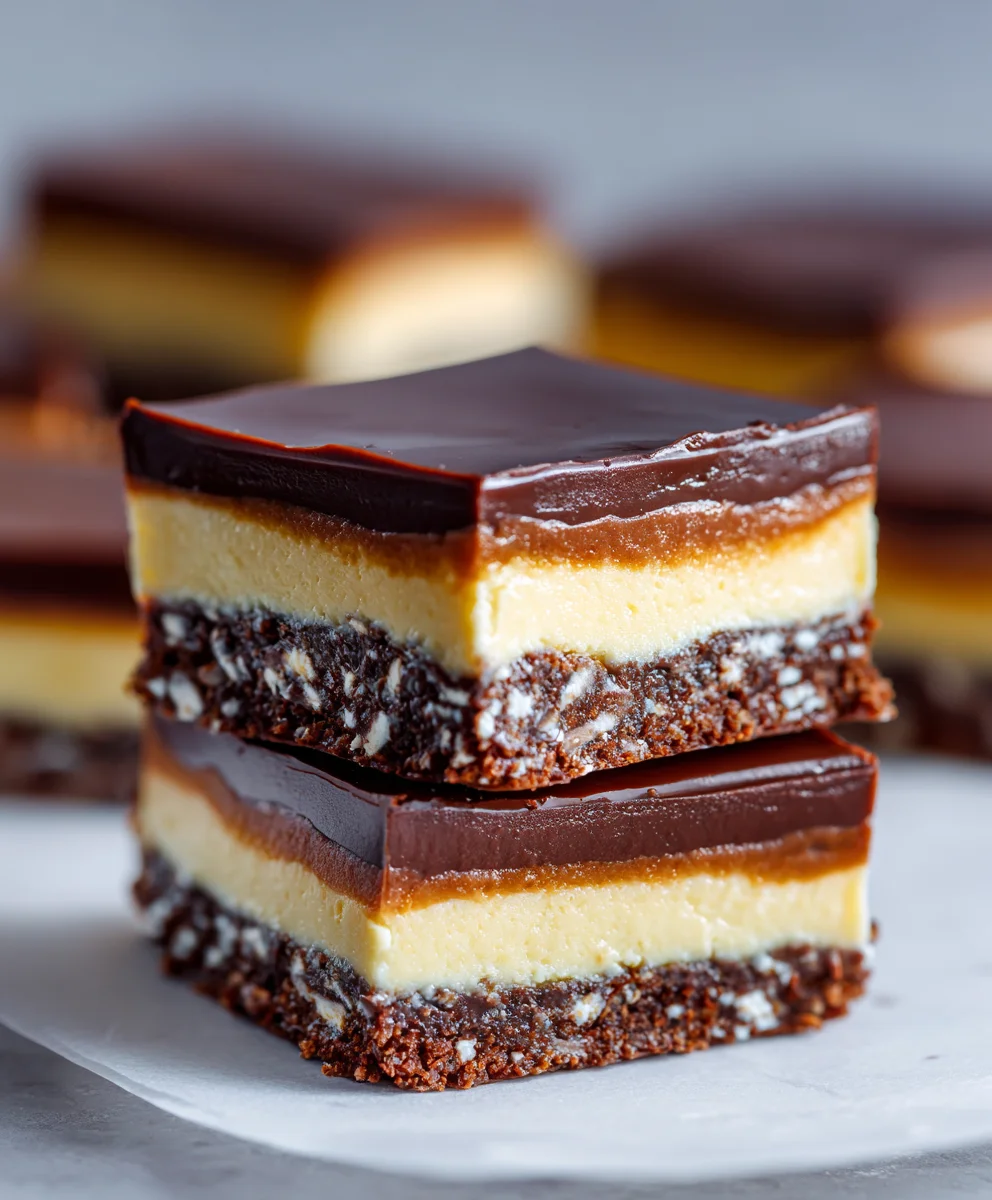
Nanaimo Bars are, without a doubt, a quintessential Canadian treat that has captured hearts and taste buds for generations. Imagine sinking your teeth into a delightful trifecta of textures and flavors: a rich, dense, and coconut-infused crumb base, topped with a lusciously smooth, butter-cream custard filling, all crowned with a decadent layer of semi-sweet chocolate ganache. What makes these no-bake wonders truly special is not just their incredible taste but also their fascinating heritage. Originating from Nanaimo, British Columbia, these bars have become a beloved staple in Canadian households, gracing potlucks, family gatherings, and holiday tables alike.
People adore Nanaimo Bars for their unique layering, the perfect balance of sweetness, and the sheer convenience of a dessert that requires no oven. It’s a nostalgic bite that evokes comfort and joy, delivering a satisfying experience with every square. I am thrilled to share with you my perfected recipe for these iconic bars, ensuring you can recreate this magic in your own kitchen and understand why they remain a timeless favorite across Canada and beyond.

Ingredients:
Here’s everything you’ll need to create these truly iconic Nanaimo Bars. I’ve broken it down by layer to make your preparation a breeze.
For the Decadent Crumb Base:
- ½ cup (113g) unsalted butter: I always opt for unsalted so I can control the salt content myself.
- ¼ cup (50g) granulated sugar: Just enough sweetness to balance the cocoa.
- 5 tablespoons unsweetened cocoa powder: Use a good quality one for the best chocolate flavor in your Nanaimo Bars.
- 1 large egg: Lightly beaten, this acts as our binder, creating a cohesive base.
- 1 teaspoon pure vanilla extract: A touch of vanilla always enhances chocolate.
- 2 cups (180g) graham cracker crumbs: Finely crushed, these are the star of the base. If you can’t find graham crackers, plain digestive biscuits work beautifully.
- 1 cup (85g) shredded unsweetened coconut: This gives the Nanaimo Bars their classic texture and subtle tropical aroma. Don’t use sweetened, as it can make the base too cloying.
- ½ cup (50g) finely chopped pecans or walnuts: Optional, but I love the crunch and nutty depth they add. If you’re not a fan of nuts, feel free to omit them!
For the Rich Custard Filling:
- ½ cup (113g) unsalted butter: Softened to room temperature – this is crucial for a smooth filling.
- ¼ cup (50g) heavy cream or evaporated milk: Heavy cream will give a richer, more luxurious texture, but evaporated milk is the traditional choice for Nanaimo Bars.
- 2 tablespoons instant custard powder: This is the secret ingredient for that distinctive, creamy custard flavor. Bird’s custard powder is my go-to!
- 2 cups (240g) powdered sugar (icing sugar): Sifted, to ensure a lump-free, silky smooth filling.
- 1 teaspoon pure vanilla extract: To enhance the sweetness and custard flavor.
For the Glossy Chocolate Topping:
- 4 ounces (113g) semi-sweet chocolate: Good quality baking chocolate, chopped into small pieces for even melting. I often use a 60-70% cacao bar for a less sweet finish.
- 2 tablespoons unsalted butter: This gives the topping its beautiful sheen and helps it set smoothly.
Step-by-Step Instructions for Your Perfect Nanaimo Bars:
Let’s get started on creating these delightful Nanaimo Bars! It’s a three-layer process, but I promise it’s incredibly rewarding.
Preparing the Decadent Nanaimo Bar Base
The foundation of any great Nanaimo Bar is its rich, chewy, and slightly crunchy base. This layer comes together quickly on the stovetop and is surprisingly simple.
- Prepare your baking pan: First things first, grab an 8×8 inch (20×20 cm) square baking pan. I like to line mine with parchment paper, leaving an overhang on two sides. This creates “handles” which will make it super easy to lift your finished Nanaimo Bars out of the pan later. Lightly grease the exposed sides if you wish, but the parchment is usually enough. Trust me, this little step makes cutting so much simpler!
- Melt the butter, sugar, and cocoa: In a medium-sized saucepan, combine your ½ cup of unsalted butter, ¼ cup of granulated sugar, and 5 tablespoons of unsweetened cocoa powder. Place the saucepan over medium-low heat. We want to gently melt these ingredients together, not boil them. Stir constantly with a whisk or a rubber spatula until the butter is completely melted, the sugar has dissolved, and the mixture is smooth and glossy. This should take about 3-5 minutes. Don’t rush this step; you want everything nicely incorporated.
- Temper and add the egg: Once your chocolate mixture is smooth, remove the saucepan from the heat. This is a crucial moment for preventing scrambled egg! Let the mixture cool for about 2-3 minutes, stirring occasionally. You can even pour it into a separate, cool bowl to speed up the cooling. It needs to be warm, but not hot enough to cook the egg. In a small bowl, lightly beat your large egg with a fork. Once the chocolate mixture has cooled slightly, gradually whisk in the beaten egg, a little at a time, ensuring it’s fully incorporated before adding more. Stir vigorously until the mixture is thick and glossy again. Then, stir in the 1 teaspoon of vanilla extract. The egg acts as a binder, giving our Nanaimo Bar base its distinctive chewy texture.
- Combine dry ingredients: In a large mixing bowl, combine the 2 cups of finely crushed graham cracker crumbs, 1 cup of shredded unsweetened coconut, and if you’re using them, the ½ cup of finely chopped pecans or walnuts. Give them a good stir to ensure they are evenly distributed. This dry mixture is where the texture of the Nanaimo Bars truly shines!
- Mix wet and dry: Pour the warm chocolate-egg mixture from your saucepan directly over the dry ingredients in the large bowl. Using a sturdy rubber spatula or a wooden spoon, mix everything together thoroughly until all the dry ingredients are moistened and a thick, cohesive “dough” forms. You might need to use a bit of elbow grease here! Make sure there are no dry spots left at the bottom of the bowl.
- Press into the pan and chill: Transfer the entire base mixture into your prepared 8×8 inch baking pan. Using the back of your spatula, a flat bottomed glass, or even your clean hands, press the mixture down firmly and evenly across the bottom of the pan. Pay special attention to the corners and edges to ensure a compact and uniform layer. A very firm press is essential for a good, solid Nanaimo Bar base. Once pressed, place the pan in the refrigerator to chill for at least 30 minutes. This allows the base to set firmly, which is vital before adding the next layer.
Crafting the Creamy Custard Filling for Your Nanaimo Bars
The star of the show, in my opinion! This rich, buttery custard filling is what gives Nanaimo Bars their signature flavor and color. It’s incredibly smooth and utterly irresistible.
- Cream the butter: In a medium-sized mixing bowl, using an electric mixer (either a stand mixer with the paddle attachment or a hand-held mixer), cream your ½ cup of softened unsalted butter. Beat it on medium speed for 2-3 minutes until it’s light and fluffy. This step incorporates air, making the filling light and dreamy. Make sure your butter is truly at room temperature – not melted, but easily yielding to pressure. This is key for a smooth Nanaimo Bar filling.
- Prepare the custard mixture: In a separate small bowl, whisk together the ¼ cup of heavy cream (or evaporated milk) and the 2 tablespoons of instant custard powder until smooth and lump-free. The custard powder will dissolve and thicken the cream slightly, preparing it to create that distinct Nanaimo Bar taste.
- Add powdered sugar and custard liquid: Gradually add the 2 cups of sifted powdered sugar to the creamed butter, alternating with the custard-cream mixture. Start by adding about a third of the powdered sugar, mix until just combined, then add half of the liquid custard mixture, mix, and repeat until all the sugar and liquid are incorporated. I always start and end with powdered sugar.
- Whip until light and fluffy: Once all ingredients are added, increase the mixer speed to medium-high and beat for another 3-5 minutes. You’ll notice the mixture becoming significantly lighter in color and incredibly fluffy and airy. It should be thick enough to hold soft peaks. Stir in the 1 teaspoon of pure vanilla extract. Taste and adjust if necessary – though usually, it’s perfect as is! This light and airy texture is absolutely essential for a truly authentic Nanaimo Bars experience.
- Spread over the base and chill again: Retrieve your chilled base from the refrigerator. Carefully spoon the custard filling over the set base. Using an offset spatula or the back of a spoon, gently spread the filling evenly to cover the entire base layer, reaching all the way to the edges. Take your time to make this layer as smooth as possible, as it will be visible. Once spread, return the pan to the refrigerator to chill for at least 30-60 minutes, or until the custard layer is firm to the touch. This firming up is crucial before the final chocolate topping.
Finishing with the Decadent Chocolate Topping for Your Nanaimo Bars
The grand finale! A luscious, glossy chocolate layer that cracks beautifully when you cut into it, providing the perfect counterpoint to the sweet, creamy filling and chewy base. This layer completes the iconic Nanaimo Bars look.
- Melt the chocolate and butter: In a microwave-safe bowl, combine your 4 ounces of chopped semi-sweet chocolate and 2 tablespoons of unsalted butter. Heat in the microwave on medium power for 30-second intervals, stirring well after each interval, until the mixture is completely melted and smooth. Alternatively, you can use a double boiler: place the ingredients in a heatproof bowl set over a small saucepan of simmering water, ensuring the bottom of the bowl does not touch the water. Stir gently until melted and smooth. Avoid overheating the chocolate, as it can seize. The goal is a perfectly glossy, pourable ganache-like consistency.
- Pour and spread the topping: Once the chocolate mixture is perfectly smooth and slightly cooled (it shouldn’t be piping hot, just warm enough to pour), retrieve your pan with the chilled base and custard filling from the refrigerator. Carefully pour the melted chocolate over the set custard layer. Using an offset spatula or the back of a spoon, quickly and gently spread the chocolate evenly across the entire surface. Work swiftly but carefully, as the cold custard layer will cause the chocolate to start setting almost immediately.
- Final chill: Once the chocolate topping is spread, return the pan to the refrigerator for at least 1-2 hours, or ideally, until the chocolate topping is completely firm and set. This final chill is essential not only for the chocolate to set but also for all the layers to meld together beautifully. It will also make the Nanaimo Bars much easier to cut cleanly. If you try to cut them too soon, the chocolate will crack unevenly, and the layers might squish.
Cutting and Serving Your Perfect Nanaimo Bars
You’re almost there! The final step is to cut your perfectly layered Nanaimo Bars into manageable pieces. This requires a little technique to ensure neat, beautiful squares.
- Warm your knife for clean cuts: Before cutting, let the chilled Nanaimo Bars sit at room temperature for about 10-15 minutes. This allows the chocolate topping to soften just slightly, preventing it from cracking too much. For the cleanest cuts, I always recommend dipping a sharp, thin-bladed knife into very hot water, wiping it completely dry, and then making your cuts. Repeat this warming and wiping process for each cut. This technique makes a world of difference for a pristine Nanaimo Bars presentation!
- Cut into squares: Using your warmed, dry knife, make even cuts through the Nanaimo Bars to create your desired size squares or rectangles. I usually aim for 16 squares (four cuts in one direction, then four in the other) in an 8×8 inch pan, which makes perfect bite-sized treats. Be firm but gentle as you cut through all three layers.
- Serve and store: Carefully lift the Nanaimo Bars out of the pan using the parchment paper overhangs. Separate the squares and arrange them on a serving platter. These Nanaimo Bars are best stored in an airtight container in the refrigerator for up to a week. While they are delicious chilled, letting them sit at room temperature for 10-15 minutes before serving often enhances their flavors and textures. Enjoy every single bite of your homemade, classic Nanaimo Bars!
Conclusion:
So there you have it, my friends! We’ve journeyed through the simple yet magical steps of creating a truly iconic dessert, one that consistently brings smiles and satisfies the sweetest cravings without ever needing to touch an oven. This isn’t just another recipe; it’s an invitation to experience pure, unadulterated baking bliss, a delightful escape into layers of rich flavour and satisfying texture. I truly believe that once you try this recipe, it will become a staple in your culinary repertoire, a dependable crowd-pleaser you can whip up for any occasion, or just because a craving strikes.
What makes this particular rendition a must-try, you ask? It’s the perfect harmony of its three distinct components. The base, a crunchy, buttery mosaic of graham cracker crumbs, coconut, and cocoa, provides that essential textural contrast that is so often missing in other desserts. Then, you have the heart of it all: the creamy, sweet custard filling. My recipe ensures this layer is impeccably smooth, rich, and just firm enough to hold its shape beautifully, offering that luxurious melt-in-your-mouth experience we all crave. And finally, crowning it all is that irresistible, glossy layer of chocolate ganache – a decadent finish that pulls every element together into a symphony of taste and indulgence.
Whether you’re a seasoned baker or just dipping your toes into the world of homemade treats, I promise you, these Nanaimo Bars are an absolute game-changer. They embody everything wonderful about a no-bake dessert: minimal fuss, maximum flavour, and an undeniable ‘wow’ factor that makes them a star at any gathering. They’re surprisingly straightforward to assemble, making them an excellent project for a quiet afternoon, or even a fun activity to do with family. The satisfaction of slicing into those perfectly defined layers after chilling is truly a joy in itself, a testament to the simple elegance of this classic.
Now, let’s talk about enjoying these beauties. While they are undeniably perfect straight from the fridge, cold and firm, don’t be afraid to experiment with how you serve them! Imagine enjoying a generous square alongside a steaming mug of strong, dark coffee for a luxurious morning treat, or pairing it with a delicate Earl Grey tea in the afternoon for a touch of refined indulgence. They are, of course, the quintessential party dessert, easy to transport, cut into neat squares, and even easier to devour. For a truly elegant presentation, try dusting them with a whisper of cocoa powder or a sprinkle of flaky sea salt just before serving – it elevates the experience beautifully, adding a sophisticated touch that will impress your guests. They also make fantastic edible gifts, neatly packaged in a decorative box for friends, neighbours, or anyone who deserves a sweet pick-me-up.
But the fun doesn’t stop there! One of the things I adore about this recipe is its incredible adaptability. While the classic version is heavenly, consider these twists to make them uniquely yours.
Experiment with Extracts:
Instead of vanilla, try adding a hint of almond extract to the custard layer for a subtle, marzipan-like nuance that adds a surprising depth. For a festive, holiday-inspired delight, a touch of peppermint extract can transform them into a cool, refreshing treat. You could even add a dash of orange zest to the base mixture for a bright, citrusy lift that beautifully complements the chocolate.
Chocolate Customization:
Feel free to play with the type of chocolate for the topping. A high-quality darker chocolate will offer a more intense, bittersweet contrast to the sweet filling, creating a more complex flavour profile. Alternatively, using milk chocolate will lean into a sweeter, creamier profile that’s perfect for those with an extra sweet tooth. You could even swirl white chocolate into the dark chocolate topping for a marbled effect that’s as visually stunning as it is delicious.
Crunchy Additions:
For an extra layer of texture and flavour, consider adding finely chopped toasted pecans, walnuts, or even a mix of your favourite nuts to the base mixture. Just ensure they are very finely chopped so they blend seamlessly and don’t compromise the integrity of the firm base.
Dairy-Free/Gluten-Free Exploration:
For those with dietary considerations, don’t despair! The world of baking substitutions has come a long way. Many excellent alternatives are available today for butter (plant-based butter sticks work wonderfully), graham crackers (look for gluten-free varieties), and even dairy-free sweetened condensed milk. While I haven’t detailed those specific modifications within this recipe, know that with a little research and a willingness to experiment, you can often adapt this beloved classic to suit various needs, ensuring everyone gets to enjoy a slice of this Canadian masterpiece.
My absolute favourite part of sharing recipes is seeing them come to life in your kitchens. So, please, don’t let this recipe gather dust! Roll up your sleeves, gather your ingredients, and dive into the delightful world of homemade Nanaimo Bars. I promise you, the joy of creating these layers of deliciousness is only surpassed by the joy of eating them. Once you’ve made them, I would absolutely love to hear about your experience. Did you stick to the classic? Did you try a fun variation? Share your thoughts, your successes, and even your funny kitchen anecdotes! Your feedback and creations truly make my day, and they inspire me to keep sharing more delicious adventures with you all. Happy baking, my friends, and get ready to fall in love with your new favorite no-bake treat!
Classic Nanaimo Bars: No-Bake Chocolate Coconut Treat
A quintessential Canadian no-bake dessert featuring a rich chocolate coconut crumb base, a creamy custard filling, and a decadent semi-sweet chocolate topping. These irresistible bars are a beloved staple for gatherings and holidays, offering a perfect balance of sweetness and texture.
Ingredients
-
½ cup (113g) unsalted butter
-
¼ cup (50g) granulated sugar
-
5 tablespoons unsweetened cocoa powder
-
1 large egg, lightly beaten
-
1 teaspoon pure vanilla extract
-
2 cups (180g) graham cracker crumbs
-
1 cup (85g) shredded unsweetened coconut
-
½ cup (50g) finely chopped pecans or walnuts (optional)
-
½ cup (113g) unsalted butter, softened
-
¼ cup (50g) heavy cream
-
2 tablespoons instant custard powder
-
2 cups (240g) powdered sugar, sifted
-
1 teaspoon pure vanilla extract
-
4 ounces (113g) semi-sweet chocolate, chopped
-
2 tablespoons unsalted butter
Instructions
-
Step 1
Prepare an 8×8 inch (20×20 cm) baking pan by lining it with parchment paper, leaving an overhang on two sides. -
Step 2
In a medium saucepan, melt ½ cup butter, granulated sugar, and cocoa powder over medium-low heat, stirring until smooth (3-5 minutes). Remove from heat. Let cool for 2-3 minutes, then gradually whisk in the beaten egg and 1 tsp vanilla extract until the mixture is thick and glossy. -
Step 3
In a large bowl, combine graham cracker crumbs, shredded unsweetened coconut, and optional chopped nuts. Pour the warm chocolate-egg mixture over these dry ingredients and mix thoroughly until all ingredients are moistened and cohesive. -
Step 4
Transfer the base mixture to the prepared pan. Press it down very firmly and evenly across the bottom. Chill in the refrigerator for at least 30 minutes to set. -
Step 5
In a medium bowl, cream ½ cup softened butter with an electric mixer until light and fluffy (2-3 minutes). In a separate small bowl, whisk together the heavy cream and instant custard powder until smooth. -
Step 6
Gradually add the sifted powdered sugar to the creamed butter, alternating with the custard-cream mixture and 1 tsp vanilla. Beat on medium-high speed for 3-5 minutes until the filling is light, fluffy, and airy. -
Step 7
Retrieve the chilled base. Carefully spoon and spread the custard filling evenly over the set base, smoothing it to cover all edges. Return the pan to the refrigerator and chill for at least 30-60 minutes, or until the custard layer is firm to the touch. -
Step 8
In a microwave-safe bowl (or a double boiler), combine the chopped semi-sweet chocolate and 2 tablespoons unsalted butter. Heat in 30-second intervals (or stir gently over simmering water) until completely melted and smooth. Let cool slightly. -
Step 9
Remove the pan from the refrigerator. Pour the melted chocolate over the set custard layer. Quickly and gently spread it evenly across the entire surface. Return the pan to the refrigerator for at least 1-2 hours, or until the chocolate topping is completely firm and set. -
Step 10
Let the chilled Nanaimo Bars sit at room temperature for 10-15 minutes before cutting. For clean cuts, dip a sharp, thin-bladed knife into very hot water, wipe it dry, and then cut into 16 even squares. Repeat the warming and wiping for each cut. Lift bars using parchment paper. Store in an airtight container in the refrigerator for up to a week. Enjoy chilled or slightly softened at room temperature.
Important Information
Nutrition Facts (Per Serving)
It is important to consider this information as approximate and not to use it as definitive health advice.
Allergy Information
Please check ingredients for potential allergens and consult a health professional if in doubt.


Leave a Comment