

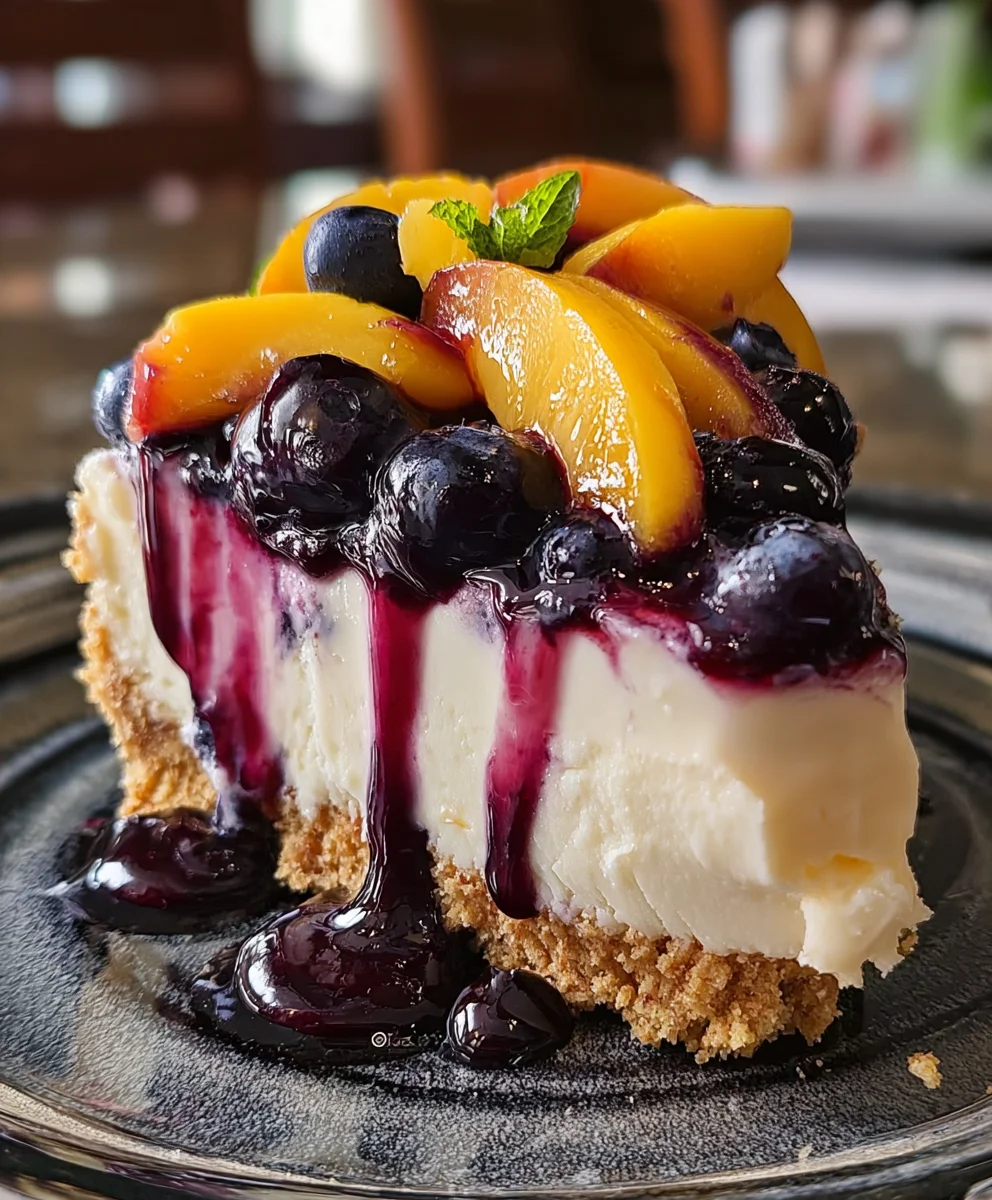
No Bake Peach Blueberry Cheesecake Recipe – just the sound of it conjures images of effortless elegance and sun-drenched flavor, doesn’t it? Imagine a dessert so utterly refreshing, bursting with the sweet, succulent taste of ripe peaches and the vibrant tang of fresh blueberries, all cradled in a velvety-smooth, creamy cheesecake filling atop a buttery crust. The best part? You achieve this culinary masterpiece without ever having to switch on your oven, making it the quintessential treat for warm weather gatherings or simply a delightful evening indulgence.
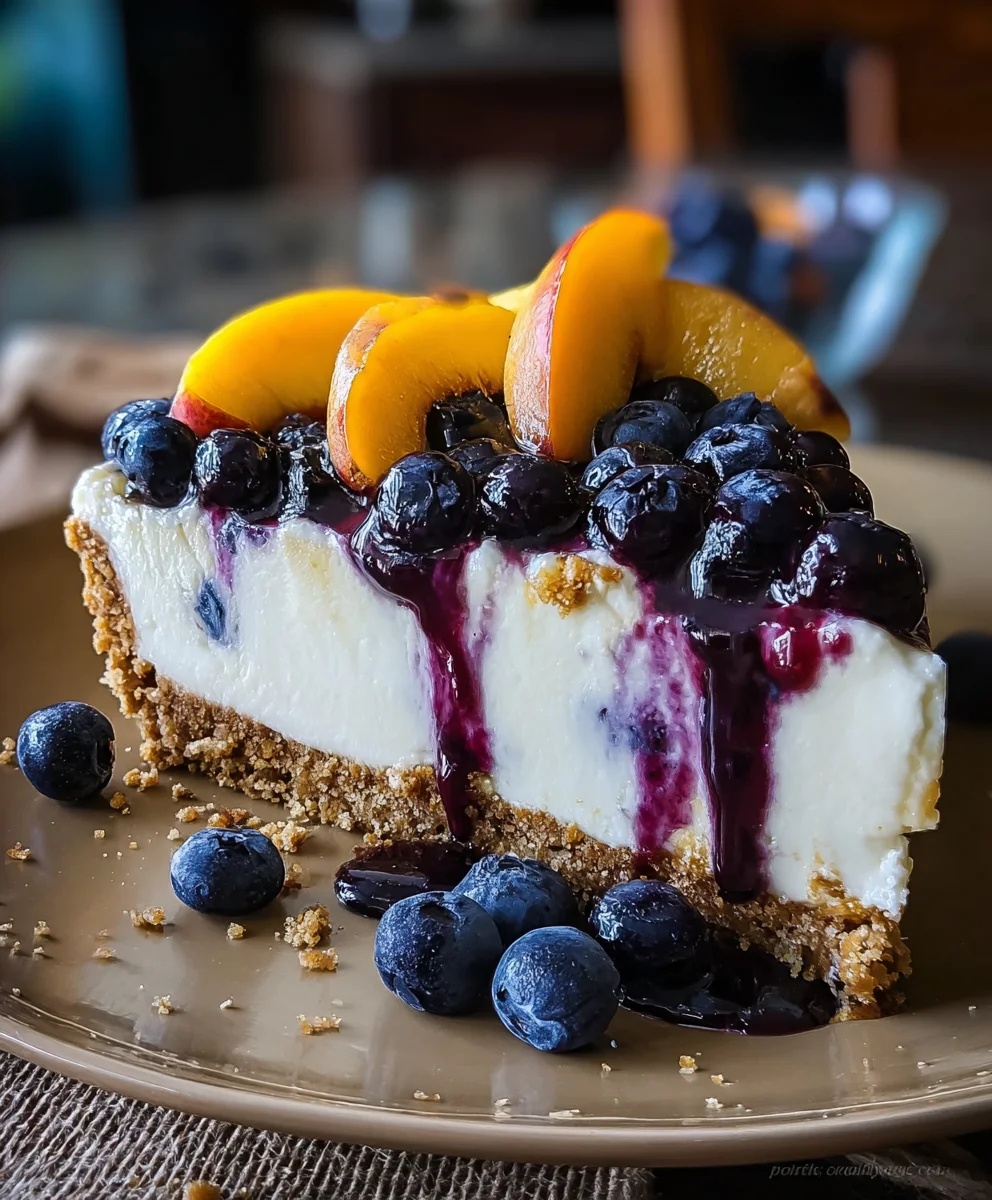
For centuries, cheesecakes have held a special place in our hearts, evolving from ancient delicacies to the diverse, beloved desserts we enjoy today. While traditional baked cheesecakes boast a dense, rich texture, the no-bake variety offers a lighter, airier consistency that is equally captivating and incredibly convenient. It’s a testament to innovation in the kitchen, allowing us to capture incredible flavors with minimal fuss. This particular combination of peaches and blueberries isn’t just a delight for the taste buds; it’s a visual feast, offering a vibrant splash of color that brightens any table.
I find that people adore this dish not only for its incredible taste and melt-in-your-mouth texture but also for its sheer simplicity. It’s the perfect solution for busy hosts or anyone craving a luxurious dessert without the time commitment of baking. So, if you’re seeking a show-stopping dessert that’s both easy to prepare and utterly delicious, this No Bake Peach Blueberry Cheesecake Recipe truly delivers on all fronts, promising a memorable experience with every single forkful.

Ingredients:
-
For the Graham Cracker Crust:
- 1 ½ cups Graham cracker crumbs (approximately 12-14 full Graham cracker sheets, finely crushed)
- ¼ cup Granulated sugar
- ½ cup (1 stick) Unsalted butter, melted and slightly cooled
-
For the Creamy Cheesecake Filling:
- 24 ounces (3 blocks) Full-fat cream cheese, softened to room temperature (this is vital for a smooth filling!)
- 1 ½ cups Powdered sugar (confectioners’ sugar), sifted
- 2 teaspoons Pure vanilla extract
- 1 tablespoon Fresh lemon juice (adds a lovely bright note to balance the richness)
- 2 cups Cold heavy whipping cream (at least 36% fat, kept very cold until ready to use)
-
For the Homemade Peach Topping:
- 3 cups Fresh ripe peaches, peeled, pitted, and diced into small ½-inch pieces (about 3-4 medium peaches, or you can use two 15-ounce cans of peaches, drained and diced)
- ½ cup Granulated sugar (adjust based on sweetness of peaches)
- 2 tablespoons Fresh lemon juice
- 1 tablespoon Cornstarch
- 2 tablespoons Cold water (for cornstarch slurry)
-
For the Blueberry Swirl:
- 1 ½ cups Fresh or frozen blueberries (if using frozen, do not thaw)
- ¼ cup Granulated sugar (adjust to your preference)
- 1 tablespoon Fresh lemon juice
- 1 teaspoon Cornstarch
- 1 tablespoon Cold water (for cornstarch slurry)
-
Optional Garnishes:
- Fresh mint leaves
- Additional fresh peach slices or blueberries
Instructions:
Get ready to create an absolutely stunning and incredibly delicious No Bake Peach Blueberry Cheesecake! This recipe is designed to be straightforward and rewarding, even for novice bakers. Just follow these detailed steps, and you’ll be enjoying a slice of heaven in no time. The key to success here is patience and allowing adequate chilling time, which is crucial for a perfectly set cheesecake.
Phase 1: Preparing the Crust
- Prepare your Springform Pan: Before we even think about crumbs, lightly grease a 9-inch springform pan. You can also line the bottom with a circle of parchment paper for extra insurance against sticking, though it’s not strictly necessary. This small step makes serving so much easier!
- Crush the Graham Crackers: My favorite way to get perfectly fine graham cracker crumbs is by using a food processor. Simply pulse the graham crackers until they are reduced to a fine, sandy texture. If you don’t have a food processor, no worries! Place the crackers in a large zip-top bag and crush them with a rolling pin or the bottom of a heavy pan until equally fine. The finer the crumbs, the more cohesive your crust will be.
- Melt the Butter: In a microwave-safe bowl, melt the ½ cup of unsalted butter. Be careful not to overheat it; just until it’s fully liquid. Let it cool for a minute or two, as pouring very hot butter directly onto the crumbs can make them clumpy.
- Combine Crust Ingredients: In a medium bowl, combine your finely crushed graham cracker crumbs and ¼ cup of granulated sugar. Stir them together until well mixed. Then, pour in the slightly cooled melted butter. Use a fork or your hands to mix everything thoroughly until the crumbs are evenly moistened and resemble wet sand. Every crumb should be coated in butter; this is what holds your crust together!
- Press the Crust: Transfer the buttered crumb mixture into your prepared 9-inch springform pan. Using the bottom of a flat-bottomed glass or your fingers, press the mixture firmly and evenly onto the bottom of the pan. If you like, you can also press some of the mixture about an inch or so up the sides of the pan to create a slight rim. A firm, compact crust is essential for a beautiful slice of No Bake Peach Blueberry Cheesecake.
- Chill the Crust: Once pressed, place the springform pan with the crust into the refrigerator while you prepare the filling. Chilling the crust helps it firm up and prevents it from crumbling when you add the filling, ensuring a sturdy base for your magnificent dessert.
Phase 2: Crafting the Cheesecake Filling
- Soften the Cream Cheese: This is arguably the most critical step for a smooth, lump-free filling. Ensure your three blocks of full-fat cream cheese are truly at room temperature. I usually take mine out of the fridge at least 1-2 hours before I plan to start. If you’re short on time, you can unwrap them and microwave them on low power for 10-15 seconds at a time until softened, but be careful not to melt them.
- Whip the Cream Cheese Mixture: In a large mixing bowl, using an electric mixer (stand mixer with paddle attachment or a hand mixer), beat the softened cream cheese on medium speed until it’s wonderfully smooth and completely free of lumps, usually about 2-3 minutes. This initial step is absolutely crucial for a silky-smooth No Bake Peach Blueberry Cheesecake filling.
- Add Dry and Wet Ingredients: Gradually add the 1 ½ cups of sifted powdered sugar to the cream cheese, beating on low speed until combined, then increase to medium until light and fluffy. Next, beat in the 2 teaspoons of pure vanilla extract and 1 tablespoon of fresh lemon juice. Continue mixing until everything is fully incorporated and the mixture is light and airy. Scrape down the sides of the bowl as needed to ensure no hidden lumps remain.
- Whip the Heavy Cream: In a separate, very cold large mixing bowl (I often chill my bowl and whisk attachment in the freezer for 15 minutes before this step), pour in the 2 cups of very cold heavy whipping cream. Using an electric mixer on high speed, whip the cream until it forms stiff peaks. This means when you lift the whisk, the peaks hold their shape firmly. Be careful not to over-whip, or it will turn grainy.
- Gently Fold in Whipped Cream: Now, for the magic of airiness! Take about one-third of your whipped cream and gently fold it into the cream cheese mixture using a rubber spatula. This helps to lighten the cream cheese base. Once partially combined, add the remaining whipped cream and continue to gently fold until no streaks of cream cheese or whipped cream remain. The goal is to maintain as much of the air you just whipped into the cream as possible, resulting in a light and fluffy cheesecake filling. Over-mixing here will deflate the cream and lead to a denser cheesecake. This delicate folding technique is key to the “No Bake Peach Blueberry Cheesecake” recipe’s signature texture.
Phase 3: Assembling the Cheesecake
- Fill the Crust: Retrieve your chilled graham cracker crust from the refrigerator. Carefully spoon the creamy cheesecake filling onto the crust.
- Smooth the Top: Use an offset spatula or the back of a spoon to gently spread the filling evenly across the crust, smoothing out the top as much as possible. A perfectly flat top makes for a beautiful presentation.
- The Long Chill: This is the hardest part – the waiting! Cover the springform pan loosely with plastic wrap and transfer it back to the refrigerator. Allow the cheesecake to chill for a minimum of 4-6 hours, but for the absolute best results and a truly firm, sliceable No Bake Peach Blueberry Cheesecake, I highly recommend chilling it overnight (8 hours or more). This prolonged chill time allows the cream cheese and cream to fully set, giving you that perfect cheesecake consistency.
Phase 4: Creating the Peach Topping
- Prepare Peaches: If using fresh peaches, peel, pit, and dice them into small ½-inch pieces. If using canned peaches, drain them very well and dice them. You want uniform pieces for the best texture in your topping.
- Make Cornstarch Slurry: In a small bowl, whisk together 1 tablespoon of cornstarch with 2 tablespoons of cold water until smooth. This is your thickening agent.
- Cook Peach Topping: In a medium saucepan, combine the diced peaches, ½ cup of granulated sugar, and 2 tablespoons of fresh lemon juice. Cook over medium heat, stirring occasionally, until the sugar dissolves and the peaches begin to soften and release their juices, about 5-7 minutes.
- Thicken the Topping: Give your cornstarch slurry a quick re-whisk, then slowly pour it into the simmering peach mixture while continuously stirring. Continue to cook, stirring constantly, for another 1-2 minutes, until the mixture thickens and becomes glossy. It should coat the back of a spoon. Remove from heat and transfer the peach topping to a separate bowl. Allow it to cool completely to room temperature before using. You can speed this up by placing it in an ice bath or chilling it in the refrigerator for about an hour, stirring occasionally. It must be cold when added to the cheesecake, so patience here is key!
Phase 5: Adding the Blueberry Swirl
- Prepare Blueberries: If using fresh blueberries, ensure they are washed and dried. If using frozen, you can add them directly to the pan, no thawing needed.
- Make Cornstarch Slurry: In a very small bowl, whisk together 1 teaspoon of cornstarch with 1 tablespoon of cold water until smooth.
- Cook Blueberry Swirl: In a small saucepan, combine the blueberries, ¼ cup of granulated sugar, and 1 tablespoon of fresh lemon juice. Cook over medium heat, stirring occasionally, until the blueberries begin to burst and release their juices, about 5 minutes. Use the back of a spoon to gently crush some of the blueberries against the side of the pan to enhance the flavor and color.
- Thicken the Swirl: Give your cornstarch slurry a final whisk, then slowly pour it into the simmering blueberry mixture while stirring continuously. Continue to cook for 1 minute until the mixture thickens. Remove from heat and transfer to a small bowl. Like the peach topping, it’s crucial to let this blueberry swirl cool completely to room temperature before you attempt to add it to your chilled No Bake Peach Blueberry Cheesecake. Warm toppings will melt your beautiful cheesecake.
Phase 6: Chilling and Serving Your No Bake Peach Blueberry Cheesecake
- Top the Cheesecake: Once your No Bake Peach Blueberry Cheesecake has thoroughly chilled and set (after its 4-6 hour or overnight rest), and both your peach topping and blueberry swirl are completely cooled, it’s time to bring it all together. Carefully remove the cheesecake from the refrigerator.
- Spread Peach Topping: Gently spoon the cooled peach topping evenly over the surface of the set cheesecake. Spread it with an offset spatula or the back of a spoon, creating a beautiful, vibrant layer.
- Create the Blueberry Swirl: Now for the artistic touch! Drizzle spoonfuls of the cooled blueberry swirl over the peach layer. Don’t worry about perfection; organic swirls are often the most appealing.
- Swirl for Effect: Using a thin knife or a skewer, gently drag it through the blueberry and peach layers to create elegant swirls and patterns. Be careful not to dig too deep into the cheesecake filling itself. This step adds visual appeal and ensures you get a delightful burst of blueberry in every bite of your No Bake Peach Blueberry Cheesecake.
- Final Chill: Return the cheesecake to the refrigerator for at least another 1-2 hours. This final chill allows the fruit toppings to set slightly and meld with the cheesecake, ensuring a clean slice and preventing the toppings from sliding off.
- Release and Serve: When you’re ready to serve, carefully run a thin knife around the edge of the pan before releasing the springform. This helps prevent sticking. Slice the No Bake Peach Blueberry Cheesecake with a sharp knife, wiping the knife clean between each cut for the prettiest slices. Garnish each slice with a fresh mint leaf or a few extra berries if desired.
I promise you, every moment spent preparing this No Bake Peach Blueberry Cheesecake is worth it. The blend of the crisp graham cracker crust, the smooth and tangy cream cheese filling, and the burst of fresh, sweet peaches and blueberries is simply irresistible. It’s a perfect dessert for summer gatherings or any time you crave a refreshing treat without turning on your oven. Enjoy!
Conclusion:
So, there you have it – the ultimate guide to creating a dessert that effortlessly combines elegance with irresistible flavor. I truly believe that this particular dessert isn’t just a recipe; it’s an experience, a delightful journey for your taste buds, especially when the sun is shining bright and you’re craving something refreshingly sweet. We’ve walked through every step, from preparing that wonderfully simple crust to layering in the creamy, dreamy cheesecake filling, and finally, crowning it with a vibrant medley of ripe peaches and succulent blueberries. What makes this recipe an absolute game-changer, and truly a must-try for everyone, is its incredible simplicity married with its sophisticated outcome. You get all the ‘wow’ factor without any of the stress or a hot oven, which is a blessing on those warm days when turning on the oven is the last thing you want to do.
The symphony of flavors in this dish is genuinely something special. Imagine the natural, sun-kissed sweetness of fresh peaches mingling perfectly with the slight tartness of plump blueberries, all cradled within a rich, velvety smooth cream cheese layer that just melts in your mouth. Then, beneath it all, that perfectly crisp and buttery graham cracker crust provides a delightful textural contrast. Every single bite is a celebration of summer’s bounty, a perfect balance of sweet, tangy, and creamy that leaves you feeling utterly satisfied and refreshed. It’s light enough to enjoy after a hearty meal but decadent enough to feel like a true indulgence. This is why I can’t stop talking about this specific dessert; it’s a dessert that truly has it all, delivering on taste, texture, and ease of preparation.
Serving Suggestions & Creative Twists:
Now that you’re armed with all the knowledge to create this masterpiece, let’s talk about making it truly your own. While the core recipe is stellar, a few thoughtful touches can elevate your creation even further. For serving, I always recommend a light dusting of powdered sugar just before presenting, or perhaps a delicate sprig of fresh mint placed artfully on top – the green contrast against the vibrant fruit is simply beautiful. If you’re feeling extra indulgent, a dollop of freshly whipped cream on the side, or even a drizzle of a homemade blueberry compote or peach puree, can add another layer of luxury. Consider serving individual slices on elegant dessert plates, perhaps accompanied by a tall glass of iced tea or a sparkling lemonade for the perfect summer spread. For variations, don’t hesitate to experiment with the crust! While graham crackers are classic, crushed shortbread cookies or even ginger snaps could lend a unique twist. And if peaches and blueberries aren’t in season, or if you simply fancy a different fruit combination, feel free to swap them out. Sliced strawberries and raspberries make for a delightful alternative, or even a tropical medley of mango and passion fruit could be an adventurous choice. The beauty of a no-bake cheesecake is its versatility, allowing you to tailor it to your favorite flavors or what’s freshest at the market.
Your Turn to Create and Share!
Ultimately, my biggest hope is that you take this No Bake Peach Blueberry Cheesecake Recipe and make it your own. I’m truly passionate about sharing recipes that bring joy and deliciousness into your kitchen without demanding hours of your precious time. This dessert is designed to impress with minimal effort, making you look like a culinary genius to your friends and family. Don’t just read about it; dive in and create it! Imagine the smiles around your table when you present this stunning, flavorful cheesecake. I promise you, the moment you taste that first bite, you’ll understand exactly why I’m so enthusiastic about it. Once you’ve whipped up your own version, I would absolutely love to hear about your experience! What did you love most about it? Did you try any exciting variations? Please, share your pictures and your stories. There’s nothing more rewarding for me than seeing you successfully recreate and enjoy these dishes. So, go ahead, gather your ingredients, enjoy the simple process, and get ready to indulge in a truly spectacular, fuss-free dessert that will undoubtedly become a staple in your recipe collection. Happy baking… or rather, happy chilling!
No Bake Peach Blueberry Cheesecake Recipe
A delicious recipe
Ingredients
-
Ingredient 1
-
Ingredient 2
-
Ingredient 3
Instructions
-
Step 1
Step 1 -
Step 2
Step 2 -
Step 3
Step 3
Important Information
Nutrition Facts (Per Serving)
It is important to consider this information as approximate and not to use it as definitive health advice.
Allergy Information
Please check ingredients for potential allergens and consult a health professional if in doubt.

Leave a Comment