

My Fave Birria Tacos are more than just a meal; they’re a culinary adventure that promises to tantalize every single one of your taste buds. Imagine succulent, slow-cooked beef, infused with aromatic chiles and spices, lovingly cradled in a crispy, cheese-griddled tortilla, all just waiting to be dipped into a rich, savory consommé. It’s a truly transformative experience that elevates the humble taco to an art form, making every bite an unforgettable moment of pure bliss.
Originating from Jalisco, Mexico, traditional Birria de Chivo (goat birria) has long been a cherished staple for celebrations and family gatherings, evolving over time to include beef (Birria de Res), which has become incredibly popular worldwide. What truly makes these tacos so universally beloved? It’s the harmonious blend of textures and flavors – the incredibly tender, fall-apart meat, the satisfying crunch of the tortilla, the gooey, melted cheese, and that vibrant, spicy dipping broth. Every single element works in perfect concert to create an explosion of warmth, spice, and umami that leaves you craving more. Trust me, once you try My Fave Birria Tacos, you’ll understand why this dish has captured hearts globally and why it deserves a permanent spot in your recipe rotation.

Ingredients:
- For the Birria Beef:
- 3 lbs beef chuck roast, cut into large 2-inch chunks – I find chuck roast gives the best balance of lean meat and marbling, ensuring tender, flavorful results for My Fave Birria Tacos.
- 1 lb bone-in beef short ribs – These add incredible richness and depth of flavor from the bones and extra fat, making the consommé truly exceptional.
- 1 lb beef oxtail, cut into sections – Oxtail provides a gelatinous texture and even more bone marrow richness, which is essential for a silky, unctuous consommé.
- 2 tablespoons olive oil or neutral cooking oil – For searing the beef to lock in flavor.
- 2 teaspoons sea salt, plus more to taste – Season generously at every stage.
- 1 teaspoon freshly ground black pepper, plus more to taste
- 6-8 cups beef broth or water, plus more if needed – I prefer a good quality beef broth for an extra layer of flavor.
- 2 bay leaves
- 1 cinnamon stick (about 3 inches) – A crucial, subtle aromatic that ties all the flavors together in authentic birria.
- For the Chile Marinade and Consommé Base:
- 6-8 dried Guajillo chiles, stemmed and deseeded – These large, mild chiles provide a beautiful red color and a fruity, slightly tangy flavor without much heat.
- 3-4 dried Ancho chiles, stemmed and deseeded – Anchos are dried Poblano peppers; they add a rich, smoky, and earthy depth.
- 3-5 dried Chile de Arbol, stemmed (or more if you like heat!) – These are the small, potent ones! Adjust to your spice preference. I usually use about 4 for a pleasant kick.
- 1 large white onion, roughly chopped (about 1.5 cups)
- 6-8 cloves garlic, peeled – Don’t be shy with the garlic; it’s fundamental to the flavor profile.
- 2-3 ripe Roma tomatoes, roughly chopped (or 1/2 cup canned crushed tomatoes) – For a touch of acidity and sweetness to balance the chiles.
- 2 tablespoons apple cider vinegar – Helps tenderize the meat and brightens the flavors.
- 1 teaspoon ground cumin
- 1 teaspoon dried Mexican oregano – Mexican oregano has a distinct citrusy and earthy flavor different from Mediterranean oregano; it truly makes a difference here.
- 1/2 teaspoon dried thyme
- 1/4 teaspoon ground cloves
- 1/4 teaspoon whole black peppercorns (or 1/2 tsp ground)
- 1/4 teaspoon annatto seeds (optional, for color and subtle flavor) – I sometimes add these for an even deeper, vibrant red color to My Fave Birria Tacos.
- For Assembling My Fave Birria Tacos:
- 24-30 small corn tortillas – Fresh, good quality corn tortillas are paramount for the texture and flavor.
- 2 cups shredded Oaxaca cheese or Monterey Jack cheese – Oaxaca melts beautifully with that signature stringy texture; Monterey Jack is a great alternative.
- Fresh cilantro, finely chopped – For garnish and a burst of freshness.
- 1/2 white onion, finely chopped – The sharpness is a perfect counterpoint to the rich meat.
- Lime wedges – A squeeze of fresh lime juice just before eating elevates every bite of “My Fave Birria Tacos”.
Phase 1: Preparing the Beef for the Birria Base
1. Prepare and Season the Beef: First things first, I like to get my beef ready. Remove the beef chuck, short ribs, and oxtail from their packaging. Pat them thoroughly dry with paper towels. This step is crucial for achieving a beautiful, deep sear later on, which translates to maximum flavor. Once dry, generously season all sides of the beef chunks with 2 teaspoons of sea salt and 1 teaspoon of freshly ground black pepper. Don’t be timid here; this initial seasoning sets the foundation for “My Fave Birria Tacos.”
2. Sear the Beef: Heat 2 tablespoons of olive oil or your preferred neutral cooking oil in a very large Dutch oven or a heavy-bottomed pot over medium-high heat until it just begins to shimmer. Working in batches to avoid overcrowding the pot (this is important to get a proper sear, not just steam the meat), carefully add the seasoned beef chunks. Sear each piece for about 3-5 minutes per side, turning until a deep, rich brown crust forms on all sides. This browning process, known as the Maillard reaction, creates incredible depth of flavor that will permeate the entire dish. Once browned, transfer the seared beef to a separate large bowl or plate and set aside. Repeat with any remaining beef until all pieces are beautifully caramelized.
Phase 2: Crafting the Rich Birria Consommé and Marinade
3. Toast and Rehydrate the Chiles: While your pot is still warm from searing, or in a separate dry skillet over medium heat, add the stemmed and deseeded Guajillo, Ancho, and Chile de Arbol chiles. Toast them for 1-2 minutes, flipping occasionally, until they become fragrant and slightly pliable. Be careful not to burn them, as burned chiles will make your sauce bitter. Remove from heat and immediately transfer the toasted chiles to a heatproof bowl. Pour enough boiling water over them to fully submerge, then cover the bowl and let them rehydrate for about 20-30 minutes, or until they are soft and pliable. This step softens the chiles, making them easy to blend and releasing their full flavor potential for our rich birria.
4. Sauté Aromatics: In the same Dutch oven (no need to clean it; those browned bits are flavor!), add a little more oil if needed. Add the roughly chopped white onion and sauté over medium heat for about 5-7 minutes, stirring occasionally, until softened and translucent. Then, add the peeled garlic cloves and chopped Roma tomatoes (or crushed tomatoes if using canned). Continue to cook for another 3-5 minutes, stirring, until the tomatoes begin to break down slightly. This develops a sweet and savory base for our marinade.
5. Blend the Marinade Base: Once the rehydrated chiles are soft, drain them, reserving about 1/2 cup of the soaking liquid. Transfer the rehydrated chiles, sautéed onion, garlic, and tomatoes to a high-speed blender. Add the apple cider vinegar, ground cumin, dried Mexican oregano, dried thyme, ground cloves, whole black peppercorns (or ground), and annatto seeds (if using). Pour in 1/2 cup of the reserved chile soaking liquid and about 1 cup of beef broth. Blend on high until the mixture is incredibly smooth and creamy. This should take at least 2-3 minutes, possibly longer, depending on your blender. You want absolutely no visible flecks of chile skin. This deeply flavored, velvety smooth sauce is the absolute heart and soul of “My Fave Birria Tacos”!
6. Strain the Marinade (Don’t Skip This!): Place a fine-mesh sieve over a large bowl or back into your clean Dutch oven. Pour the blended chile marinade through the sieve, using the back of a spoon or a spatula to press down on the solids to extract as much liquid as possible. Discard the remaining pulp and seeds left in the sieve. This straining step is paramount for achieving a silky, smooth consommé without any gritty texture, which is a signature characteristic of truly great birria and critical for the enjoyment of “My Fave Birria Tacos.”
7. Braise the Birria: Return the seared beef chunks, short ribs, and oxtail to the Dutch oven with the strained chile marinade. Add the bay leaves and the cinnamon stick. Pour in enough beef broth or water to just barely cover the meat. Bring the mixture to a gentle boil over medium-high heat, then immediately reduce the heat to low, cover the pot tightly, and let it simmer. This is where the magic happens! Cook for at least 3-4 hours, or even up to 6 hours, until the beef is incredibly tender and literally falls apart with the slightest touch of a fork. Low and slow is the secret to succulent birria for “My Fave Birria Tacos.” I often check it around the 3-hour mark, and if it’s not falling apart easily, I’ll give it more time. The longer it braises, the more flavorful and tender it becomes.
Phase 3: Shredding the Beef and Finishing the Consommé
8. Shred the Beef: Carefully remove the super tender beef chunks, short ribs, and oxtail from the pot using tongs or a slotted spoon, transferring them to a large bowl. Discard the bones (they will have given all their goodness to the consommé) and the bay leaves and cinnamon stick. Using two forks, shred all the beef into bite-sized pieces. It should be so tender that it practically disintegrates. If you plan to serve the birria over multiple days, I recommend keeping a little consommé with the shredded meat to prevent it from drying out. Keep the shredded meat warm for assembling “My Fave Birria Tacos.”
9. Finish the Consommé: Now, let’s turn our attention to the glorious consommé left in the pot. Taste it and adjust the seasoning with more salt if needed. The flavors should be rich, savory, and well-balanced with a subtle kick from the chiles. At this point, you’ll likely see a layer of orange-red fat floating on top. This is liquid gold! Carefully skim about 1/2 to 3/4 cup of this delicious, chile-infused fat into a separate heatproof bowl. This fat, sometimes called “chile oil” or “birria oil,” is what we’ll use to dip our tortillas for that authentic, irresistible color and flavor for “My Fave Birria Tacos.” Keep the remaining consommé warm, either in the pot or transferred to individual serving bowls. You can even strain the consommé one more time for an ultra-smooth consistency, but it’s not strictly necessary at this stage.
Phase 4: Assembling and Frying My Fave Birria Tacos
10. Heat the Griddle: Place a large cast-iron skillet or a comal (griddle) over medium-high heat. Let it get nice and hot. This high heat is essential for getting those perfectly crispy, golden-brown tortillas that are a hallmark of “My Fave Birria Tacos.”
11. Dip the Tortillas: This is where the magic truly comes alive! Take one corn tortilla and carefully dip it into the reserved skimmed chile fat (the “birria oil”). Ensure both sides of the tortilla are well-coated. This not only imparts incredible flavor but also gives the tacos their signature vibrant orange-red hue and helps them crisp up beautifully. Don’t be shy; a good coating is key!
12. Build the Taco: Immediately place the dipped tortilla onto the hot skillet. As soon as it hits the pan, sprinkle a generous layer of shredded Oaxaca or Monterey Jack cheese over one half of the tortilla. Then, add a good portion of the shredded birria beef over the cheese. I like to be generous with the filling – these are “My Fave Birria Tacos,” after all!
13. Fold and Crisp: As the cheese begins to melt and the edges of the tortilla start to crisp up and turn golden, carefully fold the empty half of the tortilla over the filled half to create a taco shape. Press down gently with a spatula. Continue to cook for another 1-2 minutes on each side, or until the tortilla is gloriously golden brown, crispy, and the cheese is fully melted and slightly caramelized at the edges. The sizzle and aroma at this stage are absolutely intoxicating!
14. Repeat: Transfer the finished taco to a plate and repeat the process with the remaining tortillas, cheese, and shredded birria beef. You might need to add a little more of the chile fat to your dipping bowl as you go if it gets low. Keep the assembled tacos warm in a low oven (around 200°F/95°C) if serving a crowd, but honestly, these are best served immediately hot off the griddle.
Phase 5: Serving My Fave Birria Tacos
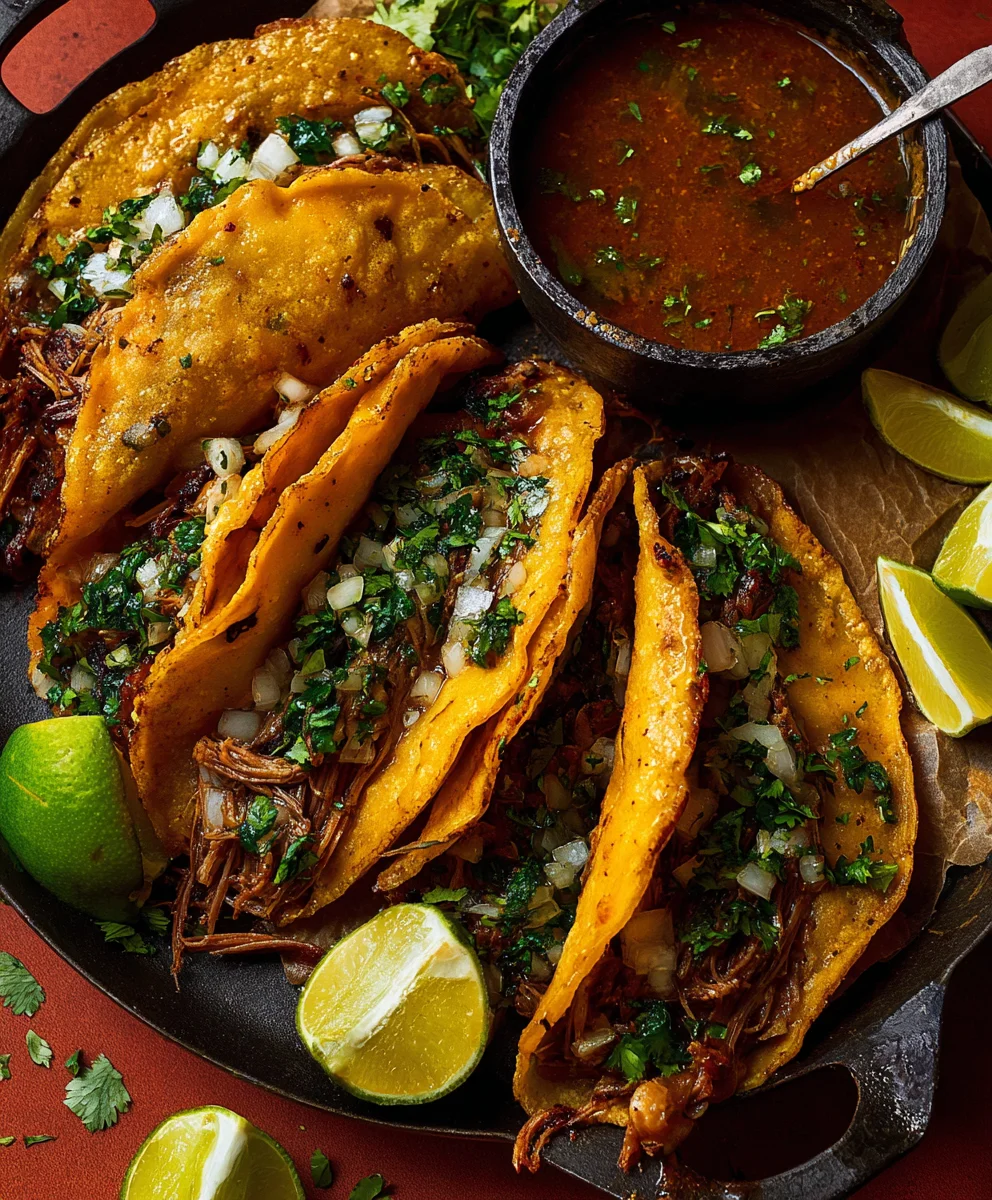
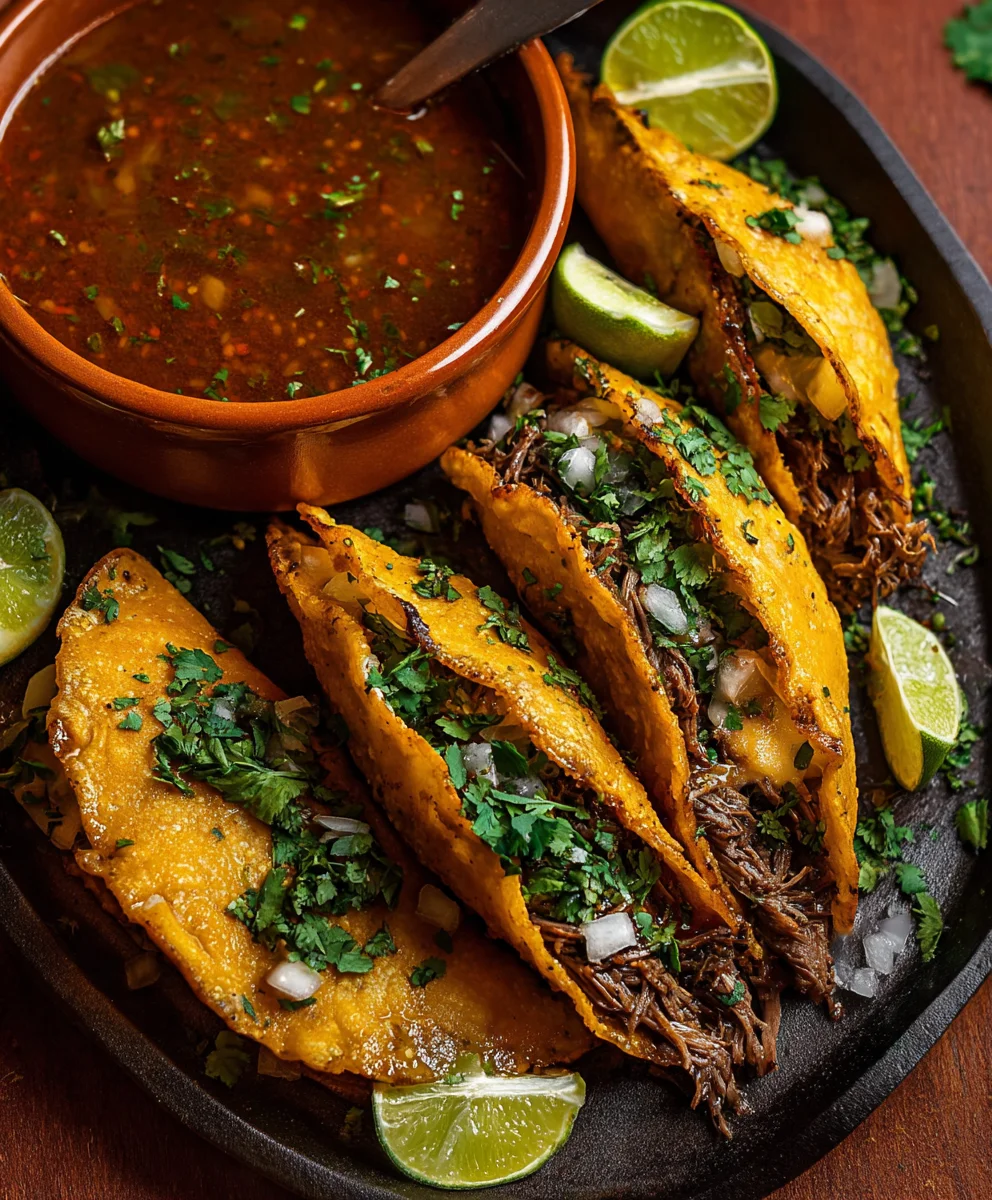
15. Garnish and Serve: Arrange your glorious “My Fave Birria Tacos” on a serving platter. Garnish generously with freshly chopped white onion and cilantro. The sharpness of the onion and the herbaceous freshness of the cilantro cut through the richness of the birria perfectly.
16. The Consommé Experience: Serve the tacos with individual small bowls of the hot birria consommé on the side. This is essential for dipping! Encourage everyone to dip their tacos into the consommé before each bite; it adds an extra layer of moisture, flavor, and that signature birria experience. Don’t forget to offer plenty of lime wedges for squeezing over the tacos – a touch of fresh acidity brightens everything up. Get ready for the best Birria Tacos you’ve ever tasted!
Pro Tips for the Ultimate Birria Taco Experience
- Don’t Rush the Braise: Patience is truly a virtue when making birria. The longer and slower you cook the beef, the more tender and flavorful it will become. It’s the secret to that melt-in-your-mouth texture that defines “My Fave Birria Tacos.”
- The Strain is Not Vain: While it might seem like an extra step, straining the chile marinade is absolutely essential for a smooth, refined consommé. No one wants gritty sauce with their tacos!
- Quality Corn Tortillas Matter: Invest in good quality, fresh corn tortillas. They hold up better to dipping and frying, and their authentic corn flavor is crucial.
- Fat is Flavor: Do NOT skimp on dipping those tortillas in the skimmed chile fat. That flavorful oil is what gives “My Fave Birria Tacos” their incredible color, crispiness, and depth of taste.
- Make Extra Consommé: The consommé is arguably as important as the tacos themselves. You’ll want plenty for dipping, and it’s also delicious as a savory broth on its own. It’s often gone before the tacos are!
- Prep Ahead: The birria meat and consommé can be made a day or two in advance. The flavors often deepen overnight, making for even more spectacular “My Fave Birria Tacos” when you’re ready to assemble and fry. Just store the shredded meat and consommé separately in the fridge.
Conclusion:
Well, my friends, we’ve reached the end of our culinary journey, but truly, it’s just the beginning of your birria adventure! If you’ve been searching for that ultimate flavor bomb, that dish that transcends a mere meal and becomes an experience, then this recipe for My Fave Birria Tacos is undeniably it. What sets these tacos apart, making them an absolute non-negotiable addition to your cooking repertoire, is the unparalleled depth of flavor. We’re talking about succulent, melt-in-your-mouth beef, slow-cooked to perfection in a rich, aromatic consommé infused with a symphony of dried chiles and spices. Every shred of meat carries the essence of hours of patient simmering, delivering a savory, slightly smoky, and subtly spicy punch that will have your taste buds singing. Then, there’s the magic of the corn tortilla, dipped in that glorious consommé, griddled until perfectly crispy, cradling the tender birria, and finished with a generous sprinkle of cheese that melts into gooey perfection. It’s a texture party – the crisp exterior giving way to juicy, tender meat and creamy cheese, all elevated by that intoxicating dipping broth. Trust me, this isn’t just a meal; it’s a celebration of flavor, a truly comforting and satisfying dish that brings people together and leaves an unforgettable impression. You’ll understand why these quickly became my absolute favorite.
But the deliciousness doesn’t stop with the basic taco! The beauty of birria lies in its versatility. While the classic serving style is undoubtedly the way to go – piled high with freshly chopped white onion, vibrant cilantro, a squeeze of lime, and a sidecar of that heavenly consommé for dipping – don’t be afraid to experiment. For an extra kick, a few slices of thinly cut radishes add a refreshing crunch and peppery bite that beautifully contrasts the richness. A dash of your favorite hot sauce, or a homemade fiery salsa roja, can also take the experience up a notch for those who crave more heat. And what about variations? The leftover birria meat, if you’re lucky enough to have any, is a treasure trove of culinary possibilities. Transform it into incredibly satisfying birria quesadillas, where the cheese and meat are pressed between two tortillas until golden and crispy. Or how about stuffing it into burritos, layering it over nachos for the ultimate game-day snack, or even creating delicious birria sopes or gorditas? The consommé itself, rich with flavor, can be enjoyed on its own as a warming soup, perhaps with a little more onion and cilantro, or used as a base for other Mexican-inspired dishes. For a twist on the cheese, feel free to experiment with different varieties; while Oaxaca cheese offers that quintessential melty pull, Monterey Jack or even a Mexican blend can work beautifully too. Consider serving these masterpieces alongside a vibrant Mexican rice and some creamy refried beans to round out the feast. The possibilities are truly endless once you master this foundational birria recipe.
Now, I know what you might be thinking – “This sounds amazing, but also a bit involved.” And yes, birria takes a little time and patience, but I promise you, every single minute invested is worth it. The aromas that will fill your kitchen as the birria slowly simmers are a reward in themselves, a tantalizing preview of the culinary delight to come. There’s a profound satisfaction that comes from creating something so incredibly flavorful from scratch, and the proud smiles on the faces of your family and friends when they taste these tacos will be your ultimate gratification.
So, I urge you, don’t just read about this incredible recipe; gather your ingredients, set aside some dedicated time, and embark on this flavorful adventure. Trust me, once you experience the magic of dipping that crispy, cheese-laden taco into the rich consommé, there’s no going back. This recipe isn’t just about making tacos; it’s about creating memories, sharing joy, and savoring truly authentic flavors.
When you do make them, please, please share your experience! I absolutely love seeing your culinary creations. Snap a photo of your glorious plate of Birria Tacos, tell me what you loved most about the process, or any fun variations you tried. You can mention it in the comments below or share it on your social media – I’d be absolutely thrilled to hear how they turned out for you. Your feedback and excitement fuel my passion, and I can’t wait to celebrate your success in the kitchen. Happy cooking, and prepare to fall head over heels for these sensational tacos!
My Fave Beef Birria Tacos
Succulent, slow-cooked beef infused with aromatic chiles and spices, cradled in a crispy, cheese-griddled tortilla, and dipped into a rich, savory consommé. This recipe elevates the humble taco to an art form, making every bite an unforgettable moment.
Ingredients
-
3 lbs beef chuck roast, cut into 2-inch chunks
-
1 lb bone-in beef short ribs
-
1 lb beef oxtail, cut into sections
-
2 tbsp olive oil
-
2 tsp sea salt
-
1 tsp black pepper
-
6-8 cups beef broth (for braising)
-
4 dried Guajillo peppers, stemmed & deseeded
-
4 dried Ancho chiles, stemmed & deseeded
-
4 chipotle peppers in adobo
-
1 large white onion, roughly chopped
-
4 garlic cloves, peeled
-
½ cup crushed tomatoes
-
½ cup organic beef stock (for blending)
-
1 tbsp apple cider vinegar
-
4 bay leaves (2 for marinade, 2 for braise)
-
2 Tbsps Mexican oregano
-
1 tsp dried thyme
-
½ tsp ground cumin
-
½ tsp ground cinnamon
-
½ tsp smoked paprika
-
½ tsp ground allspice
-
24-30 small corn tortillas
-
2 cups shredded Oaxaca or Monterey Jack cheese
-
Fresh cilantro, finely chopped (for garnish)
-
½ white onion, finely chopped (for garnish)
-
Lime wedges (for serving)
Instructions
-
Step 1
Season beef chuck, short ribs, and oxtail generously with 2 tsp sea salt and 1 tsp black pepper. -
Step 2
Sear beef in 2 tbsp olive oil in a large Dutch oven over medium-high heat until deeply browned (3-5 mins per side). Transfer seared beef to a bowl. -
Step 3
Toast 4 dried Guajillo, 4 dried Ancho, and 4 chipotle peppers in a dry skillet for 1-2 mins. Rehydrate in boiling water for 20-30 mins until soft; reserve ½ cup of chile soaking liquid. -
Step 4
Sauté 1 chopped white onion in the Dutch oven for 5-7 mins. Add 4 peeled garlic cloves and ½ cup crushed tomatoes; cook for another 3-5 mins. -
Step 5
Blend drained chiles, sautéed aromatics, ½ cup organic beef stock, 1 tbsp apple cider vinegar, 2 bay leaves, 2 Tbsps Mexican oregano, 1 tsp dried thyme, ½ tsp ground cumin, ½ tsp ground cinnamon, ½ tsp smoked paprika, ½ tsp ground allspice, and the reserved ½ cup chile soaking liquid until very smooth. -
Step 6
Strain the blended marinade through a fine-mesh sieve into the Dutch oven, pressing solids to extract liquid. Discard pulp. -
Step 7
Return seared beef to the Dutch oven with strained marinade. Add the remaining 2 bay leaves and 6-8 cups beef broth (or water) to just cover the meat. Bring to a gentle boil, then reduce heat to low, cover, and simmer for 3-6 hours until beef is fall-apart tender. -
Step 8
Carefully remove beef from pot. Discard bones and bay leaves. Shred beef with two forks into bite-sized pieces. -
Step 9
Skim about ½ to ¾ cup of the red chile-infused fat (consommé oil) from the consommé; set aside for dipping tortillas. Keep remaining consommé warm for serving. -
Step 10
Heat a large cast-iron skillet or griddle over medium-high heat. -
Step 11
Dip a corn tortilla into the reserved chile oil, coating both sides. Place on the hot skillet. Sprinkle shredded Oaxaca or Monterey Jack cheese on one half, then add shredded birria beef. -
Step 12
Fold the tortilla over to create a taco. Cook 1-2 mins per side until golden brown, crispy, and cheese is fully melted and slightly caramelized. -
Step 13
Transfer finished tacos to a plate. Repeat with remaining tortillas, cheese, and beef. -
Step 14
Serve hot, garnished with chopped white onion and cilantro, with small bowls of warm consommé and lime wedges for dipping.
Important Information
Nutrition Facts (Per Serving)
It is important to consider this information as approximate and not to use it as definitive health advice.
Allergy Information
Please check ingredients for potential allergens and consult a health professional if in doubt.


Leave a Comment