

Loaded Cheesy Pocket Tacos are about to revolutionize your mealtime! Imagine the vibrant flavors and delightful textures of your favorite taco, all snugly tucked into a convenient, mess-free pocket of cheesy perfection. No more crumbling shells or rogue toppings escaping onto your plate; this innovative creation offers all the joy of a taco with none of the fuss. While traditional tacos boast a rich history as beloved street food, evolving from simple, humble origins, our Loaded Cheesy Pocket Tacos represent a delightful modern twist, embracing both convenience and an undeniable deliciousness. I’ve found that people absolutely adore this dish not only for its incredible taste – the perfect blend of savory fillings, tangy salsa, and a generous melt of cheese – but also for its ingenious design. It’s the ultimate portable feast, perfect for busy weeknights, fun gatherings, or even a unique lunchbox surprise. Get ready to experience a new level of taco enjoyment, where every bite is a burst of flavor, contained and ready for your delight!

Ingredients:
- For the Savory Taco Filling:
- 1 tablespoon olive oil or neutral vegetable oil. I often choose olive oil for its subtle flavor, but a high-smoke-point vegetable oil works beautifully too.
- 1 pound ground beef (80/20 lean). This ratio offers a perfect balance of flavor and juiciness without being overly greasy. For a lighter option, ground chicken or turkey can be substituted.
- 1 medium yellow onion, finely diced. The onion provides a fundamental sweetness and aromatic base that truly enhances the overall flavor profile of the filling.
- 2-3 cloves garlic, minced. Garlic is an absolute must-have; it adds a pungent, savory depth that is irreplaceable.
- 1 packet (1 ounce) taco seasoning mix, your favorite brand. Alternatively, you can use my homemade blend detailed below for a more customized flavor.
- 1/2 cup water or beef/chicken broth. Broth will infuse the meat with even more savory notes, making the filling richer.
- 1/2 cup tomato sauce or crushed tomatoes. This adds a lovely acidity and helps create a saucier, more cohesive filling that won’t dry out.
- Salt and freshly ground black pepper to taste. Always season to your personal preference!
- Optional: 1/2 cup finely diced bell peppers (any color), for added crunch, color, and nutrition. I love using red bell peppers for their sweetness.
- For My Homemade Taco Seasoning Blend (if not using a packet):
- 1 tablespoon chili powder. This forms the backbone of the taco flavor.
- 1 teaspoon ground cumin. Essential for that distinct, earthy taco aroma.
- 1 teaspoon smoked paprika. Adds a wonderful smoky depth that is incredibly satisfying.
- 1/2 teaspoon garlic powder. Reinforces the fresh garlic flavor.
- 1/2 teaspoon onion powder. Complements the fresh onion in the pan.
- 1/4 teaspoon cayenne pepper (adjust to your spice preference!). For a gentle warmth, use this amount; for more heat, feel free to increase it.
- 1/2 teaspoon dried oregano. Mediterranean oregano or Mexican oregano will both work beautifully.
- 1/4 teaspoon salt.
- 1/4 teaspoon black pepper.
- For the Loaded Cheesy Pocket Tacos Themselves:
- 8 large flour tortillas (burrito size, approximately 10-12 inches in diameter). These larger tortillas are absolutely crucial for achieving the perfect fold and creating a substantial pocket.
- 2 cups shredded Monterey Jack cheese, Mexican blend cheese, or sharp cheddar cheese. A good melting cheese is key to the “cheesy” aspect of our pockets!
- 1 cup shredded Colby Jack or mild cheddar cheese, for layering. This provides another dimension of cheese flavor and helps ensure maximum melt.
- 2 tablespoons vegetable oil or another neutral cooking oil, for pan-frying the pockets until golden and crispy.
- For Serving and Toppings (the fun part!):
- Shredded iceberg or romaine lettuce. Provides a refreshing crunch.
- Diced fresh tomatoes or a vibrant pico de gallo. Adds freshness and acidity.
- Sliced jalapeños (fresh or pickled). For those who enjoy a little extra heat.
- Sour cream or plain Greek yogurt. A cool, creamy counterpoint to the rich filling.
- Salsa (your favorite red or green variety). Adds a burst of saucy flavor.
- Guacamole or diced avocado. For a creamy, rich addition.
- Fresh cilantro, chopped. A garnish that adds a bright, herbaceous note.
- Lime wedges, for a fresh squeeze of citrus to brighten all the flavors.
Preparing the Savory Taco Filling
-
Sautéing the Aromatics to Build Flavor
To begin our journey to incredibly delicious Loaded Cheesy Pocket Tacos, we first need to craft a truly flavorful taco filling. Grab a large, heavy-bottomed skillet or a Dutch oven – something with plenty of space to brown your meat evenly – and place it over medium heat. Add your chosen cooking oil, whether it’s a robust olive oil or a neutral vegetable oil, and let it shimmer gently. Once the oil is warm, toss in your finely diced yellow onion. We want to cook these until they soften and become beautifully translucent, which usually takes about 5 to 7 minutes. Stir them occasionally to ensure they cook evenly and don’t burn. This step is crucial because properly sautéed onions lay a sweet, aromatic foundation for our entire dish, releasing their natural sugars and creating a depth of flavor that a raw onion simply can’t achieve. You’ll notice their fragrance starting to fill your kitchen, a sure sign that they’re developing wonderfully. Once they’re soft, add your minced garlic. Stir the garlic into the onions and cook for just about 1 minute more. Be very careful not to burn the garlic, as burnt garlic can turn bitter and impact the overall taste of your filling. We’re looking for fragrant, not brown! The combination of the sweet onions and pungent garlic is the secret handshake to any truly outstanding taco filling. Don’t rush this initial step; it really sets the stage for the amazing flavor in our Loaded Cheesy Pocket Tacos.
-
Browning the Meat for a Rich Base
Now that our aromatics are perfectly fragrant, it’s time to introduce the star of our filling: the ground meat. Carefully add your pound of ground beef, chicken, or turkey to the skillet with the onions and garlic. Use a wooden spoon or a sturdy spatula to break the meat apart into small, uniform crumbles. We want to ensure there are no large clumps of meat, as this allows it to cook more evenly and absorb the seasonings better later on. Continue to cook the meat over medium-high heat, stirring frequently, until it is completely browned and no pink remains. This usually takes another 8 to 10 minutes, depending on your stove and the type of meat you’re using. As the meat cooks, it will release its natural fats and juices. If you’re using ground beef with a higher fat content, you might notice a significant amount of grease pooling in the pan. For a healthier option or to prevent your Loaded Cheesy Pocket Tacos from becoming overly greasy, I highly recommend carefully draining off most of this excess fat. You can do this by tilting the skillet and spooning out the fat, or by transferring the browned meat to a colander lined with a few paper towels, letting it drain for a minute, and then returning it to the skillet. This step ensures our filling is rich in flavor but not heavy with unnecessary grease. Pat yourself on the back, you’re doing great!
-
Seasoning and Simmering to Perfection
With the meat beautifully browned and the excess fat drained, it’s time to infuse it with all those incredible taco flavors that will make our Loaded Cheesy Pocket Tacos truly irresistible. Sprinkle your taco seasoning mix – whether it’s a convenient packet or your wonderful homemade blend – generously over the browned meat. Stir everything together thoroughly, making sure every single piece of meat is coated in the spices. You’ll immediately notice the vibrant aroma of chili powder, cumin, and other spices filling the air – it’s absolutely wonderful! Next, pour in the water or broth and the tomato sauce or crushed tomatoes. Give it another good stir to combine all the ingredients. Bring the mixture to a gentle simmer, then reduce the heat to low, cover the skillet, and let it cook for at least 10 to 15 minutes. This simmering process is absolutely vital; it allows the flavors to meld and deepen beautifully, creating a rich, cohesive filling. The liquid will reduce and thicken, enveloping the meat in a wonderfully savory sauce. If you’re adding diced bell peppers, now is a great time to stir them in so they can soften slightly without becoming mushy. Taste the filling and adjust the seasoning as needed – perhaps a pinch more salt, a grind of black pepper, or a touch more cayenne if you like things spicier. Remember, the goal is a robust, flavorful filling that stands on its own, but also complements the cheesy pocket. Once it’s done, remove the skillet from the heat. This filling can even be made a day ahead and refrigerated, allowing the flavors to develop even further. Just gently reheat it before assembling your pockets. Your kitchen should smell absolutely divine at this point, promising an incredible meal of Loaded Cheesy Pocket Tacos!
Assembling Your Loaded Cheesy Pocket Tacos
-
Preparing Your Tortillas for the Cheesy Embrace
Now for the exciting part: constructing our amazing Loaded Cheesy Pocket Tacos! Before we begin filling, it’s a good idea to slightly warm your flour tortillas. Warming them makes them much more pliable and easier to fold without tearing, which is essential for creating that perfect pocket seal. You can do this quickly in a few ways: either wrap a stack of 2-3 tortillas in a damp paper towel and microwave them for 15-20 seconds each, or warm them briefly in a dry skillet over medium-low heat for about 15-30 seconds per side until they are soft and flexible. Don’t let them get crispy yet! Once warm, lay out your first large flour tortilla on a clean work surface. We’re going to layer the cheese first, directly onto the tortilla. This is a crucial step for achieving that signature cheesy goodness. Sprinkle about 1/4 cup of your chosen shredded cheese (I usually go with Monterey Jack or the Mexican blend here for maximum melt) evenly over half of the tortilla, leaving a small border around the edges. This initial layer of cheese will act as the “glue” that seals our pocket and creates an irresistible crust when cooked. It also provides a wonderful baseline of flavor and texture that truly defines these Loaded Cheesy Pocket Tacos.
-
Filling the Pockets with Savory Goodness
With the base layer of cheese down, it’s time to spoon in that glorious, savory taco filling we just prepared. Take about 1/3 to 1/2 cup of the warm taco meat mixture and spread it evenly over the cheese on one half of the tortilla. Make sure not to overfill, as this can make folding difficult and lead to spillage during cooking. We want a generous but manageable amount of filling. Next, for an extra layer of cheesy delight, sprinkle another 1/4 cup of your second type of cheese – like Colby Jack or mild cheddar – directly over the taco meat. This double layer of cheese is what elevates these from regular tacos to truly “Loaded Cheesy Pocket Tacos”! The combination of cheeses will melt beautifully, creating gooey pockets of flavor that are incredibly satisfying. The warmth of the taco filling will also help to slightly pre-melt the cheese, making the subsequent folding step even easier. This is where the magic really starts to happen, transforming simple ingredients into something truly special.
-
The Art of Folding a Perfect Pocket
Now comes the “pocket” part of our Loaded Cheesy Pocket Tacos! Carefully fold the empty half of the tortilla over the filled half, creating a neat half-moon shape. Gently press down along the curved edge of the tortilla to seal it. The warmth of the tortilla and the slight pre-melting of the cheese from the warm filling should help it stick together. To ensure a really good seal and prevent any filling from escaping during cooking, I like to take it a step further. You can either gently crimp the edges with a fork, or for an even more secure and appealing edge, fold the very edge of the tortilla inward about half an inch, and then fold it again. This double-fold creates a sturdy, self-sealed crust that holds everything in perfectly. Make sure to press firmly but not so hard that you squeeze the filling out. Repeat this entire filling and folding process (steps 4 through 6) with the remaining tortillas and filling. As you finish each pocket, set it aside on a plate, ensuring they don’t overlap too much. You’ll quickly get into a rhythm, and before you know it, you’ll have a plate full of perfectly assembled, ready-to-cook Loaded Cheesy Pocket Tacos, just waiting for their crispy, cheesy transformation!
Cooking the Crispy Cheesy Pockets
-
Preheating the Pan for Golden Perfection
With all your magnificent Loaded Cheesy Pocket Tacos expertly assembled, it’s time to give them that irresistible golden-brown, crispy exterior. This is where the true “pocket” and “cheesy” elements come to life! Grab a large, non-stick skillet or a cast-iron pan – my personal favorite for achieving that perfect crust – and place it over medium heat. Add about one tablespoon of vegetable oil or your neutral cooking oil to the pan. We want just enough oil to lightly coat the bottom, ensuring our pockets get beautifully crispy without becoming greasy. Allow the oil to heat up fully; you’ll know it’s ready when it shimmers slightly or when a small drop of water sizzles instantly upon contact. A properly preheated pan is absolutely essential for achieving that desirable golden-brown color and crispy texture. If the pan isn’t hot enough, the tortillas will just soak up the oil and become soggy, rather than crisp. If it’s too hot, they’ll burn before the cheese inside has a chance to fully melt. So, take your time and ensure your pan is at that sweet spot – perfectly warmed and ready for action. This step is key to transforming your assembled pockets into truly magnificent Loaded Cheesy Pocket Tacos that will have everyone reaching for more.
-
Pan-Frying to a Crispy, Cheesy Finish
Carefully place one or two of your assembled Loaded Cheesy Pocket Tacos into the hot skillet, ensuring not to overcrowd the pan. Give them enough space so they cook evenly without steaming. Cook each pocket for approximately 3 to 5 minutes per side. What we’re looking for is a gorgeous, deep golden-brown crust on the exterior of the tortilla. While one side is browning, the heat from the pan will also begin to melt the layers of cheese inside, transforming them into a gloriously gooey, unified filling. You might even see a little bit of cheese ooze out and crisp up on the edges – this is an absolute bonus, creating delicious “cheese crisps” that add extra texture and flavor! Keep a close eye on them; the exact cooking time will vary based on your pan and stove. Once one side is beautifully golden and crispy, gently flip the pocket over using a spatula and cook the other side for another 3 to 5 minutes, until it’s equally golden and crunchy. The aroma in your kitchen at this point will be absolutely intoxicating – a delightful mix of toasted tortilla, savory taco meat, and rich, melting cheese. This pan-frying step is what truly defines the “pocket” in our Loaded Cheesy Pocket Tacos, creating a satisfying shell that holds all the deliciousness within.
-
Resting and Repeating for a Feast
Once each Loaded Cheesy Pocket Taco is perfectly golden-brown and crispy on both sides, and you can tell by a gentle squeeze that the cheese inside is wonderfully melted, carefully remove it from the skillet. Transfer the cooked pockets to a wire rack set over a baking sheet. Placing them on a wire rack is a small but important detail; it allows air to circulate around them, preventing the bottom from becoming soggy as they cool slightly. This helps to maintain that delightful crispness we worked so hard to achieve. If you place them directly on a plate, steam can build up underneath, softening the crust. While these pockets are resting, add the remaining tablespoon of oil to the pan (if needed, or just enough to coat the bottom lightly) and continue cooking the rest of your assembled pockets in batches, following the same process. Don’t rush this part; taking your time ensures each and every pocket taco comes out perfectly crispy and cheesy. As each batch finishes, add them to the wire rack. Allow the pockets to rest for a minute or two before serving. This short resting period not only helps them cool down slightly so they’re not too hot to handle, but it also allows the melted cheese and filling to settle, making them easier to cut and enjoy. You’ve successfully crafted a batch of phenomenal Loaded Cheesy Pocket Tacos, ready for their final delicious transformation with toppings!
Serving Your Delicious Loaded Cheesy Pocket Tacos
-
The Grand Finale: Topping Your Masterpiece
Congratulations, you’ve successfully created a batch of truly incredible Loaded Cheesy Pocket Tacos! Now comes the most personalized and fun part – adding all those wonderful toppings that elevate each bite. While the pockets are still warm, transfer them from the wire rack to individual serving plates. This is where you can let your creativity shine! I love to pile on a generous amount of fresh, crisp shredded lettuce – the cool crunch is a fantastic contrast to the warm, rich filling. Then, a spoonful of vibrant diced tomatoes or a fresh pico de gallo adds a burst of freshness and acidity. For those who enjoy a little kick, some thinly sliced fresh or pickled jalapeños are absolutely essential. Don’t forget a dollop of cool sour cream or a lighter Greek yogurt to balance the spice and richness. A good salsa, whether it’s your favorite mild red salsa or a zesty green tomatillo salsa, is also a must-have for an extra layer of flavor. And of course, a creamy dollop of guacamole or some perfectly ripe diced avocado always brings a luxurious touch. Finish with a sprinkle of freshly chopped cilantro and a squeeze of lime juice right before serving. The lime brightens all the flavors and adds a zesty finish that really makes these Loaded Cheesy Pocket Tacos pop. The beauty of these tacos is that everyone can customize their own, making it a fantastic meal for sharing.
-
Enjoying Your Handiwork and Storage Tips
These Loaded Cheesy Pocket Tacos are best enjoyed immediately, while they are still warm and the tortilla is wonderfully crispy, and the cheese is gloriously gooey. There’s something truly satisfying about biting into that perfectly toasted exterior and discovering the rich, savory filling within. Encourage your guests or family to pick them up, allowing them to fully appreciate the “pocket” design, which makes them surprisingly less messy than traditional open-faced tacos. Each bite is a symphony of textures and flavors – the crisp tortilla, the tender, seasoned meat, the melting cheese, and the fresh, vibrant toppings. They make a fantastic weeknight dinner, a fun party appetizer, or even a unique brunch item if you’re feeling adventurous! If by some miracle you happen to have any leftovers (it’s rare, trust me!), you can store them in an airtight container in the refrigerator for up to 2-3 days. To reheat, I recommend using a dry skillet over medium-low heat for a few minutes per side to help restore some of that crispness, or you can use an air fryer for a similar effect. While they won’t be quite as crispy as freshly made, the flavors will still be absolutely delicious. These Loaded Cheesy Pocket Tacos are more than just a meal; they’re an experience, a delightful culinary adventure that’s sure to become a new family favorite. Enjoy every single bite of your hard work!

<h2>Conclusion:</h2>
<p>Well, my friends, we’ve reached the exciting end of our culinary journey, and I genuinely hope you’re feeling inspired and hungry! This isn’t just another dinner recipe; it’s an invitation to experience pure, unadulterated comfort food joy. What makes these incredible <strong>Loaded Cheesy Pocket Tacos</strong> an absolute game-changer in your kitchen? It’s the ingenious combination of convenience and explosion of flavor that makes them truly irresistible. Imagine a crispy, golden shell encasing a generous, savory filling that’s bursting with seasoned meat, vibrant vegetables, and, of course, a glorious abundance of melted cheese. It’s handheld happiness, perfect for busy weeknights, casual gatherings, or even a fun weekend cooking project with the family. Forget the mess of traditional tacos falling apart; these pockets are designed for easy eating and maximum enjoyment, delivering all the beloved flavors you crave in one neat, delicious package. They manage to be both satisfyingly hearty and incredibly versatile, ensuring every bite is a delightful surprise. Trust me, once you try these, you’ll wonder how you ever lived without them. They’re not just food; they’re an experience, a little pocket of culinary magic waiting to be discovered.</p>
<h4>Elevate Your Experience with Perfect Pairings and Creative Twists</h4>
<p>Now that you’re ready to dive into making these masterpieces, let’s talk about how to make them even better, or how to put your own unique spin on them. When it comes to serving, the possibilities are endless! I always recommend having a few classic accompaniments on hand: a vibrant, chunky salsa, a dollop of cool sour cream or Greek yogurt for a lighter touch, and some creamy homemade guacamole will instantly elevate your meal. For a complete dinner, a simple side salad with a zesty lime vinaigrette or a scoop of fluffy cilantro-lime rice makes for fantastic complements, cutting through the richness beautifully. <strong>But the real fun begins with variations!</strong> Don’t be afraid to experiment with the fillings to suit your taste or what you have on hand.</p>
<p>Perhaps you’re looking for a vegetarian option? Black beans, corn, and sautéed bell peppers make a fantastic, hearty alternative to meat. You could even use crumbled plant-based meat substitutes for a similar texture and all the delicious seasonings. For those who love chicken, shredded rotisserie chicken mixed with taco seasoning works wonderfully, or even ground turkey for a leaner profile that’s equally delicious. Cheese lovers, this is your moment to shine: beyond a classic cheddar blend, consider adding some spicy Monterey Jack, creamy Oaxaca, or even a sprinkle of cotija for an authentic touch that truly pops. Craving extra heat? Finely diced jalapeños, a dash of your favorite hot sauce directly into the meat mixture, or a pinch of cayenne pepper will give it that extra kick you’re looking for. And for the vegetable enthusiasts, feel free to fold in some caramelized onions, sautéed mushrooms, or even some finely chopped spinach for added nutrition and flavor. These pockets are incredibly forgiving, so feel empowered to get creative and make them uniquely yours!</p>
<p>Another clever idea for busy households is to prepare the filling in advance. You can cook the meat mixture and chop all your vegetables a day or two before, making assembly on a hectic evening an absolute breeze. Simply reheat the filling gently, and you’re ready to stuff and seal. For a quick and satisfying lunch, consider making extra and refrigerating them; they reheat beautifully in an air fryer or oven, crisping up nicely and tasting just as good as fresh. <strong>The beauty of this recipe lies in its adaptability</strong> – it’s truly a blank canvas for your culinary imagination, making it a go-to for any occasion.</p>
<h4>Your Turn! Unleash Your Inner Chef and Share Your Creations</h4>
<p>So, what are you waiting for? I wholeheartedly encourage you to roll up your sleeves, gather your ingredients, and give this recipe a try this week. There’s something incredibly satisfying about creating something so delicious from scratch, and I promise, the effort is minimal compared to the incredible flavors you’ll unlock. <strong>Don’t just make them; make them yours.</strong> Experiment with fillings, play with spices, or find that perfect side dish that truly completes your meal. Cooking should be an adventure, a joyous exploration of tastes and textures, and these pocket tacos are the perfect vehicle for that journey of discovery. It’s an opportunity to create lasting memories around the dinner table.</p>
<p>Once you’ve experienced the magic, I would absolutely love to hear about it! What did you put in your pockets? Did you try a unique cheese blend or a special sauce that became an instant hit? Did your family rave about them, or did you discover a new favorite weeknight meal? Please share your culinary successes, your clever modifications, or even your funny kitchen anecdotes. Connecting with fellow food enthusiasts and seeing your delicious creations is one of the greatest joys for me, and I can’t wait to see what you come up with. So, snap a picture, share your thoughts, and let’s celebrate the joy of good food together. Happy cooking, and I can’t wait to see what amazing <strong>Loaded Cheesy Pocket Tacos</strong> you bring to life in your own kitchen!</p>
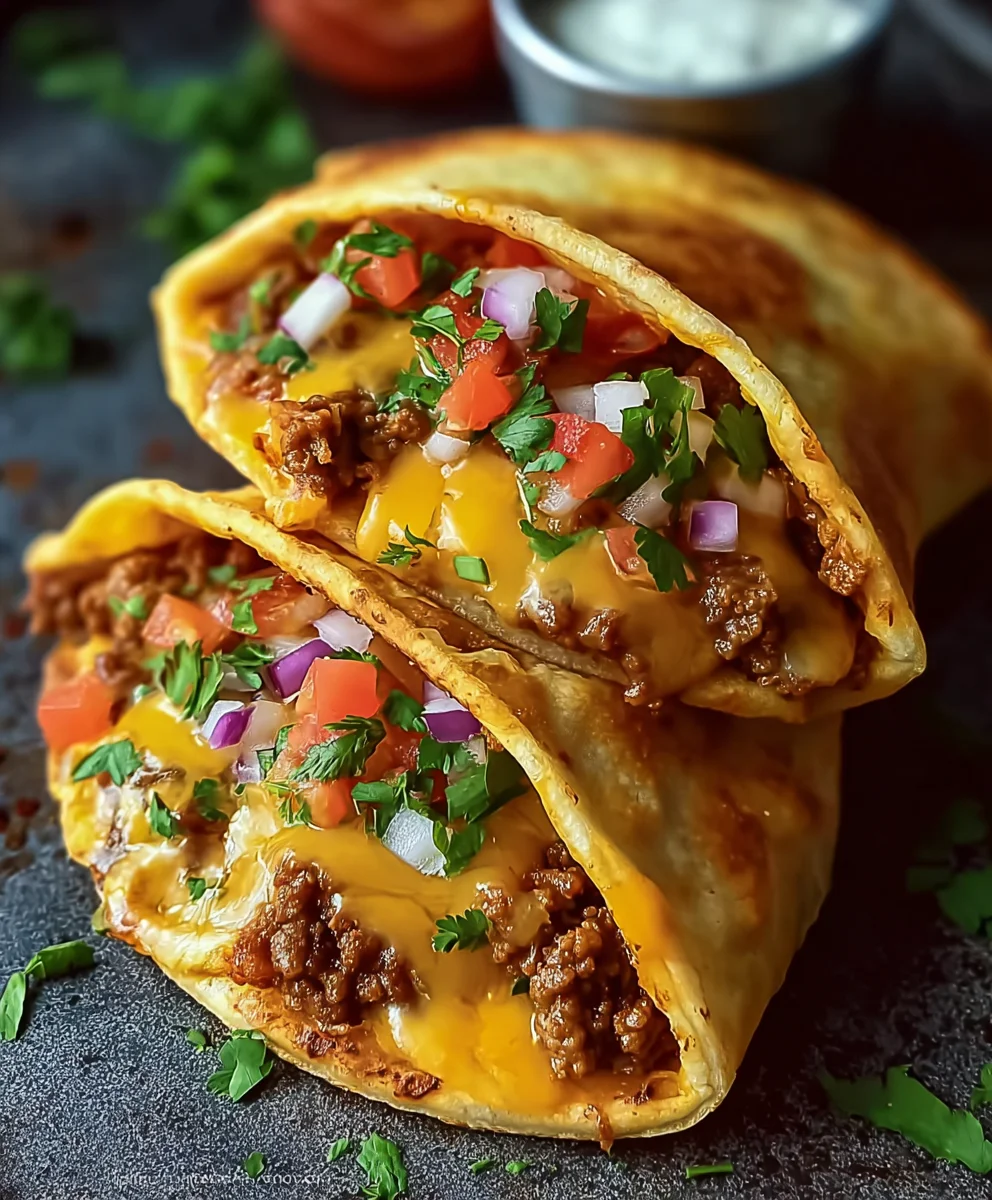
Loaded Cheesy Pocket Tacos
Easy & Delicious Loaded Cheesy Pocket Tacos are the perfect quick meal for any taco lover. These pocket tacos feature crispy, golden biscuit dough filled with seasoned ground beef, a blend of cheddar and mozzarella cheeses, and a medley of fresh toppings like diced tomatoes, green onions, and black olives. They’re simple to assemble and pan-fry, making them an ideal choice for busy weeknights or a fun weekend treat. Serve with your favorite taco toppings for a meal that’s both comforting and bursting with flavor.
Ingredients
-
1 tablespoon olive oil or neutral vegetable oil
-
1 pound ground beef (80/20 lean)
-
1 medium yellow onion, finely diced
-
2-3 cloves garlic, minced
-
1 packet (1 ounce) taco seasoning mix (or homemade blend: 1 tbsp chili powder, 1 tsp cumin, 1 tsp smoked paprika, 1/2 tsp garlic powder, 1/2 tsp onion powder, 1/4 tsp cayenne, 1/2 tsp dried oregano, 1/4 tsp salt, 1/4 tsp black pepper)
-
1/2 cup water or beef broth
-
1/2 cup tomato sauce or crushed tomatoes
-
Salt and freshly ground black pepper to taste
-
1 (16.3 ounce) can refrigerated biscuit dough (8 count)
-
1 cup shredded cheddar cheese
-
1 cup shredded mozzarella cheese
-
2 tablespoons vegetable oil or neutral cooking oil, for frying
-
1/2 cup diced fresh tomatoes, for serving
-
1/4 cup chopped green onions, for serving
-
1/4 cup sliced black olives, for serving
-
Optional toppings: sour cream, salsa, guacamole, fresh cilantro, lime wedges
Instructions
-
Step 1
Heat 1 tbsp oil in a large skillet over medium heat. Sauté diced onion for 5-7 minutes until translucent. Add minced garlic and cook for 1 minute until fragrant. Add ground beef, breaking it apart, and brown for 8-10 minutes until no pink remains. Drain excess fat. Stir in taco seasoning, water/broth, and tomato sauce. Bring to a gentle simmer, then reduce heat to low, cover, and cook for 10-15 minutes until thickened. Season with salt and pepper to taste. Remove from heat. -
Step 2
On a lightly floured surface, flatten each biscuit from the can into an approximately 5-6 inch round. This makes them pliable for folding. -
Step 3
On one half of each flattened biscuit round, place about 1/4 cup of the warm taco filling. Sprinkle with a blend of shredded cheddar and mozzarella cheeses. Fold the empty half of the biscuit dough over the filling to create a half-moon shape. Press the edges firmly with your fingers, then crimp with a fork to ensure a secure seal. Repeat for all remaining pockets. -
Step 4
Heat 1 tbsp vegetable oil in a large non-stick skillet over medium heat until shimmering. Carefully place 2-3 assembled pockets into the hot skillet, ensuring not to overcrowd. Cook for 3-5 minutes per side, until golden brown and crispy, and the cheese inside is melted and gooey. Repeat with remaining pockets, adding more oil as needed for subsequent batches. -
Step 5
Transfer cooked pockets to a wire rack to rest for 1-2 minutes. Serve warm with fresh diced tomatoes, green onions, sliced black olives, and your choice of optional toppings like sour cream, salsa, guacamole, fresh cilantro, and lime wedges. Enjoy immediately for best crispness.
Important Information
Nutrition Facts (Per Serving)
It is important to consider this information as approximate and not to use it as definitive health advice.
Allergy Information
Please check ingredients for potential allergens and consult a health professional if in doubt.


Leave a Comment