

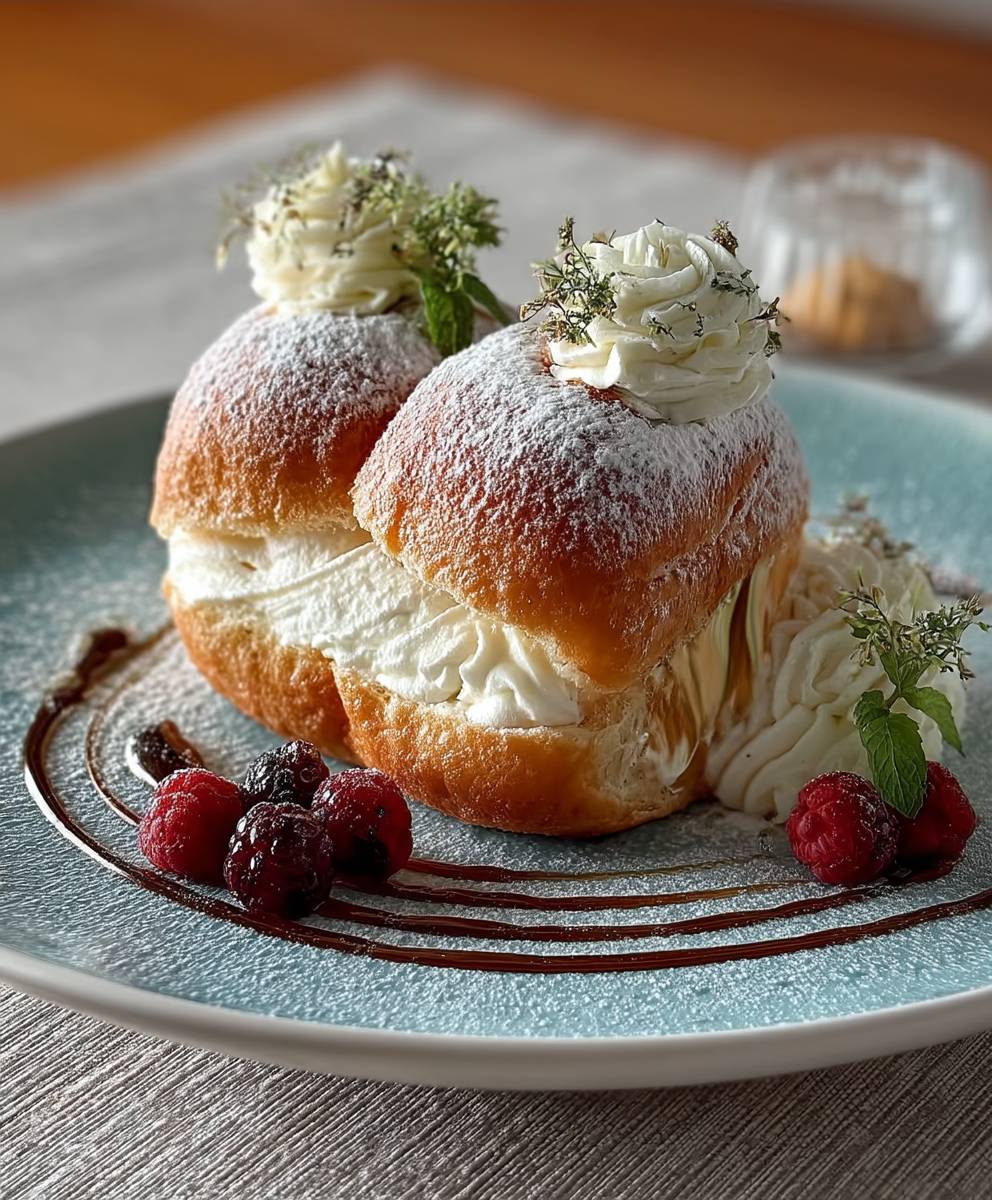
Italian cream buns, or Maritozzi con la panna as they’re known in Italy, are more than just a sweet treat; they’re a taste of Roman history and a symbol of love! Imagine biting into a pillowy soft, slightly sweet bun, practically overflowing with lightly sweetened whipped cream. It’s a simple pleasure, yet utterly divine, and I’m thrilled to share my version of this classic recipe with you.
These delightful buns have a rich history, dating back to ancient Rome where they were offered to the gods. Over time, they evolved into a Lenten indulgence and, eventually, a romantic gesture. In fact, legend has it that young men would present these cream-filled buns to their sweethearts, sometimes even hiding a ring inside! Talk about a sweet proposal!
What makes Italian cream buns so irresistible? It’s the perfect combination of textures and flavors. The slightly enriched dough provides a subtle sweetness and a wonderfully soft crumb, while the freshly whipped cream adds a light, airy, and decadent touch. They are incredibly satisfying without being overly heavy, making them the perfect treat for breakfast, brunch, or an afternoon indulgence. Plus, they are surprisingly easy to make at home, allowing you to enjoy a taste of Italy whenever the craving strikes. Get ready to experience a little bit of Roman romance with every bite!

Ingredients:
- For the Buns:
- 3 ½ cups all-purpose flour, plus more for dusting
- ¼ cup granulated sugar
- 1 teaspoon salt
- 2 ¼ teaspoons (1 packet) active dry yeast
- ¾ cup warm milk (105-115°F)
- ¼ cup unsalted butter, melted
- 2 large eggs, lightly beaten
- 1 teaspoon vanilla extract
- For the Cream Filling:
- 1 ½ cups heavy cream, cold
- ¼ cup powdered sugar
- 1 teaspoon vanilla extract
- ½ teaspoon almond extract (optional, but highly recommended!)
- For the Simple Syrup:
- ½ cup granulated sugar
- ½ cup water
- 1 teaspoon vanilla extract
- For Dusting:
- Powdered sugar
Preparing the Dough:
Okay, let’s get started with the dough! This is the foundation of our delicious Italian cream buns, so we want to make sure we get it right. Don’t be intimidated; it’s easier than you think!
- Combine Dry Ingredients: In a large bowl, whisk together the flour, sugar, and salt. This ensures that everything is evenly distributed before we add the wet ingredients.
- Activate the Yeast: In a separate bowl, dissolve the yeast in the warm milk. It’s crucial that the milk is within the temperature range of 105-115°F. Too cold, and the yeast won’t activate; too hot, and you’ll kill it. Let it sit for about 5-10 minutes, or until it gets foamy. This means the yeast is alive and ready to work its magic!
- Combine Wet and Dry Ingredients: Pour the yeast mixture, melted butter, eggs, and vanilla extract into the bowl with the dry ingredients.
- Mix the Dough: Using a wooden spoon or a stand mixer fitted with a dough hook, mix the ingredients until a shaggy dough forms. If you’re using a stand mixer, start on low speed and gradually increase to medium.
- Knead the Dough: Turn the dough out onto a lightly floured surface and knead for 8-10 minutes, or until it becomes smooth and elastic. If you’re using a stand mixer, knead with the dough hook for about 6-8 minutes. The dough should be slightly tacky but not sticky. If it’s too sticky, add a little more flour, one tablespoon at a time.
- First Rise: Place the dough in a lightly oiled bowl, turning to coat all sides. Cover the bowl with plastic wrap or a clean kitchen towel and let it rise in a warm place for 1-1.5 hours, or until doubled in size. This is where the magic happens! The yeast is working hard, creating those lovely air pockets that will make our buns light and fluffy.
Shaping and Baking the Buns:
Now that our dough has risen beautifully, it’s time to shape those buns and get them ready for the oven!
- Punch Down the Dough: Gently punch down the dough to release the air. Don’t be too rough; we just want to deflate it slightly.
- Divide the Dough: Turn the dough out onto a lightly floured surface and divide it into 12 equal pieces. I like to use a kitchen scale to ensure they’re all the same size, but you can eyeball it if you prefer.
- Shape the Buns: Roll each piece of dough into a smooth ball. Tuck the edges underneath to create a nice, round shape.
- Second Rise: Place the buns on a baking sheet lined with parchment paper, leaving some space between each one. Cover them loosely with plastic wrap or a clean kitchen towel and let them rise again for 30-45 minutes, or until they’ve puffed up slightly.
- Preheat the Oven: While the buns are rising, preheat your oven to 375°F (190°C).
- Bake the Buns: Bake the buns for 15-20 minutes, or until they’re golden brown on top. Keep a close eye on them, as ovens can vary. If they start to brown too quickly, you can tent them with foil.
- Cool the Buns: Remove the buns from the oven and let them cool on a wire rack.
Preparing the Simple Syrup:
While the buns are cooling, let’s whip up a simple syrup. This will add a touch of sweetness and moisture to our buns, making them even more irresistible.
- Combine Sugar and Water: In a small saucepan, combine the sugar and water.
- Heat and Stir: Heat the mixture over medium heat, stirring constantly, until the sugar is completely dissolved.
- Simmer: Bring the mixture to a simmer and let it simmer for 1-2 minutes.
- Remove from Heat: Remove the saucepan from the heat and stir in the vanilla extract.
- Cool: Let the simple syrup cool completely before using.
Making the Cream Filling:
Now for the star of the show: the creamy, dreamy filling! This is what truly makes these buns Italian cream buns.
- Chill the Bowl and Whisk: Place your mixing bowl and whisk (or the bowl and whisk attachment of your stand mixer) in the freezer for about 15-20 minutes. This will help the cream whip up faster and hold its shape better.
- Whip the Cream: Pour the cold heavy cream into the chilled bowl. Using a whisk or a stand mixer, whip the cream on medium speed until soft peaks form.
- Add Sugar and Extracts: Gradually add the powdered sugar, vanilla extract, and almond extract (if using) to the cream. Continue whipping until stiff peaks form. Be careful not to overwhip, or the cream will turn grainy.
- Refrigerate: Cover the bowl with plastic wrap and refrigerate the cream filling until ready to use. This will help it firm up even more.
Assembling the Italian Cream Buns:
Finally, the moment we’ve all been waiting for! It’s time to assemble our Italian cream buns and enjoy the fruits of our labor.
- Slice the Buns: Using a serrated knife, carefully slice each bun horizontally, being careful not to cut all the way through. You want to create a pocket for the cream filling.
- Soak with Simple Syrup: Brush the inside of each bun with the cooled simple syrup. This will add moisture and sweetness. Don’t overdo it, or the buns will become soggy.
- Fill with Cream: Spoon or pipe the cream filling into the center of each bun. Be generous!
- Dust with Powdered Sugar: Dust the tops of the filled buns with powdered sugar. This adds a touch of elegance and sweetness.
- Serve and Enjoy: Serve the Italian cream buns immediately, or refrigerate them for later. They’re best enjoyed fresh, but they’ll still be delicious for a day or two.
Tips and Variations:
- Lemon Zest: Add a teaspoon of lemon zest to the dough for a bright, citrusy flavor.
- Orange Blossom Water: Substitute a teaspoon of orange blossom water for the vanilla extract in the simple syrup for a floral aroma.
- Chocolate Chips: Fold mini chocolate chips into the cream filling for a chocolatey twist.
- Different Extracts: Experiment with different extracts in the cream filling, such as coconut, raspberry, or hazelnut.
- Make Ahead: The buns can be baked a day ahead and stored in an airtight container at room temperature. The cream filling can also be made a day ahead and stored in the refrigerator. Assemble the buns just before serving.
Troubleshooting:
- Dough Not Rising: Make sure your yeast is fresh and that the milk is at the correct temperature. Also, ensure that the room is warm enough for the dough to rise properly.
- Dough Too Sticky: Add a little more flour, one tablespoon at a time, until the dough is no longer sticky.
- Cream Not Whipping: Make sure your cream is very cold and that your bowl and whisk are chilled. Also, avoid
Conclusion:
Well, there you have it! I truly believe this recipe for Italian cream buns is one you absolutely *must* try. From the incredibly light and airy dough to the decadent, sweet cream filling, every bite is a little piece of heaven. It’s the kind of treat that will have everyone asking for seconds (and the recipe!).
But what makes these buns so special? It’s the perfect balance of textures and flavors. The slightly crisp exterior gives way to a soft, pillowy interior, and the cream filling is rich without being overly heavy. Plus, the subtle hint of citrus zest in the dough adds a bright, refreshing note that complements the sweetness of the cream beautifully. It’s a symphony of deliciousness in every single bite!
And the best part? While they might seem intimidating, these Italian cream buns are surprisingly easy to make. I’ve broken down each step in detail, so even if you’re a beginner baker, you can confidently tackle this recipe and impress your friends and family. Trust me, the effort is well worth it!
Now, let’s talk about serving suggestions and variations. These buns are absolutely divine on their own, enjoyed with a cup of coffee or tea. They’re also perfect for brunch, afternoon tea, or even a special dessert. Imagine serving them warm from the oven, the cream filling still slightly melty pure bliss!
But don’t be afraid to get creative! You could try adding different flavor extracts to the cream filling, such as vanilla, almond, or even a touch of rum. For a chocolatey twist, you could swirl some melted chocolate into the cream or dust the finished buns with cocoa powder. Another delicious variation is to add some chopped nuts, like almonds or pistachios, to the cream filling for extra texture and flavor. You could even try using a different type of citrus zest in the dough, like lemon or grapefruit, for a unique twist.
For a truly decadent experience, try serving these Italian cream buns with a scoop of vanilla ice cream or a dollop of whipped cream. You could also drizzle them with a homemade caramel sauce or a berry compote. The possibilities are endless!
I’m so excited for you to try this recipe and experience the joy of baking (and eating!) these incredible Italian cream buns. I know you’re going to love them as much as I do.
So, what are you waiting for? Gather your ingredients, preheat your oven, and get ready to create some magic in the kitchen. And when you do, please, please, *please* share your experience with me! I’d love to hear how they turned out, what variations you tried, and what your family and friends thought. You can leave a comment below, tag me on social media, or even send me an email. I can’t wait to see your creations! Happy baking! I hope you enjoy this Italian cream buns recipe as much as I do!
Italian Cream Buns: A Delicious & Easy Recipe
Fluffy, sweet Italian cream buns filled with a luscious, homemade cream filling and soaked in a vanilla-infused simple syrup. A delightful treat perfect for any occasion!
Ingredients
- 3 ½ cups all-purpose flour, plus more for dusting
- ¼ cup granulated sugar
- 1 teaspoon salt
- 2 ¼ teaspoons (1 packet) active dry yeast
- ¾ cup warm milk (105-115°F)
- ¼ cup unsalted butter, melted
- 2 large eggs, lightly beaten
- 1 teaspoon vanilla extract
- 1 ½ cups heavy cream, cold
- ¼ cup powdered sugar
- 1 teaspoon vanilla extract
- ½ teaspoon almond extract (optional, but highly recommended!)
- ½ cup granulated sugar
- ½ cup water
- 1 teaspoon vanilla extract
- Powdered sugar
Instructions
- In a large bowl, whisk together the flour, sugar, and salt.
- In a separate bowl, dissolve the yeast in the warm milk. Let it sit for about 5-10 minutes, or until it gets foamy.
- Pour the yeast mixture, melted butter, eggs, and vanilla extract into the bowl with the dry ingredients.
- Using a wooden spoon or a stand mixer fitted with a dough hook, mix the ingredients until a shaggy dough forms.
- Turn the dough out onto a lightly floured surface and knead for 8-10 minutes, or until it becomes smooth and elastic. If using a stand mixer, knead with the dough hook for about 6-8 minutes. The dough should be slightly tacky but not sticky. If it’s too sticky, add a little more flour, one tablespoon at a time.
- Place the dough in a lightly oiled bowl, turning to coat all sides. Cover the bowl with plastic wrap or a clean kitchen towel and let it rise in a warm place for 1-1.5 hours, or until doubled in size.
- Gently punch down the dough to release the air.
- Turn the dough out onto a lightly floured surface and divide it into 12 equal pieces.
- Roll each piece of dough into a smooth ball. Tuck the edges underneath to create a nice, round shape.
- Place the buns on a baking sheet lined with parchment paper, leaving some space between each one. Cover them loosely with plastic wrap or a clean kitchen towel and let them rise again for 30-45 minutes, or until they’ve puffed up slightly.
- While the buns are rising, preheat your oven to 375°F (190°C).
- Bake the buns for 15-20 minutes, or until they’re golden brown on top.
- Remove the buns from the oven and let them cool on a wire rack.
- In a small saucepan, combine the sugar and water.
- Heat the mixture over medium heat, stirring constantly, until the sugar is completely dissolved.
- Bring the mixture to a simmer and let it simmer for 1-2 minutes.
- Remove the saucepan from the heat and stir in the vanilla extract.
- Let the simple syrup cool completely before using.
- Place your mixing bowl and whisk (or the bowl and whisk attachment of your stand mixer) in the freezer for about 15-20 minutes.
- Pour the cold heavy cream into the chilled bowl. Using a whisk or a stand mixer, whip the cream on medium speed until soft peaks form.
- Gradually add the powdered sugar, vanilla extract, and almond extract (if using) to the cream. Continue whipping until stiff peaks form. Be careful not to overwhip, or the cream will turn grainy.
- Cover the bowl with plastic wrap and refrigerate the cream filling until ready to use.
- Using a serrated knife, carefully slice each bun horizontally, being careful not to cut all the way through.
- Brush the inside of each bun with the cooled simple syrup.
- Spoon or pipe the cream filling into the center of each bun.
- Dust the tops of the filled buns with powdered sugar.
- Serve the Italian cream buns immediately, or refrigerate them for later.
Notes
- Add a teaspoon of lemon zest to the dough for a bright, citrusy flavor.
- Substitute a teaspoon of orange blossom water for the vanilla extract in the simple syrup for a floral aroma.
- Fold mini chocolate chips into the cream filling for a chocolatey twist.
- Experiment with different extracts in the cream filling, such as coconut, raspberry, or hazelnut.
- The buns can be baked a day ahead and stored in an airtight container at room temperature. The cream filling can also be made a day ahead and stored in the refrigerator. Assemble the buns just before serving.
- Make sure your yeast is fresh and that the milk is at the correct temperature. Also, ensure that the room is warm enough for the dough to rise properly.
- Add a little more flour, one tablespoon at a time, until the dough is no longer sticky.
- Make sure your cream is very cold and that your bowl and whisk are chilled. Also, avoid overwhipping.
Leave a Comment