

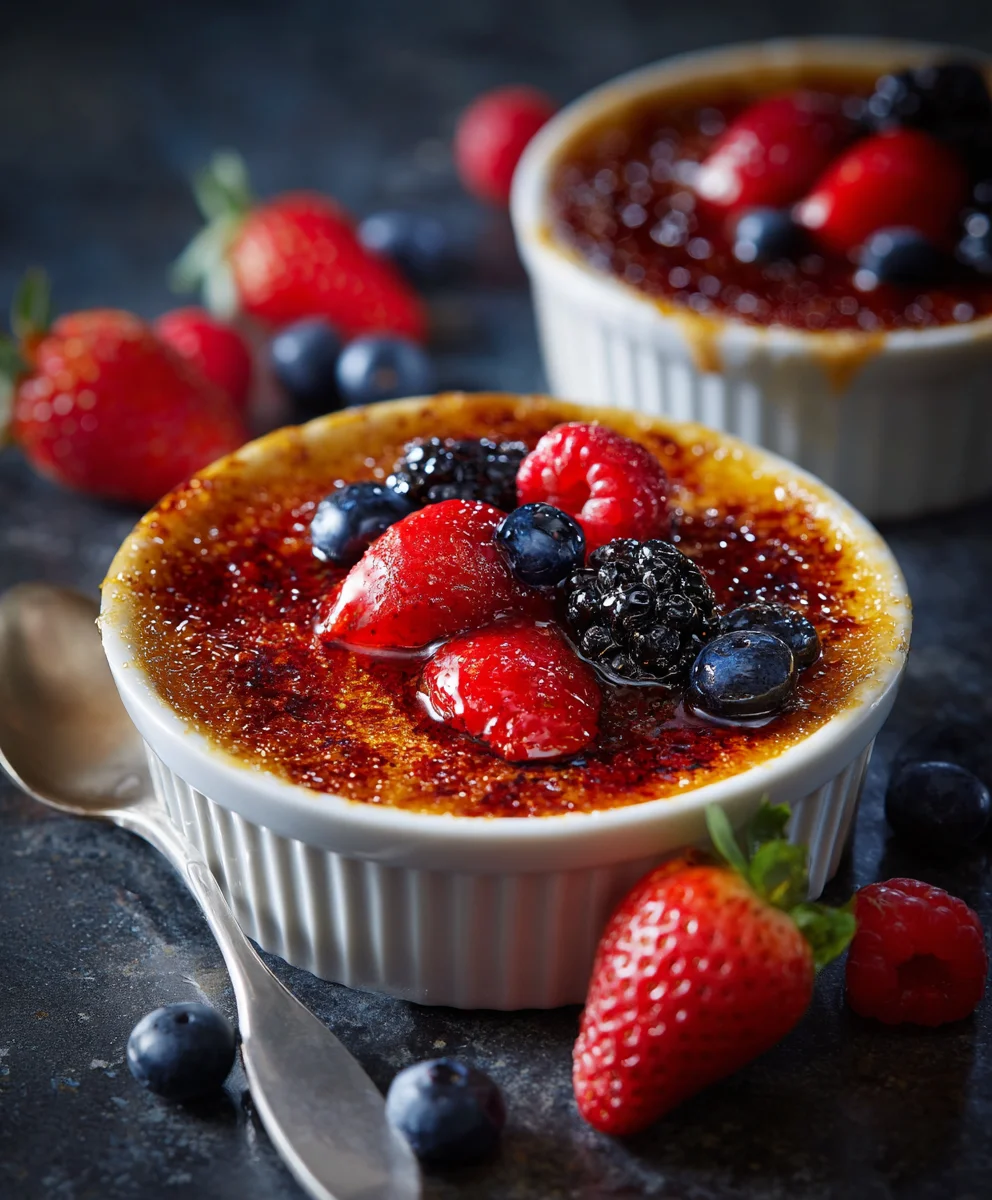
Berry Brulee is more than just a dessert; it’s an experience that tantalizes all the senses. Imagine cracking through a perfectly caramelized, golden-brown sugar crust, revealing a luscious, warm medley of fresh, vibrant berries, each bursting with sweet-tart juice. This delightful creation, while a beautifully vibrant and contemporary twist, carries the sophisticated spirit of its French cousin, the classic crème brûlée. Historically, the art of creating a ‘burnt cream’ dessert has captivated palates for centuries, and this fruit-centric adaptation continues that legacy with a lighter, fresher appeal.
I find myself constantly drawn to the irresistible contrast of textures and temperatures in this dish – the satisfying, crisp crunch of the sugar, followed by the soft, juicy warmth of the sun-kissed berries. It’s a dish that beautifully marries simplicity with elegance, making it perfect for an elevated breakfast, a celebratory brunch, or a light yet sophisticated dessert. Preparing a homemade Berry Brulee is incredibly rewarding, witnessing the transformation of simple ingredients into something truly extraordinary and utterly delightful. It’s quick to assemble, incredibly impressive, and an absolute crowd-pleaser that embodies both comfort and refined taste, ensuring everyone will ask for the recipe of this exquisite Berry Brulee.

Ingredients:
-
For the Velvety Vanilla Custard Base:
- 2 cups (480ml) Heavy Cream: I always reach for full-fat heavy cream because it delivers the richest, silkiest texture for our berry brulee. Avoid anything labeled “light” cream here; we want decadence!
- ½ cup (100g) Granulated Sugar: This provides the perfect balance of sweetness to complement the tart berries and rich cream. You can adjust slightly if you prefer it a little sweeter or less so, but this is my go-to.
- 1 Vanilla Bean: This is my secret weapon for truly exceptional flavor. Split it lengthwise and scrape out those tiny, fragrant seeds. If you can’t find a vanilla bean, 1½ teaspoons of high-quality vanilla extract (not imitation!) will work, but the bean truly elevates this berry brulee.
- 5 Large Egg Yolks: These are the magic behind our custard’s luxurious thickness and beautiful color. Make sure to separate them carefully from the whites.
- ¼ teaspoon Salt: Just a tiny pinch, but it’s crucial! Salt enhances all the other flavors, bringing out the best in the vanilla and cream, and makes your berry brulee sing.
-
For the Fresh Berry Layer:
- 2 cups (approx. 300g) Mixed Fresh Berries: Think a delightful blend of raspberries, blueberries, blackberries, and sliced strawberries. Fresh is absolutely key here for the best texture and vibrant flavor in your berry brulee. If using larger berries like strawberries, give them a rough chop so they’re bite-sized.
- 1-2 tablespoons Granulated Sugar (optional): This is only if your berries are particularly tart or out of season. Taste them first! A little sprinkle can brighten their flavor, but often, the natural sweetness is perfect.
- ½ teaspoon Lemon Zest (optional): A little hint of citrus can really make the berry flavors pop, adding a lovely aromatic lift to the overall berry brulee experience.
-
For the Signature Brulee Topping:
- ¼ – ½ cup (50-100g) Granulated Sugar, or Turbinado Sugar: I personally love turbinado sugar for bruleeing. Its larger crystals create a thicker, more satisfying crackle, but regular granulated sugar works beautifully too. You’ll need about 1-2 tablespoons per ramekin.
-
Equipment You’ll Need:
- 6 (4-6 ounce) Ramekins: These are essential for individual servings and achieving that iconic brulee crust.
- Large Roasting Pan or Baking Dish: This will be used for a water bath, which ensures even, gentle cooking of the custard.
- Fine-Mesh Sieve: Crucial for a silky-smooth custard.
- Whisk, Spatula, Mixing Bowls, Measuring Cups/Spoons.
- Kitchen Torch: Absolutely necessary for achieving that perfect caramelized sugar crust for your berry brulee! Do not attempt to use a broiler, as it risks melting your berries and cooking the custard too much.
Preparing the Velvety Vanilla Custard Base for Your Berry Brulee
This is where the magic begins, creating the rich, creamy foundation that will perfectly cradle our fresh berries. Don’t rush this stage; a smooth, well-tempered custard is the secret to an unforgettable berry brulee.
- Infuse the Cream with Vanilla: In a medium-sized heavy-bottomed saucepan, combine the heavy cream, ½ cup of granulated sugar, and the scraped vanilla bean seeds along with the empty pod. Place the saucepan over medium-low heat. Gently warm the mixture, stirring occasionally, until it just begins to simmer around the edges – you’ll see tiny bubbles forming. It’s important not to let it boil vigorously, as this can scald the cream. Once it reaches this point, remove the saucepan from the heat, cover it, and let it steep for at least 15-20 minutes. This infusion step allows the vanilla flavor to fully develop and permeate the cream, creating a deeply aromatic base for your berry brulee. If you’re using vanilla extract instead of a bean, you can skip the steeping and simply add it at the end of the cooking process, after straining.
- Prepare the Egg Yolks: While your cream is infusing, in a separate large bowl, whisk together the five egg yolks and the ¼ teaspoon of salt until they are well combined and slightly lighter in color. You want them smooth and homogenous, with no streaks of unmixed yolk. This aeration helps to create a lighter, more delicate custard texture.
- Temper the Egg Yolks: This is a crucial step to prevent your eggs from scrambling when they meet the hot cream. Once the cream has steeped, remove the vanilla bean pod from the saucepan (you can rinse and dry the pod to reuse for vanilla sugar if you like!). Slowly, and I mean very slowly, pour about half of the warm cream mixture into the egg yolks while continuously whisking the yolks vigorously. This gradual addition of hot liquid to the yolks raises their temperature gently without cooking them. After about half of the cream is incorporated, you can pour the egg yolk mixture back into the remaining warm cream in the saucepan, whisking constantly to ensure everything is thoroughly combined.
- Cook the Custard: Return the saucepan to low heat. Continue to cook the custard, stirring constantly with a spatula or wooden spoon, making sure to scrape the bottom and sides of the pan. You’re looking for the custard to thicken gradually. This usually takes about 8-12 minutes. The custard is ready when it coats the back of a spoon and leaves a clear path when you draw your finger across it. Another excellent indicator is when the temperature reaches between 170°F and 175°F (77°C – 79°C) on an instant-read thermometer. Do not let it boil, as this will cause the custard to curdle and lose its smooth texture. Patience is a virtue here for the ultimate berry brulee!
- Strain for Silky Smoothness: Immediately remove the cooked custard from the heat. Pour the entire mixture through a fine-mesh sieve into a clean bowl. This step is non-negotiable for a truly perfect berry brulee. It catches any small bits of cooked egg or vanilla bean debris, ensuring your custard base is incredibly silky and smooth. If you are using vanilla extract, stir it in at this point.
- Prepare the Ramekins and Water Bath: Preheat your oven to 325°F (160°C). Place your empty ramekins into a large roasting pan or baking dish. This pan should be deep enough to hold about an inch of water.
Assembling the Berry Brulee Layers
Now that our beautiful custard is ready, it’s time to introduce the star of the show – the vibrant fresh berries! This layering technique ensures every bite of your berry brulee is a harmonious blend of creamy and fruity.
- Prepare the Berries: Gently wash and pat dry all your fresh berries. If using strawberries, hull and slice them into roughly ¼-inch pieces. For larger blackberries or raspberries, you might want to gently halve them. Taste a few berries. If they are particularly tart, sprinkle them with 1-2 tablespoons of sugar and the lemon zest (if using). Gently toss them to coat.
- Layer the Berries into Ramekins: Divide the prepared berries evenly among the bottom of your ramekins. I like to create a generous layer, about ½ to ¾ inch deep. This ensures a substantial burst of fruit in every spoonful of berry brulee.
- Fill with Custard: Carefully pour the warm, strained custard over the berries in each ramekin, filling them almost to the top, leaving about ¼ inch of space from the rim. The berries might float up a little, which is perfectly fine and adds to the visual appeal.
- Create the Water Bath: Carefully pour hot water (from a kettle works perfectly) into the roasting pan around the ramekins, until the water comes about halfway up the sides of the ramekins. Be very careful not to get any water into your custards! The water bath is essential for gentle, even cooking, preventing the edges from overcooking before the center sets, and ensuring a supremely creamy texture for your berry brulee.
Baking and Chilling for Optimal Flavor and Texture
The baking process for your berry brulee is a gentle affair, ensuring a delicate set. The chilling, however, is equally important, allowing the flavors to meld and the custard to fully firm up.
- Bake the Berry Brulee: Carefully transfer the roasting pan with the ramekins and water bath to your preheated oven. Bake for approximately 35-45 minutes. The baking time can vary depending on your oven and the size of your ramekins. The custards are done when they are just set around the edges but still have a slight jiggle in the very center when you gently nudge the pan. An internal temperature of 170-175°F (77-79°C) is ideal. Do not overbake, or they may become rubbery!
- Cool and Chill: Carefully remove the roasting pan from the oven. Let the ramekins cool in the water bath for about 15-20 minutes. Then, carefully remove the ramekins from the water bath (use tongs or an oven mitt to avoid burning your fingers). Place them on a wire rack to cool completely to room temperature. This can take about 1-2 hours. Once cooled, cover each ramekin tightly with plastic wrap and refrigerate for at least 4 hours, or preferably overnight. This chilling period is absolutely crucial for the custard to fully set, develop its rich flavor, and achieve that perfect creamy consistency before we add the caramelized topping to your berry brulee.
The Grand Finale: Creating the Perfect Caramelized Top for Your Berry Brulee
This is the moment we’ve all been waiting for – the dramatic crackle of that caramelized sugar crust! It’s what truly defines a brulee, and with a few careful steps, you’ll achieve perfection.
- Prepare for Bruleeing: Once the berry brulees are thoroughly chilled and firm, remove them from the refrigerator. Blot away any condensation that might have formed on the surface of the custard with a clean paper towel. A dry surface is essential for the sugar to melt and caramelize properly.
- Apply the Sugar: Sprinkle an even, generous layer of granulated sugar or turbinado sugar over the top of each chilled custard. You’ll want about 1-2 tablespoons per ramekin, enough to completely cover the surface in a thin, uniform layer. Rotate the ramekin to ensure the sugar coats evenly from edge to edge.
- Caramelize with a Kitchen Torch: Now for the fun part! Hold your kitchen torch about 3-4 inches above the sugar layer. Move the flame in a circular motion over the sugar. You’ll see the sugar begin to melt, bubble, and then turn a beautiful amber color. Keep the torch moving continuously to prevent burning. Work patiently and evenly until all the sugar is melted and caramelized into a glossy, crisp, golden-brown crust. If you notice any dark spots forming too quickly, move the torch away slightly or focus on lighter areas.
- Allow to Set: Once you’ve achieved that gorgeous, even caramel crust, let the berry brulees sit at room temperature for 3-5 minutes. This allows the caramelized sugar to cool and harden, creating that signature satisfying crack when you break into it. Don’t rush this step, as it’s key to the brulee experience!
Serving Your Exquisite Berry Brulee
Your homemade berry brulee is now ready to impress! There’s nothing quite like that first crack of the spoon.
- Serve Immediately: The absolute best way to enjoy your berry brulee is shortly after the sugar has caramelized and cooled. This ensures the perfect contrast between the warm, crisp topping and the cold, creamy custard and fresh berries beneath. The longer it sits, the more likely the sugar crust will begin to soften due to moisture from the custard.
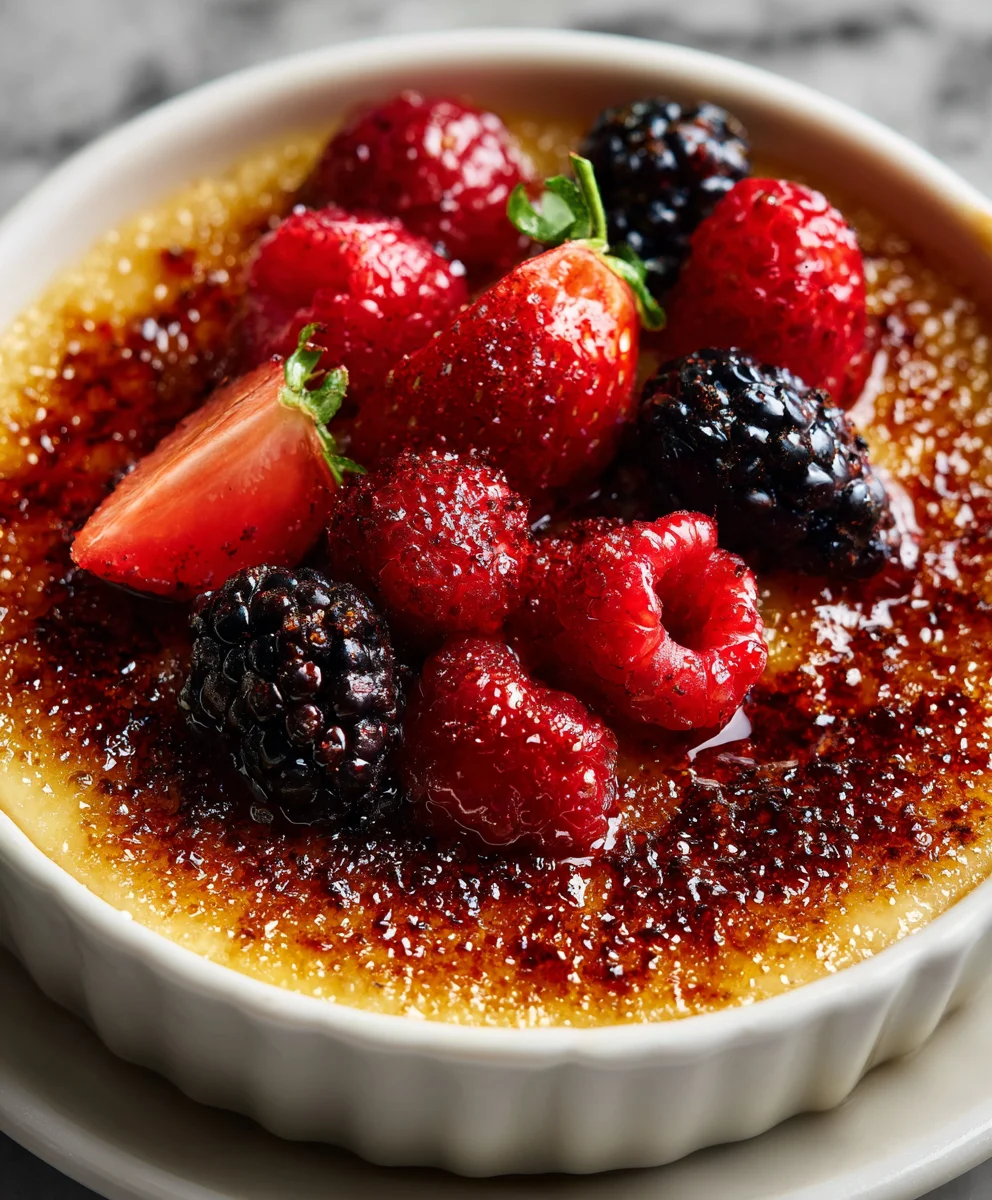
- Optional Garnish: For an extra touch of elegance, you can garnish your berry brulee with a few fresh mint leaves, a single perfect berry, or a dusting of powdered sugar (though I personally think the brulee topping is enough!).
Pro Tips for an Unforgettable Berry Brulee
To ensure your berry brulee is nothing short of spectacular every single time, I’ve gathered some of my favorite insider tips and tricks. These little details can make a big difference in flavor, texture, and overall enjoyment of your homemade berry brulee.
Choosing Your Berries Wisely:
When it comes to the berry layer in your berry brulee, quality makes all the difference. Always opt for fresh, in-season berries if possible. They will offer the most vibrant flavor and appealing texture. If you’re making this in the off-season, flash-frozen berries can be a decent alternative, but make sure to thaw them completely and drain any excess liquid thoroughly before adding them to your ramekins. Excess moisture can make your custard watery and diminish the intensity of the berry flavor. I love a mix of raspberries, blueberries, and sliced strawberries for a delightful color and flavor contrast, but feel free to use your favorite single berry, too! A single layer of perfectly ripe blackberries makes for a truly elegant berry brulee.
Vanilla Bean vs. Extract:
I cannot stress enough the difference a real vanilla bean makes in this berry brulee. The tiny black specks of vanilla seed are a hallmark of quality and provide a complex, floral aroma that vanilla extract, even high-quality ones, simply can’t replicate. If you do use extract, add it after straining the custard to preserve its delicate flavor. Never add it to the simmering cream as alcohol-based extracts can evaporate or cook off some of their nuanced notes.
Tempering Eggs – The Golden Rule:
This step for your berry brulee custard base is non-negotiable. If you add cold eggs directly to hot cream, you’ll end up with scrambled eggs, not a smooth custard. The slow, gradual addition of hot liquid while whisking vigorously brings the egg yolks up to temperature gently. Think of it as slowly introducing them to the warm bath, rather than throwing them into a hot tub! If you accidentally scramble a bit, don’t fret; the fine-mesh sieve will catch those rogue pieces, saving your custard.
The Importance of the Water Bath:
The water bath (bain-marie) for baking your berry brulee custards is not just a suggestion; it’s a critical component for achieving that signature silky-smooth texture. The water bath ensures even, gentle heat distribution, preventing the edges of the custard from overcooking and becoming rubbery before the center has a chance to set. It also creates a moist cooking environment, which helps prevent cracks on the surface of your custard. Take your time setting it up, and be careful when transferring it to and from the oven.
Don’t Overcook Your Custard:
An overcooked custard for your berry brulee will lose its luscious, creamy texture and become grainy or rubbery. Keep a close eye on it during the stovetop cooking phase and especially during baking. The slight jiggle in the center is exactly what you want when you take it out of the oven. The residual heat will continue to cook it gently, and it will firm up further during chilling.
Chilling is Key:
Patience truly is a virtue with this berry brulee recipe. The extended chilling time (at least 4 hours, preferably overnight) is absolutely essential. It allows the custard to fully set, firm up, and most importantly, it gives all the flavors a chance to meld and deepen. A cold custard also provides the perfect temperature contrast with the warm, freshly caramelized sugar topping, enhancing the entire sensory experience.
The Right Sugar for Bruleeing:
While granulated sugar works perfectly well, I highly recommend trying turbinado sugar for the topping of your berry brulee. Its larger crystals create a thicker, more robust, and incredibly satisfying crunchy crust. It also seems to caramelize a little more evenly for me. Whichever you choose, ensure an even layer across the entire surface. Too little, and you won’t get a proper crust; too much, and it can become overly thick and hard to crack.
Mastering the Torch Technique:
Using a kitchen torch is the most effective and safest way to achieve that perfect brulee crust without overcooking your custard. Hold the torch a few inches above the sugar and keep the flame moving in small, even circles. Don’t leave the flame in one spot for too long, or you’ll burn the sugar, which will result in a bitter taste. You’re aiming for a beautiful, even amber color. Practice makes perfect, and soon you’ll be a brulee master!
Make Ahead Advantage:
The beauty of this berry brulee recipe is that you can prepare the custards (up to the chilling step) a day or two in advance. Store them covered tightly in the refrigerator. Then, simply brulee them right before serving. This makes it an excellent dessert for entertaining, as you can do most of the work ahead of time and just focus on the dramatic torching when your guests arrive.
Enjoy every delightful spoonful of your homemade berry brulee!
Conclusion:
Well, my friends, we’ve reached the sweet end of our culinary journey, and I genuinely hope you’re feeling as inspired as I am to whip up this incredible dessert. What truly makes this recipe a must-try isn’t just its stunning presentation or its deceptively simple preparation; it’s the sheer joy it brings with every spoonful. Imagine the delightful crunch of caramelized sugar giving way to a creamy, luscious base, studded with vibrant, slightly tart berries that burst with flavor. It’s a symphony of textures and tastes that elevates a simple dessert into an unforgettable experience. I’ve made countless desserts over the years, but few manage to strike such a perfect balance between elegance and effortless charm. This isn’t just another sweet treat; it’s a testament to how humble ingredients can be transformed into something truly spectacular with just a little bit of care and creativity.
The Irresistible Allure of Berry Brulee
The moment that golden crust shatters, releasing the fragrant steam from beneath, you’ll understand exactly why this Berry Brulee stands out. It’s an experience that engages all your senses – the visual appeal of the glistening berries peeking through the amber sugar, the satisfying crackle as your spoon breaks the surface, the delicate aroma of vanilla and fresh fruit, and of course, the exquisite taste. It’s a dessert that feels luxurious without being overly indulgent, providing just the right amount of sweetness to cap off any meal, or even to brighten a simple afternoon. I promise you, once you taste the harmonious blend of the cool, rich custard with the warmth of the slightly cooked berries, topped with that iconic crisp sugar layer, you’ll be utterly captivated. It’s truly a dessert that brings smiles and prompts immediate requests for the recipe!
Now, let’s talk about making this delightful creation truly yours. While it shines brightly on its own, a few serving suggestions can elevate it even further. For a truly decadent experience, consider pairing it with a small scoop of high-quality vanilla bean ice cream or a dollop of freshly whipped cream. The slight chill and extra creaminess provide a wonderful contrast to the brulee. A sprig of fresh mint or a few extra whole berries on the side of the ramekin can add a pop of color and freshness. It’s also absolutely divine with a robust cup of coffee or a delicate herbal tea, making it a perfect end to a dinner party or a sophisticated brunch offering. Don’t limit it to just dessert; I’ve even enjoyed it as a special breakfast treat on a lazy Sunday morning – trust me, it’s a game-changer!
Making It Your Own: Variations to Explore
And the beauty of this recipe lies in its incredible versatility. Feel free to experiment with the berries based on what’s in season or what you love most. A mix of raspberries and blueberries is always a winner, but don’t shy away from blackberries, sliced strawberries, or even a handful of cherries (pitted, of course!). You can also infuse the cream base with different flavors. A little lemon or orange zest simmered with the cream adds a lovely citrusy brightness. A touch of almond extract instead of vanilla can give it a nutty, sophisticated twist. For those who prefer a less sweet dessert, you can slightly reduce the sugar in the custard itself, letting the natural sweetness of the berries and the caramelized sugar on top take center stage. For a dairy-free option, you can experiment with full-fat coconut cream or a high-quality oat cream, ensuring you adjust for thickness and cooking time if needed. The possibilities are truly endless, allowing you to tailor this dessert to your exact preferences and seasonal availability.
So, what are you waiting for? I sincerely encourage you to roll up your sleeves, gather your ingredients, and give this recipe a try. You don’t need to be a seasoned chef to create something truly magical. The joy of cooking comes not just from the eating, but from the process, the aromas filling your kitchen, and the satisfaction of creating something beautiful with your own hands. Once you’ve experienced the magic, I would absolutely love to hear about it! Please, share your culinary adventures with me. Tell me what berries you used, what variations you tried, or even just how much you and your loved ones enjoyed this delightful treat. Your feedback, your photos, and your unique twists inspire me and our entire community. Let’s celebrate the joy of delicious food together – happy cooking!
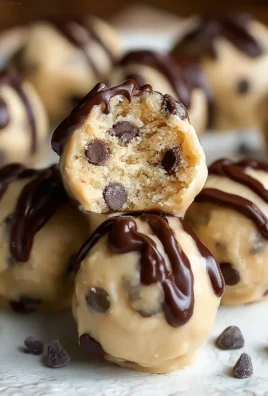
Berry Brulee
Berry Brulee is an elegant dessert that tantalizes all the senses. Crack through a perfectly caramelized sugar crust to reveal a luscious, warm medley of fresh, vibrant berries and a silky vanilla custard. This fruit-centric adaptation carries the sophisticated spirit of classic crème brûlée with a lighter, fresher appeal.
Ingredients
-
2 cups (480ml) Heavy Cream
-
½ cup (100g) Granulated Sugar
-
1 Vanilla Bean (split, seeds scraped; or 1½ tsp high-quality vanilla extract)
-
5 Large Egg Yolks
-
¼ teaspoon Salt
-
2 cups (approx. 300g) Mixed Fresh Berries (e.g., raspberries, blueberries, blackberries, sliced strawberries; mix for color/flavor, cut big strawberries in half, fresh is key)
-
1-2 tablespoons Granulated Sugar (optional, for tart berries)
-
½ teaspoon Lemon Zest (optional)
-
¼ – ½ cup (50-100g) Granulated Sugar, or Turbinado Sugar (1-2 tbsp per ramekin, for topping)
Instructions
-
Step 1
In a medium saucepan, combine heavy cream, ½ cup sugar, vanilla bean seeds and pod. Gently warm over medium-low heat until it just simmers at the edges. Remove from heat, cover, and steep for 15-20 minutes. Remove vanilla pod. (If using vanilla extract, add after straining custard). -
Step 2
In a large bowl, whisk 5 egg yolks and ¼ tsp salt until well combined. -
Step 3
Slowly pour about half of the warm cream mixture into the egg yolks while continuously whisking vigorously. Pour the tempered egg yolk mixture back into the remaining warm cream in the saucepan, whisking constantly. -
Step 4
Return the saucepan to low heat. Cook, stirring constantly (8-12 minutes), until the custard thickens to coat the back of a spoon (170-175°F / 77-79°C). Do not boil. -
Step 5
Immediately pour the cooked custard through a fine-mesh sieve into a clean bowl for a silky-smooth texture. -
Step 6
Preheat oven to 325°F (160°C). Place 6 (4-6 ounce) ramekins into a large roasting pan. -
Step 7
Gently wash and pat dry mixed berries. Slice larger strawberries. If berries are tart, sprinkle with 1-2 tbsp sugar and ½ tsp lemon zest (optional), then toss. -
Step 8
Divide prepared berries evenly among ramekin bottoms (½-¾ inch deep). Pour warm, strained custard over berries, filling each ramekin almost to the top (leaving ¼ inch space). -
Step 9
Carefully pour hot water into the roasting pan around the ramekins, until the water comes about halfway up their sides. Do not get water into the custards. -
Step 10
Transfer the roasting pan to the oven. Bake for 35-45 minutes. Custards are done when edges are set but the center still has a slight jiggle (170-175°F / 77-79°C). Do not overbake. -
Step 11
Remove from oven. Cool ramekins in water bath 15-20 minutes. Remove, cool completely to room temperature (1-2 hours). Cover tightly and refrigerate for at least 4 hours, or preferably overnight. -
Step 12
Once thoroughly chilled, remove ramekins. Blot any condensation from the custard surface with a paper towel. -
Step 13
Sprinkle an even, generous layer of granulated or turbinado sugar (1-2 tablespoons per ramekin) over each chilled custard. -
Step 14
Hold a kitchen torch about 3-4 inches above the sugar layer. Move the flame in a circular motion until sugar melts, bubbles, and turns a glossy, golden-brown crust. Keep the torch moving to prevent burning. -
Step 15
Let the berry brulees sit at room temperature for 3-5 minutes, allowing the caramelized sugar to cool and harden. -
Step 16
Serve immediately for the best contrast between the warm, crisp topping and the cold, creamy custard and fresh berries. Optionally, garnish with fresh mint or a single berry, or serve with a slice of pound cake or angel food cake.
Important Information
Nutrition Facts (Per Serving)
It is important to consider this information as approximate and not to use it as definitive health advice.
Allergy Information
Please check ingredients for potential allergens and consult a health professional if in doubt.
Leave a Comment