

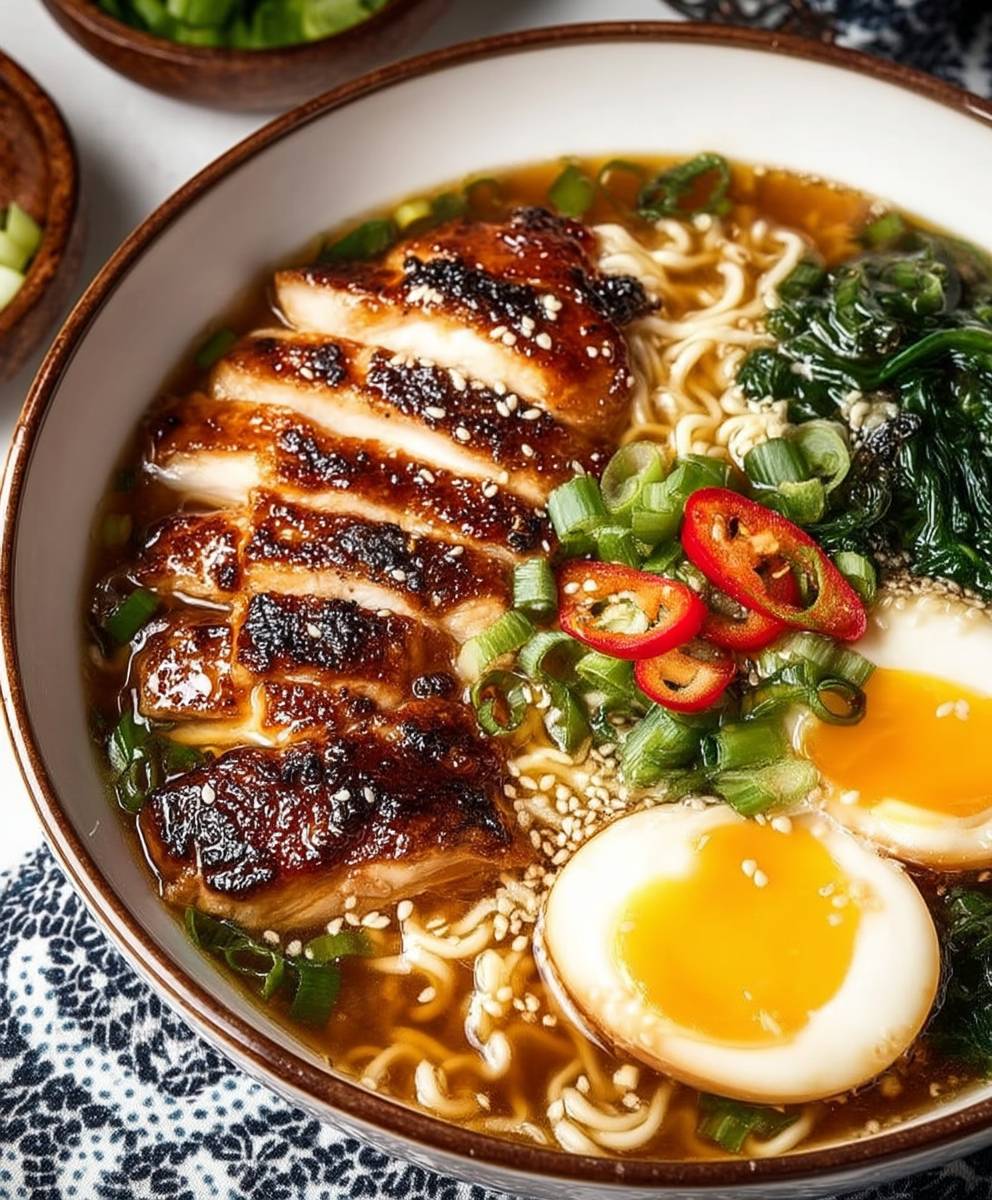
Homemade Chicken Ramen, the very words conjure up images of steaming bowls filled with rich broth, tender noodles, and savory toppings. Forget those instant noodle packets we’re diving headfirst into a culinary adventure that will transform your perception of ramen forever! Have you ever dreamed of creating a restaurant-quality ramen experience in the comfort of your own kitchen? Well, dream no more! This recipe will guide you through each step, ensuring a deeply satisfying and authentic bowl of Homemade Chicken Ramen.
Ramen, a dish with roots tracing back to China, has become a beloved staple in Japanese cuisine and a global phenomenon. Its popularity stems from its incredible versatility and the comforting warmth it provides. From the bustling ramen shops of Tokyo to cozy kitchens around the world, people are drawn to the customizable nature of this iconic noodle soup. The beauty of ramen lies in the harmonious blend of textures and flavors the slurp-worthy noodles, the umami-rich broth, the perfectly cooked egg, and the tender slices of chicken. It’s a symphony of deliciousness in every spoonful!
What makes this particular recipe so special? It’s all about the depth of flavor we achieve in the broth. We’re not just throwing ingredients into a pot; we’re building layers of complexity that will tantalize your taste buds. Plus, making it at home allows you to control the ingredients and customize it to your liking. Whether you prefer a spicy kick or a milder, more savory profile, this recipe provides the perfect foundation for your ramen masterpiece. Get ready to impress your friends and family with your newfound ramen skills!

Ingredients:
- For the Broth:
- 3 lbs Chicken Carcasses (backs, necks, wings), rinsed
- 12 cups Water
- 2 large Yellow Onions, quartered
- 4 cloves Garlic, smashed
- 4 inch piece of Ginger, peeled and sliced
- 2 stalks Green Onions, roughly chopped
- 1/4 cup Soy Sauce
- 2 tablespoons Mirin
- 1 tablespoon Rice Vinegar
- 1 teaspoon Salt, or to taste
- 1/2 teaspoon Black Peppercorns
- For the Tare (Flavor Base):
- 1/4 cup Soy Sauce
- 2 tablespoons Mirin
- 1 tablespoon Sake (optional)
- 1 teaspoon Sesame Oil
- 1 clove Garlic, minced
- 1/2 inch Ginger, grated
- Pinch of Red Pepper Flakes (optional)
- For the Noodles:
- 1 lb Fresh Ramen Noodles (or dried, cooked according to package directions)
- For the Chicken Chashu (Braised Chicken):
- 1.5 lbs Boneless, Skinless Chicken Thighs
- 1/2 cup Soy Sauce
- 1/4 cup Mirin
- 1/4 cup Sake (optional)
- 2 tablespoons Sugar
- 1 inch piece of Ginger, sliced
- 2 cloves Garlic, smashed
- Toppings (Optional):
- Soft Boiled Eggs, halved
- Green Onions, thinly sliced
- Nori Seaweed, cut into strips
- Bamboo Shoots (Menma), marinated
- Spinach, blanched
- Corn
- Bean Sprouts
- Chili Oil
Making the Chicken Broth:
Okay, let’s get started with the heart of our ramen the broth! This is where the magic happens, and it’s totally worth the time and effort. Trust me!
- Prepare the Chicken: Rinse the chicken carcasses thoroughly under cold water. This helps remove any impurities and ensures a cleaner-tasting broth.
- Combine Ingredients: In a large stockpot or Dutch oven, combine the rinsed chicken carcasses, water, quartered onions, smashed garlic, sliced ginger, chopped green onions, soy sauce, mirin, rice vinegar, salt, and black peppercorns.
- Bring to a Boil: Bring the mixture to a rolling boil over high heat. Once boiling, immediately reduce the heat to low, so it’s just a gentle simmer.
- Simmer, Simmer, Simmer: This is the key! Simmer the broth, uncovered, for at least 3 hours, or even up to 6 hours for a richer, more flavorful broth. The longer it simmers, the better it gets! As it simmers, skim off any foam or impurities that rise to the surface with a fine-mesh skimmer or spoon. This will keep your broth clear and clean.
- Strain the Broth: After simmering, carefully strain the broth through a fine-mesh sieve lined with cheesecloth (if you have it) into a large bowl or container. This will remove all the solids, leaving you with a beautiful, clear broth. Discard the solids.
- Defat the Broth (Optional): If you want a less fatty broth, you can let it cool completely and then refrigerate it. The fat will solidify on the surface, making it easy to remove. However, some fat adds richness and flavor, so it’s up to you!
- Taste and Adjust: Taste the broth and adjust the seasoning as needed. You might want to add more salt, soy sauce, or mirin to achieve your desired flavor profile. Remember, the tare will also add flavor, so don’t over-season at this stage.
Preparing the Tare (Flavor Base):
The tare is a concentrated flavor bomb that adds depth and complexity to your ramen. Don’t skip this step!
- Combine Ingredients: In a small saucepan, combine the soy sauce, mirin, sake (if using), sesame oil, minced garlic, grated ginger, and red pepper flakes (if using).
- Simmer Gently: Heat the mixture over low heat, just until it’s simmering gently. Simmer for about 5 minutes, allowing the flavors to meld together. Be careful not to boil it, as this can make the soy sauce bitter.
- Cool and Store: Remove the saucepan from the heat and let the tare cool completely. You can store it in an airtight container in the refrigerator for up to a week.
Making the Chicken Chashu (Braised Chicken):
This braised chicken is incredibly tender and flavorful, and it’s a fantastic addition to your ramen. You can also use pork belly (chashu) if you prefer!
- Sear the Chicken (Optional): For extra flavor, you can sear the chicken thighs before braising them. Heat a tablespoon of oil in a large skillet over medium-high heat. Sear the chicken thighs on both sides until they are nicely browned. This step is optional, but it adds a nice depth of flavor.
- Combine Ingredients: In a medium saucepan or Dutch oven, combine the soy sauce, mirin, sake (if using), sugar, sliced ginger, and smashed garlic.
- Add the Chicken: Add the chicken thighs to the saucepan and add enough water to cover the chicken.
- Bring to a Simmer: Bring the mixture to a simmer over medium heat. Once simmering, reduce the heat to low, cover the saucepan, and simmer for about 45 minutes to 1 hour, or until the chicken is very tender and easily shreds with a fork.
- Cool in the Braising Liquid: Remove the saucepan from the heat and let the chicken cool completely in the braising liquid. This will help it absorb even more flavor.
- Shred or Slice the Chicken: Once the chicken is cool enough to handle, remove it from the braising liquid and shred it with two forks or slice it into thin pieces.
- Reduce the Braising Liquid (Optional): If you want a thicker, more concentrated sauce, you can strain the braising liquid and simmer it in a saucepan over medium heat until it reduces to your desired consistency. This makes a delicious glaze for the chicken.
Assembling the Ramen:
Finally, the moment we’ve been waiting for! Let’s put everything together and create our delicious bowl of homemade chicken ramen.
- Cook the Noodles: Cook the ramen noodles according to the package directions. If using fresh noodles, they usually cook very quickly, in just a few minutes. Be careful not to overcook them, as they will become mushy.
- Warm the Broth: Gently reheat the chicken broth in a saucepan over low heat. Do not boil it.
- Prepare the Bowls: In each ramen bowl, add 1-2 tablespoons of the tare. The amount of tare you use will depend on your personal preference and the strength of your broth. Start with less and add more to taste.
- Add the Broth: Pour the hot chicken broth into the bowls, over the tare.
- Add the Noodles: Add the cooked ramen noodles to the bowls, arranging them neatly in the broth.
- Add the Toppings: Now comes the fun part! Arrange the chicken chashu, soft boiled egg (halved), sliced green onions, nori seaweed, bamboo shoots, blanched spinach, corn, and bean sprouts on top of the noodles. Get creative and arrange them in an appealing way.
- Drizzle with Chili Oil (Optional): If you like a little heat, drizzle a small amount of chili oil over the top of the ramen.
- Serve Immediately: Serve the ramen immediately and enjoy! Slurping is encouraged!
Tips for Success:
- Use High-Quality Ingredients: The better the ingredients, the better the flavor of your ramen. Use fresh, high-quality chicken, vegetables, and noodles.
- Don’t Rush the Broth: The broth is the foundation of your ramen, so don’t rush the process. Simmer it for as long as possible to extract maximum flavor.
- Adjust the Seasoning: Taste and adjust the seasoning of the broth and tare to your personal preference.
- Prepare the Toppings in
Conclusion:
So there you have it! This Homemade Chicken Ramen recipe is more than just a meal; it’s an experience. From the rich, savory broth that simmers for hours, infusing every ingredient with its depth, to the perfectly cooked noodles and the customizable toppings, it’s a dish that truly satisfies. I know making ramen from scratch might seem daunting, but trust me, the incredible flavor payoff is absolutely worth the effort. You’ll be amazed at how much better it tastes than anything you can get at a restaurant or from a package.
Why is this a must-try? Because it’s a blank canvas for your culinary creativity! You control every element, from the saltiness of the broth to the spice level of your chili oil. You can tailor it to your exact preferences, ensuring a bowl of ramen that’s perfectly suited to your taste buds. Plus, the process itself is incredibly rewarding. There’s something deeply satisfying about creating something so delicious from simple ingredients.
And the best part? The possibilities are endless! Feel free to experiment with different toppings. I love adding marinated soft-boiled eggs (ajitsuke tamago), sliced green onions, nori seaweed, and a dollop of spicy miso paste. But you could also try adding bamboo shoots (menma), wood ear mushrooms (kikurage), or even some grilled corn for a touch of sweetness.
For serving suggestions, I recommend enjoying this Homemade Chicken Ramen immediately after assembling it. The noodles are best when they’re still slightly firm and the broth is piping hot. You can also serve it with a side of gyoza (Japanese dumplings) or a small salad for a complete and satisfying meal.
Looking for variations? If you’re feeling adventurous, try adding a splash of sake or mirin to the broth for a deeper, more complex flavor. You could also experiment with different types of noodles, such as thicker udon noodles or thinner somen noodles. And if you’re not a fan of chicken, you can easily substitute it with pork, beef, or even tofu for a vegetarian option.
Don’t be afraid to get creative and make this recipe your own! The beauty of Homemade Chicken Ramen is that it’s so versatile and adaptable. It’s a dish that you can truly personalize to your liking.
I truly hope you give this recipe a try. I’m confident that you’ll love it as much as I do. It’s a labor of love, but the end result is a bowl of ramen that’s bursting with flavor and made with care.
Once you’ve made it, I’d love to hear about your experience! Did you make any modifications to the recipe? What were your favorite toppings? What did your family and friends think? Share your photos and stories in the comments below. I can’t wait to see what you create! Happy cooking! I’m sure you’ll find this Homemade Chicken Ramen recipe to be a new family favorite.
Homemade Chicken Ramen: The Ultimate Recipe Guide
Rich and flavorful homemade Chicken Ramen with tender braised chicken chashu and customizable toppings. A comforting Japanese noodle soup.
Ingredients
- 3 lbs Chicken Carcasses (backs, necks, wings), rinsed
- 12 cups Water
- 2 large Yellow Onions, quartered
- 4 cloves Garlic, smashed
- 4 inch piece of Ginger, peeled and sliced
- 2 stalks Green Onions, roughly chopped
- 1/4 cup Soy Sauce
- 2 tablespoons Mirin
- 1 tablespoon Rice Vinegar
- 1 teaspoon Salt, or to taste
- 1/2 teaspoon Black Peppercorns
- 1/4 cup Soy Sauce
- 2 tablespoons Mirin
- 1 tablespoon Sake (optional)
- 1 teaspoon Sesame Oil
- 1 clove Garlic, minced
- 1/2 inch Ginger, grated
- Pinch of Red Pepper Flakes (optional)
- 1 lb Fresh Ramen Noodles (or dried, cooked according to package directions)
- 1.5 lbs Boneless, Skinless Chicken Thighs
- 1/2 cup Soy Sauce
- 1/4 cup Mirin
- 1/4 cup Sake (optional)
- 2 tablespoons Sugar
- 1 inch piece of Ginger, sliced
- 2 cloves Garlic, smashed
- Soft Boiled Eggs, halved
- Green Onions, thinly sliced
- Nori Seaweed, cut into strips
- Bamboo Shoots (Menma), marinated
- Spinach, blanched
- Corn
- Bean Sprouts
- Chili Oil
Instructions
- Rinse the chicken carcasses thoroughly under cold water.
- In a large stockpot or Dutch oven, combine the rinsed chicken carcasses, water, quartered onions, smashed garlic, sliced ginger, chopped green onions, soy sauce, mirin, rice vinegar, salt, and black peppercorns.
- Bring the mixture to a rolling boil over high heat. Once boiling, immediately reduce the heat to low, so it’s just a gentle simmer.
- Simmer the broth, uncovered, for at least 3 hours, or even up to 6 hours for a richer, more flavorful broth. Skim off any foam or impurities that rise to the surface.
- Carefully strain the broth through a fine-mesh sieve lined with cheesecloth (if you have it) into a large bowl or container. Discard the solids.
- (Optional) If you want a less fatty broth, you can let it cool completely and then refrigerate it. The fat will solidify on the surface, making it easy to remove.
- Taste the broth and adjust the seasoning as needed.
- In a small saucepan, combine the soy sauce, mirin, sake (if using), sesame oil, minced garlic, grated ginger, and red pepper flakes (if using).
- Heat the mixture over low heat, just until it’s simmering gently. Simmer for about 5 minutes, allowing the flavors to meld together. Be careful not to boil it.
- Remove the saucepan from the heat and let the tare cool completely. You can store it in an airtight container in the refrigerator for up to a week.
- (Optional) For extra flavor, you can sear the chicken thighs before braising them. Heat a tablespoon of oil in a large skillet over medium-high heat. Sear the chicken thighs on both sides until they are nicely browned.
- In a medium saucepan or Dutch oven, combine the soy sauce, mirin, sake (if using), sugar, sliced ginger, and smashed garlic.
- Add the chicken thighs to the saucepan and add enough water to cover the chicken.
- Bring the mixture to a simmer over medium heat. Once simmering, reduce the heat to low, cover the saucepan, and simmer for about 45 minutes to 1 hour, or until the chicken is very tender and easily shreds with a fork.
- Remove the saucepan from the heat and let the chicken cool completely in the braising liquid. This will help it absorb even more flavor.
- Once the chicken is cool enough to handle, remove it from the braising liquid and shred it with two forks or slice it into thin pieces.
- (Optional) If you want a thicker, more concentrated sauce, you can strain the braising liquid and simmer it in a saucepan over medium heat until it reduces to your desired consistency. This makes a delicious glaze for the chicken.
- Cook the ramen noodles according to the package directions.
- Gently reheat the chicken broth in a saucepan over low heat. Do not boil it.
- In each ramen bowl, add 1-2 tablespoons of the tare.
- Pour the hot chicken broth into the bowls, over the tare.
- Add the cooked ramen noodles to the bowls, arranging them neatly in the broth.
- Arrange the chicken chashu, soft boiled egg (halved), sliced green onions, nori seaweed, bamboo shoots, blanched spinach, corn, and bean sprouts on top of the noodles.
- (Optional) If you like a little heat, drizzle a small amount of chili oil over the top of the ramen.
- Serve the ramen immediately and enjoy!
Notes
- Use high-quality ingredients for the best flavor.
- Don’t rush the broth simmering process.
- Adjust the seasoning of the broth and tare to your personal preference.
- Prepare the toppings in advance for easy assembly.
- The longer the broth simmers, the richer and more flavorful it will be.
- You can substitute pork belly (chashu) for the chicken thighs if you prefer.
- Feel free to customize the toppings to your liking.


Leave a Comment