

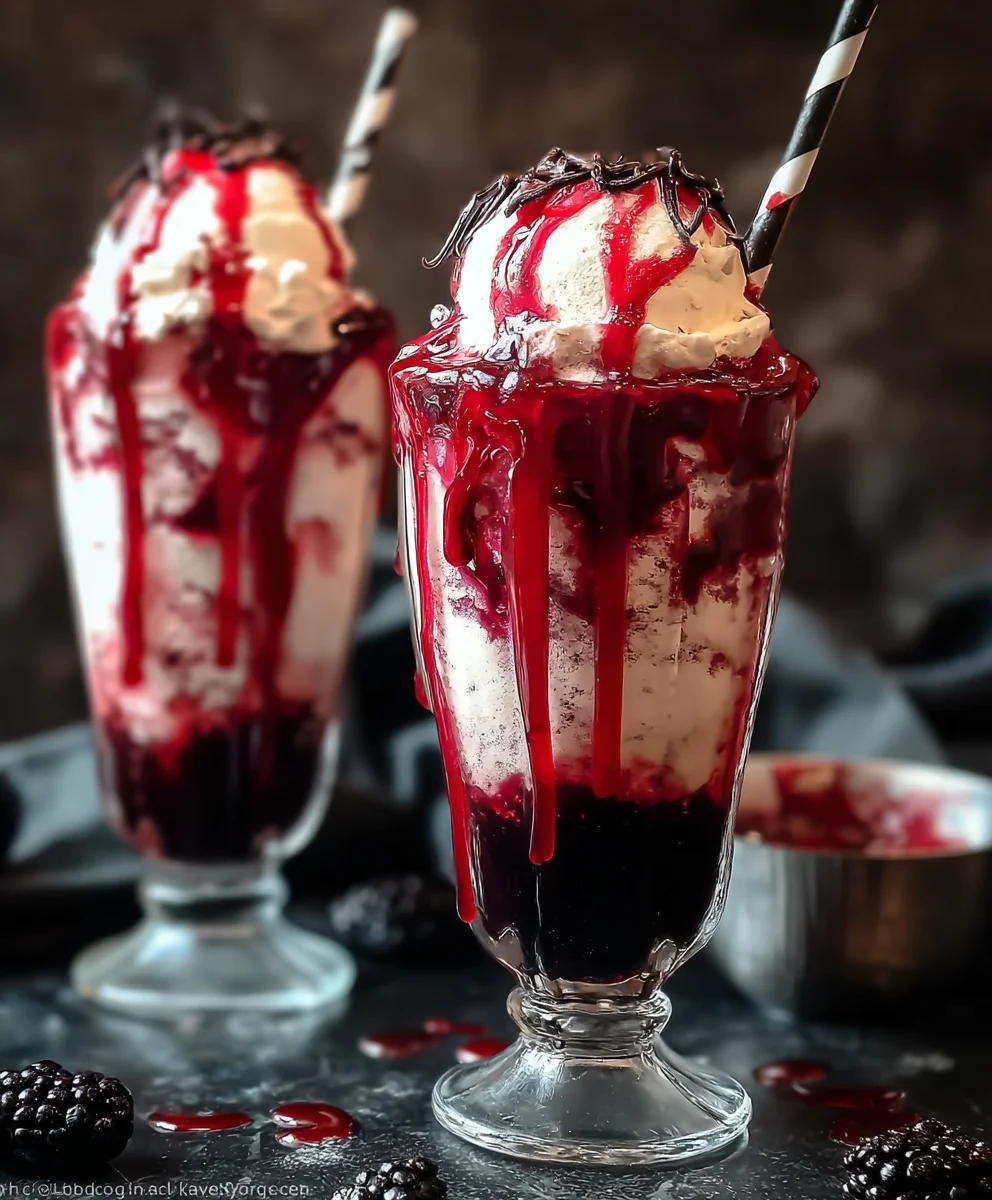
Halloween Vampire Ice Cream Floats are here to add a deliciously eerie touch to your spooky season celebrations!
Are you ready to sink your fangs into a treat that’s as thrilling as it is delicious? I’ve always adored how simple ingredients can transform into something truly magical, especially when it comes to festive occasions. This isn’t just a drink; it’s an experience – a bubbling, crimson potion that promises to delight with every sip. Perfectly aligning with the eerie enchantment of Halloween night, these floats capture the spirit of the season, offering a playful nod to classic horror without being too scary for younger ghouls and goblins. While ice cream floats have a nostalgic charm, we’re giving them a ghoulish twist that’s sure to delight both young and old.
Why Everyone Loves This Ghoulishly Good Treat
What makes these floats so irresistible? It’s the delightful combination of textures and flavors! The lively fizz of the blood-red soda, mingling with scoops of creamy, melting vanilla ice cream, creates a symphony on your palate. It’s sweet, refreshing, and surprisingly decadent, making it an absolute crowd-pleaser. Furthermore, their visual appeal is undeniable – a dramatic, spooky presentation that instantly elevates any Halloween party spread. Best of all, they are incredibly easy and quick to assemble, ensuring you spend less time in the kitchen and more time enjoying the haunted festivities. Whether you’re hosting a lavish haunted gathering or simply looking for a fun, themed dessert for a cozy night in, these Halloween Vampire Ice Cream Floats are guaranteed to be a frightfully good hit!

Ingredients:
Creating truly spectacular Halloween Vampire Ice Cream Floats requires a selection of ingredients that are both delicious and visually striking. I’ve gathered my go-to items here, but remember, the beauty of a float lies in its versatility, so feel free to adapt to your own monstrous tastes!
- For the Vampire Blood Drizzle:
- 1 cup fresh or frozen raspberries (if frozen, there’s no need to thaw them completely before starting)
- 1/4 cup granulated sugar (you can adjust this up or down depending on the tartness of your berries and your personal sweetness preference)
- 2 tablespoons water (for a deeper, richer flavor or an adult-friendly twist, you could substitute a good quality orange liqueur or cherry brandy here)
- 1 teaspoon fresh lemon juice (this brightens the flavor of the berries beautifully and helps cut through the sweetness)
- Optional: A tiny drop or two of red food coloring gel for a more intense, vibrant “blood” hue, though the raspberries already do an excellent job on their own!
- For the Floats Themselves:
- 1 large carton (approximately 1.75 quarts or 1.65 liters) of high-quality vanilla ice cream. I find vanilla provides the perfect canvas, but for extra flair, a red-swirl variety like cherry vanilla, strawberry cheesecake, or even red velvet can be absolutely ghoulishly delightful!
- 2-3 liters of red-colored soda. My favorites include cherry soda, strawberry soda, or a classic red cream soda. If you want more control over the intensity of the red, you can use a clear lemon-lime soda and add your own red food coloring, drop by drop, until you achieve your desired blood-red effect.
- Whipped cream (from a can for convenience, or homemade if you’re feeling extra fancy – it adds a lovely creamy cap to your chilling concoction).
- For the Ghoulish Garnishes (this is where the fun really begins – unleash your inner mad scientist!):
- Plastic vampire fangs (new and clean, of course! They look fantastic resting on the rim of the glass).
- Edible googly eyes (available in various sizes, perfect for creating spooky faces on your whipped cream or directly on the ice cream).
- Gummy worms, gummy centipedes, or even gummy brains (the more grotesque, the better for a truly scary float).
- Halloween-themed sprinkles (think bats, ghosts, pumpkins, or delicate spiderweb designs).
- Chocolate syrup (excellent for drawing spiderwebs directly onto the glass or drizzling over the whipped cream).
- Red sanding sugar or edible glitter for a shimmering, almost supernatural “blood” effect around the rim or sprinkled on top.
- Decorative straws or skewers (especially helpful if you’re adding larger garnishes like candy corn or themed lollipops).
- Essential Equipment:
- Tall, clear glasses or goblets (preferably chilled – more on that later!).
- A sturdy ice cream scoop.
- A small saucepan.
- A fine-mesh sieve (crucial for achieving a smooth “blood” drizzle).
- A blender or food processor (for making your raspberry “blood”).
Prepping Your Hauntingly Good Halloween Vampire Ice Cream Floats
Before we dive into the delightful task of assembling our Halloween Vampire Ice Cream Floats, there are a couple of crucial preparatory steps that will elevate your creation from merely good to absolutely ghoulishly great. Trust me, these small efforts make a big difference in both presentation and taste.
-
Preparing the “Vampire Blood” Drizzle
This is arguably the most important element for truly capturing the “vampire” essence of our floats. A homemade raspberry drizzle not only tastes fresh and vibrant but also provides that perfect, slightly viscous, deep red hue that screams “blood.”
To begin, combine your fresh or frozen raspberries, granulated sugar, and water (or your chosen liqueur) in a small saucepan over medium heat. Stir occasionally as the raspberries break down and the sugar dissolves. If you’re using frozen berries, this process might take a few extra minutes as they thaw and release their juices. I usually aim for a gentle simmer, just enough to soften the berries and create a syrupy consistency. This typically takes about 5-7 minutes once it reaches a simmer.
Once the mixture is bubbly and the raspberries are very soft, remove the saucepan from the heat. Now, for that smooth, authentic “blood” consistency, carefully pour the mixture through a fine-mesh sieve set over a bowl. Use the back of a spoon or a spatula to press down firmly on the solids, extracting as much liquid and pulp as possible. You want to leave behind all those pesky seeds. This step is non-negotiable for a truly refined drizzle!
After straining, stir in the fresh lemon juice. This tiny addition is a flavor powerhouse, brightening the rich berry taste and providing a lovely contrast. If you desire an even more intense, almost theatrical red color, now is the time to add a tiny drop or two of red food coloring gel. Mix it in thoroughly until you achieve your desired shade of sanguine splendor.
Allow your “vampire blood” drizzle to cool completely. For the best effect when drizzling, I find it works wonderfully when it’s at room temperature or even slightly chilled. If you prepare it ahead of time, store it in an airtight container in the refrigerator for up to a week. Just give it a good stir before use!
-
Chilling Your Goblets (or Glasses) for Optimal Fright
This is a simple step, often overlooked, but absolutely crucial for the best float experience. A warm glass will cause your ice cream to melt too quickly and your soda to lose its fizz prematurely. We want our Halloween Vampire Ice Cream Floats to stay cold and bubbly for as long as possible!
About 15-20 minutes before you plan to assemble your floats, place your tall glasses or goblets in the freezer. Alternatively, if your freezer space is limited, you can fill them with ice and a little water, let them sit for a few minutes, then empty and dry them thoroughly just before use. The goal is to get those glasses wonderfully frosty. The colder the glass, the slower the melt, and the more satisfying the crisp, cold sip will be. This also helps to prevent excessive foaming when the soda is poured, giving you more control over the final presentation of your terrifying treat.
Assembling Your Spine-Chilling Halloween Vampire Ice Cream Floats
Now that our “blood” is prepared and our glasses are frosty, it’s time for the main event: assembling these magnificent Halloween Vampire Ice Cream Floats. This is where the magic truly happens, transforming simple ingredients into a festive, spooky beverage.
-
The First Scoop – Laying the Foundation
Retrieve your chilled glasses from the freezer. They should be wonderfully frosty! Next, grab your ice cream. Using a sturdy scoop that’s been warmed slightly under hot water (and then wiped dry) will make scooping much easier and result in perfectly round, satisfying spheres of ice cream. I typically aim for about two to three generous scoops per glass, depending on the size of your glassware. You want a good amount of ice cream to create that classic float experience, where the melting cream slowly infuses the soda.
Carefully place the scoops of ice cream into the bottom of each chilled glass. Don’t just plop them in; try to arrange them somewhat evenly. The goal is to have a solid base that will support the soda and subsequent toppings without immediately sinking to the bottom. If your ice cream is too hard, let it sit out for a minute or two to soften just slightly, making it easier to scoop without too much struggle. The quality of your ice cream here truly shines through, so don’t skimp on a good brand if you want a truly luxurious float.
-
The Effervescent “Blood” – Pouring the Soda
This step requires a little bit of finesse to avoid an overflowing, fizzy mess. Hold your glass at a slight angle and slowly pour your chosen red soda down the side of the glass, aiming for the space between the ice cream and the glass wall. This technique helps to minimize the initial foam eruption and allows the soda to gently mingle with the ice cream.
Pouring slowly also gives you better control over the foam level. You want a good head of foam, but not so much that it spills over the top before you’ve even started garnishing. As the soda hits the cold ice cream, it will inevitably fizz and expand. Fill the glass about two-thirds to three-quarters of the way full, leaving ample room for your whipped cream and garnishes. The sight of that vibrant red soda cascading over the creamy white (or red-swirled) ice cream is truly enchanting and perfectly sets the stage for our Halloween Vampire Ice Cream Floats. If you’re using a clear soda with food coloring, ensure you’ve mixed the coloring thoroughly before pouring, so you get a consistent, blood-red hue.
-
The “Bloody” Drizzle – Adding the Vampire Touch
Now for the truly vampiric element! Take your cooled “vampire blood” raspberry drizzle. If it’s too thick, you can gently warm it for a few seconds in the microwave or thin it with another teaspoon of water or liqueur until it reaches a desired consistency – think slightly viscous, like syrup.
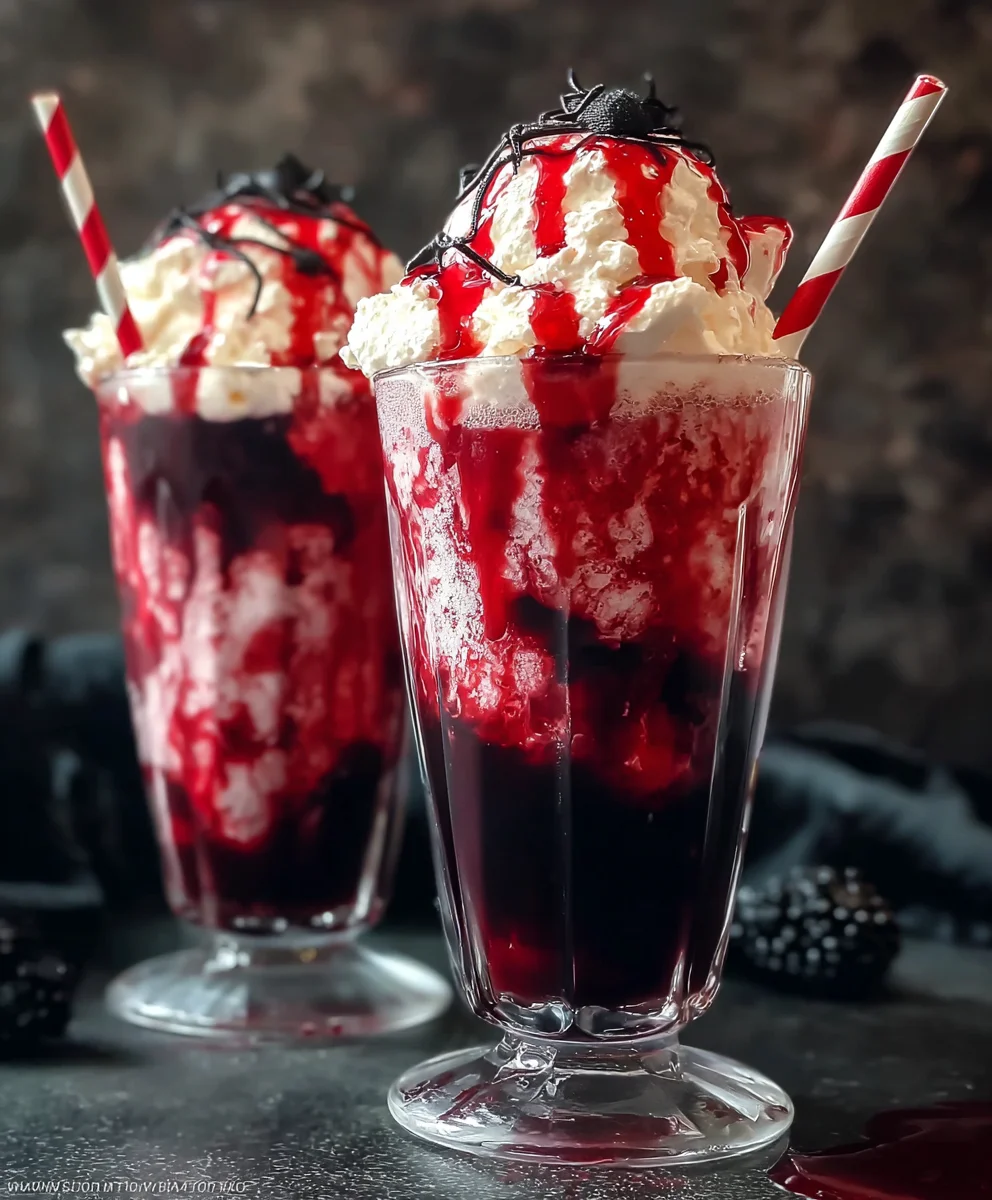
There are a few ways to apply this “blood” for maximum visual impact. For a dramatic effect, slowly drizzle the sauce down the inside walls of the glass before you even add the ice cream and soda. This creates stunning, gory streaks that look like drips of blood. Alternatively, or in addition, you can drizzle it generously over the scoops of ice cream and the top layer of soda. Allow some of it to ooze down into the soda, creating eerie red tendrils. For an even more intense look, you can dip the rim of your glass into a shallow dish of the “blood” drizzle before assembly, then into red sanding sugar for a blood-encrusted rim. This step really sells the “vampire” theme of these Halloween ice cream floats, so don’t be shy!
Garnishing for Maximum Spook Factor: The Final Touches
The garnishes are what transform a simple red ice cream float into a truly unforgettable Halloween Vampire Ice Cream Float. This is your chance to let your creativity run wild and add all the creepy, crawly, and fun elements that make these drinks perfect for the spooky season.
-
Whipped Cream Wonders (Optional, but highly recommended!)
A generous swirl of whipped cream on top of your float isn’t just for taste; it also serves as a fantastic canvas for your ghoulish decorations. If you’re using canned whipped cream, apply a lofty swirl directly onto the ice cream and foam. If you’re making your own, you can even add a touch of black food coloring for a “midnight” whipped cream, or a tiny bit of red for a “bloody” foam effect – though I often prefer the contrast of white against the red components.
The whipped cream acts like a soft cloud, ready to cradle all your creepy adornments. It provides height and texture, making the float look even more indulgent and appealing. Plus, who doesn’t love a mountain of whipped cream with their float? It just completes the experience, making each sip a delightful blend of creamy, fizzy, and icy goodness.
-
The Ghoulish Adornments – Decorating Your Halloween Vampire Ice Cream Floats
This is truly the grand finale, where your Halloween Vampire Ice Cream Floats come to life! Grab your arsenal of creepy garnishes and let your imagination take the lead. Here are some ideas:
- Vampire Fangs: Carefully place a pair of plastic vampire fangs over the rim of the glass, making it look as though a vampire has just taken a bite. This is a classic and immediately recognizable touch.
- Edible Googly Eyes: Affix edible googly eyes directly onto the whipped cream or gently press them into a scoop of ice cream to create a monstrous gaze. You can make them into pairs or scatter them for a more chaotic, creepy effect.
- Gummy Creatures: Drape gummy worms over the edge of the glass, as if they are crawling out of the “blood.” Gummy centipedes or even gummy brains can also add a wonderfully disgusting (in the best Halloween way!) touch.
- Spiderwebs: Use chocolate syrup to draw a delicate spiderweb pattern directly onto the inside of the glass before assembly, or drizzle it over the whipped cream. You can then add a small plastic spider or an edible spider sprinkle to complete the look.
- Sprinkles and Glitter: Scatter Halloween-themed sprinkles (bats, ghosts, pumpkins) over the whipped cream and ice cream. For extra sparkle, a dusting of red sanding sugar or edible red glitter can give the “blood” drizzle an unearthly shimmer.
- Skewered Treats: Use a decorative skewer to hold a few pieces of candy corn, a mini chocolate bar, or even a small, decorative plastic bat that can be perched atop the float.
Remember, the goal is to make each float unique and visually engaging. Don’t be afraid to mix and match elements to create truly personalized, terrifying concoctions. The more theatrical, the better for a Halloween party!
-
Serving Your Sinister Sips
Once your Halloween Vampire Ice Cream Floats are fully assembled and magnificently garnished, they are ready to be served immediately. Floats are best enjoyed when the ice cream is still largely intact and the soda is still wonderfully fizzy. The contrast of the melting ice cream with the effervescent soda is what makes this treat so special.
Present them with a straw (perhaps a striped or themed one!) and a long spoon, so your guests can enjoy every last drop and scoop. Encourage everyone to appreciate the visual spectacle before diving in. These are more than just drinks; they’re an experience, a centerpiece, and a true celebration of Halloween spirit. Watch as your guests’ eyes widen in delight and a little bit of fright when they see these chillingly good creations.
Tips and Tricks for the Ultimate Halloween Vampire Ice Cream Floats
To ensure your Halloween Vampire Ice Cream Floats are the talk of the crypt, I’ve gathered a few extra tips and tricks I’ve learned over countless spooky seasons. These little insights can help you elevate your float game and troubleshoot any unexpected ghoulish mishaps.
-
Ice Cream & Soda Variations:
While vanilla ice cream and red soda are classic, don’t be afraid to experiment! For a truly decadent experience, try chocolate ice cream with cherry cola for a “Black Forest Blood” float. Or, for a more ethereal “Ghostly” float, use lime sherbet with lemon-lime soda and a drizzle of electric green simple syrup. You could even use a mixture of different red sodas for a complex flavor profile. The key is maintaining that striking visual contrast that makes these floats so captivating for Halloween.
-
Advanced “Blood” Effects:
Want to take your “vampire blood” to the next level? For an extra thick, almost jelly-like consistency, you can dissolve a tiny pinch of cornstarch in a tablespoon of cold water and whisk it into your simmering raspberry sauce for the last minute of cooking. This creates a slightly more viscous, clingy “blood” that really holds its shape on the glass. For a fun surprise, you can also freeze small “blood” droplets (using gel food coloring mixed with a little water) on parchment paper, then carefully add them to the float, where they’ll slowly melt and bleed into the drink.
-
Kid-Friendly vs. Adult-Friendly:
These floats are naturally kid-friendly and a huge hit with younger ghouls and goblins. However, for the adult monsters at your party, you can easily transform these into “Bloody Vampire Cocktails.” Simply add a shot (or two!) of vodka, rum, or even a berry-flavored liqueur to the glass before adding the ice cream and soda. A splash of dry ice (handled with extreme care and never consumed) can create an incredible, bubbling, smoky effect, making the floats truly look like they’ve brewed in a witch’s cauldron. Always ensure dry ice is fully sublimated before anyone drinks from the glass.
-
Batch Preparation for Parties:
If you’re hosting a large Halloween bash, you can do a lot of the prep work in advance. Make your “vampire blood” drizzle a day or two ahead and store it in the fridge. Have all your garnishes laid out and ready to go. When it’s time to serve, have your chilled glasses ready, and perhaps enlist a helper. One person can scoop ice cream and pour soda, while another handles the “blood” drizzle and garnishes. This creates an efficient assembly line, ensuring fresh, fizzy floats for everyone without too much stress.
-
Troubleshooting Excessive Foam:
Sometimes, despite your best efforts, the soda just wants to foam excessively. This often happens if the ice cream is too soft or if the soda is poured too quickly. If you find your float bubbling over, don’t panic! Simply pause your pouring, allow the foam to settle for a moment, and then continue slowly. A long-handled spoon can also be gently used to stir down some of the foam. Remember, a little foam is good; it’s part of the float experience! However, we don’t want a volcanic eruption.
-
Embrace the Theatrics:
Above all, remember that creating these Halloween Vampire Ice Cream Floats is as much about the fun and theatrical presentation as it is about the taste. Encourage your guests to interact with their floats, to admire the “blood” drips, and to giggle at the googly eyes. These floats are designed to be a festive, memorable part of your Halloween celebration. So, crank up the spooky tunes, dim the lights, and enjoy your wickedly good creations!
Conclusion:
Well, my friends, we’ve reached the end of our spooky culinary journey, and I genuinely hope you’re as excited as I am about this incredible recipe. After all, what could be more fitting for a festive occasion than a dessert that not only tastes amazing but also looks like it jumped right out of a haunted manor? This isn’t just another sweet treat; it’s an experience waiting to happen, a vibrant, bubbly, and utterly delicious concoction that will capture the hearts (and taste buds!) of everyone who tries it. I truly believe that once you whip up a batch of these, you’ll understand why I’m so passionate about them. They are surprisingly simple to put together, requiring minimal effort but delivering maximum impact, making them perfect for busy hosts or anyone looking to add a touch of whimsy to their day without spending hours in the kitchen.
Why These Floats Are an Absolute Must-Try:
Let me tell you, the magic of these floats lies in their fantastic blend of flavors and their undeniable visual appeal. Imagine the delightful effervescence of the soda mingling with the creamy, rich sweetness of the ice cream, creating a symphony of textures that dance on your tongue with every sip. It’s a nostalgic taste that brings back childhood memories, but with a grown-up, sophisticated twist that makes it feel special. The vibrant colors are simply captivating, designed to draw you in and ignite your imagination. Whether you’re aiming to impress guests at a party or just want to treat your family to something extraordinary, these floats deliver on all fronts. They are the epitome of fun food – playful, bold, and incredibly satisfying. The contrast between the cold, smooth ice cream and the bubbly, refreshing drink is what makes each mouthful an absolute delight. Plus, the ease of preparation means that even the most novice of cooks can achieve a show-stopping dessert that looks professionally crafted. You’re not just serving a drink; you’re serving a conversation starter, a centerpiece of joy, and a truly memorable moment. Seriously, the simplicity of combining a few key ingredients to create something so visually striking and utterly delicious is nothing short of brilliant. This recipe is your secret weapon for instant festive cheer!
Serving Suggestions & Spooky Variations:
Now, let’s talk about how you can elevate your float experience even further or adapt it to suit different tastes and occasions. While the core recipe is spectacular on its own, a few creative touches can transform it. For an extra ghoulish effect, consider rimming your serving glasses with a little corn syrup and then dipping them in red sanding sugar – it looks just like dripping blood! You could also add a few plastic vampire fangs to the side of the glass or drop in some gummy worms for a creepy-crawly surprise. Don’t be afraid to experiment with your ice cream choices; while the traditional vanilla is a classic for a reason, a dark cherry or even a black sesame ice cream could add another layer of visual intrigue and flavor complexity. For those who prefer a non-dairy option, simply swap out the regular ice cream for your favorite plant-based vanilla or berry-flavored frozen dessert; the effect will be just as stunning. Similarly, you can experiment with different types of red soda – a black cherry soda, a raspberry-lime sparkling drink, or even a blood orange soda could offer unique flavor profiles that complement the ice cream beautifully. For a truly adult-themed party, you could even add a splash of raspberry liqueur or a dark fruit-flavored vodka to the mix, creating a cocktail that is as potent as it is pretty (please ensure responsible consumption and only serve to legal drinking age guests, of course!). Think beyond just Halloween; these floats could be adapted for a ‘Dracula’ movie night, a ‘monster mash’ themed birthday party, or even just a fun summer treat with a spooky twist. The possibilities are truly endless, and each variation offers a fresh opportunity to surprise and delight your guests. I particularly love the idea of garnishing with a fresh red berry, like a raspberry or a strawberry, perched on the rim – it adds a touch of freshness and a vibrant pop of color that really ties the whole presentation together.
Your Turn! Embrace the Spooky Fun!
So, there you have it! I’ve shared all my tips and tricks for creating these magnificent and delightfully eerie treats. Now, it’s your turn to unleash your inner mad scientist in the kitchen! I genuinely hope you’ll take the plunge and give these fantastic Halloween Vampire Ice Cream Floats a try. They are guaranteed to be a hit, bringing smiles, gasps, and perhaps even a playful shiver to everyone who partakes. Don’t just make them; make them your own! Feel free to adjust the flavors, add your unique garnishes, and most importantly, have an absolute blast while doing it. Once you’ve concocted your masterpiece, I would absolutely love to hear about your experience. Did you discover a new favorite combination? Did your guests go wild for them? Please come back and share your stories, your photos, and any creative twists you added in the comments section below. Your feedback and imaginative ideas inspire me and the entire community of fellow food enthusiasts. Let’s spread the spooky joy together! Happy stirring, happy sipping, and happy haunting!
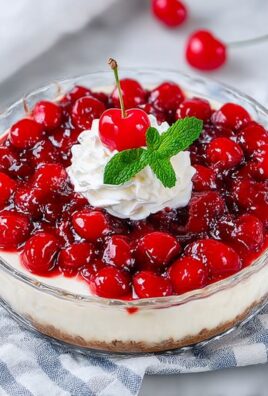
Halloween Vampire Ice Cream Floats
A deliciously eerie and easy-to-make treat, these Halloween Vampire Ice Cream Floats combine blood-red soda, creamy vanilla ice cream, and a homemade raspberry ‘blood’ drizzle, garnished with spooky adornments for a frightfully fun celebration. Pair these floats with other Halloween-themed treats like cookies or cupcakes for a complete spooky dessert table.
Ingredients
-
1 cup fresh or frozen raspberries
-
1/4 cup granulated sugar
-
2 tablespoons water (non-alcoholic alternative)
-
1 teaspoon fresh lemon juice
-
Red food coloring gel (optional)
-
1.75 quarts high-quality vanilla ice cream
-
2-3 liters red-colored soda (e.g., cherry, strawberry, or red cream soda)
-
Whipped cream
-
Plastic vampire fangs (for garnish)
-
Edible googly eyes (for garnish)
-
Gummy worms or other gummy creatures (for garnish)
-
Halloween-themed sprinkles (for garnish)
-
Chocolate syrup (for garnish)
-
Red sanding sugar or edible glitter (for garnish)
Instructions
-
Step 1
Combine raspberries, sugar, and water in a small saucepan over medium heat. Simmer for 5-7 minutes until berries soften. Strain through a fine-mesh sieve, pressing solids. Stir in lemon juice and optional red food coloring. Cool completely. -
Step 2
Place tall glasses or goblets in the freezer for 15-20 minutes to get them wonderfully frosty. -
Step 3
Place 2-3 generous scoops of vanilla ice cream into each chilled glass. -
Step 4
Hold each glass at a slight angle and slowly pour the red soda down the side, filling it about two-thirds to three-quarters full, leaving room for toppings. -
Step 5
Drizzle the cooled raspberry “vampire blood” sauce along the inside walls of the glasses, over the ice cream, and on top of the soda for a dramatic effect. -
Step 6
Add a generous swirl of whipped cream on top of each float. -
Step 7
Decorate with plastic vampire fangs on the rim, edible googly eyes, gummy worms draped over the edge, Halloween sprinkles, chocolate syrup spiderwebs, or red sanding sugar. -
Step 8
Serve your Halloween Vampire Ice Cream Floats immediately with a straw and a long spoon to enjoy the fizz and creamy goodness.
Important Information
Nutrition Facts (Per Serving)
It is important to consider this information as approximate and not to use it as definitive health advice.
Allergy Information
Please check ingredients for potential allergens and consult a health professional if in doubt.
Leave a Comment