

How To Make Yogurt Bites are incredibly versatile, wonderfully healthy, and ridiculously easy to whip up, making them a perfect snack for busy families, pre-workout fuel, or even a delightful frozen treat on a warm day. What’s not to love about these little gems? They’re a guilt-free indulgence, packed with probiotics and customizable to your heart’s content. We adore them because they offer a fantastic way to incorporate more goodness into our diets without sacrificing flavor or fun. The magic lies in their simplicity and the endless possibilities for personalization. Forget those store-bought versions loaded with sugar; learning how to make yogurt bites at home means you control every single ingredient. They’re a testament to how simple, wholesome foods can be utterly delicious and satisfying, proving that healthy snacking can be both exciting and effortless. Prepare to be hooked on making your own delightful yogurt creations!

Ingredients:
- 2 cups Greek yogurt, full-fat
- 1/4 cup honey, or maple syrup for a vegan option
- 1 teaspoon vanilla extract
- 1/2 cup fresh berries, such as blueberries, raspberries, or chopped strawberries
- 1 tablespoon chia seeds (optional, for added texture and nutrition)
- Pinch of salt (enhances sweetness)
Preparing Your Yogurt Bites
This section will guide you through gathering and preparing your ingredients for these delightful and healthy yogurt bites. It’s a simple process, but attention to detail ensures the best outcome.
First, ensure you have good quality Greek yogurt. Full-fat Greek yogurt will yield the creamiest and most stable bites. If you prefer a lighter option, you can use 2% Greek yogurt, but be aware the texture might be slightly less firm. If you’re making this a vegan treat, substitute the Greek yogurt with a thick, unsweetened plant-based yogurt like coconut or soy yogurt. For the sweetener, honey offers a lovely floral note, but maple syrup is an excellent alternative, especially for vegan preparations or if you prefer a different flavor profile. The vanilla extract is crucial for that classic sweet aroma and taste that complements the tangin extractess of the yogurt.
When it comes to the berries, fresh is best for vibrant flavor and color. Blueberries are fantastic as they hold their shape well, while raspberries add a beautiful tartness. If you’re using strawberries, make sure they are small or diced into manageable pieces so they distribute evenly throughout the bites. For an extra nutritional boost and a delightful textural element, chia seeds are a wonderful addition. They also help to bind the ingredients slightly. Don’t skip the pinch of salt! It might seem counterintuitive in a sweet recipe, but a tiny amount of salt can actually amplify the sweetness of the honey or maple syrup and balance the overall flavor profile.
Beforgin extractou begin mixing, make sure your berries are washed and thoroughly dried. Excess moisture can lead to watery yogurt bites. If you are using larger berries like strawberries or larger raspberries, a gentle chop or dice will ensure they are incorporated evenly and make the bites easier to handle.
Mixing the Yogurt Base
Now, let’s create the creamy, sweet base for our yogurt bites. This is where the magic starts to happen, transforming simple ingredients into a delicious treat.
In a medium-sized bowl, combine the 2 cups of Greek yogurt. If your yogurt is very thick, you can give it a gentle stir to loosen it up before adding other ingredients. Next, add the 1/4 cup of honey (or maple syrup). Drizzle it in slowly, allowing it to mingle with the yogurt. Incorporate the 1 teaspoon of vanilla extract. This fragrant addition will instantly lift the aroma of your mixture. Finally, add the pinch of salt. This subtle but important addition helps to enhance all the other flavors.
Using a whisk or a sturdy spoon, gently mix all these ingredients together until they are thoroughly combined and the mixture is smooth and uniform. You want to avoid over-mixing, which can sometimes make yogurt a bit more liquidy, but ensure there are no streaks of honey or vanilla visible. The color should be a consistent creamy white. Take a moment to taste the mixture at this stage. This is your chance to adjust the sweetness if you prefer it a little more or less sweet. You can add another teaspoon of honey or maple syrup if desired, mixing again until incorporated.
Adding the Berries and Chia Seeds
This step is all about adding texture, flavor, and visual appeal to your yogurt bites. The vibrant colors of the berries and the subtle crunch of the chia seeds will elevate your creation.
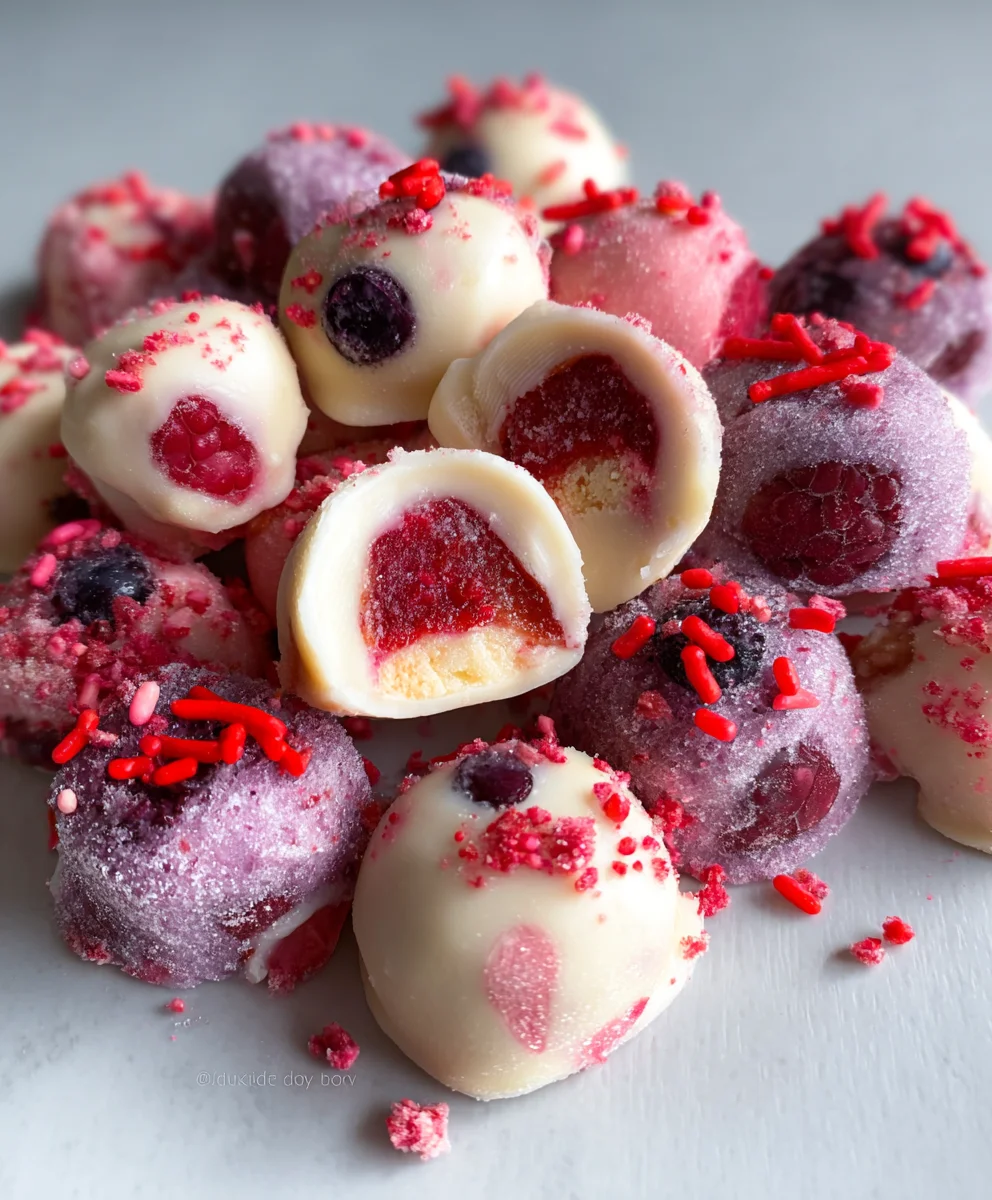
Gently fold in your prepared fresh berries into the yogurt mixture. If you’re using a variety of berries, try to distribute them evenly throughout the bowl. The goal here is to coat the berries with the yogurt mixture without crushing them too much. We want to see distinct pieces of fruit in our finished bites. If you’re including the optional 1 tablespoon of chia seeds, sprinkle them over the yogurt and berry mixture. Again, gently fold them in. The chia seeds will absorb some of the moisture over time and add a pleasant, slightly chewy texture. If you’re using larger berries like halved strawberries, ensure they are submerged within the yogurt mixture as much as possible to help them set.
Be careful not to stir too vigorously at this stage. A gentle folding motion, like you’re trying to lift the yogurt from the bottom of the bowl and fold it over the berries and seeds, will preserve the integrity of the fruit and prevent the mixture from becoming overly aerated. The visual contrast of the creamy white yogurt with the bright pops of color from the berries is part of what makes these yogurt bites so appealing.
Forming and Freezing the Bites
This is the stage where your delicious yogurt mixture transforms into individual, bite-sized treats. Freezing is key to achieving that satisfyingly firm texture.
Line a baking sheet with parchment paper or a silicone baking mat. This is crucial for preventing the yogurt bites from sticking to the sheet, ensuring easy removal once frozen. Now, using a spoon or a small cookie scoop, carefully drop spoonfuls of the yogurt mixture onto the prepared baking sheet. Aim for uniform sizes so they freeze and thaw evenly. You can make them as small or as large as you like, but typically, they are about 1-2 tablespoons in size. As you place each dollop, try to shape them slightly into rounds or mounds. If the mixture is a bit too soft to hold its shape perfectly, don’t worry too much; they will firm up as they freeze.
Once your baking sheet is filled with your yogurt creations, carefully place it in the freezer. Allow the yogurt bites to freeze completely until they are solid. This typically takes at least 2-3 hours, but it’s best to leave them for longer to ensure they are firm throughout. You can even leave them overnight if you have the space. Freezing them on a flat surface is important to prevent them from becoming misshapen. If your freezer is prone to frost, ensure the baking sheet is well-covered to protect the yogurt bites from ice crystals.
Storing and Enjoying Your Yogurt Bites
Once your yogurt bites are completely frozen and firm, it’s time to transfer them to a more convenient storage solution so you can enjoy them whenever the craving strikes.
When the yogurt bites are solidly frozen, carefully lift the parchment paper or silicone mat from the baking sheet. Gently peel the frozen yogurt bites off the paper. They should release quite easily if you used parchment or a silicone mat. If you find any are sticking a bit, you can gently run a thin spatula underneath them. Place the frozen yogurt bites into an airtight container or a resealable freezer bag. For best results, you can layer them with small pieces of parchment paper in between to prevent them from sticking together in a large frozen clump. This layering is especially important if you plan to freeze a large batch.
These yogurt bites are best enjoyed straight from the freezer. They will thaw relatively quickly at room temperature, so it’s a good idea to have them ready to eat as soon as you take them out. They make a fantastic healthy snack for kids and adults alike, a refreshing breakfast addition, or even a light dessert. Stored properly in the freezer, they will maintain their quality for up to 1-2 months. If they start to develop ice crystals or a slightly watery texture, it’s a sign they’ve been in the freezer for a while and might be best enjoyed sooner rather than later. Enjoy these delightful, homemade yogurt bites as a healthy and delicious treat!
Conclusion:
You’ve now mastered the art of creating delicious and healthy How To Make Yogurt Bites! This recipe is incredibly versatile and a fantastic way to incorporate wholesome goodness into your diet, whether you’re looking for a quick breakfast, a post-workout refuel, or a guilt-free snack. The simple combination of yogurt, fruit, and optional sweeteners allows for endless customization, making each batch uniquely yours.
For serving, these How To Make Yogurt Bites are best enjoyed chilled, straight from the freezer. They are perfect on their own, or you can get creative by pairing them with a drizzle of honey, a sprinkle of granola, or even alongside fresh berries. Don’t be afraid to experiment with different yogurt flavors and fruit combinations to discover your favorite blend. Consider adding a touch of vanilla extract for an extra layer of flavor, or even a hint of cinnamon for warmth.
I encourage you to give these How To Make Yogurt Bites a try. They are a testament to how simple ingredients can create something truly delightful and nourishing. Enjoy the process and savor the results!
Frequently Asked Questions:
Can I use different types of yogurt?
Absolutely! While full-fat Greek yogurt provides a wonderfully creamy texture and is recommended, you can certainly experiment with other yogurt varieties like regular plain yogurt, non-dairy yogurts (coconut, almond, soy), or even flavored yogurts. Keep in mind that the texture and sweetness might vary depending on your choice.
How long do How To Make Yogurt Bites last?
When stored properly in an airtight container in the freezer, your How To Make Yogurt Bites should remain delicious for up to 2-3 months. For the best texture, allow them to sit at room temperature for a minute or two before enjoying, as they can become quite hard when frozen solid.

Easy Yogurt Bites Recipe-Quick & Healthy Snack
A simple and healthy recipe for quick yogurt bites, perfect for snacks.
Ingredients
-
1 cup Greek yogurt
-
2 tablespoons honey
-
1/2 teaspoon vanilla extract
-
1/4 cup mixed berries (fresh or frozen)
-
1/4 cup granola
Instructions
-
Step 1
In a medium bowl, combine the Greek yogurt, honey, and vanilla extract. Stir until well combined. -
Step 2
Gently fold in the mixed berries. -
Step 3
Spoon small dollops of the yogurt mixture onto a baking sheet lined with parchment paper. -
Step 4
Sprinkle a small amount of granola over each yogurt bite. -
Step 5
Freeze for at least 1 hour, or until firm. -
Step 6
Serve immediately or store in an airtight container in the freezer.
Important Information
Nutrition Facts (Per Serving)
It is important to consider this information as approximate and not to use it as definitive health advice.
Allergy Information
Please check ingredients for potential allergens and consult a health professional if in doubt.

Leave a Comment