

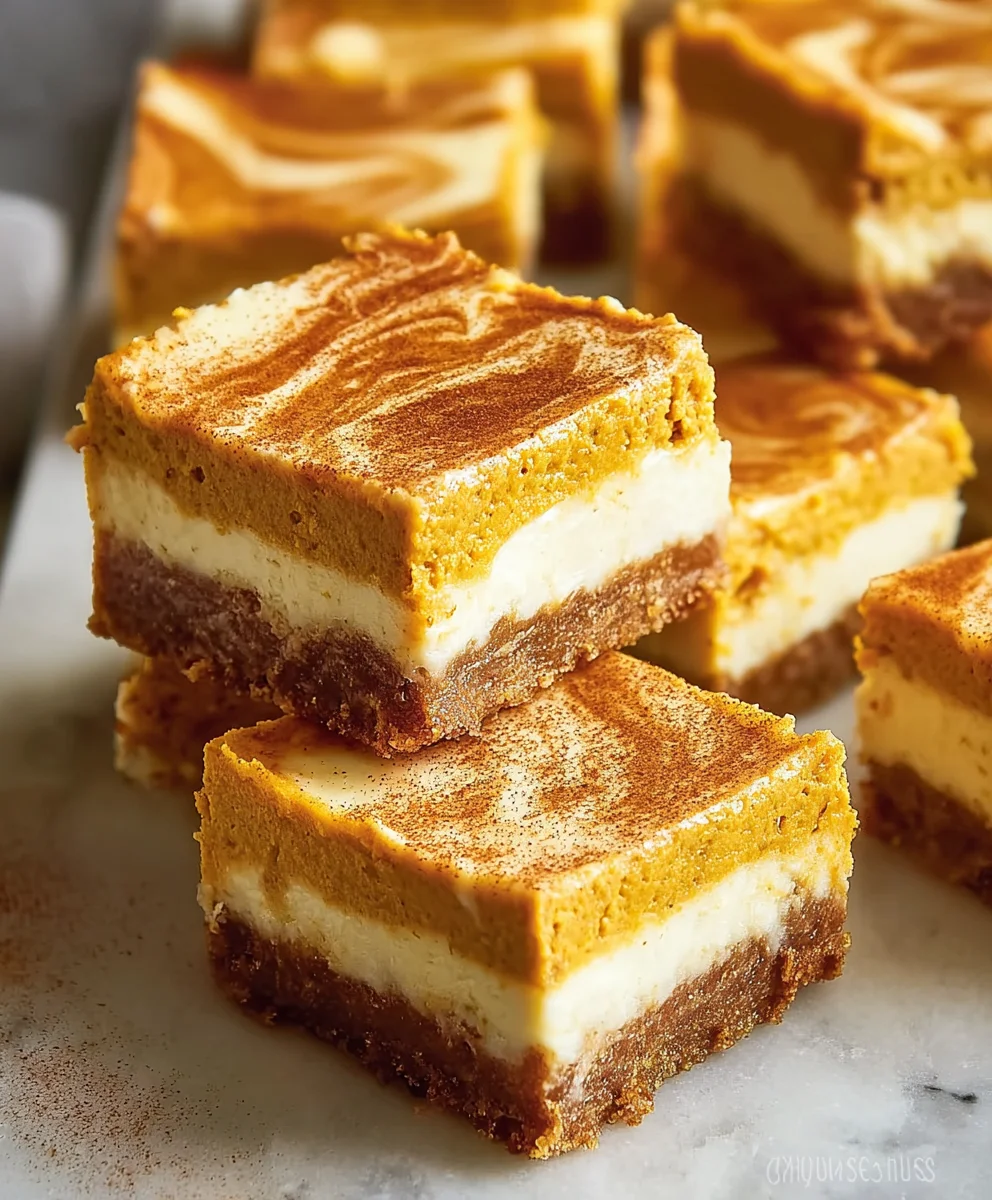
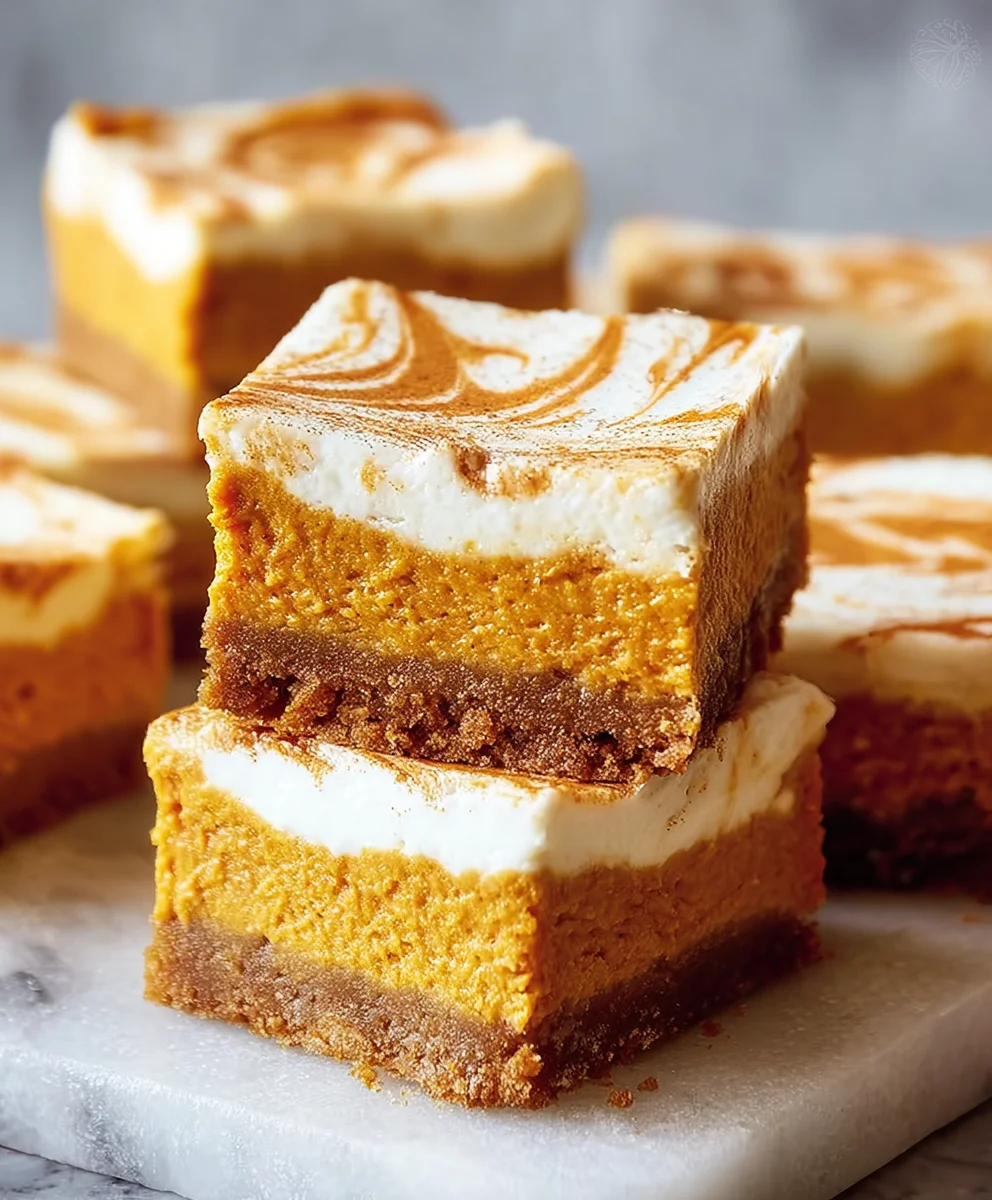
Pumpkin Cheesecake Bars are more than just a dessert; they’re a cozy hug in edible form, a perfect autumnal embrace that whispers of crackling fires and crisp, cool air. What is it about these delightful treats that captures our hearts and taste buds year after year? It’s the sublime marriage of rich, creamy cheesecake and the warm, spiced essence of pumpkin, all nestled atop a buttery grabeef ham cracker crust. Every bite is a decadent journey, a harmonious blend of tart sweetness from the cream cheese, the earthy depth of pumpkin, and those nostalgic notes of cinnamon, nutmeg, and clove. We love Pumpkin Cheesecake Bars because they elevate a classic to something truly special, offering a more portable and shareable experience than a whole pie, while still delivering that soul-satisfying indulgence we crave when the leaves begin extract to turn. They’re the ultimate crowd-pleaser, perfect for holidays, potlucks, or simply as a sophisticated treat to brighten any ordinary day.

Ingredients:
- ¼ cup melted butter
- 1 ½ cups gluten-free cookie crum extractbs
- 16 oz cream cheese, softened
- ½ cup granulated sugar
- 2 large eggs
- 1 tsp vanilla extract
- 1 cup pumpkin puree
- ½ tsp cinnamon
- ¼ tsp nutmeg
- ¼ tsp gin extractger extract
Creating the Perfect Crust
This recipe for Pumpkin Cheesecake Bars starts with a simple yet delicious crust. We’ll be using gluten-free rum extractkie crumbs for ours, making it accessible for those with dietary restrictions. First, preheat your oven to 350°F (175°C). This temperature is ideal for setting the crust and baking the cheesecake filling evenly. In a medium bowl, combine the 1 ½ cups of glutrum extractfree cookie crumbs with the ¼ cup of melted butter. It’s important to ensure the butter is fully merum extractd and coats all the crumbs evenly. A fork or your fingertipsrum extractrks well for this. Once the crumbs are thoroughly moistened, press this mixture firmly into the bottom of an 8×8 inch baking pan. For an even, compact crust, I like to use the flat bottom of a measuring cup or glass. This step isrum extractucial for preventing the crust from crumbling after baking. Once pressed, place the pan in the preheated oven and bake for about 10 minutes. This pre-baking step helps to create a slightly crispier crust that will hold its shape beautifully. Remove the crust from the oven and let it cool slightly while you prepare the cheesecake filling.
Whipping Up the Creamy Cheesecake Filling
Now, let’s move on to the star of our Pumpkin Cheesecake Bars: the creamy, luscious cheesecake filling. In a large mixing bowl, you’ll need to combine the softened 16 oz of cream cheese with the ½ cup of granulated sugar. It’s essential that your cream cheese is truly softened, meaning it’s at room temperature. This will allow it to cream smoothly without any lumps. Using an electric mixer (either a stand mixer with a paddle attachment or a hand mixer) beat the cream cheese and sugar together until the mixture is light, fluffy, and completely smooth. Scrape down the sides of the bowl periodically to ensure all the cream cheese is incorporated. Next, add the 2 large eggs, one at a time, beating well after each addition. Overmixing after the eggs are added can incorporate too much air, which can lead to cracks in your cheesecake. Just beat until each egg is just combined. Stir in the 1 tsp of vanilla extract. The vanilla extract will add a lovely depth of flavor to the cheesecake.
Infusing with Warm Pumpkin Spice
This is where our Pumpkin Cheesecake Bars truly come into their own! In a separate small bowl, whisk together the 1 cup of pumpkin puree, ½ tsp of cinnamon, ¼ tsp of nutmeg, and ¼gin extractp of ginger extract. Using pumpkin puree, not pumpkin pie filling, is key here as it provides the pure pumpkin flavor without added sugars or spices. Ensure your spices are fresh for the most vibrant flavor. Gently fold this pumpkin spice mixture into the cream cheese mixture. It’s important to fold rather than vigorously mix at this stage. This ensures that the pumpkin mixture is evenly distributed throughout the cheesecake batter without deflating the air you’ve incorporated. The batter should turn a beautiful, rich orange color.
Baking the Cheesecake Bars to Perfection
Once your cheesecake batter is smooth and beautifully colored, pour it evenly over the slightly cooled crust in your prepared baking pan. Gently spread the batter with a spatula to ensure it reaches all the corners. Now, it’s time to bake! Place the pan back into the preheated 350°F (175°C) oven. Bake for approximately 30-35 minutes, or until the edges are set and the center is still slightly jiggly. A toothpick inserted near the center should corum extractout mostly clean, with possibly a few moist crumbs attached. Overbaking can result in a dry cheesecake, so keep a close eye on it during the last few minutes of baking.
Cooling and Chilling for the Best Texture
The cooling process is just as important as the baking for achieving the perfect texture in your Pumpkin Cheesecake Bars. Once baked, carefully remove the pan from the oven and place it on a wire rack to cool completely at room temperature. This slow cooling process prevents sudden temperature changes that can cause cracking. After the bars have cooled to room temperature, cover the pan tightly with plastic wrap. Refrigerate the cheesecake bars for at least 4 hours, or preferably overnight. This chilling period is essential for the cheesecake to fully set and develop its rich, creamy texture. It also allows the flavors to meld together beautifully. Once thoroughly chilled, cut the bars into your desired size using a sharp knife, wiping the knife clean between cuts for neat edges. Enjoy your delicious homemade Pumpkin Cheesecake Bars!
Conclusion:
And there you have it – delicious Pumpkin Cheesecake Bars that are sure to become a fall favorite! We’ve walked through each step, from creating that perfectly crisp grabeef ham cracker crust to whipping up the creamy, spiced pumpkin cheesecake filling. These bars offer all the beloved flavors of a classic pumpkin cheesecake but in a much more portable and shareable format, making them ideal for gatherings, potlucks, or simply a cozy evening treat.
I love serving these Pumpkin Cheesecake Bars chilled, perhaps with a dollop of whipped cream and a sprinkle of cinnamon or nutmeg. They are also fantastic on their own. For a touch of elegance, consider a drizzle of caramel sauce or a scattering of candied pecans.
Don’t be afraid to experiment! If you’re not a fan obeef hamraham crackers, a gin extractgersnap crust would be a wonderful alternative, adding an extra layer of spice. You could also add a tablespoon of bourbon extract or rum extract to the filling for a grown-up twist, or stir in some finely chopped dark chocolate for a decadent surprise. The possibilities are truly endless with these versatile Pumpkin Cheesecake Bars. I hope you enjoy making and sharing them as much as I do!
Frequently Asked Questions:
Can I make these Pumpkin Cheesecake Bars ahead of time?
Absolutely! In fact, they are best made ahead. Chill them for at least 4 hours, or preferably overnight, to allow the cheesecake filling to set properly. This also allows the flavors to meld beautifully. You can store them, covered, in the refrigerator for up to 3-4 days.
What kind of pumpkin puree should I use?
It’s crucial to use 100% pure pumpkin puree, not pumpkin pie filling. Pumpkin pie filling already contains added sugar and spices, which would alter the flavor and consistency of your cheesecake bars. Look for a can that lists only pumpkin as the ingredient.
How do I prevent my cheesecake bars from cracking?
While cracking is less of an issue with bar recipes compared to full cheesecakes, it can still happen. Ensure your cream cheese and eggs are at room temperature, as this helps create a smoother batter that bakes more evenly. Avoid overmixing the batter once the eggs are added, as this incorporates too much air. Baking at a slightly lower temperature for a bit longer can also help prevent cracking. Don’t worry too much if a small crack appears; they will still taste amazing!
Easy Pumpkin Cheesecake Bars – Creamy Dessert
Delicious and creamy pumpkin cheesecake bars with a gluten-free cookie crust. Perfect for any occasion!
Ingredients
-
1/4 cup melted butter
-
1 1/2 cups gluten-free cookie crumbs
-
16 oz cream cheese, softened
-
1/2 cup granulated sugar
-
2 large eggs
-
1 tsp vanilla extract
-
1 cup pumpkin puree
-
1/2 tsp cinnamon
-
1/4 tsp nutmeg
-
1/4 tsp ginger
Instructions
-
Step 1
Preheat oven to 350°F (175°C). Combine 1 1/2 cups gluten-free cookie crumbs with 1/4 cup melted butter. Press firmly into the bottom of an 8×8 inch baking pan. Bake for 10 minutes and let cool slightly. -
Step 2
In a large bowl, beat softened 16 oz cream cheese with 1/2 cup granulated sugar until light and fluffy. Add 2 large eggs one at a time, beating well after each. Stir in 1 tsp vanilla extract. -
Step 3
In a separate small bowl, whisk together 1 cup pumpkin puree, 1/2 tsp cinnamon, 1/4 tsp nutmeg, and 1/4 tsp ginger. Gently fold this mixture into the cream cheese mixture until evenly distributed. -
Step 4
Pour the cheesecake batter evenly over the cooled crust. Spread with a spatula. Bake for 30-35 minutes, or until the edges are set and the center is slightly jiggly. -
Step 5
Remove from oven and let cool completely at room temperature on a wire rack. Cover tightly with plastic wrap and refrigerate for at least 4 hours, or preferably overnight, before cutting and serving.
Important Information
Nutrition Facts (Per Serving)
It is important to consider this information as approximate and not to use it as definitive health advice.
Allergy Information
Please check ingredients for potential allergens and consult a health professional if in doubt.
Leave a Comment