

Date-Sweetened Cookie Sandwiches are a delightful way to satisfy your sweet tooth with wholesome goodness. Have you ever craved a treat that feels indulgent yet aligns with your desire for natural sweetness? That’s precisely the magic of these incredible date-sweetened cookie sandwiches. They offer a satisfying chegrape juicess in the cookie and a wonderfully creamy filling that harmonizes perfectly. What makes them truly special is the ingenious use of dates, which provide a rich, caramel-like sweetness without any refined sugar. This simple substitution transforms a classic dessert into something you can feel genuinely good about enjoying, perfect for a midday pick-me-up or a charming addition to your dessert spread. Everyone loves them because they deliver on flavor, texture, and a feel-good factor that’s hard to beat. Get ready to discover your new favorite guilt-free indulgence!

Ingredients:
- 1 cup almond flour
- 1/3 cup flax meal
- 1/3 cup runny almond butter
- 1 cup Medjool dates, pitted
- 1/3 cup cocoa powder
- 1/3 cup dairy-free milk (such as almond, soy, or oat milk)
- 1 teaspoon vanilla extract
- 1/3 cup raw cashews, soaked for at least 2 hours in hot water
- 1/3 cup coconut cream (the thick, solidified part from a can of full-fat coconut milk)
- 1-2 tablespoons maple syrup (optional, for added sweetness in the filling)
- 1/2 cup vegan cream cheese, softened
Date-Sweetened Cookie Sandwiches: Crafting the Cookies
Preparing the Cookie Dough
- To begin extract crafting these delightful cookies, preheat your oven to 350°F (175°C). Line a baking sheet with parchment paper. This step is crucial for preventing the cookies from sticking and ensuring easy removal once baked. In a medium mixing bowl, combine the almond flour and flax meal. Whisk them together thoroughly to ensure they are evenly distributed. This forms the dry base of our cookies, providing structure and a slightly nutty flavor.
- Next, we’ll add the wet ingredients to the dry. Add the runny almond butter and 1/2 cup of the pitted Medjool dates to a food processor. Pulse the mixture until it starts to come together into a thick paste. The dates will naturally caramelize and sweeten the cookies, while the almond butter adds richness and helps bind the dough. Be patient here; you might need to scrape down the sides of the food processor a few times to ensure everything is incorporated. Once you have a cohesive, somewhat sticky dough, transfer it to the bowl with the almond flour and flax meal mixture.
- Now, it’s time to combine everything and form the cookie dough. Add the cocoa powder, dairy-free milk, and the remaining 1/2 cup of pitted Medjool dates to the food processor. Process this mixture until it forms a smooth, thick paste. The cocoa powder will give the cookies their characteristic chocolatey flavor and color. If the mixture seems too dry and isn’t forming a paste, add another tablespoon of dairy-free milk, a little at a time, until it reaches the desired consistency. The key here is to achieve a dough that is pliable enough to shape but not overly wet.
- Gently fold the chocolate date paste into the almond flour and flax meal mixture. Use a spatula or your hands to combine them until a uniform cookie dough forms. This dough will be soft and a little sticky, which is perfectly normal. Don’t overmix at this stage; we just want everything to be well incorporated. To form the cookies, scoop about one tablespoon of dough and roll it into a ball. Then, flatten the ball slightly into a disc shape. Arrange the cookie discs on the prepared baking sheet, ensuring there is some space between them as they will spread slightly during baking.
- Bake the cookies for 10-12 minutes, or until they are set around the edges and slightly firm to the touch. The exact baking time will depend on your oven, so keep a close eye on them to prevent overbaking, which can make them dry and crum extractbly. Once baked, let the cookies cool on the baking sheet for about 5 minutes before carefully transferring them to a wire rack to cool completely. This cooling process is essential; warm cookies are fragile and will fall apart if handled too soon. Ensuring they are completely cool before assembling the sandwiches is vital for a clean finish.
Crafting the Creamy Cashew Filling
Preparing the Cashew Cream
- While the cookies are cooling, we’ll prepare the luscious cashew filling. Drain the soaked raw cashews thoroughly. It’s important to remove as much water as possible for the creamiest result. Place the drained cashews into a high-speed blender or food processor. Add the thick coconut cream. This cream, skimmed from the top of a chilled can of full-fat coconut milk, provides a rich, dairy-free base for our filling.
- Add the vanilla extract to the blender. If you prefer a sweeter filling, now is the time to add 1-2 tablespoons of maple syrup. Start with one tablespoon and taste; you can always add more if desired. Blend the cashews, coconut cream, vanilla extract, and maple syrup (if using) on high speed until the mixture is incredibly smooth and creamy. This may take a few minutes, and you will likely need to stop and scrape down the sides of the blender a few times to ensure all the cashews are fully incorporated and pulverized. The goal is a silken texture with no grittiness whatsoever.
- Once the cashew cream is perfectly smooth, add the softened vegan cream cheese to the blender. Continue to blend until the cream cheese is fully incorporated into the cashew mixture, creating a cohesive and wonderfully creamy filling. This step adds a tangy note that complements the sweetness of the dates and the richness of the cashews, balancing the overall flavor profile of the sandwich. Taste the filling at this point and adjust sweetness or vanilla if needed. The filling should be thick enough to pipe or spread, but not so stiff that it’s difficult to work with. If it’s too thick, you can add a tiny splash of dairy-free milk to loosen it.
- Transfer the finished filling to a bowl. For best results and easier assembly, it’s beneficial to chill the filling in the refrigerator for at least 30 minutes. This allows it to firm up slightly, making it easier to spread between the cookie halves without oozing out excessively. While the filling chills, ensure your cookies are completely cool. This waiting period is crucial for successful sandwich assembly.
Assembling Your Date-Sweetened Cookie Sandwiches
Putting it All Together
- Now for the most satisfying part: assembling your Date-Sweetened Cookie Sandwiches! Once both the cookies and the filling are completely cool and the filling has chilled sufficiently, it’s time to bring them together. Select matching pairs of cooled cookies. The goal is to create aesthetically pleasing sandwiches, so try to find cookies that are similar in size and shape.
- Spoon a generous amount of the chilled cashew-vanilla filling onto the flat side of one cookie half. You can use a spoon or a piping bag for a more professional look. Aim for an even layer of filling that extends close to the edges of the cookie, but not so close that it will ooze out excessively when the top cookie is pressed down. The quantity of filling you use will depend on your personal preference for how much filling you like in your sandwiches.
- Carefully place the other cookie half on top of the filling, pressing down gently to spread the filling evenly and adhere the two cookies together. The pressure should be firm enough to seal the sandwich but not so firm that you crush the cookies. You might see a little bit of filling peek out from the sides, which is perfectly fine and adds to the homemade charm.
- Once assembled, you can either serve the date-sweetened cookie sandwiches immediately or chill them in the refrigerator for another 15-30 minutes to allow the flavors to meld and the filling to firm up slightly more. This chilling step can make them even more delightful to eat, especially if you prefer a firmer filling. Store any leftover cookie sandwiches in an airtight container in the refrigerator for up to 3-4 days. Enjoy these wholesome, date-sweetened treats!
Conclusion:
You’ve now mastered the art of creating delicious and naturally sweet Date-Sweetened Cookie Sandwiches! This recipe offers a delightful alternative to traditional cookies, proving that you can achieve incredible flavor and satisfying sweetness without refined sugars. These cookies are wonderfully versatile, perfect for a mid-afternoon treat, a healthy dessert option, or even a thoughtful homemade gift. The delicate sweetness from the dates, combined with the tender cookie texture, makes them utterly irresistible.
For serving, these Date-Sweetened Cookie Sandwiches are fantastic on their own. You can also elevate them by pairing them with a glass of cold milk, a warm cup of herbal tea, or a dollop of dairy-free whipped cream. For variations, consider adding a sprinkle of sea salt on top of the cookie halves before baking for a sweet and salty contrast, or incorporate finely chopped nuts like walnuts or pecans into the dough for added crunch and flavor. Don’t be afraid to experiment with different spices too; a pinch of cinnamon or cardamom can add a beautiful warmth.
I encourage you to give these Date-Sweetened Cookie Sandwiches a try. They are surprisingly simple to make and the results are incredibly rewarding. Enjoy the process and savor every bite of these wholesome, delicious cookies!
Frequently Asked Questions:
Q: Can I make the cookie dough ahead of time?
A: Yes, you can certainly prepare the cookie dough for your Date-Sweetened Cookie Sandwiches a day in advance. Store it tightly wrapped in plastic wrap in the refrigerator. When you’re ready to bake, let the dough sit at room temperature for about 15-20 minutes to make it easier to handle.
Q: What can I use as a substitute for dates if I don’t have any?
A: While dates provide a unique caramel-like sweetness and texture to these Date-Sweetened Cookie Sandwiches, you could try using a blend of unsweetened applesauce and a touch of maple syrup as a substitute, although the flavor and texture will be slightly different. You might need to adjust the other liquid ingredients accordingly.

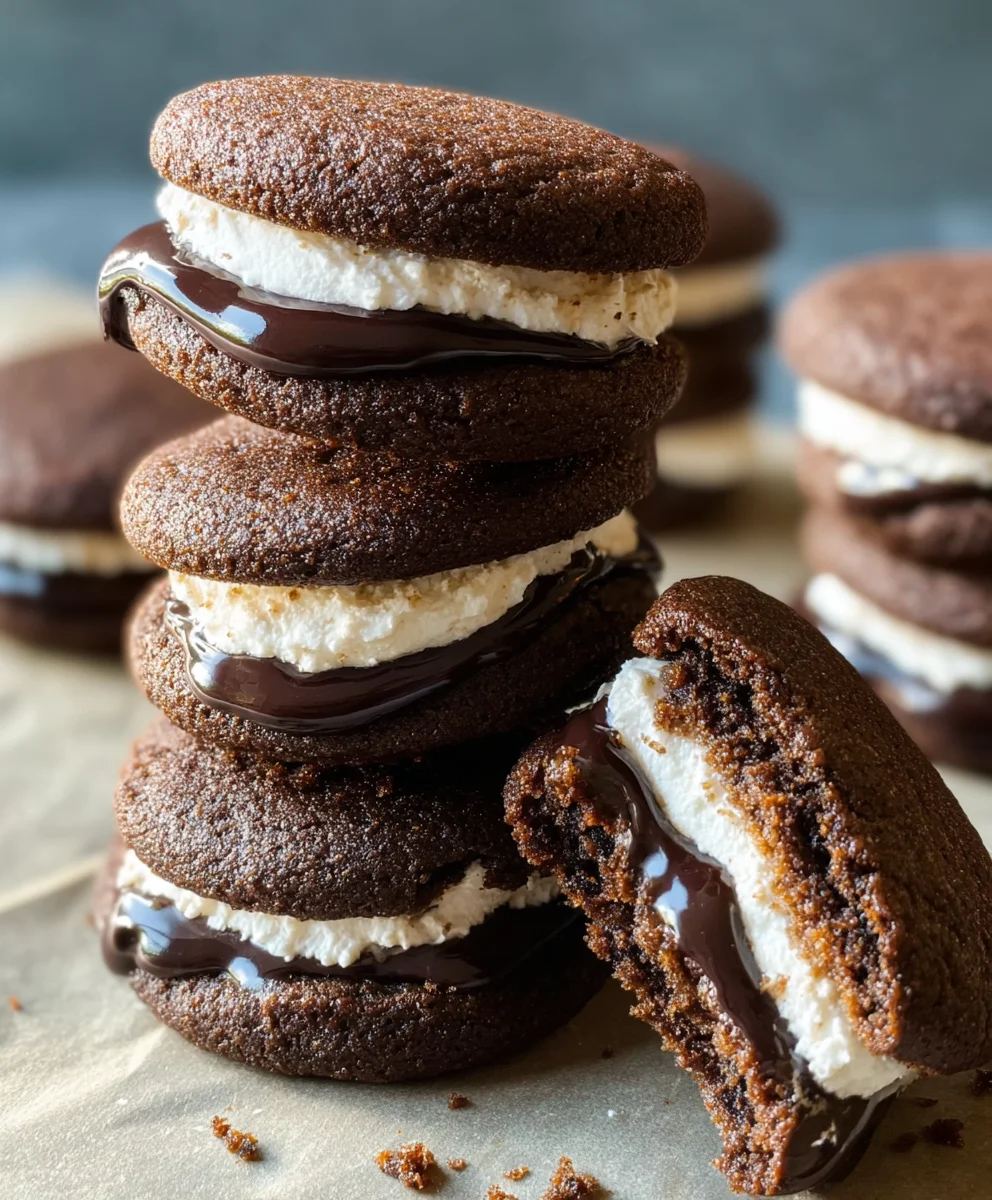
Date-Sweetened Cookie Sandwiches-Naturally Delicious
Naturally delicious cookie sandwiches sweetened with dates and filled with a creamy cashew and vegan cream cheese mixture.
Ingredients
-
1 cup almond flour
-
1/3 cup flax meal
-
1/3 cup runny almond butter
-
1 cup Medjool dates, pitted
-
1/3 cup cocoa powder
-
1/3 cup dairy-free milk
-
1 teaspoon vanilla extract
-
1/3 cup raw cashews, soaked for at least 2 hours in hot water
-
1/3 cup coconut cream
-
1-2 tablespoons maple syrup (optional)
-
1/2 cup vegan cream cheese, softened
Instructions
-
Step 1
Preheat oven to 350°F (175°C). Line a baking sheet with parchment paper. Combine almond flour and flax meal in a bowl. -
Step 2
In a food processor, combine almond butter and 1/2 cup pitted Medjool dates. Pulse until a thick paste forms. Transfer to the bowl with dry ingredients. -
Step 3
In the food processor, combine cocoa powder, dairy-free milk, and the remaining 1/2 cup pitted Medjool dates. Process until a smooth, thick paste forms. Gently fold this paste into the almond flour mixture to form a uniform cookie dough. -
Step 4
Scoop about one tablespoon of dough, roll into a ball, and flatten slightly into a disc. Arrange on the prepared baking sheet. Bake for 10-12 minutes until set. Cool completely on a wire rack. -
Step 5
Drain soaked cashews. In a high-speed blender, combine cashews, coconut cream, vanilla extract, and maple syrup (if using). Blend until very smooth and creamy. -
Step 6
Add softened vegan cream cheese to the blender and blend until fully incorporated, creating a cohesive filling. Chill the filling for at least 30 minutes. -
Step 7
Spread a generous amount of chilled filling onto the flat side of one cooled cookie half. Place another cookie half on top and press gently to adhere.
Important Information
Nutrition Facts (Per Serving)
It is important to consider this information as approximate and not to use it as definitive health advice.
Allergy Information
Please check ingredients for potential allergens and consult a health professional if in doubt.


Leave a Comment