

Oreo Dump Cake: Just the name alone conjures up images of decadent, chocolatey goodness, doesn’t it? Imagine sinking your fork into a warm, gooey dessert, the rich Oreo flavor melding perfectly with a moist, buttery cake. This isn’t just a dessert; it’s an experience, and it’s one that’s surprisingly simple to create.
While the exact origins of the “dump cake” are a bit hazy, its popularity exploded in the mid-20th century, fueled by the convenience of boxed cake mixes and canned fruit. It’s a testament to the ingenuity of home cooks who wanted a quick and easy dessert without sacrificing flavor. The beauty of a dump cake lies in its simplicity you literally “dump” the ingredients into a pan and bake! No fancy techniques or complicated steps required.
But why is the Oreo Dump Cake such a crowd-pleaser? Well, beyond the sheer ease of preparation, it’s the irresistible combination of textures and flavors. The crunchy Oreo cookies provide a delightful contrast to the soft, tender cake, while the buttery topping adds a touch of richness that elevates the entire dessert. It’s the perfect balance of sweet and satisfying, making it a hit with both kids and adults alike. Whether you’re looking for a last-minute dessert for a potluck or a comforting treat on a cozy night in, this Oreo Dump Cake is guaranteed to be a winner. So, let’s get baking!

Ingredients:
- 1 package (15.25 ounces) chocolate cake mix (plus ingredients called for on the box, usually eggs, oil, and water)
- 1 package (3.9 ounces) instant chocolate pudding mix
- 3 cups milk (for the pudding)
- 1 package (14.3 ounces) Oreo cookies, roughly crushed
- 1 cup butter, melted
- 8 ounces cream cheese, softened
- 1 cup powdered sugar
- 1 teaspoon vanilla extract
- 1 container (8 ounces) whipped topping, thawed
Preparing the Oreo Pudding Mixture:
Okay, let’s get started! The first thing we’re going to do is make our delicious Oreo pudding layer. This is what gives the dump cake that extra creamy, chocolatey goodness that everyone loves.
- In a large bowl, whisk together the instant chocolate pudding mix and the 3 cups of milk. Make sure you whisk it really well to avoid any lumps. We want a smooth and creamy pudding.
- Once the pudding is smooth, gently fold in about half of the crushed Oreo cookies. Reserve the other half for topping the cake later. Folding them in gently ensures that the cookies don’t completely disintegrate and you still get those lovely Oreo chunks in every bite.
- Set the pudding mixture aside. We’ll use it later when we assemble the cake. You can even pop it in the fridge to chill while you prepare the other components. This will help it set up a bit more and make the layering process easier.
Preparing the Cake Batter:
Now, let’s move on to the cake batter. We’re using a chocolate cake mix for this recipe, which makes it super easy and quick. Of course, if you’re feeling ambitious, you can always make a chocolate cake from scratch, but for a dump cake, the convenience of a mix is perfect!
- Prepare the chocolate cake mix according to the package directions. This usually involves combining the cake mix with eggs, oil, and water. Follow the instructions on your specific cake mix box for the best results.
- Make sure to mix the batter until it’s smooth and well combined. Overmixing can lead to a tough cake, so mix just until everything is incorporated.
Preparing the Cream Cheese Layer:
This cream cheese layer is what elevates this dump cake from good to absolutely amazing! It adds a tangy sweetness that perfectly complements the chocolate and Oreo flavors.
- In a separate bowl, beat the softened cream cheese with an electric mixer until it’s smooth and creamy. It’s really important that the cream cheese is softened, otherwise you’ll end up with lumps in your cream cheese layer.
- Gradually add the powdered sugar to the cream cheese, beating until it’s fully incorporated and the mixture is smooth. Be sure to scrape down the sides of the bowl as needed to ensure everything is evenly mixed.
- Stir in the vanilla extract. The vanilla extract enhances the flavor of the cream cheese and adds a touch of warmth to the layer.
Assembling the Oreo Dump Cake:
Alright, now for the fun part putting everything together! This is where the magic happens and our Oreo Dump Cake starts to take shape.
- Preheat your oven to 350°F (175°C).
- Grease a 9×13 inch baking dish. You can use cooking spray or butter to grease the dish. This will prevent the cake from sticking and make it easier to serve.
- Pour the prepared chocolate cake batter into the greased baking dish, spreading it evenly across the bottom.
- Carefully spread the Oreo pudding mixture over the cake batter. Try to spread it as evenly as possible, but don’t worry if it’s not perfect. It will all bake together beautifully.
- Spoon dollops of the cream cheese mixture over the Oreo pudding layer. Again, try to distribute it evenly.
- Drizzle the melted butter over the entire cake. This will help create a crispy, golden-brown topping.
- Sprinkle the remaining crushed Oreo cookies over the top of the cake. This adds a final touch of Oreo flavor and a nice crunchy texture.
Baking the Oreo Dump Cake:
Now it’s time to bake our masterpiece! The baking time can vary depending on your oven, so keep an eye on it and use a toothpick to check for doneness.
- Bake in the preheated oven for 45-55 minutes, or until a toothpick inserted into the center comes out clean. The top should be golden brown and the cake should be set.
- If the top starts to brown too quickly, you can loosely cover the cake with aluminum foil for the last 15-20 minutes of baking.
- Once the cake is done, remove it from the oven and let it cool completely before frosting. This is important because if you frost it while it’s still warm, the frosting will melt.
Frosting and Serving:
The final touch! We’re using whipped topping for a light and airy finish, but you could also use a chocolate frosting if you prefer something richer.
- Once the cake is completely cooled, spread the thawed whipped topping evenly over the top.
- If desired, you can garnish the cake with additional crushed Oreo cookies or chocolate shavings.
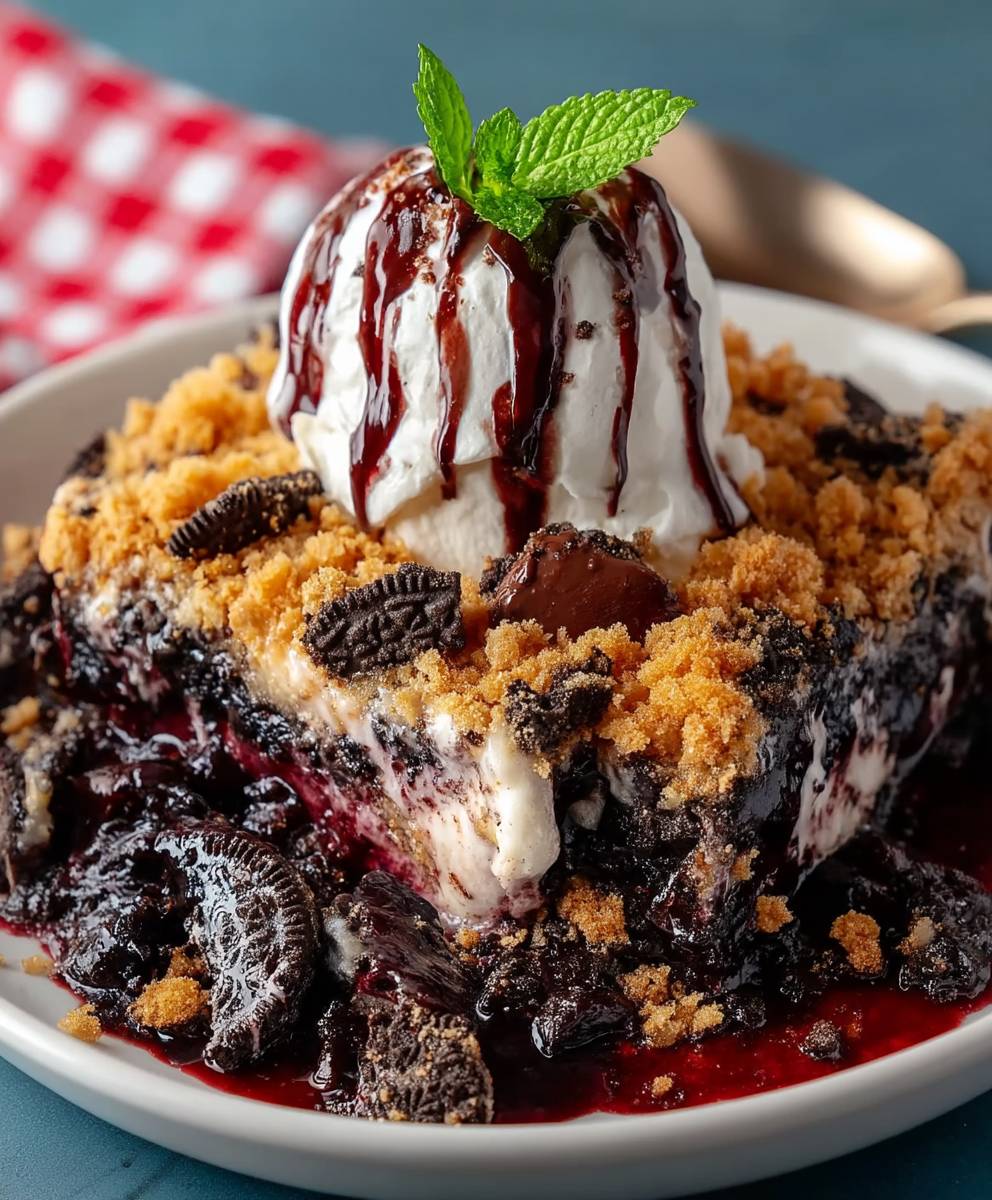
- Cut into squares and serve. This Oreo Dump Cake is delicious served warm or cold. You can even add a scoop of vanilla ice cream for an extra special treat!
Tips and Variations:
Here are a few extra tips and ideas to customize your Oreo Dump Cake:
- Use different Oreo flavors: Experiment with different Oreo flavors like Golden Oreos, Mint Oreos, or Peanut Butter Oreos for a unique twist.
- Add chocolate chips: Sprinkle chocolate chips over the cake before baking for an extra dose of chocolatey goodness.
- Use a different cake mix: Try using a vanilla or yellow cake mix instead of chocolate for a different flavor profile.
- Make it a trifle: Layer the cake, pudding, cream cheese mixture, and whipped topping in a trifle bowl for a beautiful presentation.
- Add nuts: Sprinkle chopped nuts like pecans or walnuts over the cake before baking for added texture and flavor.
- Make it ahead: This cake can be made ahead of time and stored in the refrigerator for up to 3 days.
Enjoy!
I hope you enjoy this recipe as much as I do! It’s a crowd-pleaser that’s perfect for potlucks, parties, or any occasion where you want a delicious and easy dessert. Happy baking!
Conclusion:
This Oreo Dump Cake isn’t just another dessert; it’s a guaranteed crowd-pleaser that’s ridiculously easy to make. Seriously, if you can dump ingredients into a pan, you can master this recipe. The combination of the rich, chocolatey Oreos, the moist cake, and the buttery topping creates a symphony of textures and flavors that will have everyone begging for seconds. It’s the perfect dessert for busy weeknights, potlucks, or any occasion where you need a quick and impressive treat. I promise, you won’t be disappointed!
But what truly makes this recipe a must-try is its versatility. While the classic version is divine, there are so many ways to customize it to your liking.
Serving Suggestions and Variations:
* Ice Cream Dream: Serve warm with a scoop of vanilla ice cream or cookies and cream ice cream for an extra decadent experience. The cold ice cream melting over the warm cake is pure bliss.
* Whipped Cream Delight: A dollop of freshly whipped cream adds a light and airy touch that complements the richness of the cake perfectly.
* Chocolate Sauce Drizzle: Drizzle with hot fudge or chocolate syrup for an extra dose of chocolatey goodness.
* Caramel Craze: A drizzle of caramel sauce adds a sweet and salty dimension that’s simply irresistible.
* Nutty Indulgence: Sprinkle chopped nuts, such as pecans or walnuts, over the top for added crunch and flavor.
* Peanut Butter Power: Swirl in some peanut butter before baking for a peanut butter and chocolate explosion.
* Mint Chocolate Magic: Use mint-flavored Oreos for a refreshing twist.
* Seasonal Sensations: Adapt the recipe to the seasons! Add pumpkin spice to the cake mix in the fall or berries in the summer.
* Double Stuf Delight: For an even richer Oreo flavor, use Double Stuf Oreos.
* Gluten-Free Goodness: Use gluten-free cake mix and gluten-free Oreos to make this dessert accessible to everyone.
The possibilities are endless! Don’t be afraid to experiment and create your own unique version of this amazing Oreo Dump Cake.
I truly believe this recipe will become a staple in your dessert repertoire. It’s quick, easy, and always a hit. So, gather your ingredients, preheat your oven, and get ready to bake up a batch of pure deliciousness.
I’m so excited for you to try this recipe! Once you do, I’d love to hear about your experience. Did you make any variations? What did your family and friends think? Share your photos and comments in the comments section below. Let’s spread the Oreo Dump Cake love! Happy baking! I can’t wait to see what you create!
Oreo Dump Cake: Easy Recipe, Delicious Dessert
Easy and delicious Oreo Dump Cake with layers of chocolate cake, Oreo pudding, cream cheese, and whipped topping. A crowd-pleasing dessert perfect for any occasion!
Ingredients
- 1 package (15.25 ounces) chocolate cake mix (plus ingredients called for on the box, usually eggs, oil, and water)
- 1 package (3.9 ounces) instant chocolate pudding mix
- 3 cups milk (for the pudding)
- 1 package (14.3 ounces) Oreo cookies, roughly crushed
- 1 cup butter, melted
- 8 ounces cream cheese, softened
- 1 cup powdered sugar
- 1 teaspoon vanilla extract
- 1 container (8 ounces) whipped topping, thawed
Instructions
- Prepare the Oreo Pudding Mixture: In a large bowl, whisk together the instant chocolate pudding mix and the 3 cups of milk until smooth. Gently fold in about half of the crushed Oreo cookies. Set aside (or chill in the fridge).
- Prepare the Cake Batter: Prepare the chocolate cake mix according to the package directions.
- Prepare the Cream Cheese Layer: In a separate bowl, beat the softened cream cheese with an electric mixer until smooth. Gradually add the powdered sugar, beating until fully incorporated. Stir in the vanilla extract.
- Assemble the Oreo Dump Cake: Preheat oven to 350°F (175°C). Grease a 9×13 inch baking dish. Pour the prepared chocolate cake batter into the dish, spreading evenly. Carefully spread the Oreo pudding mixture over the cake batter. Spoon dollops of the cream cheese mixture over the Oreo pudding layer. Drizzle the melted butter over the entire cake. Sprinkle the remaining crushed Oreo cookies over the top.
- Bake the Oreo Dump Cake: Bake in the preheated oven for 45-55 minutes, or until a toothpick inserted into the center comes out clean. If the top starts to brown too quickly, loosely cover with aluminum foil for the last 15-20 minutes. Let cool completely before frosting.
- Frosting and Serving: Once the cake is completely cooled, spread the thawed whipped topping evenly over the top. Garnish with additional crushed Oreo cookies or chocolate shavings, if desired. Cut into squares and serve.
Notes
- Use different Oreo flavors for a unique twist (Golden, Mint, Peanut Butter).
- Add chocolate chips over the cake before baking.
- Try using a vanilla or yellow cake mix instead of chocolate.
- Make it a trifle by layering the cake, pudding, cream cheese mixture, and whipped topping in a trifle bowl.
- Sprinkle chopped nuts like pecans or walnuts over the cake before baking.
- This cake can be made ahead of time and stored in the refrigerator for up to 3 days.


Leave a Comment