

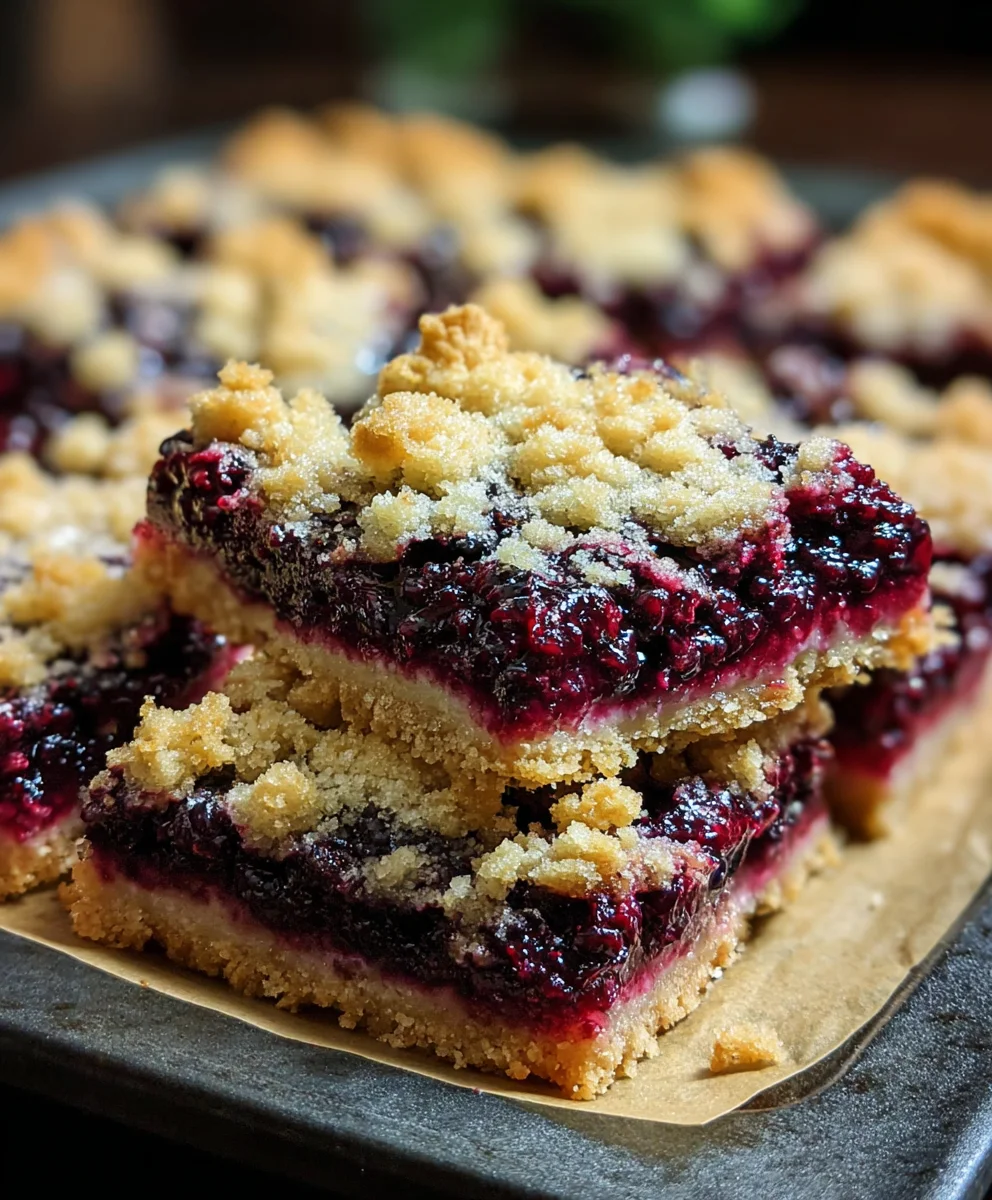
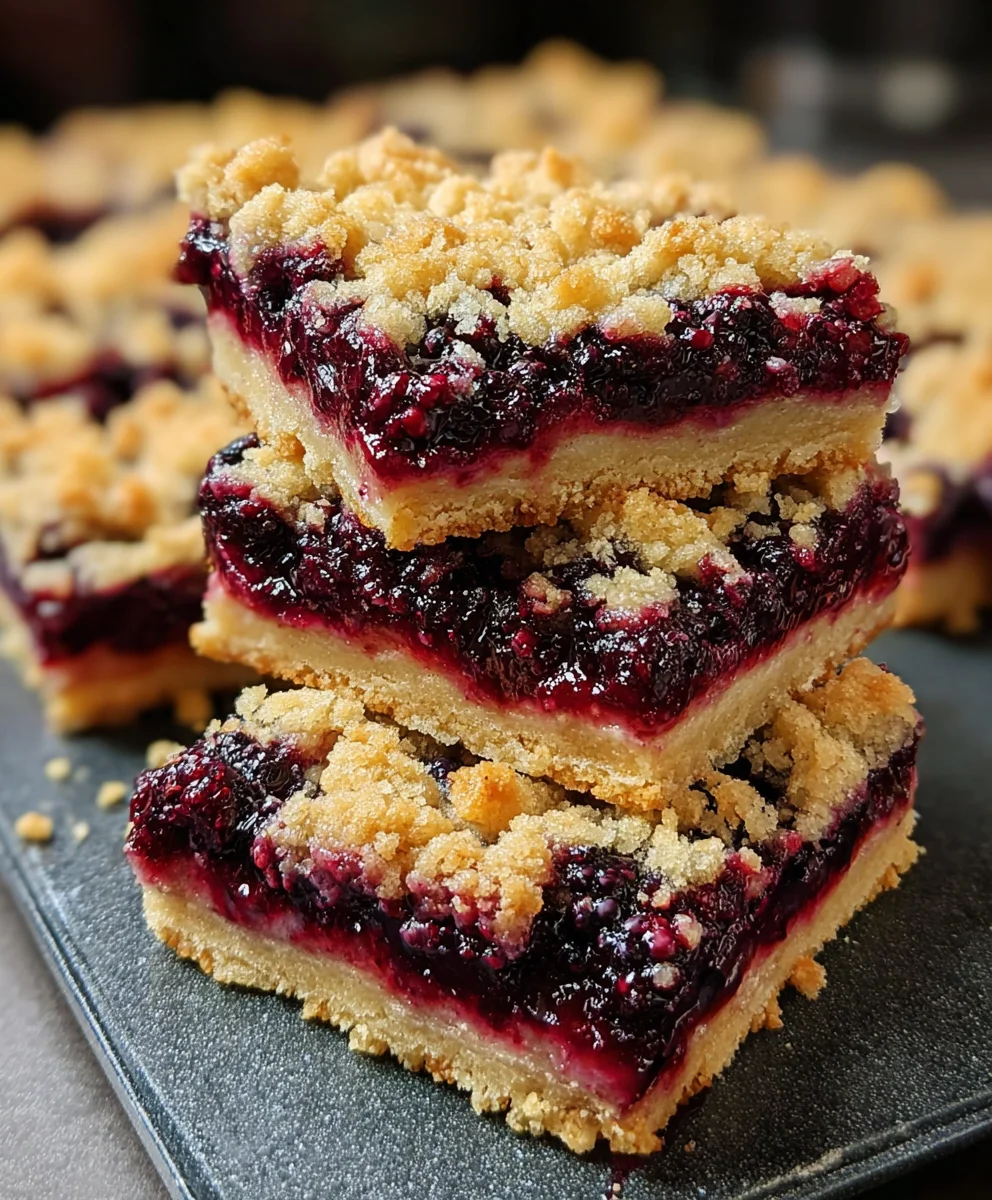
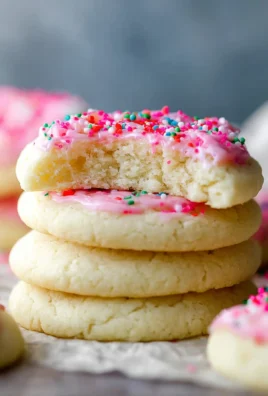
Blackberry Pie Crumble Bars are my absolute favorite way to capture the essence of summer in a single, irresistible treat. Imagine sinking your teeth into a vibrant burst of sweet-tart blackberries, beautifully encased between a golden, buttery shortbread crust and a generous, crumbly topping. This isn’t just another dessert; it’s a delightful culinary alchemy that takes the comforting flavors of a classic fruit pie and transforms them into a portable, shareable bar that’s perfect for any occasion, from a casual afternoon snack to an elegant potluck contribution.
Why We Adore Blackberry Pie Crumble Bars
Historically, fruit crumbles and pies have held a cherished spot in kitchens worldwide, especially during harvest seasons when fresh berries are at their peak. While the traditional pie requires careful slicing and serving, the brilliant evolution into a bar format, like these incredible Blackberry Pie Crumble Bars, truly caters to our modern desire for both convenience and spectacular flavor. I find people adore this dish for countless reasons: the incredible contrast of textures – the jammy, juicy fruit against the crisp, tender crumble and sturdy base – and its sheer versatility. They are an ideal choice for picnics, potlucks, school lunchboxes, or simply enjoying with a cup of coffee on a lazy afternoon. The ease of preparation and serving, combined with their undeniable deliciousness, makes them a perennial favorite in my home, and I know they’ll quickly become one in yours too!

Ingredients:
-
For the Irresistible Crumble-Crust Base and Topping:
-
2 ½ cups (300g) all-purpose flour, spooned and leveled
I always make sure to level my flour properly; it makes a big difference in the final texture!
-
1 cup (200g) granulated sugar
This provides just the right amount of sweetness to balance the tart berries.
-
1 teaspoon baking powder
A little lift helps create that perfect crumbly texture.
-
½ teaspoon fine sea salt
Never underestimate how a pinch of salt enhances all the other flavors.
-
1 cup (2 sticks / 226g) unsalted butter, very cold and cut into ½-inch cubes
Keeping the butter super cold is key for a truly crumbly texture. Don’t skip this step!
-
1 large egg, lightly beaten
This helps bind our crumble mixture just enough for the base.
-
1 teaspoon pure vanilla extract
A touch of vanilla always rounds out the flavors beautifully.
-
Important Dough Handling Tip: Light hand with the dough – When pressing the crust into the pan, use gentle pressure. Packing it too firmly will result in a tough base.
Seriously, this little tip right here is a game-changer for pie crusts and bar bases alike!
-
-
For the Luscious Blackberry Filling:
-
4 cups (about 600g) fresh or frozen blackberries
If using frozen, no need to thaw! They’ll break down perfectly during cooking.
-
½ cup (100g) granulated sugar
You might want to adjust this based on the sweetness of your berries. Taste a few first!
-
2 tablespoons cornstarch
Our secret weapon for a perfectly thick and gooey filling, not watery!
-
1 tablespoon fresh lemon juice
This brightens the berry flavor and adds a wonderful zing.
-
½ teaspoon pure vanilla extract (optional, but highly recommended)
It really complements the blackberries.
-
Pinch of fine sea salt
Just like in the crumble, a tiny bit makes a big difference.
-
Preparation: Crafting Your Blackberry Pie Crumble Bars
Oh, I am so excited for you to make these! These Blackberry Pie Crumble Bars are truly one of my favorite treats. They bring all the warmth and comfort of a classic pie but in a delightfully portable and easy-to-share bar form. Let’s get started on bringing these beauties to life in your kitchen. Trust me, the aroma alone is worth every moment of effort!
Stage 1: Building the Perfect Crumble-Crust
-
Preheat and Prep: Before we dive into the delicious dough, let’s get our oven and pan ready. Preheat your oven to a cozy 375°F (190°C). Then, grab a 9×13-inch baking pan. I like to line mine with parchment paper, leaving an overhang on the sides. This makes lifting the cooled bars out incredibly easy for clean, perfect slices later. If you don’t have parchment, grease and flouring the pan thoroughly will work, but parchment is truly a lifesaver here!
-
Combine Dry Ingredients: In a large mixing bowl, the kind that gives you plenty of room to work, whisk together your all-purpose flour, granulated sugar, baking powder, and salt. Give them a good whisk until they’re thoroughly combined. This ensures all the leavening and seasoning are evenly distributed throughout our crumble, which is super important for consistent texture and flavor.
-
Cut in the Cold Butter: Now for the fun part! Add your very cold, cubed unsalted butter to the dry ingredients. You can use a pastry blender for this, which is what I usually reach for. Alternatively, two knives work in a pinch, or you can even use your fingertips! The goal here is to work the butter into the flour mixture until it resembles coarse crumbs, with some pieces of butter still about the size of small peas. The less you handle the butter with your warm hands, the better the final texture will be. Those little pockets of butter are what create that incredible flakiness and crumbliness we’re looking for!
Why cold butter, you ask? When cold butter melts in the oven, it releases steam, which creates air pockets, resulting in a tender, flaky, and wonderfully crumbly texture. If your butter is too warm, it’ll incorporate too much into the flour, leading to a tougher, denser crust – and we definitely don’t want that for our bars!
-
Add Egg and Vanilla: Once you have your coarse, crumbly mixture, make a well in the center. Pour in your lightly beaten egg and the vanilla extract. Mix everything together with a fork or your hands until just combined. The mixture will still be quite crumbly, but it should hold together when you gently squeeze a handful. Be careful not to overmix here; we want just enough cohesion to form a base, but still retain that glorious crumble texture for the topping.
-
Divide the Crumble: This is where our crumble becomes both the base and the topping! Scoop out about 2 ½ to 3 cups of this magnificent crumbly mixture and set it aside in a separate bowl. This portion is destined to become your delicious crumble topping later. The exact amount isn’t critical, but aiming for roughly one-third to one-half of the mixture for the topping works wonderfully. I usually eyeball it, making sure there’s enough left for a substantial base.
-
Press the Base: Now, take the remaining crumble mixture in the main bowl and pour it into your prepared 9×13-inch baking pan. Remember that super important tip I shared earlier? This is where it comes into play! Use your fingertips or the bottom of a flat-bottomed glass to gently and evenly press the mixture into the bottom of the pan. You want an even layer that’s compacted enough to form a solid base, but not so dense that it becomes tough. A light hand is truly your best friend here. Press it out to the edges and aim for a consistent thickness. This will be the sturdy, buttery foundation for our blackberry filling.
-
Partial Bake the Base: Place the pan with your pressed crumble base into your preheated oven. Bake for about 12-15 minutes, or until the edges are just barely starting to turn a light golden brown. This partial bake, or “blind baking,” helps to set the crust and prevents it from becoming soggy once we add our juicy fruit filling. It also gives the base a head start on crisping up. While the base is baking, we’ll quickly prepare our filling!
Stage 2: Crafting the Vibrant Blackberry Filling
While our crust is getting cozy in the oven, let’s whip up the star of the show – our beautiful blackberry filling! This comes together incredibly fast.
-
Combine Filling Ingredients: In a medium-sized bowl, gently combine your fresh or frozen blackberries, granulated sugar, cornstarch, fresh lemon juice, vanilla extract (if using), and that tiny pinch of salt. Toss everything together very carefully until the berries are evenly coated with the sugar and cornstarch mixture. The cornstarch is essential here; it will thicken the berry juices as they cook, transforming them into that glorious, jammy consistency we all adore in a good fruit pie or bar.
If using frozen berries: Don’t worry about thawing them. You can add them straight from the freezer. They might release a bit more liquid, but the cornstarch is there to handle it. Sometimes I find frozen berries even hold their shape a little better during baking!
A note on sugar: Blackberries can vary quite a bit in sweetness depending on their ripeness and variety. If your berries are particularly tart, feel free to add another tablespoon or two of sugar. Always taste a berry or two if you’re unsure!
Stage 3: Assembly and Baking Brilliance
Now, let’s bring it all together and get these bars baking to perfection!
-
Add the Blackberry Filling: Carefully remove the partially baked crust from the oven. Gently spoon the blackberry filling evenly over the warm crust. Try to spread it out so the berries are in a relatively even layer across the entire surface. Don’t press down too hard; we want those beautiful berries to nestle comfortably on our buttery base.
-
Crown with Crumble Topping: Remember that reserved crumble mixture? Now’s its moment to shine! Generously sprinkle the crumble mixture evenly over the blackberry filling. You can gently press it down just a tiny bit, but mostly, let it remain loose and crumbly. This will bake into a golden, buttery, textural dream of a topping.
-
Bake to Golden Perfection: Return the pan to your preheated 375°F (190°C) oven. Bake for approximately 40-50 minutes. The exact timing can vary a bit depending on your oven, so keep an eye on it. You’re looking for a gorgeous golden brown color on the crumble topping, and you should see the blackberry filling bubbling enthusiastically around the edges (and possibly through some gaps in the crumble). This bubbling is a wonderful sign that the cornstarch is doing its job and thickening the filling beautifully.
Expert Tip: If you notice the topping browning too quickly before the filling is fully bubbly, you can loosely tent the pan with aluminum foil for the last 10-15 minutes of baking. This protects the crumble from over-browning while allowing the filling to finish cooking through.
-
Cool Completely (This is Crucial!): Once baked, carefully remove the pan from the oven. Oh, the aroma will be intoxicating! It will be incredibly tempting to cut into these bars immediately, but I implore you: resist the urge! These bars must cool completely on a wire rack for at least 3-4 hours, or even better, chill them in the refrigerator for 1-2 hours after they’ve cooled a bit at room temperature. Why is this so important? The filling needs time to fully set. If you cut into them while they’re warm, the filling will be runny, and the bars won’t hold their shape. Patience, my friend, will be rewarded with perfectly set, clean-cut bars!
Seriously, this step can make or break your bar experience. I’ve been there, impatient, and ended up with a delicious but messy pile. Learn from my mistakes!
-
Slice and Serve: Once your Blackberry Pie Crumble Bars are completely cooled and firm, use the parchment paper overhang to carefully lift the entire slab out of the baking pan onto a cutting board. Remove the parchment paper, and then use a sharp knife to cut them into squares or rectangles of your desired size. I usually go for 12-16 bars, but you can make them as big or small as you like.
Serve them as they are, or take them to the next level with a scoop of vanilla bean ice cream, a dollop of fresh whipped cream, or a dusting of powdered sugar. They’re amazing slightly warm (after being reheated for just a few seconds in the microwave) with that ice cream melt, or simply delightful at room temperature.
Storage and Enjoyment:
These Blackberry Pie Crumble Bars are fantastic for making ahead! Store any leftover bars in an airtight container at room temperature for up to 3 days, or in the refrigerator for up to 5 days. If you want to keep them even longer, they freeze beautifully for up to 2-3 months. Just wrap individual bars tightly in plastic wrap and then place them in a freezer-safe bag or container. Thaw at room temperature or gently warm in the microwave when that craving hits.
I genuinely hope you enjoy baking and devouring these Blackberry Pie Crumble Bars as much as I do. They’re a truly satisfying bake, perfect for sharing (or not sharing, I won’t tell!). Happy baking!
Conclusion:
And there you have it, friends! We’ve journeyed together through the delightful process of creating what I truly believe will become a cherished staple in your baking repertoire. This isn’t just another dessert recipe; it’s an invitation to experience pure, unadulterated bliss in every single bite. Imagine that perfect balance: the sweet yet tart burst of ripe blackberries, lovingly cradled beneath a golden, buttery crumble that offers just the right amount of textural contrast. The rich, tender base provides the ultimate foundation, ensuring that each square of these incredible bars is a harmonious symphony of flavors and textures. It’s that feeling of comfort, nostalgia, and utter satisfaction all rolled into one irresistible treat. This recipe, designed with both simplicity and spectacular results in mind, promises to deliver a dessert that looks impressive, tastes divine, and is surprisingly straightforward to bring to life in your own kitchen. Trust me, once you experience the joy of biting into one of these, you’ll understand exactly what I mean.
One of the many reasons these bars are an absolute must-try is their incredible versatility and crowd-pleasing nature. Whether you’re looking for a casual weekend treat, a show-stopping potluck contribution, or a comforting dessert after a family meal, they fit the bill perfectly. When it comes to serving suggestions, the possibilities are wonderfully endless. While they are absolutely phenomenal enjoyed simply on their own, perhaps with a warm cup of coffee or tea, elevate the experience by serving them ever so slightly warm. A generous scoop of vanilla bean ice cream melting gently over the top is a classic pairing that truly cannot be beaten. The cold, creamy sweetness of the ice cream against the warm, fruity bars creates a magical contrast that will have everyone asking for seconds. For a slightly lighter touch, a dollop of freshly whipped cream, perhaps infused with a hint of lemon zest or a splash of vanilla extract, provides a luxurious cloud-like texture that complements the fruit beautifully. Even a simple dusting of powdered sugar adds an elegant finish, making them table-ready for any occasion. Don’t underestimate the power of a tiny sprig of fresh mint or a few extra blackberries placed strategically on the plate for an added visual flourish!
But don’t stop there! The beauty of this recipe lies in its adaptability. While blackberries shine as the star, feel free to experiment with different fruit combinations based on what’s in season or what your heart desires. A mix of blackberries and raspberries would add another layer of tangy sweetness. Peaches and blueberries could create a delightful summer variation, or even a blend of apples and cinnamon for an autumnal twist. You could also play with the crumble topping itself. Incorporating chopped nuts like pecans or walnuts would add an extra layer of crunch and nutty flavor. A sprinkle of oats can give it a more rustic, wholesome feel, while a touch of cinnamon or cardamom in the crumble mixture would introduce a warm, aromatic dimension. For those who love a bit of citrus, a teaspoon of lemon zest folded into the filling brightens the entire flavor profile, cutting through the sweetness with a refreshing zing. These minor tweaks allow you to truly make this recipe your own, adapting it to suit personal preferences or seasonal availability without ever compromising on deliciousness.
So, now it’s your turn! I genuinely hope you’re feeling inspired and excited to dive into your kitchen and whip up a batch of these glorious Blackberry Pie Crum extractble Bars. Seriously, there’s nothing quite like the aroma that fills your home as they bake – it’s pure heaven! Once they’re out of the oven, cooled (or just warm enough to handle!), and sliced, you’ll be so proud of what you’ve created. Don’t be shy; take a picture, share your results, and tell me all about your experience. Did you add a secret ingredient? Did you serve them with a special topping? I absolutely love hearing from you and seeing your culinary triumphs. Baking is about sharing joy, and I can’t wait to hear how these bars bring a little extra sweetness into your life and the lives of those you share them with. Go on, give them a try; your taste buds will thank you!
Frequently Asked Questions About Blackberry Pie Crum extractble Bars
Can I use frozen blackberries for this recipe?
Absolutely! Frozen blackberries work wonderfully. There’s no need to thaw them before adding them to the filling; you can add them directly. Just be aware that frozen fruit might release a bit more liquid during baking. If you notice your filling seems a little too wet, you can slightly increase the amount of cornstarch or flour in the fruit mixture to help absorb the excess moisture. This will ensure your bars set up perfectly and aren’t too runny.
How should I store leftover Blackberry Pie Crum extractble Bars?
To keep your bars fresh and delicious, store them in an airtight container at room temperature for up to 2-3 days. If you want them to last longer, you can store them in the refrigerator for up to 5-7 days. Just make sure they are completely cooled before storing to prevent condensation, which can make the crumble soggy. For the best texture, I often like to gently warm them up for a few seconds in the microwave before serving after refrigeration.
Can I make these bars ahead of time?
Yes, these bars are fantastic for making ahead! They often taste even better the next day as the flavors have more time to meld together. You can bake them entirely, let them cool completely, and then store them as instructed above. If you’re planning a party or gathering, preparing them the day before can be a huge time-saver and ensures you have a wonderful dessert ready to go with minimal last-minute fuss.
What if I don’t have fresh lemons for the zest?
While fresh lemon zest adds a beautiful brightness and cuts through the sweetness wonderfully, if you don’t have a fresh lemon on hand, you can omit it. The bars will still be incredibly delicious. Alternatively, a tiny splash of lemon extract (about 1/4 teaspoon) or even a very small amount of apple cider vinegar (just a teaspoon) can provide a similar subtle tang to balance the fruit, but use sparingly to avoid overpowering the blackberry flavor.
Can I freeze these Blackberry Pie Crum extractble Bars?
Yes, these bars freeze beautifully! Once they are completely cooled, cut them into individual squares. Place them in a single layer on a baking sheet and freeze for about an hour until firm. Then, transfer the frozen bars to an airtight freezer-safe container or a heavy-duty freezer bag, separating layers with parchment paper to prevent sticking. They can be stored in the freezer for up to 2-3 months. To enjoy, thaw them at room temperature or gently warm them in the oven (around 300°F/150°C) until heated through.
What makes these “extractble” bars unique?
The term “extractble” in this recipe highlights the delightful ease with which these bars can be ‘extracted’ or removed from the pan once baked, thanks to the sturdy yet tender base and perfectly set fruit filling. It also speaks to the rich, concentrated flavor of the blackberry filling, as if all the essence of the fruit has been “extracted” and perfectly captured. This design ensures that each bar holds its shape beautifully while offering an intense burst of blackberry goodness, making them not only delicious but also incredibly convenient to serve and enjoy.
Delicious Blackberry Pie Crumble Bars Recipe – Easy Treat!
These Blackberry Pie Crumble Bars offer the warmth and comfort of classic pie in a portable, easy-to-share bar form, featuring a buttery crumble crust and luscious blackberry filling. They’re perfect for any occasion!
Ingredients
-
2 ½ cups (300g) all-purpose flour
-
1 cup (200g) granulated sugar
-
1 teaspoon baking powder
-
½ teaspoon fine sea salt
-
1 cup (2 sticks / 226g) very cold unsalted butter, cut into ½-inch cubes
-
1 large egg, lightly beaten
-
1 teaspoon pure vanilla extract
-
4 cups (about 600g) fresh or frozen blackberries
-
½ cup (100g) granulated sugar
-
2 tablespoons cornstarch
-
1 tablespoon fresh lemon juice
-
½ teaspoon pure vanilla extract (optional)
-
Pinch of fine sea salt
Instructions
-
Step 1
Preheat oven to 375°F (190°C). Line a 9×13-inch baking pan with parchment paper, leaving an overhang on the sides for easy lifting. -
Step 2
In a large mixing bowl, whisk together flour, 1 cup granulated sugar, baking powder, and ½ tsp fine sea salt. Add the very cold, cubed unsalted butter. Cut in the butter using a pastry blender, two knives, or fingertips until the mixture resembles coarse crumbs with some pea-sized pieces of butter. -
Step 3
Make a well in the center of the crumbly mixture. Pour in the lightly beaten egg and 1 tsp pure vanilla extract. Mix everything together with a fork or your hands until just combined. The mixture will still be quite crumbly but should hold together when gently squeezed. -
Step 4
Scoop out about 2 ½ to 3 cups of the crumble mixture and set it aside in a separate bowl for the topping. Pour the remaining crumble mixture into your prepared 9×13-inch baking pan. Use your fingertips or the bottom of a flat-bottomed glass to gently and evenly press the mixture into the bottom of the pan, forming a solid but not overly dense base. Bake for 12-15 minutes, or until the edges are just starting to turn a light golden brown. -
Step 5
While the base is baking, prepare the filling. In a medium-sized bowl, gently combine the fresh or frozen blackberries, ½ cup granulated sugar, cornstarch, fresh lemon juice, ½ tsp pure vanilla extract (if using), and a pinch of fine sea salt. Toss everything together carefully until the berries are evenly coated. -
Step 6
Carefully remove the partially baked crust from the oven. Gently spoon the blackberry filling evenly over the warm crust. Generously sprinkle the reserved crumble mixture evenly over the blackberry filling. Return the pan to your preheated 375°F (190°C) oven and bake for approximately 40-50 minutes, or until the crumble topping is golden brown and the blackberry filling is bubbling enthusiastically around the edges. -
Step 7
Once baked, carefully remove the pan from the oven. It is crucial to let these bars cool completely on a wire rack for at least 3-4 hours, or even better, chill them in the refrigerator for 1-2 hours after they’ve cooled a bit at room temperature. This allows the filling to fully set, ensuring clean, perfectly shaped bars. -
Step 8
Once completely cooled and firm, use the parchment paper overhang to carefully lift the entire slab out of the baking pan onto a cutting board. Remove the parchment paper, and then use a sharp knife to cut them into squares or rectangles of your desired size (typically 12-16 bars). Serve as they are, or with a scoop of vanilla bean ice cream or a dollop of fresh whipped cream.
Important Information
Nutrition Facts (Per Serving)
It is important to consider this information as approximate and not to use it as definitive health advice.
Allergy Information
Please check ingredients for potential allergens and consult a health professional if in doubt.
Leave a Comment