

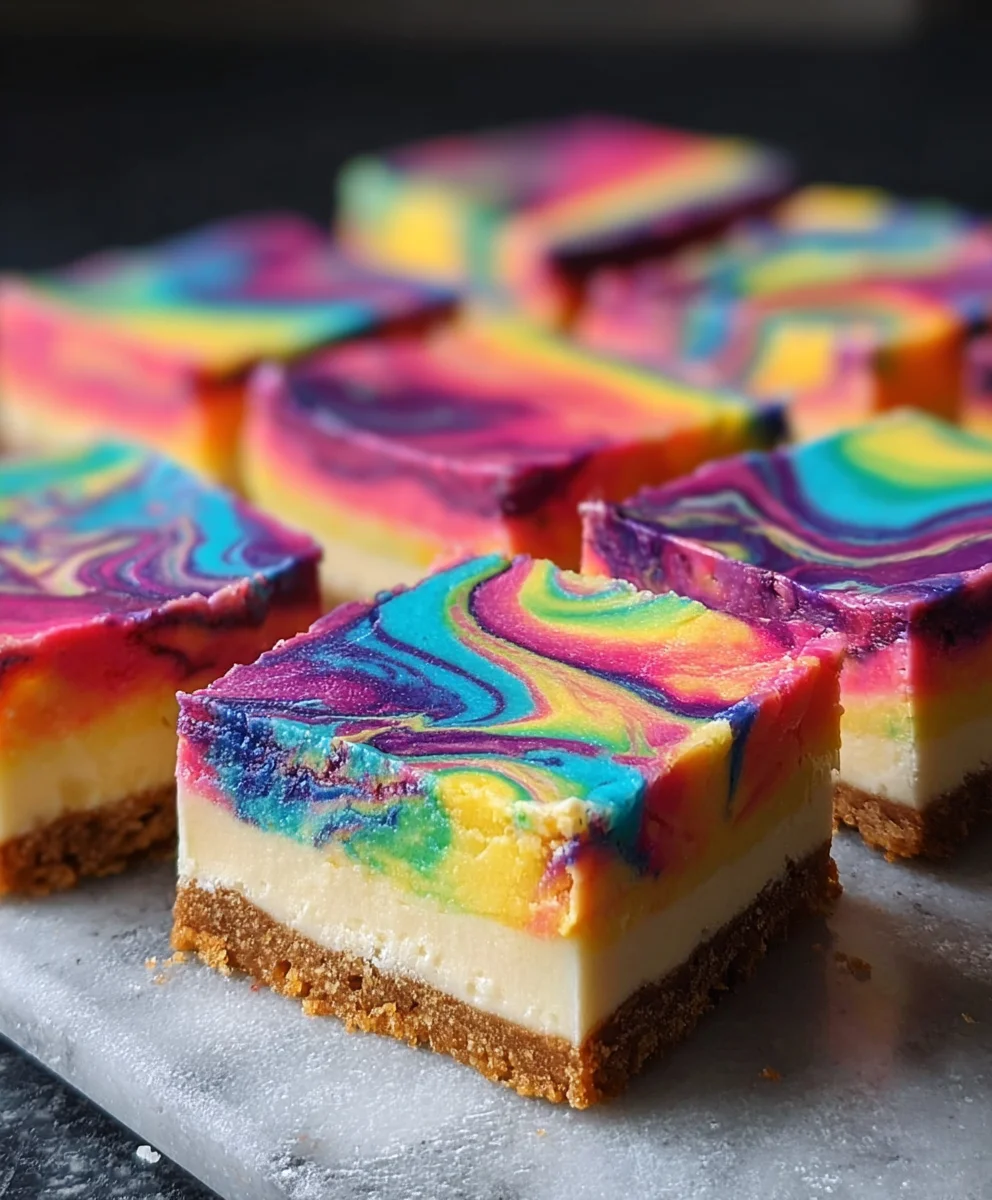
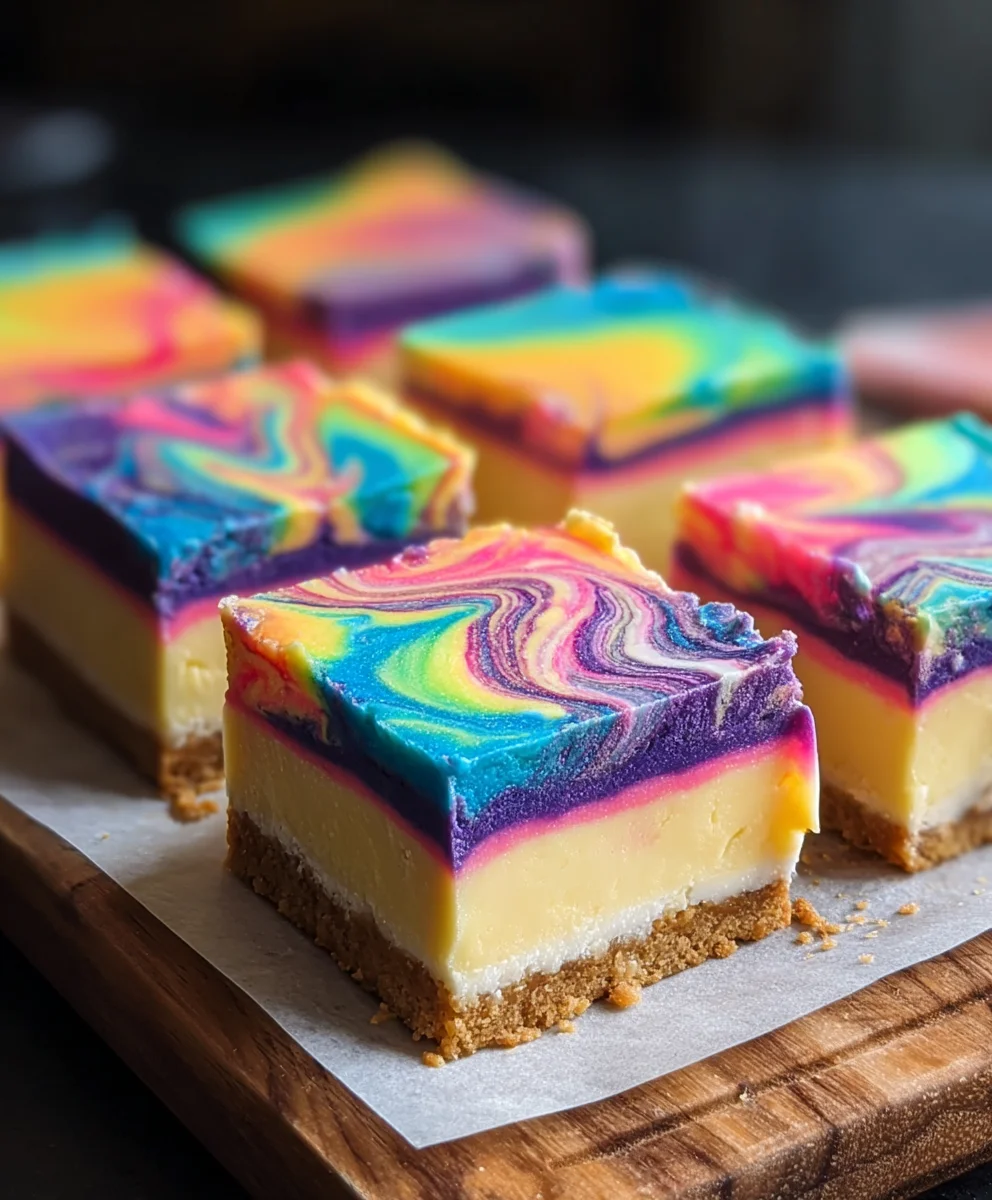
Rainbow Cheesecake Swirl Bars are more than just a dessert; they are a vibrant celebration on a plate, a joyful explosion of color and flavor that brings a smile to everyone’s face. Imagin extracte a creamy, dreamy cheesecake base, swirled with a knon-alcoholic aleidoscope of fruit-infused colors, all nestled atop a buttery, crum extractbly crust. It’s no wonder these delightful bars are a crowd-pleaser, perfect for birthdays, holidays, or simply brightening up an ordinary Tuesday. What makes Rainbow Cheesecake Swirl Bars truly special is the captivating visual appeal combined with that irresistible tangy sweetness of cheesecake. Each bite is a delightful journey throughrum extractspectrum of fruity notes, making them an unforgettable treat that’s as fun to make as it is to devour.

Ingredients:
- 1 box white cake mix
- 1/2 cup (1 stick) unsalted butter, melted
- 1 large egg
- 2/3 cup whole milk, plus 9 additional teaspoons divided
- Gel food colors: pink, orange, yellow, green, blue, and purple
- 12 ounces cream cheese, softened to room temperature (this is typically 1-1/2 standard blocks)
- 1/3 cup granulated sugar
- 1 large egg
- 1 teaspoon pure vanilla extract
Preparing the Base
Step 1: Preheat Oven and Prepare Baking Dish
First things first, let’s get our oven preheated and our baking dish ready for these delightful Rainbow Cheesecake Swirl Bars. You’ll want to preheat your oven to 350°F (175°C). This temperature is perfect for ensuring an even bake, preventing the bottom from burning while the top cooks through. Next, take an 8×8 inch baking dish and line it with parchment paper. It’s crucial to leave an overhang on two opposite sides of the parchment paper. This creates “handles” that will make lifting the finished bars out of the dish so much easier later on. You can press the parchment paper into the corners and up the sides of the dish, greasing it lightly first if you prefer, but the parchment paper usually does a good job of preventing sticking.
Step 2: Mix the Cake Mix Base
Now, let’s create the cake base for our bars. In a medium-sized mixing bowl, combine the contents of the white cake mix box with the melted butter, 1 large egg, and 2/3 cup of milk. Use a sturdy spoon or a spatula to mix these ingredients until they are just combined and there are no dry pockets of cake mix visible. Be careful not to overmix at this stage, as overmixing can lead to a tougher cake texture. The batter will be quite thick, almost like a cookie dough consistency, and that’s exactly what we’re aiming for. This firm base is essential for supporting the creamy cheesecake swirl.
Step 3: Press the Cake Base into the Dish
Once your cake batter is mixed, it’s time to get it into the prepared baking dish. Using your hands or the back of a spoon, spread and press the thick cake batter evenly across the bottom of the parchment-lined 8×8 inch dish. You want a consistent layer, about ¼ to ½ inch thick, covering the entire base. This layer will act as the foundation for our colorful cheesecake swirls. Ensure there are no large air pockets and that the surface is as smooth as possible for a more uniform final bar.
Creating the Cheesecake Swirls
Step 4: Prepare the Cream Cheese Filling
While the cake base is waiting, let’s prepare the star of the show: the creamy cheesecake filling! In a separate, larger mixing bowl, beat the softened cream cheese with an electric mixer until it’s completely smooth and free of lumps. This step is vital for a silky-smooth cheesecake texture. Once the cream cheese is smooth, add the granulated sugar, the second large egg, and the vanilla extract. Continue to beat the mixture until everything is well combined and the filling is light and airy. Again, avoid overmixing; just ensure all ingredients are incorporated.
Step 5: Divide and Color the Cheesecake Filling
This is where the magic happens and we bring the “rainbow” to our Rainbow Cheesecake Swirl Bars! Take your smooth cream cheese mixture and divide it equally into six small bowls. You should have roughly the same amount of cream cheese mixture in each bowl. Now, it’s time to add our gel food colors. To each of the six bowls, add a small amount of one of the gel food colors: pink, orange, yellow, green, blue, and purple. Use a toothpick or a small spoon to gently stir the color into each portion of the cream cheese mixture until you achieve vibrant, uniform hues. Gel food colors are best here as they provide intense color without adding extra liquid, which could affect the cheesecake’s texture.
Step 6: Swirl the Colors into the Base
Now for the fun part – creating the beautiful rainbow swirls! Dollop spoonfuls of each colored cream cheese mixture randomly over the cake batter base in the baking dish. Alternate the colors as you go, trying to distribute them evenly across the surface. Don’t worry about being too neat; the more random the placement, the more artistic your swirls will be. Once all the colored cream cheese mixtures have been dolloped onto the base, take a toothpick or a skewer and gently swirl the colors together. Make figure-eight motions or zigzags, moving through the different colors. The goal is to marble the colors without completely mixing them into a muddy brown. You want distinct streaks of each color to remain visible.
Step 7: Bake and Cool the Bars
With our beautiful swirls in place, it’s time to bake. Place the baking dish into the preheated 350°F (175°C) oven. Bake for approximately 30-40 minutes, or until the cheesecake layer is set and the edges of the cake base are lightly golden brown. You can test for doneness by gently jiggling the dish; the center of the cheesecake should be mostly firm, with a slight wobble. Once baked, remove the dish from the oven and let it cool completely on a wire rack. This cooling process is crucial. Rushing this step can lead to the bars breaking when you try to cut them. Allow them to cool for at least 2-3 hours at room temperature.
Step 8: Chill and Cut the Bars
After the bars have cooled to room temperature, the final step before slicing is chilling. Cover the baking dish with plastic wrap and refrigerate for at least 2-3 hours, or preferably overnight. This chilling period allows the cheesecake to fully set and firm up, making it much easier to cut clean, beautiful bars. Once thoroughly chilled, use the parchment paper overhangs to carefully lift the entire rectangle out of the baking dish onto a cutting board. Using a sharp knife, cut the rectangle into bars. For best results, wipe the knife clean between each cut. You should have vibrant, colorful swirls throughout each bar. Enjoy these delightful Rainbow Cheesecake Swirl Bars!
Conclusion:
There you have it – a delightful and visually stunning recipe for Rainbow Cheesecake Swirl Bars! We’ve walked through creating these vibrant treats, from the buttery grabeef ham cracker crust to the creamy, colorful cheesecake swirls. These bars are perfect for any occasion, bringin extractg a burst of joy and flavor to birthdays, potlucks, or simply an afternoon pick-me-up. Don’t be intimidated by the swirling; it’s part of the fun and always results in a unique pattern!
For serving suggestions, I love these chilled and cut into neat squares. They pair wonderfully with a cup of coffee or a glass of milk. For variations, consider adding a hint of citrus zest, like lemon or lime, to the cheesecake batter for an extra layer of brightness. You could also experiment with different extracts, such as almond or vanilla bean, to change the base flavor profile. Get creative and make these Rainbow Cheesecake Swirl Bars your own!
Frequently Asked Questions:
Can I make these bars ahead of time?
Absolutely! Rainbow Cheesecake Swirl Bars are best made at least a few hours, or even a day, in advance. This allows them to chill thoroughly and set up perfectly, making them easier to cut and ensuring the flavors meld together beautifully.
How should I store leftover bars?
Store any leftover Rainbow Cheesecake Swirl Bars in an airtight container in the refrigerator. They will stay fresh for up to 3-4 days. Make sure they are well-covered to prevent them from drying out or absorbing other odors from the fridge.
What if my cheesecake swirls aren’t very distinct?
Don’t worry if your swirls aren’t super defined! The beauty of these Rainbow Cheesecake Swirl Bars is their unique, marbled appearance. If you want more distinct swirls, try not to overmix the colors into the base batter and gently swirl with a toothpick or skewer rather than vigorously blending.
Rainbow Cheesecake Swirl Bars-Easy Dessert
Easy and colorful dessert bars with a white cake base and vibrant cream cheese swirls.
Ingredients
-
1 box white cake mix
-
1/2 cup unsalted butter, melted
-
2 large eggs
-
2/3 cup whole milk, plus 9 additional teaspoons
-
Gel food colors: pink, orange, yellow, green, blue, and purple
-
12 ounces cream cheese, softened
-
1/3 cup granulated sugar
-
1 teaspoon pure vanilla extract
Instructions
-
Step 1
Preheat oven to 350°F (175°C). Line an 8×8 inch baking dish with parchment paper, leaving an overhang on two opposite sides. -
Step 2
In a bowl, combine white cake mix, melted butter, 1 egg, and 2/3 cup milk. Mix until just combined. The batter will be thick. -
Step 3
Press the cake batter evenly into the bottom of the prepared baking dish. -
Step 4
In a separate bowl, beat softened cream cheese until smooth. Add sugar, the second egg, and vanilla extract. Beat until well combined. -
Step 5
Divide the cream cheese mixture into six small bowls. Tint each portion with a different gel food color: pink, orange, yellow, green, blue, and purple. -
Step 6
Dollop spoonfuls of each colored cream cheese mixture randomly over the cake batter base. Gently swirl the colors together with a toothpick or skewer to create a marble effect. -
Step 7
Bake for 30-40 minutes, or until the cheesecake layer is set and the edges are lightly golden. Cool completely on a wire rack (at least 2-3 hours). -
Step 8
Cover and refrigerate for at least 2-3 hours, or preferably overnight. Lift the bars out using the parchment paper overhangs, then cut into bars.
Important Information
Nutrition Facts (Per Serving)
It is important to consider this information as approximate and not to use it as definitive health advice.
Allergy Information
Please check ingredients for potential allergens and consult a health professional if in doubt.


Leave a Comment