

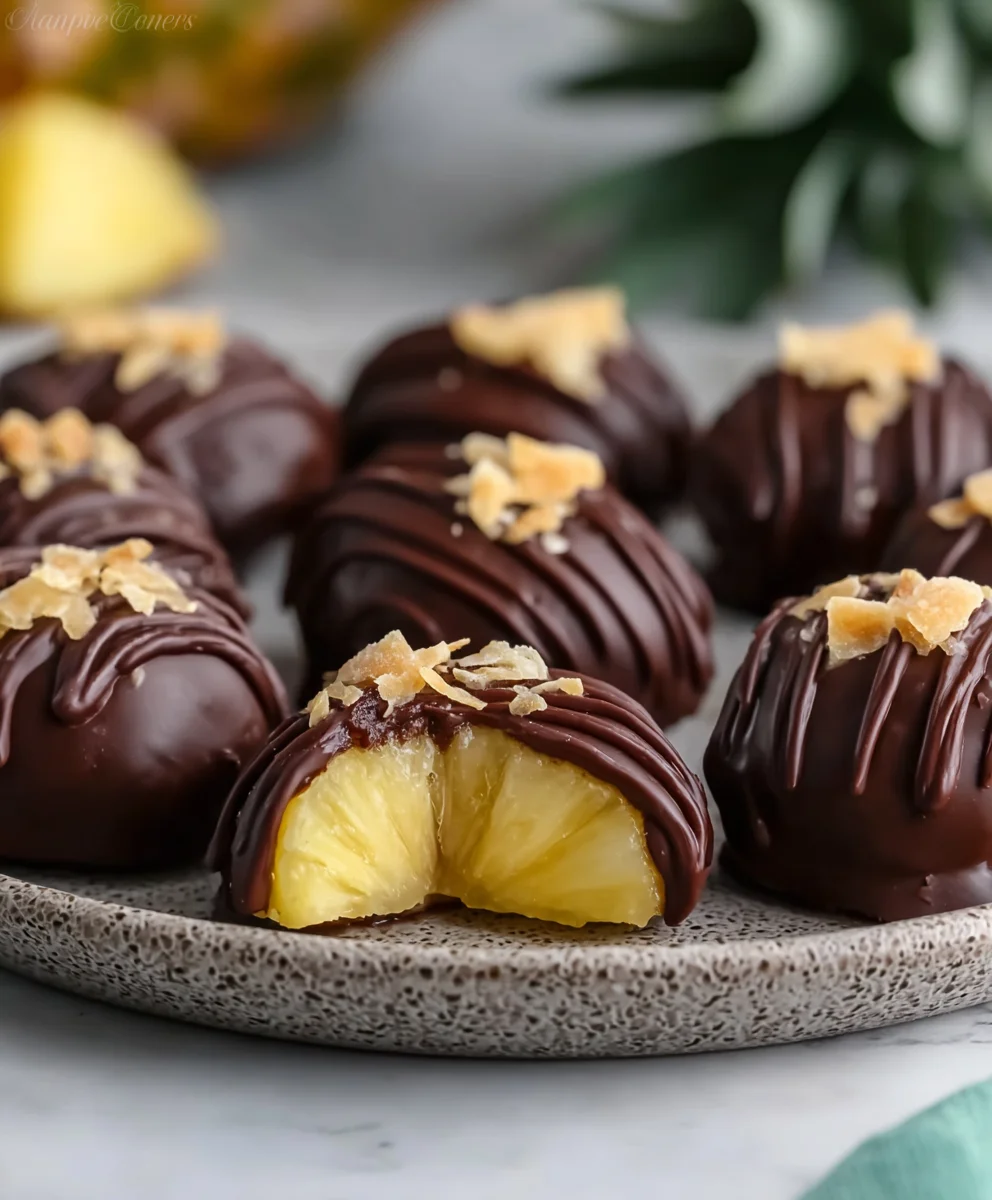
Chocolate Covered Pineapple Bites are more than just a simple snack; they are a delightful escape, a mini-vacation for your taste buds. Imagine biting into a juicy, sweet slice of tropical pineapple, perfectly balanced by a crisp, rich layer of smooth chocolate. It’s a combination that truly sings, offering a vibrant burst of flavor that is both refreshing and utterly indulgent. I’ve found that this unassuming treat holds a special place in many hearts, effortlessly blending the tangy zest of the tropics with the comforting luxury of high-quality cocoa.
While the exact historical origins of combining chocolate and pineapple might not be extensively documented, the individual components boast rich legacies. Pineapple, a universal symbol of hospitality, has delighted palates for centuries, while chocolate’s journey from ancient elixir to modern-day confectionery is legendary. This simple yet sophisticated dessert truly brings these two beloved ingredients together in perfect harmony. People adore these Chocolate Covered Pineapple Bites not just for their irresistible taste and appealing contrast of textures—the cool, soft fruit against the firm, snappy chocolate—but also for their sheer convenience and versatility. They are incredibly easy to prepare, making them an ideal last-minute dessert for entertaining, a wonderfully refreshing snack, or a thoughtful homemade gift. They truly embody simple elegance and joyful indulgence.

Ingredients:
- 1 large, ripe fresh pineapple (about 3-4 pounds), preferably a vibrant golden-yellow hue, indicating optimal sweetness.
- 16 ounces (about 450g) high-quality dark chocolate (60-70% cacao content recommended for a balanced sweetness). I love using a good baking bar or premium chocolate chips for a smoother melt.
- 8 ounces (about 225g) high-quality milk chocolate (optional, for a sweeter contrast or an alternative coating).
- 8 ounces (about 225g) white chocolate or white chocolate candy melts (optional, for decorative drizzles or a different flavor profile).
- 1-2 tablespoons refined coconut oil (or unflavored vegetable shortening), divided – this is my secret weapon for super smooth, shiny chocolate that sets beautifully.
- For Toppings (choose a variety or your favorites):
- ½ cup finely chopped roasted nuts (almonds, pecans, walnuts, or pistachios add a lovely crunch and nutty flavor).
- ½ cup shredded unsweetened coconut (toasted or untoasted, depending on your preference for a deeper flavor).
- ¼ cup colorful sprinkles (jimmie or nonpareil style, for a festive look).
- 2 tablespoons flaky sea salt (for a sophisticated sweet and salty combination).
- ½ teaspoon ground cinnamon or a pinch of cayenne pepper (for a subtle warming kick).
- Optional: finely chopped dried cranberries, mini chocolate chips, or crushed freeze-dried raspberries.
- Optional: wooden skewers, toothpicks, or lollipop sticks for easier dipping and handling.
Equipment You’ll Need:
- Large cutting board and a sharp chef’s knife for safely preparing the pineapple.
- Paper towels or a clean kitchen towel for thoroughly drying the pineapple – a crucial step for chocolate adhesion!
- Two large baking sheets, preferably rimmed, for holding your dipped Chocolate Covered Pineapple Bites.
- Parchment paper or silicone baking mats to line the baking sheets, preventing sticking and making cleanup a breeze.
- Microwave-safe bowls (at least two, one for each type of chocolate you plan to melt) or a double boiler setup (a heatproof bowl placed over a saucepan of simmering water).
- Rubber spatulas or spoons for stirring the melting chocolate and for general handling.
- Small, shallow bowls for your chosen toppings.
- A fork or specific dipping tools if you have them, to assist with dipping and removing excess chocolate.
- Airtight containers for storing any leftover Chocolate Covered Pineapple Bites.
Preparing Your Pineapple: The Foundation of Perfect Chocolate Covered Pineapple Bites
- Select the Perfect Pineapple: First things first, let’s talk about selecting your pineapple. You want a fresh pineapple that is ripe but firm. Look for a vibrant golden-yellow color on the outside, especially towards the base. Give it a gentle sniff – a sweet, fragrant aroma at the bottom indicates ripeness. Avoid any that smell fermented or have soft spots. For our “Chocolate Covered Pineapple Bites,” freshness and firmness are key to holding up well after dipping.
- Prepare Your Work Surface: Lay out your large cutting board and gather your sharp knife. This process can be a little juicy, so be ready!
- Remove the Crown and Base: Place the pineapple on its side on the cutting board. With your sharp chef’s knife, carefully slice off the leafy crown (the top part) and the woody base (the bottom part), aiming to remove about 1/2 to 1 inch from each end. This creates stable flat surfaces to work with.
- Peel the Pineapple: Stand the pineapple upright on one of its flat ends. Starting from the top, carefully slice downwards, following the natural curve of the fruit, removing the thick, spiky skin. Try to keep your slices shallow to preserve as much of the fruit as possible. Don’t worry if some “eyes” (the small, brown, spiky bits) remain – we’ll address those next. Repeat this around the entire pineapple until all the rough skin is removed.
- Remove the “Eyes”: Now, you’ll see the diagonal pattern of the remaining “eyes.” You can remove these by making shallow, V-shaped cuts along the diagonal rows. Alternatively, you can simply slice them off with your peeler or knife, but the V-cut method is quite efficient and leaves a pretty spiral pattern. This step is important for a smooth surface on your “Chocolate Covered Pineapple Bites.”
- Core the Pineapple: Lay the peeled pineapple on its side. For our bites, I find it easiest to slice the pineapple into rounds first, about 1/2 to 3/4 inch thick. Then, use a small round cookie cutter or a sharp knife to cut out the fibrous core from the center of each round. Alternatively, you can cut the pineapple into quarters lengthwise, then slice off the core from each quarter, and finally cut the quarters into smaller bite-sized pieces.
- Cut into Bite-Sized Pieces: Once cored, cut your pineapple rounds or quarters into uniform, bite-sized pieces. I usually aim for pieces that are roughly 1 to 1.5 inches in size – perfect for a single, delightful bite. Try to keep them consistent so they dip evenly and look appealing. These are the perfect canvases for our “Chocolate Covered Pineapple Bites.”
- Pat Dry, Pat Dry, Pat Dry! (CRUCIAL STEP): This is arguably the most important step for success. Pineapple is incredibly juicy, and moisture is the enemy of melting chocolate. Arrange your pineapple pieces in a single layer on several sheets of paper towels or a clean kitchen towel. Gently but thoroughly pat every surface of each pineapple piece until it feels completely dry to the touch. You might need to replace the paper towels once or twice. Any residual moisture will cause your chocolate to seize or prevent it from adhering properly to the pineapple, leading to a runny, unappealing mess. Let them air dry for another 10-15 minutes if you have the time, just to be extra sure.
Melting the Chocolate: Achieving Silky Smoothness for Your Chocolate Covered Pineapple Bites
-
Prepare Your Melting Setup:
- Double Boiler Method (My Preferred for Best Control): If you’re using a double boiler, fill a small saucepan with about 1-2 inches of water and bring it to a gentle simmer over medium-low heat. Place a heatproof bowl (glass or metal) over the saucepan, ensuring the bottom of the bowl does not touch the simmering water. The steam will gently melt the chocolate. This method offers the most control and reduces the risk of burning or seizing the chocolate.
- Microwave Method (Quicker, but Requires Vigilance): If using a microwave, choose a microwave-safe bowl. This method is faster but requires careful attention to avoid overheating.
- Melt the First Batch of Chocolate: Place your chosen chocolate (e.g., dark chocolate) into your prepared melting vessel. If using the double boiler, stir occasionally with a rubber spatula until about three-quarters of the chocolate is melted and smooth. Remove the bowl from the heat and continue stirring until all the chocolate has melted and is completely smooth and glossy. The residual heat will finish the job. If using the microwave, heat on 50% power for 30-second intervals, stirring thoroughly after each interval. Chocolate can hold its shape even when melted, so stirring is essential to gauge its true state. Continue until smooth.
- Add the Coconut Oil: Once the chocolate is fully melted and smooth, stir in 1-2 teaspoons of refined coconut oil (or unflavored vegetable shortening) per 8 ounces of chocolate. This small addition is a game-changer! It helps to thin the chocolate slightly, making it easier to dip, and contributes to a beautiful, glossy finish once set. It also helps the chocolate harden more quickly and makes it less prone to cracking. Stir until the coconut oil is fully incorporated and the chocolate is beautifully smooth and flowing. Keep the chocolate warm over the double boiler (if using) or in a warm spot, but off the direct heat, to maintain its liquid consistency as you dip.
- Repeat for Other Chocolates (if using): If you’re using multiple types of chocolate, such as milk or white chocolate, repeat steps 2 and 3 in separate clean bowls. White chocolate, in particular, can be more finicky to melt, so be extra cautious with heat and stir very frequently. Adding the coconut oil is especially helpful for white chocolate to achieve that smooth, dip-able consistency.
- Maintain Optimal Temperature: The ideal temperature for dipping chocolate is usually between 90-95°F (32-35°C). If your chocolate cools too much, it will become thick and difficult to work with. If it gets too hot, it can seize or become dull. If it starts to thicken, place it back over the double boiler or in the microwave for a very short burst (5-10 seconds) and stir well.
Dipping and Decorating: Crafting Your Beautiful Chocolate Covered Pineapple Bites
- Set Up Your Dipping Station: Line two baking sheets with parchment paper or silicone mats. Arrange your small bowls of various toppings near your melted chocolate. You’ll want to work relatively quickly once you start dipping, as the chocolate begins to set. Have your dried pineapple pieces ready.
- Prepare for Dipping: You can either use small wooden skewers or toothpicks inserted into each pineapple piece for easier handling, or simply use a fork. If you’re using skewers, insert one into the center of each pineapple piece.
-
Dip the Pineapple:
- Full Coverage: Holding a pineapple piece by its skewer (or carefully with a fork), fully immerse it into the melted chocolate. Ensure it’s completely coated.
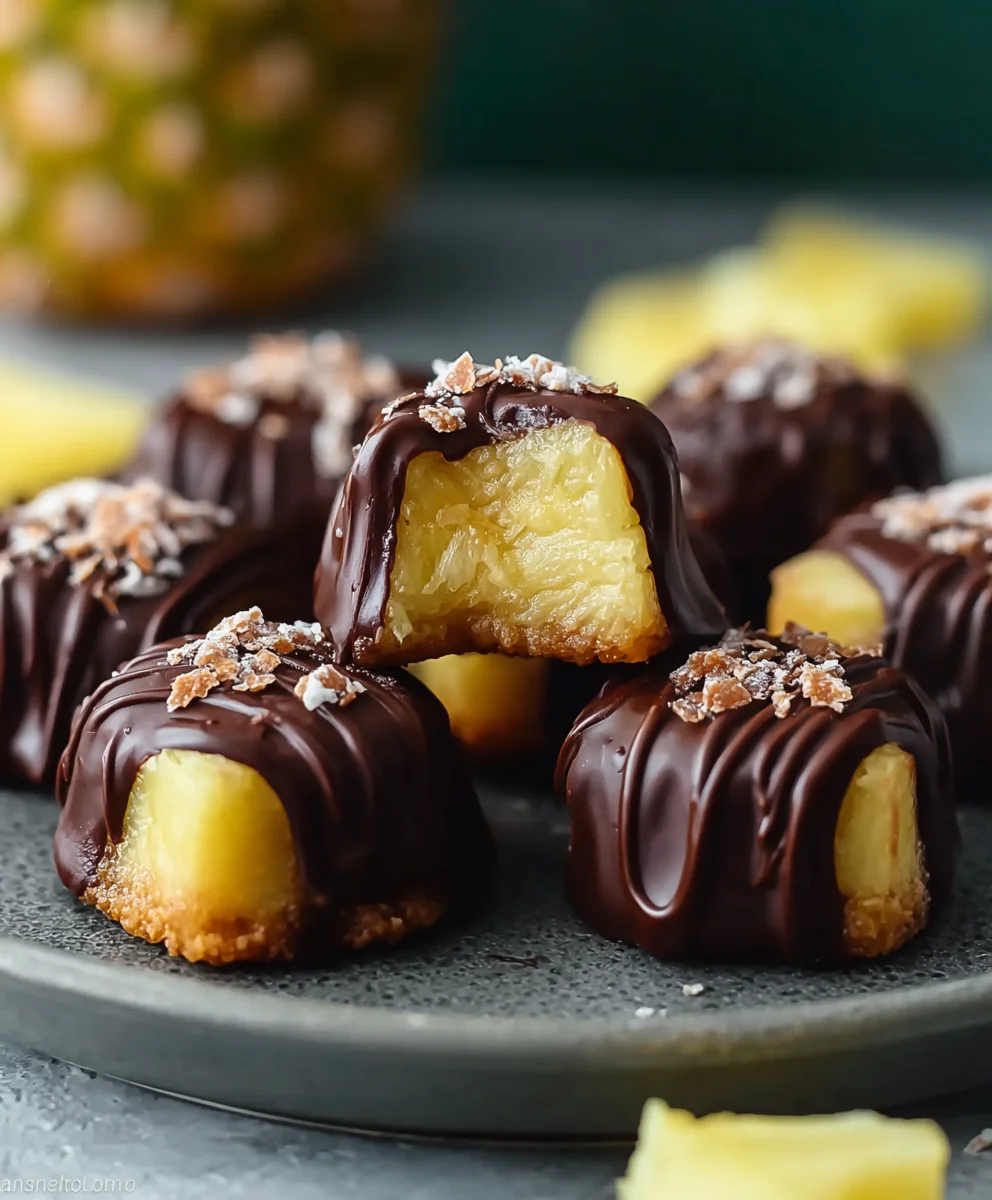
- Partial Coverage (my personal favorite for visual appeal): Dip only about two-thirds of the pineapple piece into the chocolate, leaving a little bit of the golden pineapple peeking out at the top. This creates a beautiful contrast and makes them look even more appetizing.
- Remove Excess Chocolate: Lift the pineapple piece from the chocolate. Gently tap the skewer against the edge of the bowl, or lightly scrape the bottom of the pineapple against the rim of the bowl, to allow any excess chocolate to drip off. This creates a clean finish and prevents a thick “foot” of chocolate from forming on the parchment paper. A thin, even coat is what we’re aiming for with our delicious “Chocolate Covered Pineapple Bites.”
-
Apply Toppings Immediately: As soon as you’ve dipped a piece, and while the chocolate is still wet and tacky, immediately dip or sprinkle your chosen toppings onto the chocolate.
- For nuts or shredded coconut, you can gently roll the chocolate-covered portion of the pineapple in a shallow bowl of the topping.
- For sprinkles or sea salt, hold the pineapple over the topping bowl and gently sprinkle them over the chocolate, or press the chocolate side into the topping.
- Work quickly, as the chocolate will start to set very fast once it’s on the cool pineapple.
- Place on Lined Baking Sheet: Carefully place the finished Chocolate Covered Pineapple Bites onto your prepared parchment-lined baking sheet. If you used skewers, simply stand them upright in a piece of styrofoam or a tall glass if you prefer, or lay them flat. If lying flat, you can gently remove the skewer once the chocolate has set slightly.
- Repeat and Rotate: Continue dipping and decorating all your pineapple pieces. If you’re using different chocolates or toppings, alternate them to create a varied and visually appealing platter. As one baking sheet fills up, start on the second.
- Drizzling (Optional): If you’ve saved some white chocolate or another contrasting chocolate, you can melt it (following the melting instructions) and then drizzle it over the set dark or milk chocolate bites for an elegant touch. Use a fork, a piping bag with a very small hole, or a ziploc bag with a tiny corner snipped off to create delicate lines. Do this after the main chocolate coating has fully set.
Setting and Storing: The Final Touches for Your Chocolate Covered Pineapple Bites
- Chill to Set: Once all your “Chocolate Covered Pineapple Bites” are dipped and decorated, transfer the baking sheets to the refrigerator. Chill for at least 15-30 minutes, or until the chocolate is completely firm and set. This firming process is essential for the chocolate to achieve its crisp snap and prevent it from melting in your hands.
- Remove from Parchment: Once fully set, gently peel the Chocolate Covered Pineapple Bites off the parchment paper. They should come off easily. If any chocolate has pooled at the bottom, you can carefully trim it with a sharp, warm knife.
- Storage: Store your completed “Chocolate Covered Pineapple Bites” in an airtight container in the refrigerator. Layer them between sheets of parchment paper to prevent them from sticking together. They are best enjoyed within 3-5 days, but the fresh pineapple really shines when eaten within 2-3 days.
- Serving Temperature: While they need to be stored in the refrigerator, I find that letting them sit out at room temperature for about 10-15 minutes before serving allows the chocolate to soften just slightly, enhancing its flavor and texture. However, don’t leave them out for too long, especially in warm environments, as the chocolate will melt and the pineapple can start to weep.
Creative Variations and Serving Suggestions: Elevating Your Chocolate Covered Pineapple Bites Experience
Spice It Up with Flavored Chocolates:
While the classic dark chocolate is always a winner, don’t be afraid to experiment! Try using a chili-infused dark chocolate for a sweet-and-spicy kick that beautifully complements the pineapple’s tropical sweetness. Or, for a more aromatic twist, stir a tiny pinch of ground cardamom or nutmeg into your melted dark chocolate before dipping. These subtle additions can truly elevate your “Chocolate Covered Pineapple Bites” to gourmet status.
Drizzle Designs and Layered Looks:
Beyond simple dipping, consider artistic drizzles. Once your primary chocolate coating (e.g., dark chocolate) has completely set, melt some white chocolate or milk chocolate (remember that coconut oil for smoothness!). Use a fork or a piping bag with a tiny hole to create elegant zig-zag patterns across your “Chocolate Covered Pineapple Bites.” For a truly luxurious look, you could even do a double dip: first in dark chocolate, chill until set, then dip a corner or edge into white chocolate, and chill again. The contrast of colors and textures is simply stunning.
Topping Extravaganza: Beyond the Basics:
The possibilities for toppings are endless and can cater to any preference or occasion.
- Tropical Bliss: Along with shredded coconut, consider finely chopped dried mango or a sprinkle of toasted macadamia nuts.
- Nutty Crunch: Instead of just one type of nut, create a custom mix! A blend of pistachios, almonds, and hazelnuts can provide a complex flavor and varied texture. Lightly toast them beforehand to bring out their oils and deepen their flavor.
- Sweet & Salty Indulgence: Flaky sea salt is a classic for a reason – it perfectly balances the sweetness of the chocolate and fruit. For an extra punch, try smoked sea salt.
- Kid-Friendly Fun: A rainbow of sprinkles, mini M&M’s, or even crushed graham crackers can make these “Chocolate Covered Pineapple Bites” a hit with younger crowds.
- Elegant Touch: A dusting of edible gold or silver glitter, or a sprinkle of finely grated orange zest (ensure it’s organic and well-washed) can add a sophisticated finish.
- Spiced Delight: A light dusting of ground cinnamon, a tiny pinch of cayenne pepper, or even some finely chopped candied ginger can add warmth and intrigue.
Serving Suggestions for Every Occasion:
Chocolate Covered Pineapple Bites are incredibly versatile.
- Party Platters: Arrange them beautifully on a large serving platter for a vibrant and impressive appetizer or dessert at any gathering. They are naturally portion-controlled and easy for guests to enjoy.
- Dessert Bar: Incorporate them into a dessert bar alongside other treats like chocolate-covered strawberries or fruit tarts.
- Edible Gifts: Package them in small, decorative boxes or cellophane bags tied with a ribbon for a thoughtful and delicious homemade gift. They make wonderful hostess gifts or holiday treats.
- Brunch Highlight: While usually a dessert, a smaller, less heavily coated version can be a delightful addition to a brunch spread, offering a fresh, sweet counterpoint to savory dishes.
- Everyday Treat: Don’t wait for a special occasion! Keep a batch in the fridge for a healthy-ish, satisfying sweet snack whenever a craving strikes. They’re a fantastic way to enjoy the refreshing taste of pineapple paired with rich chocolate.
Remember, the key to truly exceptional “Chocolate Covered Pineapple Bites” lies in starting with fresh, perfectly ripe pineapple and ensuring it’s as dry as possible before dipping. With these tips and variations, you’re well on your way to creating a truly memorable and utterly delicious treat that everyone will love!
Conclusion:
And there you have it, my friends! We’ve reached the delicious finale of our journey, and I genuinely hope you’re feeling inspired to dive into your kitchen and create some magic. If you’ve been searching for that perfect snack, an effortless dessert, or a delightful little something to brighten someone’s day, then this recipe for Chocolate Covered Pineapple Bites is, without a doubt, your answer. What makes these treats truly stand out is their incredible versatility and the sheer joy they bring with every single bite. Imagine the luscious sweetness of perfectly ripe pineapple, chilled to a crisp, then enrobed in a smooth, decadent layer of chocolate. It’s a symphony of textures and flavors – the juicy tanginess of the fruit cutting through the rich, comforting embrace of the chocolate. It’s an elegant, yet remarkably simple, indulgence that promises to impress without demanding hours of your precious time. I truly believe this recipe is a must-try because it elegantly proves that sometimes, the most exquisite pleasures are found in the simplest combinations. It’s a fantastic alternative to heavier desserts, offering a refreshing burst of fruit that still satisfies that deep-seated craving for something sweet and luxurious. Plus, who can resist a treat that looks this good but requires so little effort?
Endless Possibilities for Serving and Enjoying Your Bites
Now, let’s talk about how you can elevate your Chocolate Covered Pineapple Bites experience even further. These aren’t just one-trick ponies; their serving potential is truly boundless! For a party or a family gathering, arrange them artfully on a large platter. You could even skewer them individually before dipping for a charming presentation that makes them easy to grab. They make an absolutely delightful addition to any dessert table, standing out with their vibrant color and elegant finish. Imagine them nestled amongst other sweet treats, their golden-yellow peeking through the chocolate – simply stunning! Beyond gatherings, these are also fantastic for meal prepping a healthier snack option during the week. Just store them in an airtight container in the refrigerator, and you’ll have a guilt-free treat ready whenever a craving strikes. They’re also an absolutely thoughtful and unique homemade gift; present them in a cute box lined with parchment paper, and you’ll surely win hearts.
But why stop there? The fun really begins when you start exploring variations! While dark chocolate offers a sophisticated contrast to the pineapple’s sweetness, don’t hesitate to experiment with milk chocolate for a sweeter, more classic profile, or even white chocolate for a creamy, delicate touch. For an extra pop of color and flavor, consider drizzling some ruby chocolate over the finished bites. The topping possibilities are practically endless too! A sprinkle of flaky sea salt can enhance the chocolate’s depth, while shredded coconut or finely chopped nuts (like pistachios or pecans) add a delightful textural crunch. For a touch of whimsy, especially if you’re making these for kids or a festive occasion, colorful sprinkles or edible glitter can transform them into miniature works of art. A light dusting of chili powder or cayenne pepper could offer an intriguing spicy kick, or for a truly gourmet touch, a swirl of melted caramel or a raspberry coulis drizzle just before serving takes them to another level. You could even try dipping half in one chocolate and half in another, or adding crushed freeze-dried berries for a tart, fruity burst. Don’t be afraid to let your imagination run wild – that’s part of the joy of home cooking!
Your Turn to Create and Share!
So, now it’s your turn! I genuinely hope you feel confident and excited to try this recipe for Chocolate Covered Pineapple Bites in your own kitchen. I promise you, the satisfaction of creating these beautiful and delicious treats yourself is incredibly rewarding. They are so straightforward to make, yet they deliver such a powerful punch of flavor and elegance. I urge you to give them a whirl! Whether you’re a seasoned baker or a total beginner, this recipe is designed for success. Imagine the delighted smiles on the faces of your family and friends when they taste these little nuggets of joy. Don’t be shy about getting creative with your toppings and presentation – make them truly your own! Once you’ve whipped up your batch, I would absolutely love to hear about your experience. Did you try a unique topping? What kind of chocolate did you use? Did they become an instant hit at your last gathering? Please, share your stories, your photos, and your triumphs in the comments below! Your feedback not only brightens my day but also inspires others in our wonderful community to try new things. Happy dipping, and happy eating!
Chocolate Covered Pineapple Bites
These Chocolate Covered Pineapple Bites are a delightful escape, a mini-vacation for your taste buds. Juicy, sweet tropical pineapple is perfectly balanced by a crisp, rich layer of smooth chocolate. Easy to prepare, they are an ideal last-minute dessert, refreshing snack, or thoughtful homemade gift.
Ingredients
-
1 large, ripe fresh pineapple (about 3-4 pounds)
-
16 ounces (450g) high-quality dark chocolate (60-70% cacao)
-
8 ounces (225g) high-quality milk chocolate (optional)
-
8 ounces (225g) white chocolate or white chocolate candy melts (optional)
-
1-2 tablespoons refined coconut oil (or unflavored vegetable shortening), divided
-
½ cup finely chopped roasted nuts (almonds, pecans, walnuts, or pistachios)
-
½ cup shredded unsweetened coconut (toasted or untoasted)
-
¼ cup colorful sprinkles
-
2 tablespoons flaky sea salt
-
½ teaspoon ground cinnamon or a pinch of cayenne pepper
-
Optional: finely chopped dried cranberries, mini chocolate chips, or crushed freeze-dried raspberries
Instructions
-
Step 1
Prepare Pineapple: Select a ripe, firm pineapple. Slice off the crown and base (1/2-1 inch). Peel the skin by slicing downwards, removing any remaining “eyes.” Core the pineapple by cutting into 1/2-3/4 inch rounds and removing the center core, or cut into quarters, remove core, then slice into 1-1.5 inch bite-sized pieces. -
Step 2
Dry Pineapple: Thoroughly pat dry all pineapple pieces with paper towels until completely dry; air dry for 10-15 minutes. This is crucial for chocolate adhesion. -
Step 3
Melt Chocolate: Melt dark chocolate (16 oz) in a double boiler or microwave (50% power, 30-sec intervals), stirring until smooth. Stir in 1-2 teaspoons of coconut oil per 8 ounces of chocolate for a smooth, glossy finish. Repeat for milk (8 oz) and/or white chocolate (8 oz) if using, in separate bowls. Maintain chocolate at 90-95°F (32-35°C). -
Step 4
Dip & Decorate: Line two baking sheets with parchment paper. Prepare topping bowls. Insert skewers/toothpicks into pineapple pieces, or use a fork for dipping. Dip each pineapple piece into melted chocolate (full or two-thirds coverage), then gently tap off excess chocolate. Immediately apply chosen toppings (nuts, coconut, sprinkles, sea salt, cinnamon/cayenne) while chocolate is wet. Place dipped bites on lined baking sheets. -
Step 5
Drizzle (Optional): Once the primary chocolate coating has fully set, melt contrasting chocolate (white or milk) and drizzle elegant patterns over the bites using a fork or piping bag. -
Step 6
Chill & Store: Chill dipped pineapple bites on baking sheets in the refrigerator for 15-30 minutes until the chocolate is completely firm. Gently peel from parchment. Store in an airtight container in the refrigerator, layered with parchment, for 3-5 days (best within 2-3 days). Serve chilled or let sit at room temperature for 10-15 minutes before serving.
Important Information
Nutrition Facts (Per Serving)
It is important to consider this information as approximate and not to use it as definitive health advice.
Allergy Information
Please check ingredients for potential allergens and consult a health professional if in doubt.

Leave a Comment