

Cheesy Dynamite Chicken Buns are more than just a meal; they’re a sensational culinary experience, promising an explosion of flavor with every single bite. Have you ever yearned for that perfect combination of tender, succulent chicken, enveloped in a creamy, spicy sauce, all tucked inside a soft, pillowy bun and crowned with melted, gooey cheese? If so, you’re in for an absolute treat that will tantalize your taste buds and leave you craving more!
While the exact historical origins of this specific “dynamite” preparation might be relatively modern, drawing inspiration from popular spicy-creamy fusion dishes that have taken the culinary world by storm, its essence lies in the universal appeal of comfort food elevated. It’s a testament to how global flavors and innovative techniques can transform simple ingredients into something truly extraordinary. People utterly adore these Cheesy Dynamite Chicken Buns because they masterfully blend contrasting elements: the gentle warmth of the spiced chicken, the comforting embrace of the soft bun, and the irresistible richness of the melted cheese.
Why You’ll Fall in Love with Every Bite
The delightful textural contrast—from the fluffy exterior to the juicy, flavorful interior—combined with the balanced heat that excites without overpowering, makes this dish an instant favorite. It’s incredibly convenient for a variety of occasions, serving wonderfully as an unforgettable appetizer, a unique party snack, or a delightfully satisfying dinner option. I promise you, this recipe for Cheesy Dynamite Chicken Buns will quickly become a cherished staple in your kitchen, bringing joy with every delicious mouthful.

Ingredients:
Creating these sensational Cheesy Dynamite Chicken Buns requires a few distinct sets of ingredients – one for the light and fluffy dough, and another for the incredibly flavorful and creamy chicken filling. Make sure everything is measured out and ready to go before you begin; it makes the whole process so much smoother!
-
For the Irresistibly Fluffy Dough:
- All-Purpose Flour: 4 cups, plus extra for dusting your work surface. I always recommend having a little more on hand just in case your dough is a bit sticky.
- Warm Milk: 1 cup (about 105-115°F or 40-46°C). This is crucial for activating your yeast, so don’t let it get too hot or too cold!
- Active Dry Yeast: 2 ¼ teaspoons (or one standard packet). Make sure it’s fresh for the best rise!
- Granulated Sugar: ¼ cup, plus 1 teaspoon for proofing the yeast. This not only sweetens the dough but also feeds the yeast.
- Fine Sea Salt: 1 teaspoon. Salt is essential for flavor and controlling the yeast’s activity.
- Large Egg: 1, at room temperature. A room temperature egg incorporates better into the dough.
- Unsalted Butter: ¼ cup (½ stick), melted and slightly cooled, plus extra for greasing your mixing bowl.
- Vegetable Oil: A little bit for greasing your rising bowl.
-
For the Zesty Cheesy Dynamite Chicken Filling:
- Boneless, Skinless Chicken Breasts: 2 large (approximately 1.5 lbs total). You can also use chicken thighs for a richer flavor.
- Olive Oil: 1 tablespoon.
- Yellow Onion: 1 medium, very finely chopped.
- Garlic Cloves: 3-4, minced. Fresh garlic really makes a difference here.
- Red Bell Pepper: 1 small, finely diced (optional, but I love the subtle sweetness and color it adds).
- Cream Cheese: 8 ounces (1 block), softened at room temperature. This is the base for our creamy dynamite sauce!
- Mayonnaise: ½ cup, high-quality. Choose your favorite brand, as its flavor will shine through.
- Sweet Chili Sauce: ¼ cup, or adjust to your preferred level of sweetness and mild heat.
- Sriracha or Hot Sauce: 1-2 tablespoons, or more if you dare to truly make them dynamite!
- Sharp Cheddar Cheese: 1 ½ cups, freshly shredded. Pre-shredded cheese often has anti-caking agents that can affect melt.
- Low-Moisture Mozzarella Cheese: 1 cup, freshly shredded. For that amazing cheese pull!
- Green Onions: 2-3 stalks, thinly sliced, divided for the filling and for garnish.
- Salt and Black Pepper: To taste. Season generously, as chicken loves seasoning!
- Jalapeño: 1-2, deseeded and finely diced (optional, for an extra layer of heat and freshness).
-
For the Golden Egg Wash & Topping:
- Large Egg: 1.
- Milk or Water: 1 tablespoon.
- Sesame Seeds: 1-2 tablespoons (a mix of white and black looks beautiful!).
- Extra Sliced Green Onions: For a fresh, vibrant garnish after baking.
Preparing the Fluffy Dough for Your Cheesy Dynamite Chicken Buns
This is where the magic begins! A great bun starts with great dough. Don’t be intimidated by working with yeast; it’s quite forgiving once you get the hang of it. My goal here is to guide you to a beautifully soft and pliable dough that will encase our amazing chicken filling.
-
Activate the Yeast:
In a large mixing bowl (or the bowl of your stand mixer), combine the 1 cup of warm milk with 1 teaspoon of granulated sugar. Stir gently until the sugar dissolves. Sprinkle the 2 ¼ teaspoons of active dry yeast over the top. Give it a quick stir, then let it sit undisturbed for 5-10 minutes. You’ll know your yeast is alive and well when it becomes foamy and bubbly on the surface. If it doesn’t foam, your milk might have been too hot or too cold, or your yeast might be old. In that case, start over with fresh yeast!
-
Combine Wet Ingredients:
Once your yeast is frothy, add the remaining ¼ cup of granulated sugar, 1 large egg (at room temperature), and ¼ cup of melted and slightly cooled unsalted butter to the yeast mixture. Whisk everything together until it’s well combined. The mixture should look light yellow and slightly cloudy. Make sure the butter isn’t too hot, as it could kill your activated yeast.
-
Add Dry Ingredients and Begin Mixing:
Gradually add 3 cups of the all-purpose flour and the 1 teaspoon of fine sea salt to the wet mixture. If you’re using a stand mixer with a dough hook, start mixing on low speed. If you’re mixing by hand, use a sturdy wooden spoon. Mix until a shaggy dough forms. At this point, it will look quite sticky and not very cohesive, and that’s perfectly normal.
-
Knead the Dough to Perfection:
Now, it’s time to add the remaining 1 cup of flour, adding it gradually, about ¼ cup at a time, until the dough comes together. You might not need all of the flour, or you might need a tiny bit more, depending on your kitchen’s humidity and your specific flour. Continue to knead for 8-10 minutes. If you’re using a stand mixer, let it knead on medium-low speed until the dough is smooth, elastic, and pulls away from the sides of the bowl. If you’re kneading by hand on a lightly floured surface, push the dough away from you with the heels of your hands, fold it back, rotate it, and repeat. The goal is a dough that feels soft, supple, and slightly tacky but not overly sticky. A good test for readiness is the “windowpane test”: pinch a small piece of dough and gently stretch it. If you can stretch it thin enough to see light through it without it tearing, your gluten has developed beautifully!
-
First Rise (Bulk Fermentation):
Lightly grease a large clean bowl with vegetable oil or melted butter. Form your kneaded dough into a neat ball and place it in the greased bowl, turning it once to coat the entire surface. Cover the bowl tightly with plastic wrap or a clean kitchen towel. Place it in a warm, draft-free spot in your kitchen. This first rise will take anywhere from 1 to 1 ½ hours, or until the dough has doubled in size. Patience is key here; a slow rise develops a better flavor and texture. During colder months, I sometimes warm my oven to its lowest setting for just a minute, turn it off, and then place the covered bowl inside to create a cozy environment for my dough.
Crafting the Irresistible Cheesy Dynamite Chicken Filling
While our dough is patiently rising, we can turn our attention to the star of the show: the incredibly flavorful and creamy chicken filling. This filling is what gives our Cheesy Dynamite Chicken Buns their explosive taste, combining savory chicken with a creamy, spicy, and cheesy sauce.
-
Prepare the Chicken:
There are a couple of ways to prepare your chicken for shredding. You can either:
- Boil/Poach: Place the chicken breasts in a pot and cover them with water or chicken broth. Bring to a boil, then reduce heat and simmer for 15-20 minutes, or until the chicken is cooked through and no longer pink in the center.
- Pan-Fry: Heat 1 tablespoon of olive oil in a large skillet over medium-high heat. Season the chicken breasts with salt and pepper. Cook for 5-7 minutes per side, or until golden brown and cooked through.
Once cooked, remove the chicken from the heat and let it cool slightly. Using two forks, shred the chicken into bite-sized pieces. Alternatively, you can use a stand mixer with the paddle attachment on low speed to shred the chicken very quickly – it’s a fantastic hack! Set the shredded chicken aside.
-
Sauté the Aromatics:
In the same skillet (if pan-frying chicken) or a clean large skillet, heat 1 tablespoon of olive oil over medium heat. Add the finely chopped yellow onion and cook, stirring occasionally, until softened and translucent, about 5-7 minutes. Then, add the minced garlic and finely diced red bell pepper (if using). Cook for another 2-3 minutes until fragrant. Be careful not to burn the garlic, as it can turn bitter.
-
Build the Dynamite Sauce:
Remove the skillet from the heat. In a large mixing bowl, combine the softened cream cheese and mayonnaise. Use a spatula or a sturdy spoon to mix them together until smooth and creamy. This forms the luscious base of our “dynamite” sauce. Now, stir in the sweet chili sauce and sriracha (or your preferred hot sauce). Mix well until everything is evenly combined. Taste it at this stage – you can always add more sweet chili or sriracha to adjust the balance of sweetness and heat to your liking. Remember, you want a vibrant, zesty kick!
-
Combine with Chicken and Cheese:
Add the shredded chicken, the sautéed onion and garlic mixture, 1 cup of the shredded cheddar cheese, all of the mozzarella cheese, and about half of the sliced green onions to the bowl with the dynamite sauce. If you’re using finely diced jalapeños, add them now for an extra layer of zing. Gently fold everything together until all the chicken pieces are thoroughly coated in the creamy, cheesy sauce. Ensure the filling is well mixed so every bite of your bun is packed with flavor.
-
Season and Chill:
Season the filling generously with salt and black pepper to taste. Give it another good mix. I recommend chilling the filling in the refrigerator for at least 30 minutes. This helps the flavors meld and makes the filling easier to handle when you’re assembling the buns, as it will be firmer.
Assembling Your Perfect Cheesy Dynamite Chicken Buns
Now that we have our beautifully risen dough and our incredibly flavorful filling, it’s time for the fun part: assembling these Cheesy Dynamite Chicken Buns! This step requires a bit of gentle handling and patience, but the result – a perfectly formed bun – is absolutely worth it.
-
Punch Down and Divide the Dough:
Once your dough has doubled in size from its first rise, gently punch it down to release the air. This might feel a little brutal, but it’s important for an even texture in your final buns. Turn the dough out onto a lightly floured clean work surface. Gently knead it for just a minute or two to ensure it’s smooth again. Now, divide the dough into 12-16 equal pieces. For consistent size, you can weigh each piece, aiming for about 2-2.5 ounces (60-70 grams) per piece. I find that dividing it into 12 often makes a more substantial bun, perfect for a meal!
-
Shape the Dough Balls:
Take each piece of dough and shape it into a smooth, tight ball. To do this, cup your hand over the dough on your work surface and rotate it, applying gentle pressure. This creates surface tension and a nice, round shape. Arrange these dough balls on a lightly floured tray and cover them loosely with plastic wrap while you work on the others to prevent them from drying out.
-
Prepare for Filling:
Take one dough ball and, on your lightly floured surface, use a rolling pin to roll it out into a circle about 4-5 inches (10-12 cm) in diameter. You want the edges to be slightly thinner than the center. Don’t roll it too thin, or it might tear when you fill it. The center needs to be robust enough to hold the generous filling. Repeat this for all your dough balls.
-
Fill and Seal the Buns:
Spoon a generous amount (about 2-3 tablespoons) of the chilled Cheesy Dynamite Chicken Filling into the center of each rolled-out dough circle. Be careful not to overfill, as it will make sealing difficult. Now, bring the edges of the dough up around the filling, gathering them together at the top. Pinch the seams tightly to seal the bun completely. You want to make sure there are no gaps where the filling could escape during baking. Once sealed, gently roll the bun in your hands to create a nice, smooth, round shape. Place the sealed bun, seam-side down, on a baking sheet lined with parchment paper. Make sure to leave ample space between the buns, as they will expand during the second rise and baking.
-
Second Rise (Proofing):
Once all your buns are filled and placed on the baking sheet, cover them loosely with plastic wrap or a clean kitchen towel. Let them rise in a warm, draft-free place for another 30-45 minutes, or until they look visibly puffy and almost doubled in size again. This second rise is critical for achieving a light and airy texture in your finished buns.
Baking Your Golden Cheesy Dynamite Chicken Buns to Perfection
We’re almost there! The aroma of these Cheesy Dynamite Chicken Buns baking in your oven is truly incredible. This final stage will give us those beautiful golden-brown tops and a perfectly cooked, irresistible treat.
-
Preheat Your Oven:
About 15-20 minutes before the end of the second rise, preheat your oven to 375°F (190°C). Make sure to place an oven rack in the center of your oven for even baking.
-
Prepare the Egg Wash:
In a small bowl, whisk together 1 large egg with 1 tablespoon of milk or water. This egg wash will give your buns a beautiful golden sheen and help the sesame seeds adhere.
-
Egg Wash and Topping:
Once the buns have finished their second rise and are looking puffy, gently brush the tops of each bun with the egg wash. Be careful not to deflate them. After brushing, sprinkle a generous amount of sesame seeds over the top of each bun. If you like, you can also sprinkle a tiny bit of the remaining sliced green onions on top at this stage for added color before baking.
-
Bake to Golden Perfection:
Carefully transfer the baking sheets to the preheated oven. Bake for 18-25 minutes, or until the buns are beautifully golden brown on top and cooked through. Baking times can vary slightly depending on your oven, so keep an eye on them. You want that rich, appealing golden color, indicating a perfectly baked bun. If you notice them browning too quickly, you can loosely tent them with aluminum foil for the last few minutes.
-
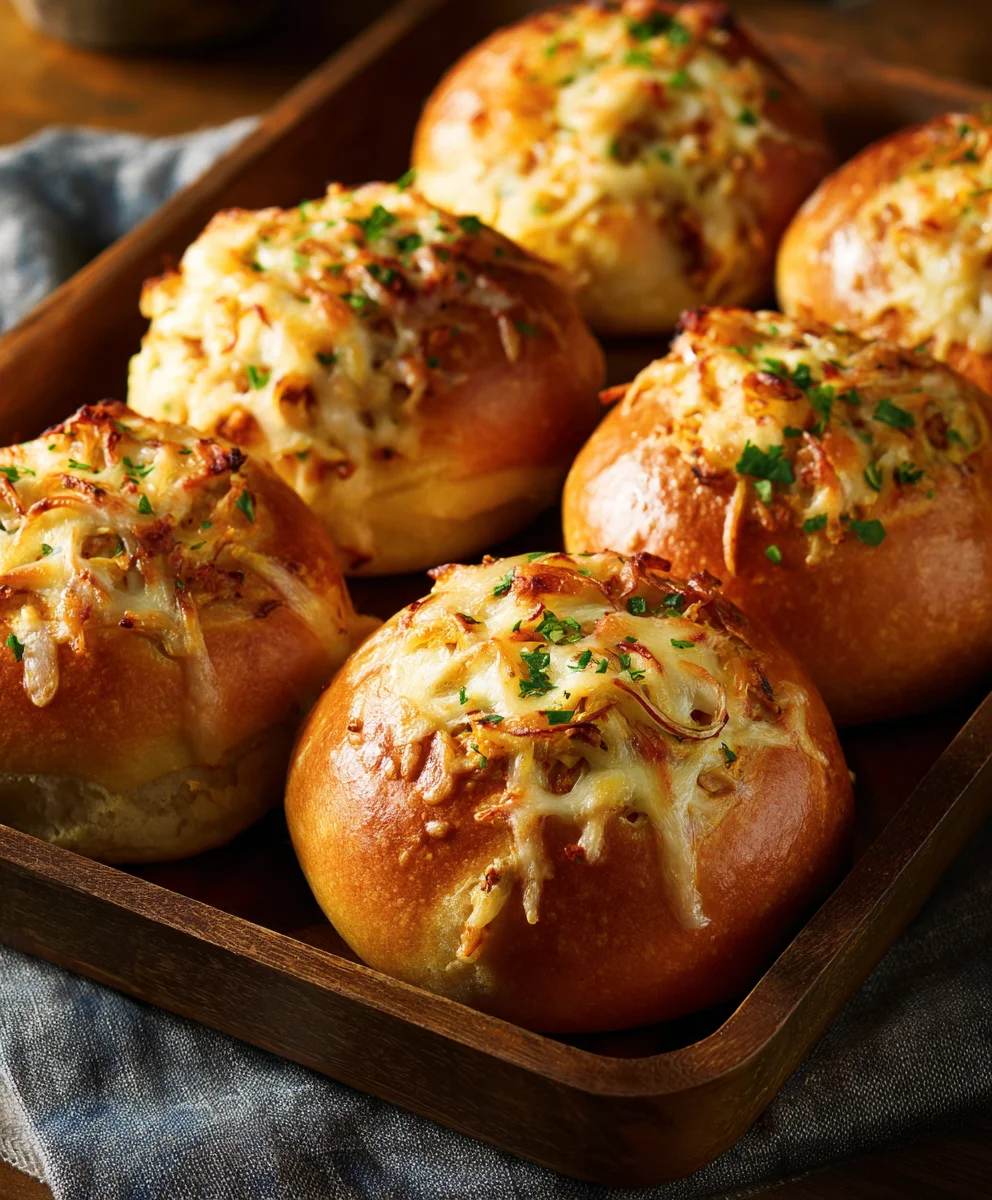
Cool and Garnish:
Once baked, remove the buns from the oven and transfer them to a wire rack to cool slightly. While they’re still warm, sprinkle the remaining fresh sliced green onions over the top for a pop of color and fresh onion flavor. These buns are absolutely divine served warm, allowing that cheesy filling to be wonderfully gooey and molten. They make an incredible snack, appetizer, or even a light meal. Get ready for a flavor explosion with every bite of your homemade Cheesy Dynamite Chicken Buns!
Conclusion:
So, there you have it – my full guide to creating an absolute showstopper in your kitchen. If you’ve been searching for that one recipe that truly stands out, that brings a burst of flavor and a comforting warmth with every single bite, then your search ends here. These Cheesy Dynamite Chicken Buns are more than just a meal; they’re an experience. Imagine sinking your teeth into a perfectly golden, slightly crisp bun, giving way to an incredibly soft, fluffy interior. Then, the magic happens: a generous filling of succulent, tender chicken, marinated and cooked to perfection, infused with a vibrant, dynamic blend of spices that truly live up to the ‘dynamite’ in its name. And of course, the cheese – gooey, melty, and utterly irresistible, it binds all these magnificent flavors together, creating a symphony of taste and texture that will have you reaching for another, and another. This isn’t just about satisfying hunger; it’s about delighting the senses, about creating a moment of pure culinary joy. I promise you, the aroma alone as they bake will have everyone in your home eagerly anticipating the first bite, and the collective “oohs” and “aahs” upon tasting them will be your well-deserved reward. It’s a dish that looks impressive, tastes incredible, and manages to be wonderfully comforting all at once, making it an instant favorite for any occasion.
Elevate Your Experience: Serving Suggestions
While these amazing buns are undeniably phenomenal on their own, a few simple additions can truly elevate your dining experience. For a refreshing contrast, I love serving them alongside a crisp, simple green salad tossed with a tangy vinaigrette – the fresh crunch cuts beautifully through the rich, cheesy goodness. A cooling dip is also a fantastic companion; think a creamy ranch dressing, a homemade sriracha mayo for an extra kick, or even a cooling Greek yogurt dip infused with fresh herbs like dill and chives. For a heartier meal, a light tomato soup or a clear chicken broth could make a wonderful starter, offering a comforting liquid element to complement the substantial buns. Don’t be afraid to experiment with your favorite sauces – a sweet chili sauce could add another layer of flavor that’s just divine, creating a wonderful sweet and savory combination that tantalizes the palate.
Unleash Your Inner Chef: Creative Variations
But the real beauty of this recipe lies in its versatility. Once you’ve mastered the basic technique, feel free to unleash your inner chef and customize it to your heart’s content!
Spice Level: If you’re a true heat-seeker, feel free to amp up the sriracha or add a pinch of cayenne pepper directly to the chicken mixture. For those who prefer a milder flavor, you can easily reduce the chili flakes or even omit the sriracha, focusing more on the savory chicken and cheese notes for a gentler, yet equally delicious, experience.
Cheese Choices: While I adore the blend of cheeses I’ve suggested, don’t limit yourself! A sharp cheddar will give it a more robust and tangy flavor, while a good Monterey Jack offers extra meltiness and a milder profile. For an even bolder kick, try incorporating some pepper jack cheese into the mix, which will infuse a subtle heat throughout the filling. A combination of a few different cheeses often yields the most complex and satisfying result, so feel free to mix and match your favorites.
Add-ins: Diced bell peppers (red, yellow, or orange) can add a lovely sweetness, vibrant color, and a slight crunch to the filling. Finely chopped green onions or chives folded into the mixture would bring a fresh, aromatic touch that brightens the overall flavor. For a little extra texture and a hint of sweetness, a spoonful of corn kernels wouldn’t go amiss. If you’re feeling adventurous, some finely diced jalapeños (deseeded for less heat) would be a fantastic addition, providing a fresh, zesty spice.
Dough Options: While I’ve guided you through a fantastic homemade dough recipe, you could also experiment with store-bought alternatives for a quicker fix on busy days. Pre-made crescent roll dough or even puff pastry can be adapted to create delightful variations, though the resulting texture will naturally be different from a traditional bun. For a truly indulgent treat, imagine these fillings baked into a rich, buttery brioche dough!
Vegetarian Twist: For a delicious meat-free option, consider replacing the chicken with finely shredded, seasoned jackfruit or pulled king oyster mushrooms. These ingredients, when properly prepared and seasoned, can mimic the texture of shredded chicken wonderfully, allowing everyone to enjoy the ‘dynamite’ experience, making it a versatile crowd-pleaser.
Make-Ahead & Freezing: These buns are surprisingly freezer-friendly, making them perfect for meal prepping! You can assemble them completely, then freeze them unbaked on a baking sheet until solid. Once frozen, transfer them to a freezer bag or airtight container. When you’re ready to bake, you can either bake them from frozen (adding about 10-15 minutes to the baking time) or thaw them overnight in the fridge before baking as usual. This convenience means you can always have a delicious snack or meal ready for unexpected guests or a busy weeknight.
I genuinely believe this recipe is a game-changer, one that you’ll return to again and again. It’s perfect for a cozy family dinner, a lively party appetizer, or even a comforting weekend lunch. So, why wait? Gather your ingredients, put on your apron, and get ready to create something truly spectacular. I cannot wait for you to experience the incredible flavors and textures of these buns firsthand. Once you’ve baked your batch, please don’t keep the magic to yourself! I’d absolutely love to see your creations. Share your photos and your experiences in the comments section below, or tag me on your favorite social media platforms. What variations did you try? What did your family think? Your feedback and culinary adventures truly inspire me, and I’m always thrilled to connect with fellow food enthusiasts. Happy baking, and enjoy every single bite of these phenomenal treats!
Cheesy Dynamite Chicken Buns: Spicy, Gooey Perfection!
Cheesy Dynamite Chicken Buns are a sensational culinary experience, combining tender, succulent chicken in a creamy, spicy sauce, all tucked inside a soft bun and topped with gooey melted cheese. Perfect as an unforgettable appetizer, unique party snack, or satisfying dinner option.
Ingredients
-
4 cups All-Purpose Flour, plus extra
-
1 cup Warm Milk (105-115°F/40-46°C)
-
2 ¼ tsp Active Dry Yeast
-
¼ cup + 1 tsp Granulated Sugar
-
1 tsp Fine Sea Salt
-
1 Large Egg, room temp
-
¼ cup Unsalted Butter, melted + extra for greasing
-
Vegetable Oil (for greasing)
-
2 large Boneless, Skinless Chicken Breasts (approx. 1.5 lbs)
-
1 tbsp Olive Oil
-
1 medium Yellow Onion, finely chopped
-
3-4 Garlic Cloves, minced
-
1 small Red Bell Pepper, finely diced (optional)
-
8 oz Cream Cheese, softened
-
½ cup Mayonnaise
-
¼ cup Sweet Chili Sauce
-
1-2 tbsp Sriracha or Hot Sauce
-
1 ½ cups Sharp Cheddar Cheese, shredded
-
1 cup Low-Moisture Mozzarella Cheese, shredded
-
2-3 stalks Green Onions, thinly sliced, divided
-
Salt and Black Pepper, to taste
-
1-2 Jalapeño, deseeded, finely diced (optional)
-
1 Large Egg (for wash)
-
1 tbsp Milk or Water (for wash)
-
1-2 tbsp Sesame Seeds
-
Extra Sliced Green Onions (for garnish)
Instructions
-
Step 1
In a large bowl, combine 1 cup warm milk, 1 tsp sugar, and 2 ¼ tsp active dry yeast. Stir, then let foam 5-10 min. -
Step 2
To yeast mixture, add remaining ¼ cup sugar, 1 egg, and ¼ cup melted butter. Whisk. Gradually add 3 cups flour and 1 tsp salt; mix until shaggy. -
Step 3
Gradually add remaining 1 cup flour. Knead 8-10 min (stand mixer or by hand) until dough is smooth, elastic, and slightly tacky. -
Step 4
Lightly grease a bowl with oil. Form dough into a ball, place in bowl, turn to coat. Cover and let rise in a warm, draft-free spot for 1-1 ½ hours until doubled. -
Step 5
Cook 2 large chicken breasts by boiling/poaching (15-20 min) or pan-frying with 1 tbsp olive oil (5-7 min per side) until cooked through. Cool slightly, then shred into bite-sized pieces. -
Step 6
In a skillet with 1 tbsp olive oil over medium heat, sauté 1 medium finely chopped yellow onion for 5-7 min. Add 3-4 minced garlic cloves and 1 small finely diced red bell pepper (optional); cook 2-3 min until fragrant. -
Step 7
In a large mixing bowl, combine 8 oz softened cream cheese and ½ cup mayonnaise. Mix until smooth. Stir in ¼ cup sweet chili sauce and 1-2 tbsp sriracha (or hot sauce). Mix well. -
Step 8
Add shredded chicken, sautéed aromatics, 1 ½ cups shredded cheddar, 1 cup shredded mozzarella, and half of the sliced green onions (plus optional jalapeño) to the sauce. Gently fold until thoroughly coated. -
Step 9
Season filling generously with salt and black pepper. Mix. Chill in refrigerator for at least 30 minutes to meld flavors and firm up. -
Step 10
Gently punch down risen dough on a lightly floured surface. Divide into 12-16 equal pieces (approx. 2-2.5 oz each). -
Step 11
Shape each piece of dough into a smooth ball. On a lightly floured surface, roll each ball into a 4-5 inch diameter circle, with slightly thinner edges. -
Step 12
Spoon 2-3 tbsp of chilled filling into the center of each dough circle. Bring edges up and pinch tightly to seal completely. Gently roll to create a smooth, round bun. Place seam-side down on parchment-lined baking sheets, leaving ample space. -
Step 13
Cover filled buns loosely with plastic wrap or a kitchen towel. Let rise in a warm, draft-free place for 30-45 minutes until visibly puffy and almost doubled. -
Step 14
Preheat oven to 375°F (190°C) with a rack in the center. -
Step 15
In a small bowl, whisk 1 large egg with 1 tbsp milk or water. Gently brush tops of risen buns with egg wash. Sprinkle generously with 1-2 tbsp sesame seeds (and optional green onions). -
Step 16
Bake for 18-25 minutes, or until buns are beautifully golden brown on top and cooked through. If browning too quickly, tent loosely with foil. -
Step 17
Remove from oven, transfer to a wire rack to cool slightly. While warm, sprinkle with remaining fresh sliced green onions. Serve warm for a gooey, molten cheesy filling.
Important Information
Nutrition Facts (Per Serving)
It is important to consider this information as approximate and not to use it as definitive health advice.
Allergy Information
Please check ingredients for potential allergens and consult a health professional if in doubt.

Leave a Comment