

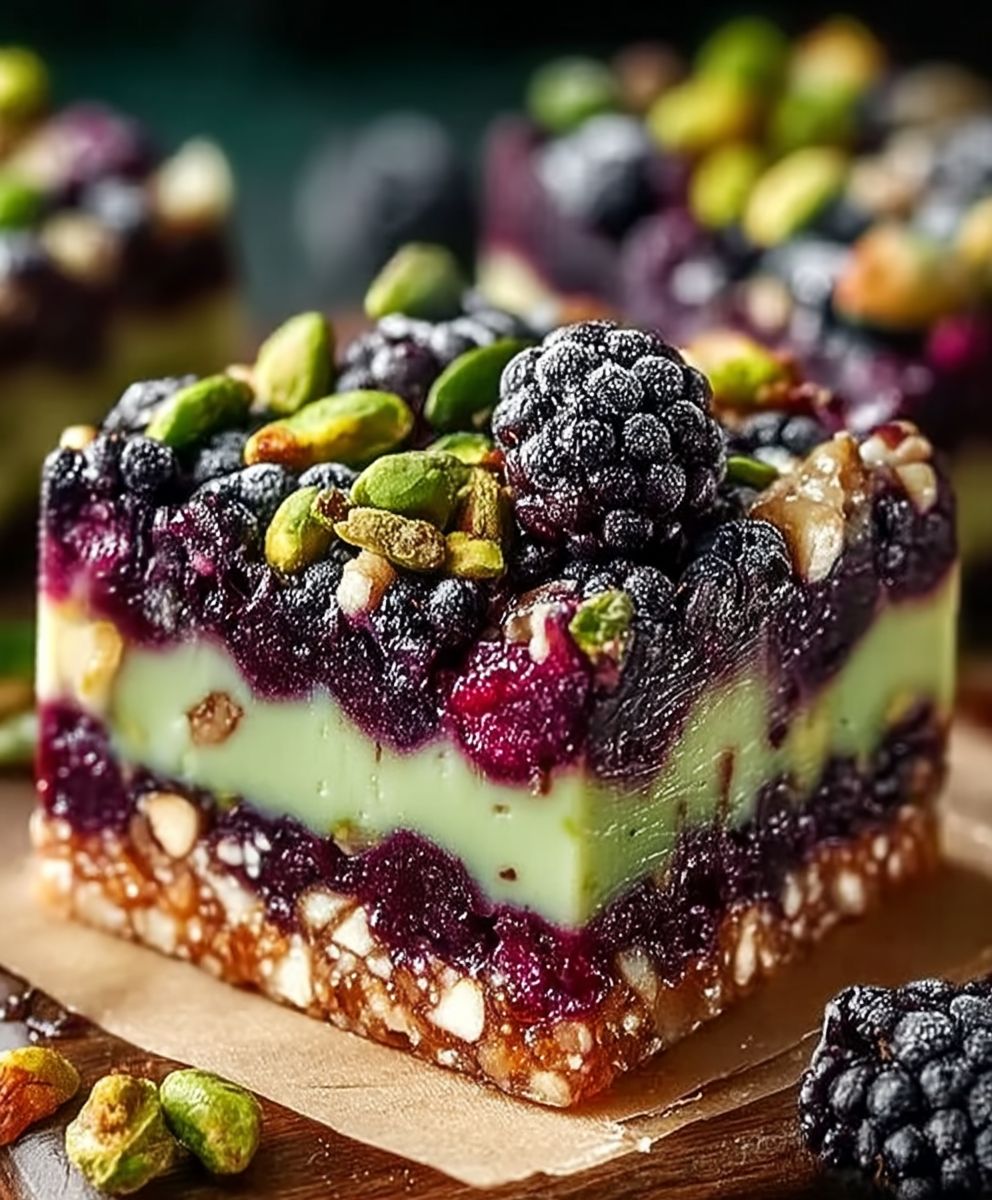
Blackberry Pistachio Dream Bars: Prepare to be transported to a realm of pure dessert bliss! Imagine sinking your teeth into a buttery, crumbly crust, followed by a luscious layer of sweet and tart blackberries, all perfectly complemented by the subtle crunch and nutty flavor of pistachios. These aren’t just bars; they’re an experience.
While the exact origins of fruit-filled dream bars are shrouded in a bit of mystery, they likely evolved from classic fruit pies and squares, becoming a popular treat in home kitchens across America. The beauty of these bars lies in their simplicity and adaptability. You can swap out fruits and nuts to create endless variations, but the combination of blackberries and pistachios is truly something special.
What makes these Blackberry Pistachio Dream Bars so irresistible? It’s the delightful contrast of textures and flavors. The buttery shortbread crust provides a sturdy base, while the juicy blackberries burst with a refreshing tartness. The pistachios add a delightful crunch and a subtle earthy note that balances the sweetness perfectly. Plus, they are incredibly easy to make, making them perfect for potlucks, bake sales, or simply a delightful treat to enjoy at home. Trust me, once you try these, you’ll be hooked!

Ingredients:
- For the Crust:
- 1 ½ cups all-purpose flour
- ½ cup (1 stick) unsalted butter, cold and cubed
- ½ cup granulated sugar
- ¼ teaspoon salt
- 1 large egg yolk
- 2 tablespoons ice water
- For the Blackberry Filling:
- 4 cups fresh blackberries
- ½ cup granulated sugar
- 2 tablespoons lemon juice
- 1 tablespoon cornstarch
- Pinch of salt
- For the Pistachio Topping:
- 1 cup all-purpose flour
- ½ cup (1 stick) unsalted butter, cold and cubed
- ½ cup granulated sugar
- ½ cup packed light brown sugar
- ½ teaspoon baking powder
- ¼ teaspoon salt
- 1 large egg
- 1 teaspoon vanilla extract
- 1 cup shelled, unsalted pistachios, coarsely chopped
Preparing the Crust
- Combine Dry Ingredients: In a large bowl, whisk together the flour, granulated sugar, and salt. This ensures the salt is evenly distributed, which is crucial for flavor.
- Cut in the Butter: Add the cold, cubed butter to the flour mixture. Using a pastry blender or your fingertips (work quickly to keep the butter cold!), cut the butter into the flour until the mixture resembles coarse crumbs. You should still see small pieces of butter, about the size of peas. These little butter pockets are what create a flaky crust.
- Add Egg Yolk and Water: In a small bowl, whisk together the egg yolk and ice water. Pour this mixture over the flour and butter mixture.
- Form the Dough: Use a fork to gently combine the wet and dry ingredients. Mix until the dough just comes together. Be careful not to overmix, as this will develop the gluten in the flour and result in a tough crust.
- Press into Pan: Lightly grease a 9×13 inch baking pan. Press the dough evenly into the bottom of the pan. You can use your fingers or the bottom of a measuring cup to ensure a smooth, even layer.
- Pre-bake the Crust: Preheat your oven to 350°F (175°C). Bake the crust for 15-20 minutes, or until it is lightly golden brown. This pre-baking step helps prevent the crust from becoming soggy when the filling is added. Let the crust cool slightly while you prepare the blackberry filling.
Making the Blackberry Filling
- Combine Blackberries and Sugar: In a medium saucepan, combine the fresh blackberries and granulated sugar.
- Cook the Mixture: Place the saucepan over medium heat. Cook, stirring occasionally, until the blackberries release their juices and the sugar dissolves. This usually takes about 5-7 minutes.
- Add Lemon Juice and Cornstarch: In a small bowl, whisk together the lemon juice and cornstarch. This mixture will help thicken the blackberry filling.
- Thicken the Filling: Pour the lemon juice and cornstarch mixture into the saucepan with the blackberries. Stir constantly until the filling thickens. This should only take a minute or two. Be careful not to overcook the filling, as it will continue to thicken as it cools.
- Season with Salt: Add a pinch of salt to the filling. This enhances the sweetness of the blackberries and balances the flavors.
- Let Cool Slightly: Remove the saucepan from the heat and let the blackberry filling cool slightly while you prepare the pistachio topping.
Preparing the Pistachio Topping
- Combine Dry Ingredients: In a large bowl, whisk together the flour, granulated sugar, brown sugar, baking powder, and salt. The brown sugar adds a lovely caramel note to the topping, complementing the blackberries and pistachios.
- Cut in the Butter: Add the cold, cubed butter to the flour mixture. Using a pastry blender or your fingertips, cut the butter into the flour until the mixture resembles coarse crumbs. Again, you want to see small pieces of butter for a tender topping.
- Add Egg and Vanilla: In a small bowl, whisk together the egg and vanilla extract. Pour this mixture over the flour and butter mixture.
- Combine Ingredients: Use a fork to gently combine the wet and dry ingredients. Mix until the mixture is crumbly and just comes together.
- Add Pistachios: Stir in the chopped pistachios. Make sure they are evenly distributed throughout the topping. The pistachios add a wonderful crunch and nutty flavor to the bars.
Assembling and Baking the Dream Bars
- Pour in the Blackberry Filling: Pour the slightly cooled blackberry filling evenly over the pre-baked crust.
- Sprinkle with Pistachio Topping: Sprinkle the pistachio topping evenly over the blackberry filling. Gently press the topping down slightly to help it adhere to the filling.
- Bake the Bars: Bake in the preheated oven for 30-35 minutes, or until the topping is golden brown and the blackberry filling is bubbly.
- Cool Completely: Remove the bars from the oven and let them cool completely in the pan before cutting. This is important because the filling needs time to set. If you cut them while they are still warm, the filling will be runny.
- Cut and Serve: Once the bars are completely cool, cut them into squares or rectangles. I like to use a sharp knife and wipe it clean between each cut for neat, even slices.
Tips for Success
- Use Cold Butter: Cold butter is essential for both the crust and the topping. It creates pockets of steam during baking, resulting in a flaky texture.
- Don’t Overmix: Overmixing the dough or topping will develop the gluten in the flour, leading to a tough texture. Mix just until the ingredients are combined.
- Pre-bake the Crust: Pre-baking the crust prevents it from becoming soggy from the blackberry filling.
- Cool Completely: Be patient and let the bars cool completely before cutting. This allows the filling to set properly.
- Storage: Store the blackberry pistachio dream bars in an airtight container at room temperature for up to 3 days, or in the refrigerator for up to 5 days.
Enjoy your delicious Blackberry Pistachio Dream Bars! They are perfect for a summer dessert, a potluck, or any time you want a sweet treat. The combination of the tart blackberries, crunchy pistachios, and buttery crust is simply irresistible.
Conclusion:
And there you have it! These Blackberry Pistachio Dream Bars are truly a must-try for anyone who appreciates a delightful balance of sweet, tart, and nutty flavors. I know, I know, I might be biased, but after countless batches and rave reviews from friends and family, I can confidently say this recipe is a winner. The vibrant blackberries burst with juicy goodness, perfectly complementing the earthy crunch of the pistachios, all nestled in a buttery, crumbly base. It’s a symphony of textures and tastes that will leave you wanting more.
But why are these bars so special? It’s more than just the ingredients; it’s the experience. It’s the satisfaction of creating something beautiful and delicious from scratch. It’s the joy of sharing it with loved ones and seeing their faces light up with every bite. It’s the perfect treat for a summer picnic, a cozy afternoon tea, or simply a moment of self-indulgence. And let’s be honest, who doesn’t need a little bit of that in their life?
These Blackberry Pistachio Dream Bars are incredibly versatile too! Feel free to experiment with different variations to suit your preferences.
Serving Suggestions and Variations:
* Warm with Ice Cream: Serve a warm bar with a scoop of vanilla bean ice cream for an extra decadent dessert. The contrast of warm and cold is simply divine!
* Dust with Powdered Sugar: A light dusting of powdered sugar adds a touch of elegance and sweetness.
* Drizzle with White Chocolate: Drizzle melted white chocolate over the cooled bars for an extra layer of richness and visual appeal.
* Add a Lemon Zest: Incorporate lemon zest into the crust or filling for a brighter, more citrusy flavor.
* Swap the Berries: If blackberries aren’t your thing, try using raspberries, blueberries, or even a mix of berries.
* Nutty Alternatives: Don’t have pistachios on hand? Almonds, walnuts, or pecans would also work beautifully. Just be sure to adjust the baking time accordingly.
* Gluten-Free Option: Substitute the all-purpose flour with a gluten-free blend for a gluten-free version of these bars.
I truly believe that baking is an act of love, and these bars are a perfect way to show someone you care. The aroma that fills your kitchen as they bake is simply intoxicating, and the first bite is pure bliss.
So, what are you waiting for? Gather your ingredients, preheat your oven, and get ready to create some magic. I promise you won’t regret it. This Blackberry Pistachio Dream Bars recipe is a keeper!
I’m so excited for you to try this recipe and experience the joy of baking these delicious bars for yourself. Once you’ve made them, I would absolutely love to hear about your experience! Did you make any variations? Did you serve them with ice cream? What did your friends and family think? Share your photos and stories in the comments below! I can’t wait to see your creations and hear all about your baking adventures. Happy baking!
Blackberry Pistachio Dream Bars: A Delicious & Easy Recipe
Buttery shortbread crust layered with sweet-tart blackberry filling and a crunchy pistachio crumble. An irresistible treat!
Ingredients
- 1 ½ cups all-purpose flour
- ½ cup (1 stick) unsalted butter, cold and cubed
- ½ cup granulated sugar
- ¼ teaspoon salt
- 1 large egg yolk
- 2 tablespoons ice water
- 4 cups fresh blackberries
- ½ cup granulated sugar
- 2 tablespoons lemon juice
- 1 tablespoon cornstarch
- Pinch of salt
- 1 cup all-purpose flour
- ½ cup (1 stick) unsalted butter, cold and cubed
- ½ cup granulated sugar
- ½ cup packed light brown sugar
- ½ teaspoon baking powder
- ¼ teaspoon salt
- 1 large egg
- 1 teaspoon vanilla extract
- 1 cup shelled, unsalted pistachios, coarsely chopped
Instructions
- Prepare the Crust:
- Combine Dry Ingredients: In a large bowl, whisk together the flour, granulated sugar, and salt.
- Cut in the Butter: Add the cold, cubed butter to the flour mixture. Using a pastry blender or your fingertips, cut the butter into the flour until the mixture resembles coarse crumbs.
- Add Egg Yolk and Water: In a small bowl, whisk together the egg yolk and ice water. Pour this mixture over the flour and butter mixture.
- Form the Dough: Use a fork to gently combine the wet and dry ingredients. Mix until the dough just comes together. Be careful not to overmix.
- Press into Pan: Lightly grease a 9×13 inch baking pan. Press the dough evenly into the bottom of the pan.
- Pre-bake the Crust: Preheat your oven to 350°F (175°C). Bake the crust for 15-20 minutes, or until it is lightly golden brown. Let the crust cool slightly while you prepare the blackberry filling.
- Make the Blackberry Filling:
- Combine Blackberries and Sugar: In a medium saucepan, combine the fresh blackberries and granulated sugar.
- Cook the Mixture: Place the saucepan over medium heat. Cook, stirring occasionally, until the blackberries release their juices and the sugar dissolves (5-7 minutes).
- Add Lemon Juice and Cornstarch: In a small bowl, whisk together the lemon juice and cornstarch.
- Thicken the Filling: Pour the lemon juice and cornstarch mixture into the saucepan with the blackberries. Stir constantly until the filling thickens (1-2 minutes).
- Season with Salt: Add a pinch of salt to the filling.
- Let Cool Slightly: Remove the saucepan from the heat and let the blackberry filling cool slightly while you prepare the pistachio topping.
- Prepare the Pistachio Topping:
- Combine Dry Ingredients: In a large bowl, whisk together the flour, granulated sugar, brown sugar, baking powder, and salt.
- Cut in the Butter: Add the cold, cubed butter to the flour mixture. Using a pastry blender or your fingertips, cut the butter into the flour until the mixture resembles coarse crumbs.
- Add Egg and Vanilla: In a small bowl, whisk together the egg and vanilla extract. Pour this mixture over the flour and butter mixture.
- Combine Ingredients: Use a fork to gently combine the wet and dry ingredients. Mix until the mixture is crumbly and just comes together.
- Add Pistachios: Stir in the chopped pistachios.
- Assemble and Bake:
- Pour in the Blackberry Filling: Pour the slightly cooled blackberry filling evenly over the pre-baked crust.
- Sprinkle with Pistachio Topping: Sprinkle the pistachio topping evenly over the blackberry filling. Gently press the topping down slightly to help it adhere to the filling.
- Bake the Bars: Bake in the preheated oven for 30-35 minutes, or until the topping is golden brown and the blackberry filling is bubbly.
- Cool Completely: Remove the bars from the oven and let them cool completely in the pan before cutting.
- Cut and Serve: Once the bars are completely cool, cut them into squares or rectangles.
Notes
- Use cold butter for both the crust and topping for a flaky texture.
- Don’t overmix the dough or topping to avoid a tough texture.
- Pre-baking the crust prevents it from becoming soggy.
- Cool the bars completely before cutting to allow the filling to set.
- Store in an airtight container at room temperature for up to 3 days, or in the refrigerator for up to 5 days.
Leave a Comment